In Lightroom, I think it’s the backslash key. Does RT have an equivalent?
I’ve since been acquainted with the shift-b toggle in RT, but I think it doesn’t show the original image.
Also, I find the 2-window setup less friendly. Any tips?
In Lightroom, I think it’s the backslash key. Does RT have an equivalent?
I’ve since been acquainted with the shift-b toggle in RT, but I think it doesn’t show the original image.
Also, I find the 2-window setup less friendly. Any tips?
Seems you updated your question while I was posting.
[quote=“mgco, post:1, topic:789”]
think it doesn’t show the original image
[/quote]What is “the original image”?
The B|A view shows you the current image vs the previous step in history, or any step in history if you lock the “before” view with the padlock icon at some point.
I never use the B|A view, instead I use the history panel (on the left) to toggle between the before or original state(s) and the current state, and intermediate states as well.
I also use the history stack to toggle various adjustments during my fiddling. Is there some way to bind a key (like backslash?) to toggle between a saved before state and current state? (As opposed to a B|A view - I prefer toggling the full view).
When the OP mentions the “before image” I think he is referring to the original, unedited image. (This is what the \ key does in Lightroom by default). The main problem with the before/after button is that once the image is closed, all history is lost. At this point it appears that there is no way to view the original unedited image. Or am I missing something? This is an essential feature in my opinion.
I don’t think it’s actually lost…it’s in the sidecar file. But when you close and re-open an image, the actions in the sidecar file are automatically performed without being presented in the UI. I’ve often wished that the actions would be loaded into the UI when an image is re-opened. It would be handy to be able to tweak things done in the prior edit.
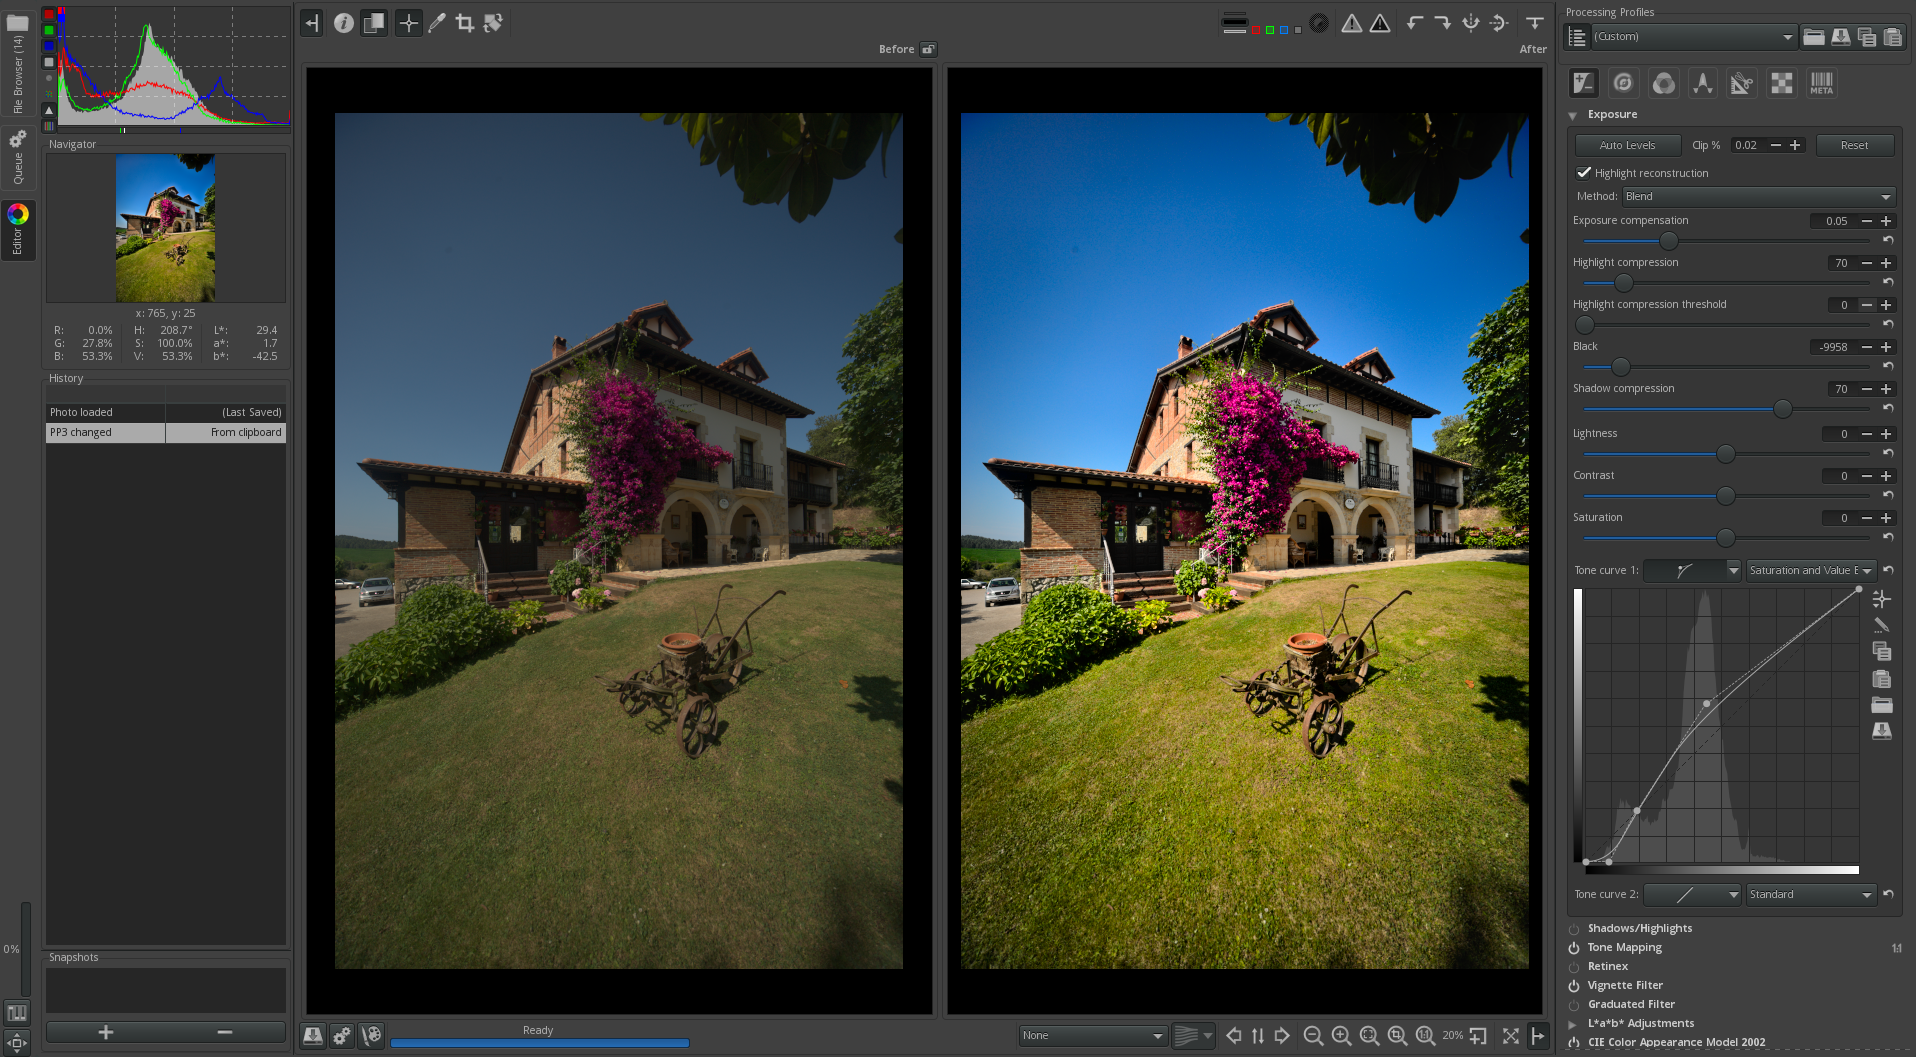
I found a workaround for this issue. If you select the default processing profile from the dropdown at the top of the right panel it appears to bring the photo back to its unedited state. You will now see “PP3 Changed” in the history. Click above it on “Photo Loaded” to see the after view, and back on PP3 to see before.
If you aren’t sure what your default profile is, check it (and change it if you want) in Preferences > Image Processing [tab] > Default Processing Profile.
Regarding my workaround, make sure your photo is in the edited state when you close RawTherapee. If it’s in the unedited state, there is no way to recall the edits, as they will be overwritten on closing.
Thanks for this suggestion and it is a workaround but for me it seem to be a serious flaw. I think it is common to want to see where your edits have taken you when you come back to a picture. Also in the browse window was there some way to know what files had been edited vs those that were not yet edited…
I just started using RawTherapee, but trying to find before/after view. I want to see the raw image as came out of the camera and the edited final view and compare them side by side. Is it possible?
@Karkera Welcome to the forum!
Toggle this icon: ![]() .
.
Thank you for the lightning reply 
Toggle just compares the last action version and the latest version. I want to see the unedited raw version and the final output. Am I missing something?
If you want to see the “unedited raw version” then apply the “(neutral)” profile and then go to Raw > Demosaicing and set method to “None”. Zoom in to 100% and enjoy. Then, just before your eyes bleed out, see Getting Started - RawPedia
You can toggle through the history: Editor - RawPedia
Thanks guys for the update, that means it’s not possible to see the unedited version and the final version as and when I need it. History is lost as I close the editor so basically other than resetting the changes temporarily there is no way to quickly check. Problem is when you have to close the editor and continue your work the next day or so.
I think it’s about getting used to new software! 
If by “unedited version” you mean the demosaiced raw file without any processing, the solution is simple.
When you want compare, click on the snapshot or any intermediate step of history.
You can save also interesting intermediate processing profiles and load it in next session. You can make a snapshot with it to toggle with last processing step.
Thank you very much for the detailed steps. Yes, I guess that’s one way to accomplish it. Yes, I meant raw as it comes out from the camera (I know raw doesn’t get edited  )
)
Yes, the capability of comparing against various stages of editing is a great innovation