I’m starting to work with the Tone Mapping tool in RawTherapee. It seems to do a nice job evening out images with high dynamic range. However, I haven’t had much success tweaking it via the sliders. Here’s tonight’s effort:
I started with auto-match tone curves, and then turned on Tone Mapping. The default settings looked pretty good. But I wanted the shadows opened up a bit more, and with more contrast within the shadows. I couldn’t get there with Gamma and Strength under the Tone Mapping tool, so I resorted to adding a second tone curve and adding a mini S-curve at the lower/left side.
I’m happy enough with the results (although I think the highlights have snuck up a bit too bright somewhere along the way). What I’m wondering is how you folks use Tone Mapping in your own work flows. Is it a stand-alone tool for tones, or do you combine it with other tools like I did here? Are there situations where you always, or never, use Tone Mapping?
You may want to publish your raw image so people can show what they can do with it.
I use mostly ART and there my favorite tools for such images are Tone Equalizer, Dynamic Range Compression, Log Tone Mapping. If you have them in RT you can try to see if they work better than Tone Mapping.
Yes, I thought about submitting this as a play raw. I’m sure I’d get a wide range of edits to consider if I did that.
But what I’m really interested in is hearing about other people’s thought processes. How do you decide which tool to use with a particular image? Which specific visual effects are best suited to which tools?
I’ve tried to ask this question a few different ways, and I’m starting to think that for most people this is a combination of intuition (based on experience), and just trying different things until you get what you’re after. Which is fine, but hard to convey to newbies like me!
Tone Mapping is a complex tool that was conceived about 10 years ago by Ben.S…
It’s very different from what we understand today as “tone mapping”. It relies primarily on Cholesky Factorization… which is anything but simple.
I myself made modifications to this algorithm a few years ago and ported it to Selective Editing.
The results in terms of DR are average, much lower than, for example, Log encoding or TRC… Comparison Dynamique Range
On the other hand, it is a very good quality tool for working on micro-contrasts and texture…Even if you have to have it “it’s not easy”. Texture
Personally, I don’t have a set recipe. According to the image, to my mood at the time of editing, I try different tools and their combinations. Don’t feel bad if you don’t know in advance what tool to use, but feel free to experiment, even what some could say is “wrong”. The best result is IMO what pleases you the most in fine, however it is achieved.
And it is also good to come back later to previous edit, with fresh eyes.
For image with high dynamic range I want to preserve details in I usually start with a Log spot with auto settings, scope 100 and edit from there. Otherwise a combination of curve & tone equalizer.
Sure, and that’s mostly my approach. And it works well enough for curves, contrast/lightness/saturation sliders etc.
It doesn’t work so well with the more complex tools, where I don’t know what the parameters do, and they don’t necessarily have an obvious or intuitive effect. That’s where I’m at with Tone Mapping, and now Log Encoding. The default settings are impressive, but trying to adjust them based on the slider labels (BlackEV, Cat16, Scale etc) is not straightforward.
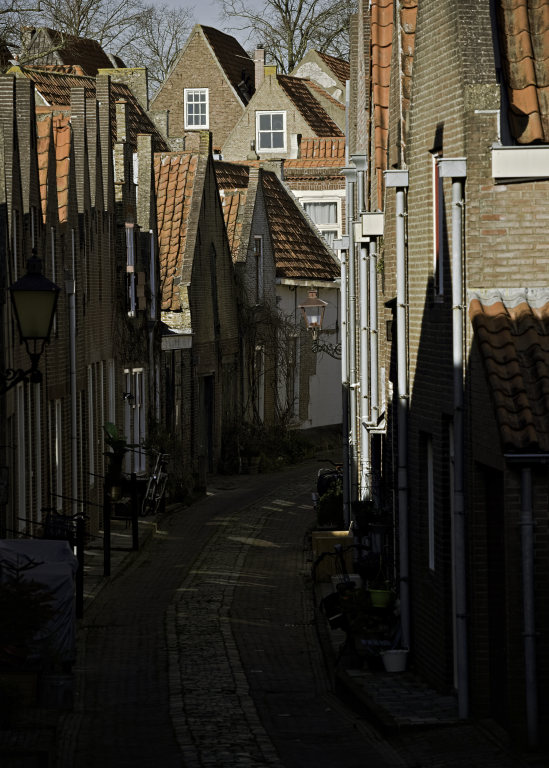
Interesting setting for the scene: f/8,1/400, -1.67 EV means a Light Value of 16-1/3 EV. For that dark street, some e.g. Ansel Adams/Archer might have shot with more exposure to “place” it in a higher Zone or two at the expense of a diurnal highlight or two.
This was during a trip to the Netherlands last month. I really struggled with daylight shots, with bright skies above narrow laneways with dark shadows. As a consequence, I have quite a few shots that required underexposure in order not to blow out the highlights. And another set of shots with more ‘proper’ exposure of the shadows and blown highlights. Sometimes that gives a pleasing high-key look. Other times it just looks like a mistake
Tried Global Spot and Log Encoding with default settings on one of my very high contrast photos. Really impressive results to open up dark shadows, could not achieve them with other tools.
I don’t use RT, but ART. Both have Log Encoding (actually it’s called “Log Tone Mapping” in ART), but they’re probably not exactly the same.
In this answer, @agriggio explains this tool in ART, maybe you can find something useful. I’m pretty @jdc also wrote some nice explanations for RT.