Seeing base curve and not seeing color calibration in your history looks like your darktable is set to display-referred workflow, which seems to be obsolete. I think scene-referred is the future. There should be a lot of resources here that explain this much better than I ever could.
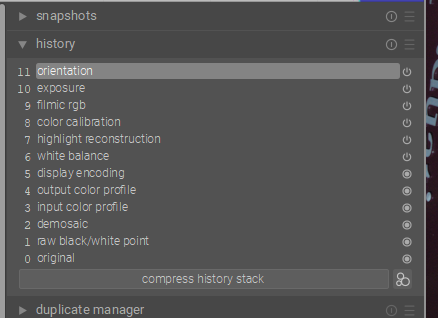
This is my default pipeline using the scene-referred workflow. Local contrast and contrast equalizer are owing to my personal preference, but I think the other ones make sense.
Espacially white balance set to D65, color calibration, color balance rgb and filmic rgb seem to be essential for scene-referred.
If you have been poking around you might have clicked a number of things…if you don’t have too much invested then you can just delete the files in your config directory and rerun DT to start with fresh default ones…however that might not be necessary if you are starting to find your way around…The default scene-referred workflow will add these modules…then you can of course as you have observed with your monochrome issue add more modules by default if you will be routinely adding them…
Consider watching this video if you have not…it sets the table for starting to use DT…
You really should do a little crossreading through the manual to get a basic idea how darktable works. e.g. history stack: darktable 3.8 user manual - history stack
The module layouts module (a utility module) is somewhat special, as it deals with other modules (what modules appear in the module groups). Think of it as the ‘tool shed’, where you can put tools (modules) into drawers (module groups). The only magical thing is that you can put a tool in several drawers at the same time.
You also have ‘cabinets’ (presets of the module layouts module), so you have great freedom in arranging your tools. You could have a ‘cabinet’ for landscapes, another for portraits, and so on, each with any number of drawers, each of those storing any number of tools.
Please read the manual, search the forum, and watch introductory videos. The forum is a great place for help, but if everyone asks the same questions over and over, people do get tired of answering them.
You are all very perceptive, and as @priort put it:
I’m muddling my way through, but while doing so, I’m getting reasonable results as I edit several images a day. It gets easier to get to do what I want. I feel like a blind person stumbling my way through a home, eventually learning.
This answers my questions from last night - and I remember being asked something about Monochrom that I didn’t understand, whether I wanted to apply it to “similar” photos or something like that. Obviously this is what caused my problem. I don’t remember reading that the module I’m now using, whatever it is will do those other things automatically. Before stopping last night, I decided not to delete them, and to just leave them as-is; the only one that was annoying for general use is the one that I somehow added, Monochrom.
In order, once I’m fully awake, I will watch:
“Rapidfire Fix #3”
marketable ep 069 - a Newbie’s introduction to marketable
…and read:
darktable 3.8 user manual - history stack
darktable 3.8 user manual - overview
As to the first paragraph, that sounds great, but I’ll save this for later, once I have a better feel for what’s going on.
As to the last part, if “everyone” (me included) is asking similar questions, maybe those questions and answers should be lumped together into a single file newbies can download. Maybe it is - a huge number of my searches led to a dead end, probably because they included “3.6” in the name, and now DarkTable is up to “3.8”. I did watch lots of videos, but they all assumed I knew more than I did.
It’s a new day, and for the first time I think I have a rough understanding of what’s going on. I still have questions, such as what did I do to reverse the order of my images down at the bottom of the screen, and how to “zoom into that screen” instead of having to click on “2021” to get to my few images that I’ve worked on. Thank you all!!
That sounds great in theory, and has been discussed in another thread.
But as came out there, you have to keep in mind at least two limitations:
you need writers to create such documents;
and you need those documents to be kept up-to-date with the latest version.
Especially the latter is difficult in FOSS. Just look at the number of programs that simply disappear because maintenance stops, or the amount of documentation you find in general. Already dt provides documentation that is (far) above average.
Perhaps what I ought to do now is uninstall DarkTable, and re-install it? I’ve had it for a long time (a year or two?) but only now have I gotten serious about using it. Maybe I should start out all over again?
It is not necessary to reinstall to start from scratch. It would not even work. You can instead (re)move the contents of your local settings folder, which is ~/.config/darktable on Linux.
Extremely helpful - I’m not sure that I would have understood this when I first installed DT, but just now it made a lot of sense, and answered quite a few questions I puzzled over.
You know, I spent forever trying to get to “Preferences”. Because of how Apple does things, I assumed that on my macOS screen, I could click on “darktable” in the top left corner, and “preferences” would show up. From watching your video, I now know how to get to “preferences”. I think it would make more sense to be able to click on the top left of the screen to get to preferences, as that seems to be typical for how programs work under macOS.
As far as I know, I have never deliberately modified my “preferences”, but after watching this video, I think the third selection, using the raw file and not using the embedded jpg, will help.
My camera, a Leica M8.2, creates horrible jpg images. I always shoot (only) in raw. I doubt that any embedded image would be useful for my editing.
Doesn’t matter - I will go through this video again, and set my own version of DT accordingly (to the final way he suggests, working from the raw image).
After watching the first video three times, with the video playing on one computer while I adjusted DT accordingly on my main computer: https://www.youtube.com/watch?v=ODGxKutkcM4&t=269s
…I have changed the setting to “scene referred”.
For “auto-apply chromatic adaptation defaults” I have changed from “legacy” to “modern” (I wondered why it said “legacy” before…). Maybe in the future, “modern” could become a default.
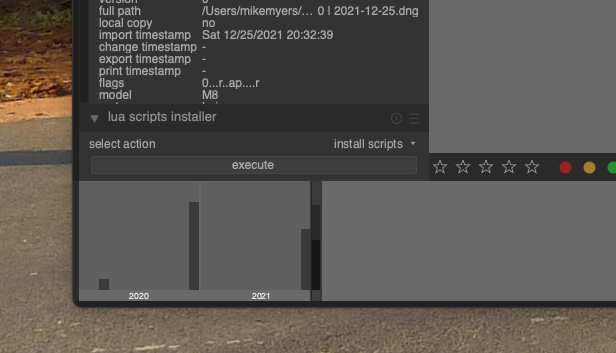
Last night I went back to “LightTable” and the bottom left of my screen looks like this:
Is this what I’m supposed to see?
Can it show thumbnails across the bottom by narrowing down the range being displayed?
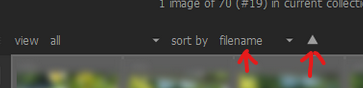
Also, somehow I confused “LightTable” such that the first thumbnail image displayed on the left on the bottom of the screen is actually the most recent image I captured with my camera. Somehow I reversed the order. I’m not sure how this happened. I looked at DarkTable Preferences, and didn’t show anything that likely caused this. …But while searching for why this happened, some how I turned on “Map”, and when I went back to “DarkRoom” the thumbnail images went back to being listed correctly.
When I click on an image at the bottom of the screen, all the “thumbnails” across the bottom shift position - can I get them remain stationary, and only the image I clicked on would be highlighted, without moving all of them to the right or left?
Enough for now. Thanks - not only are things working better now, I even understand why, but I’d hate to have to explain it to someone else.
Thanks - I was fixated on the images at the bottom, thinking this worked like my other editor. Solved.
As to the images moving back and forth, once I did the first thing you suggested, apparently when I click on any image down in the bottom of “darkroom” mode, it places that thumbnail directly below the larger image that opens up in the main screen.
Apparently DarkTable expects me to select an image to edit in “lighttable” mode, and then select “darkroom” mode. If I have a lot of images, some of them may be well off to the right or left at the bottom of the “darktable” screen, and to find them I need to go back to “lighttable” mode, rather than moving all those thumbnails one way or the other. It’s different than what I’m used to, but perfectly logical.
Thank you once again. No more questions for a while.
The more I understand, the more I enjoy the program.
I currently use DxO PhotoLab 5 for processing all images from my Nikons, my Fuji X100f, and my Leica M10.
I use DarkTable for processing images from my Leica M8.2
I also still have Lightroom, Affinity Photo, Raw Therapee, Luminar 4, Color Efex Pro 4, Photomatix Pro 6, and others I’ve forgotten about (such as free editors provided by Fuji and Nikon), but I don’t use them.
Anything worthwhile requires a lot of effort, and I guess I’ve only gotten used to “the basics”. To me, that is a huge start. I suspect DarkTable is doing a lot more for me automatically than PhotoLab, or I have suddenly become a much better photographer, along with my old Leica M8.2 suddenly working better than before. I’m pleasantly surprised by how well those images look when first opened in DarkTable. I wasn’t expecting that.
I think I am a couple of minutes ahead of you in this journey, so let me assure you that this feeling of ‘enjoy the program’ does not diminish as you learn more. Almost every day for the past year or so I have observed to my self, while using dt, such feelings as ’ that’s impressive’ - or words to that effect. And that is in the environment where I have tried a number of the alternative raw image editors that you listed.
I don’t think that this is likely to happen for me, although I certainly am appreciating how well things work. To me, all of these editors are “tools”, and I’ve always thought one should use “the best tool for the job”. DT is more like a full toolbox than a tool, and with few exceptions, it seems to be able to do the things my other editors do. As I learn it, the interface becomes logical - all “issues” so far have been me, not the editor.
I am spoiled by “control points” and now “control lines” in PhotoLab, but I don’t yet know that DT can’t accomplish those things using a different technique. When I scan and edit my old B&W negatives, I sometimes have a zillion “dust specs” to deal with. Eventually I need to learn how DT deals with that. If I capture infrared color images, the resulting file has a very deep red cast - most editors have a white balance tool that isn’t strong enough, but PhotoShop has one that works. Then too, I end up wanting to do “channel switching”, and I don’t yet know if DT can do that… but this is far off in the future. I like what I can accomplish with DT, and as of today, it does a wonderful job of importing images from my Leica M8.2 camera, looking almost “finished” before I even do any editing. That was a very pleasant surprise.
I haven’t even started to edit this image, but what I see on the screen appears to be completely finished.
Until I watched the videos linked to above, every image I opened needed some work. All this needs is for me to activate the “watermark”. DT makes my Leica M8.2 camera look quite nice - and this was taken with a 7Artisans 35mm f/2 lens that sells for only $280 brand new.
When/if you have found an acceptable solution to the ‘zillion “dust specs (sic)”’ using dt, I would be very keen to copy your approach, as I have a similar issues on the large portfolio of slides I’m in the process of scanning. Vuescan won’t touch the Kodachrome ones and Nikon Scan (from decades ago) is sometimes too aggressive. SilverFast has, so I’m told, a good solution but for other reasons I won’t got there.
One reason why your Leica images look good with dt is because they are from a Leica, surely ?
I had a brief look at what those are, and they seem to be local adjustments. darktable has both parametric and drawn masks for local adjustments, and they’re available on almost every module.
darktable has a Retouch module with a heal brush, but that’s very manual. We’ve had a thread on using the infrared channel from viewscan as a mask for gmic inpaint to repair spots, but I don’t remember where that left off.
I capture color infrared with my converted X-T20. I use a custom white balance that was provided by the shop that converted it, and the channel swapping is done in the Color Calibration module. There is a preset to swap R & B channels.
Isn’t that the good ol’ Nik u point, rebranded? Darktable doesn’t really have anything exactly like it. But if you dig that you should really check out the RawTherapee nightlies. The local adjustments in it works much the same way. See here: