When scanning film or photo prints, you may be annoyed by dust and scratch spots on them. Some film or flat-head scanners have a function that automatically removes dust and scratches, but this does not work with monochrome films or Kodachrome films that contain a high content of silver compounds. Also, if you scan them with a digital camera, there is of course no dust removal function. This is also true in scanned image of photo prints with scratch noise, etc.
GIMP has a heal tool to remove these kinds of spots, but it takes a lot of time if there are a lot of dust and scratch spots. I’ve been thinking about ways to do this all at once. This method takes advantage of GIMP’s Gaussian Blur.
First, this sample image is loaded into GIMP and is in an uncorrected state.

You can see there’s a lot of dust spots in the sky.
- Mask creation
First, let’s perform RGB channel decomposition ([Colors] > [Components] > [decompose] > [Color model: RGB]). Then, an image with RGB separated into each layer will be created in a separate file as shown below.

Then, switch the visibility of each layer and check which channel shows the dust most clearly. In this image, it is the blue channel, so in next step, we will create a mask based on the blue channel.
First, duplicate the blue channel layer.

Next, apply Gaussian blur ([Filters] > [Blur] > [Gaussian blur]) to the blue layer below until the dust is no longer visible.

In the case of this image, as shown above, a value of about 40 will get you to the point where the dust is completely blurred, but it seems better to set it at a value that doesn’t completely blur it (about 35). Next, set the layer mode of the original B image layer above the Gaussian blur layer to [Subtraction]. Then, an image with white spots and black background will appear in the screen.

Here, press the right button on the layer dialog and select [New from visible] from the context menu.

This new layer will be used as a mask, but we will adjust this layer using level correction so that the white outline of these spots become clearer.

In the case above, I set the black point to just under 20 and the white point to about 36, but the point is to find a level where a lot of spots become white as possible. If this value is too high, spots cannot be removed sufficiently.
- Create a correction layer and apply Gaussian blur
Return to the image (file) where you loaded the original image and duplicate the original image layer. This duplicated layer will become the correction layer. To this layer apply Gaussian blur until the dust spots are completely invisible (see the image below).

- Add a mask to the correction layer
Next, right-click on the Gaussian-blurred correction layer to display the context menu and add a layer mask. Make the mask type completely opaque.

Return to the file (image) where you created the mask image by decomposing the channels earlier, and copy the processed visible layer. Return to the file containing the original image, put the mask added in the above process into edit mode, and paste the copied visible layer image.
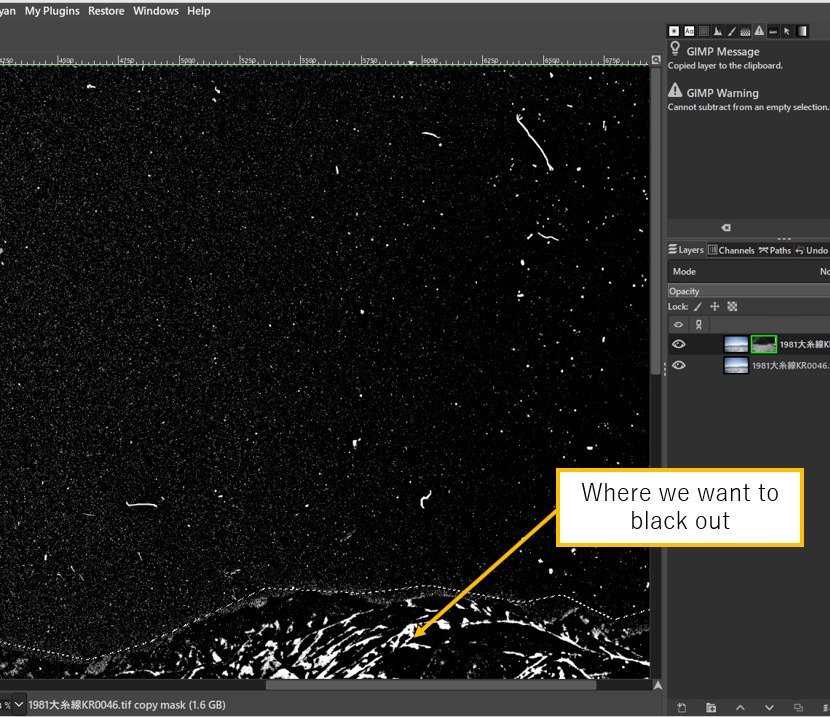
However, if you leave this as is, areas of the image that you do not want to blur may become blurred.
So, after pasting it, use mask editing again to black out the parts that you do not want to blur.
- Cancel mask display mode
Finally cancel the mask display mode. This will give you an image with much less dust, although it is not perfect.

For spots that cannot be removed with this method, use the Heal (Repair) tool as appropriate, or return to mask editing mode and correct areas with dust or stains by applying an eraser.
However, this method is not very useful for removing spots in complex textures. It is very useful in cases like spot removal in the sky.


