How to use blending modes and get expected results?

Hi all, new (and enthusiastic) user of darktable here.

One of the reasons of moving to darktable is because it has what I was looking for: a way of doing full edits inside it not having to convert to tiff to do some things like focusing or local adjustments.

darktable has great masking options and BLENDING MODES.
Other soft like C1 has good masking too, but lacks blending modes, and masking options are more limited.

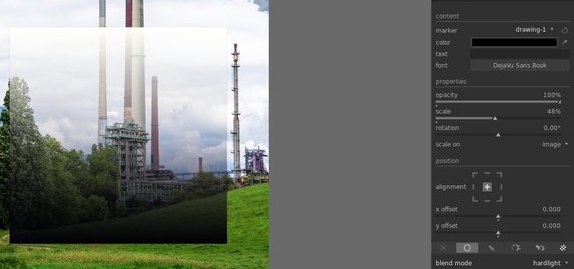
But when I begun using blending modes I realized that they do not work as expected.
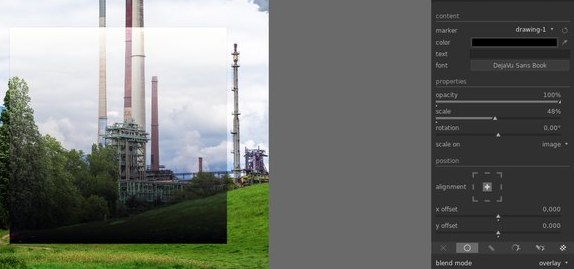
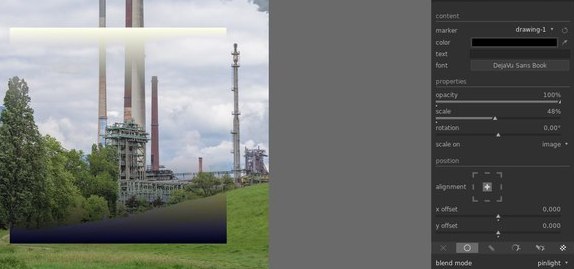
If you use a mask to brighten some part of the image, I usually use soft light (in PS and alike soft) to smoothly integrate that lighten over the background.

But then I do that in darktable, the zone is obscured, not enlighten. It was an ugly surprise.

Researching about it, i found this article of @anon41087856:

If I understood it well, it seems that it is related to the gray point an using a linear space as working space in current darktable version.

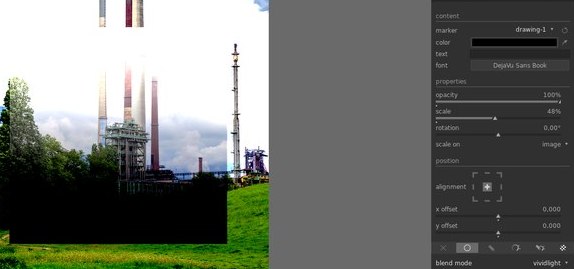
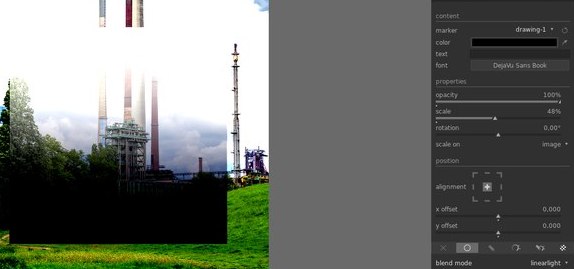
Blending modes pivot around a 50% gray (are designed to be used in a gamma compensated color space) while linear RGB gray is about 18%.

So most of the blending modes do not work as expected, and have mad results.

How do we circunvent this problem?

As darktable seems to be moving to a linear working space model,
may we expect blending modes be modified and adapted to a lineal space in order to produce expected results?

I think that would be an important point, as one of the strengths of darktable over others is being able to use blending modes.

Considering that the linear part of the pipe ends with filmic, what happens when you use blending modes with tools that come after filmic, for example, tone curve?

By redefining the problem from scratch, and certainly not by trying to bend existing broken tools.

For example, what is the usual use-case for overlay blending ?

It’s mostly used to merge a textured layered into an existing image. That texture could be the output of an high-pass filter, so you are sharpening the image, or a completely different image, so you are simulating a print over a grainy wall or canvas.

That texture swaping is best achieved in wavelets space, where the residual wavelets layer is your implicit (and self-adjusting) grey pivot.

Linear light, pin light, hard light and such are only softened variations around that same theme (overlay).

Now, lots of blending modes aim at darkening below some threshold and brightening above. You can achieve that easily with a multiplication, if you scale your darken/brighten guide properly in such a way that the pivot = 1. This way, when guide > 1, the output of multiply brightens, when guide < 1, the output of multiply darkens. To get the opposite effect, divide instead of multiplying (with special care for division by zero).

But all that exercise needs to start with “what is it you want to achieve ?”, then unroll the method, and not by “what is the scene-referred equivalent of this broken display-referred effect ?”.

Found something about blending modes in photoshop and tried to reproduce them in darktable.

I made a sqare with a color gradient from black to white and imported it as SVG into the watermark module in darktable.
draving-1.svg

After that I applied all contrast enhancing blend modes and got results that looked similar to photoshop
Bildschirmfoto von 2020-05-02 13-37-54
Bildschirmfoto von 2020-05-02 13-38-23
Bildschirmfoto von 2020-05-02 13-38-39
Bildschirmfoto von 2020-05-02 13-38-33
Bildschirmfoto von 2020-05-02 13-38-48
Bildschirmfoto von 2020-05-02 13-38-52
Bildschirmfoto von 2020-05-02 13-38-57

2 Likes

I am not sure if I understand this well.

Yes I am doing things like focusing an image using a high pass filter and linear light.
Or smoothly lightening a part of an image using a soft light blending mode.

I used to apply focusing in the final steps using frequency separation: a layer with a gaussian blur (about 4 to 6 px) and a top layer using a high pass filter (the same radius, well in PS a variation of high pass as high pass is not correctly implemented) blended using linear light.
When applied you get exactly the same image, contrasting the highpass you get the focusing effect as you know.
It dependes in linear light working as expected.

(Well now in darktable i found contrast equalizer that seems to get great results for focusing).

But the results are incorrect (quite different) in darktable, due to gray point being differente in linear working space and a gamma compensated space that you use in PS (as long as I could understand from your great article).

Of course there may be better ways of doing things like you say (wavelets or whatever, I have to learn that tools in darktable).

But if there is a blending mode final users expect it to work properly (if it is possible to get it working correctly).
You say that you can do that using multiplications but then the question is:

why are not changed the blending modes and use a 18% pivot value when applied to a linear working space instead of 50% pivot value of the original equations?

Is it just a matter of being “in transit” from the LAB model to the lineal model?
Can we expect them to work correctly in the future?
Is it just impossible to get blending modes working in lineal images?

So you say they work similar?

The posted articles says they do not, and in my experience you have quite different results, may be I am doing something wrong.

Are you using daktable 3.0 and a linear working space selected in input profile?

I don’t think that any of these programs work ‘wrong’. You just can’t expect two programs to work the same.

Wikipedia shows three different formulas for softlight blend mode:

The contrast equalizer is already using a wavelet space to split details into different scales and let you sharpen them individually. Think of it as a bank of high-pass filter.

The results are not incorrect, because, when working in wavelets space, you don’t need any blending mode at all. The blending is already inside the wavelets. You don’t need another pass of blending. And since the wavelets blending pivots around the value of the residual at each pixel, the threshold is self-adjusting, whatever the space you use.

That’s why I say you need to forget about translating display-referred operations into scene-referred. It’s a different mindset entirely. Focus on your editing (ultimate) goal, not on the tools.

Because:

  1. it’s not as simple as that, that will make some equations wrong entirely,
  2. the whole point of scene-referred is 18% doesn’t mean anything special, and your actual grey can take whatever value. There is no such assumption anymore. Setting grey to 18% will be just as wrong, you can’t know the true value of the middle grey in that particular image until you go through the output display transform, which happens at the very end of the pipe.

Linear image can use algebraic blending modes (add, multiply and the likes).

Be careful, the watermark module works after the output display transform, in a gamma-encoded place, at the very end of the pipeline. I fear you are confusing our OP more than anything, since he is asking for the linear part of the pipe.

1 Like

Well, the blending modes where first implemented in PS to get some kind of result.
If you have a lineal light blending mode you expect it to work in a similar way.

But you are right, no program has to produce the same result of other.

Just having blending modes working in a similar way to PS would let users apply some things they are used to in darktable, and apply the thousands of effects they found in internet in tutorials of how to do somehing in PS.

It would be a great thing until we learn how to do it another way in darktable (and until we have a similar number of tutorials of how to do similar things in a better way in darktable).

EDITED: OK, I see that aurelien has explained why you get similar results to PS in your example.

You are using a svg watermark and that is applied at the end of the pipeline.
Not the case in blending modes when each would be applied after the module transformation and prior to passing the result to next module.

Sorry if I did not express it correctly, I was not implying that the contrast equalizer uses blending modes or that i was using blending modes with contrast equalizer.

I just mention it because I discover it recently and it does a similar or better job than frequency separation (and I am still learning the basics with it).

I was used to do focusing using frequency separation, and to get that working you need linear light blending mode as expected to blend the contrasted high pass filter layer with the one that has been gaussian blurred.
When I tried it in darktable I got horrible results, and I had to search why it wasn’t working.

But there ar many other things that do not work, like using soft light to blend a lightened up imagen with the base one using a mask to apply it in some part.

From your response I guess we cannot expect getting blending modes to work in a similar way we are used to, it is not possible.

Wouldn’t it be possible to apply a transform to the equation a kind of gamma correction?

As each module is applied in a specific point in the pipeline it is clear that you cannot expect the blending applied in the final steps of the pipeline, you can just try to emulate the behaviour when you are in a linear workflow of the pipeline.

But again, you are trying to push a mindset valid in a certain framework into another framework where it’s not valid. Applying some kind of gamma correction doesn’t solve the issue that scene-referred images are not bounded in 0-1 as display-referred images are.

Being bounded in 0-1 implies some nice maths properties for some functions, that don’t hold outside of 0-1. Scaling the picture is possible for some filters, but changes the meaning of things for some others, and is generally not possible.

So
 forget about blending modes at all. Tell me what you want to achieve (in terms of visual results), I will tell you how to operate the linear tools to get it. But you have to break free from your knowledge first, which is valid only in display-referred spaces.

Frequency separation is only a hack. It gets a cleaner implementation inside the contrast equalizer module. And so do many other image operations.

2 Likes

But can’t they be used after filmic for artistic reasons?

They can, indeed, but again
 it’s not a linear part of the pipe, which was the original question.

1 Like

You are right, for sure.
But blending modes are introduced in darktable for that purpose: to be able to emulate a workflow we are used to.

There are lots of tutorials in internet of how to get some effects (Orton effect, bn convertions like greg gorman method, lots of them) and most of them rely on blending layers.

One of the points that attracted me from darktable (not the only one, of course) was to be able to apply layers, layer masks and blending modes in a non destructive mode, without exporting to tiff.
I hate the PS way of working with layers that grow the size if your file to crazy amounts just to do a few local adjustments.
Capture one has layers and luminosity selections, but not blending modes.

If it is not possible to implement them as expected, I think thy will be best removed, or at least state it clearly in the manuals that they work completly different (of course, I know darktable has undergo a huge recent change in the working model and the transition will take some time).

Even if a precise result cannot be get, a correction to equations that can get a similar result would be better that current situation.

My main need of blending modes was to make frequency separation for focusing.

I could never get good results using usharp mask, and frequency separation was the best way I had found.

In C1 or LR you cannot apply focusing using frequensy separation. So in the final steps I exported to tiff jus to do focusing (after all, I packed the layer, convert to 8 bit AdobeRGB to get a final not so huge file).

Now in darktable, I have solved that part using contrast equalizer which similar or better results (I have yet to learn how to control all that power, and learn what is chome contrast and the differences between contrasting borders or luminance).

I have learned too that blending modes can be apply in the final steps (after filmic o gamma curve) but that was not the original intention, as many modules that can be blended are in previous stages, in linear mode.

By the way, I was said you could control the order of the pipeline.
How can you do that, how do you see the order of the pipeline in the interface?
Is there any tutorial?

It’s hard to say why the blending modes have been added in darktable, the software just grew over the years without a clear design goal. I wouldn’t put too much meaning into the current state of the software.

Blending modes are a mean to an end in a particular framework.

The manual is undergoing massive surgery, so it’s quite outdated for now.

But for that application, you need to understand that overlay/hard light / linear light and all their blending variants were only nasty hacks from the beginning. It works, but the method is not clean and not general. It needs to be used in very particular conditions.

Hold Ctrl+Shift while you drag the module you want to move (with left click) and drop it where you want.

I understand what you say (well may be not deeply enough but I understand the surface of the problem) and agree with you.

I understand that darktable is undergoing a huge remake in its work flow right now and it will be mainly a good thing, no doubt.

I won’t use frequency separation any more, as I have found a way of doing it through contrast equalizer.

But as I stated there are thousands of effects and methods (most of them artistic effects) that are based in using blending modes.
Having a similar blending implementation would be great to get similar results.

For example Orton effect (I use it from time to time) or black and white convertion.

But if you can control the order of a module and put it after base curve or filmic you still can get that effects, don’t you?
Just you have to move the modules you use to get that effect after filmic or base curve and you will get the same effect from the blending mode (similar to what you get in PS).

I think that darktable needs a reestructuring in the way the pipeline is seen by the user and the way modules are organized, for future versions.
I cannot tell how it should be, but it will be great to have more insight of when a module is applied and if it works in your working space or does internal transformations to CIE LAB or other space and back to your working space (I was said some layers work in CIE LAB but they transform the pipe line to LAB and then back to working space).

Thank you a lot for your explanations and your time. I understand everything a bit better now.

It would be a pity if the blend modes disappeared. For artistic purposes they are still very useful when used at the end of the processing. E.g. such a soft contrast with bloom module combined with multiply (or soft light) blend mode, or low pass module with soft light etc. can hardly be achieved in any other way.

If I understood aurelien correctly (by the way aurelien is the name or the family name?) you can use them for artistic purpuse.

You can select that module and apply it in the final steps of the pipeline, after filmic or base curve, when you image is more similar to the logarithmic way our perception works.

Yes.

They are based on blending modes because every software until recently worked in display-referred space. But effects are not bounded to a particular tool.

Again, tell me the effect you want to achieve, I will tell you how. But converting the blendings for the sake of not changing workflows doesn’t make sense. It’s like wanting a car that you can ride like a horse. Better embrace the car for what it is.

That’s, indeed, work in progress.

1 Like