I designed my own business card a couple years ago and I just changed my company name. I’m using the same card but modifying it a bit. Long story short I need to create a green box with rounded corners (white or transparent). It does NOT seem to be possible. I’ve tried new layers, new images, nothing is working. I’ve spent the last 1.5 hours on just trying to create this box and it won’t even show in color.
Process:
Create new layer.
Move to top of the list (so it shows above everything else).
Select rounded rectangle, set corners.
I can invert selection and delete the corners, great.
Here’s the rub: I can’t fill the box with anything, black, white, green. I can’t fill the corners with anything. Foreground, background, etc. It just shows as a transparent box no matter what I do. What am I missing?
I’m more than happy to screenshare with someone who can help me. I can’t believe I’ve spent over 90 minutes on this when I somehow did it in the past. I do remember working with this program being infuriating at times though…
Not much wrong with the work flow. Maybe you need to invert your selection back to original. It would help knowing details of the image, a flattened jpg / png or multi-layer .xcf or psd …or…
Then the intent:
Mask out an area as an overlay to cover existing details: demo animation https://i.imgur.com/1EDaO0A.mp4 Use the rounded corners option in the rectangular selection tool.
or
A whole canvas sized layer with rounded corners: demo animation https://i.imgur.com/6bIwVEO.mp4 Use Select → Rounded Rectangle.
I’m beginning to suspect a corrupted configuration. make sure gimp isnt running, locate the .gimp folder and rename it. (.gimp-old)
then restart gimp and see if you can create a rounded rectangle filled with the color of your choice.
Inkscape would be another option that may be useful.
I am often impressed what kind of media people are producing with pixel editors such as gimp or photoshop, for the end result it typically does not matter, but the workflow feels cumbersome and the reuse possibility is limited. For the next similar project I would as well suggest to use inkscape or scribus.
I aggree. Logos, icons etc. are better drawn by vector editors. I know inkscape a bit. @DavidA: If you send me your template by private message and state what you want to change, I could have a look at it and see what I could do in inkscape.
The default for Gimp is “Save-all-Tool-Options” on exit. I have long thought this is not a good idea for beginners / occasional users who tend to ‘click-n-wish’ in the tool options and then forget what they changed.
As well as zero opacity, line-art detection enabled ?
As a starter I would go into Edit → Preferences → Tool Options and click on “Reset Saved Tool Options to Default Values” Note in the same place a tick-box for “Save tool options on exit”. Consider that.
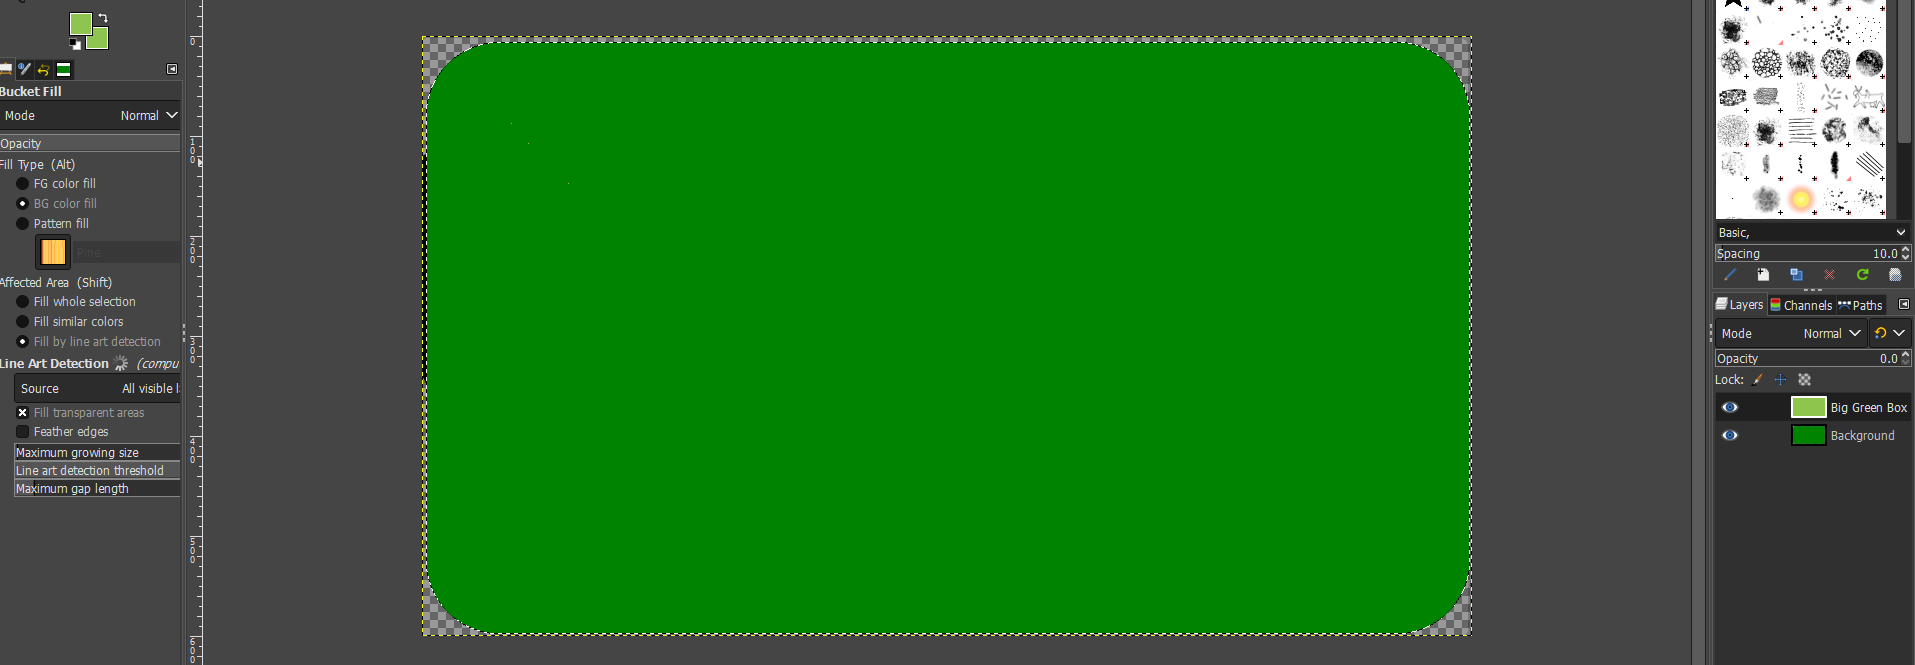
As you can see in the screenshot (see Layers), everything works as expected.
Only the visibility of the layers (probably unknowingly) has been set to 0 (meaning everything is invisible).
I think it is enough to set Opacity properly.
As seen in the other screenshot I provided, changing the Opacity does nothing. 0 or 100 doesn’t matter.
I’ve reset tool options and uninstalled and reinstalled GIMP. Same issue persists.
I couldn’t find a .gimp folder anywhere.
Update
I fired up my old PC that has a 3 year old version of GIMP on it. No issues at all, created the box and modified my business card without an issue.
So - since reinstalling GIMP on this PC didn’t work and it seems to have loaded up with the same configuration as before, am I missing some files when I did the reinstall that I should have deleted?
This comes up so many times…and the Windows user solution always seems to be re-install Gimp which 99% of the time changes nothing.
The reason. All the Gimp user settings are held in a folder, created first time Gimp runs and crucially remains between Gimp installations. Works that way for users to migrate to a Gimp update without losing their settings.
You can find the location of that folder in Gimp Preferences by looking at a folder entry but for a regular Windows installation it is C:\Users"yourname"\AppData\Roaming\GIMP\2.10\ and Appdata is a hidden folder so ‘unhide’ it. see: View hidden files and folders in Windows - Microsoft Support
If you delete that …\Gimp\2.10 folder and start Gimp, a new default User profile is created where everything works as expected.
.gimp that AdmFubar referred = C:\Users \ “yourname”\AppData\Roaming\GIMP\2.10\ Instead of deleting you could rename, it has the same effect…but if it is a new installation nothing lost by deleting.

")