I’m on my way to retiring my old Lightroom 6 and actually wanted to switch to Darktable and transfer my entire collection of photos from more than 20 years to Darktable.
Unfortunately, the imported photos only correspond to a limited extent what I see in Lightroom (usually the pictures are too dark, see below). The XMP files are available and in Darktable I can also see the converted editing steps.
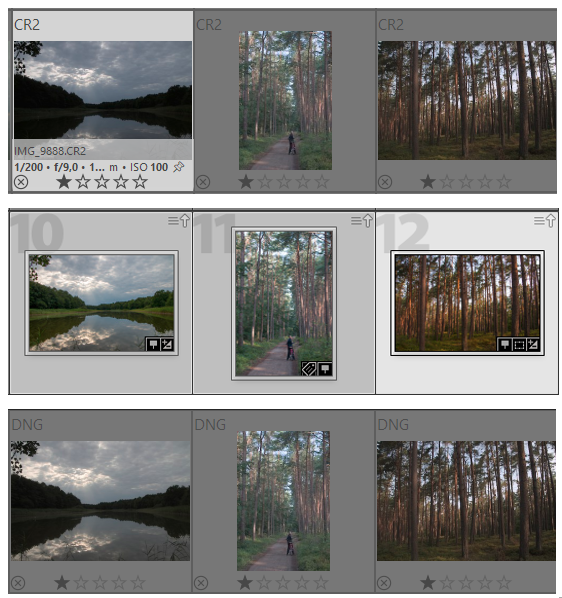
As a next idea, I exported the images from Lightroom as DNG with the hope that the thumbnails would then be taken out of the DNG. In Windows Explorer the images look like in Lightroom, but in Darktable the preview image is similar to the RAW files.
Is there a way to take the previews from the DNG files without interpretation, or does anyone have an idea why the images look so different after import than in Lightroom (I know, different program, but the tenor I read before was that it works very well…).
Lets start with dt not being a Lightroom clone. Adobe has a proprietary software and we don’t really know what they are doing. They don’t share that information. Darktable goal is not to be a free Lightroom copy. It is to enable a free and open source way to process raw images. It employs multiple processing modules to accomplish that goal.
In the past a developer took the time to try to reverse engineer the Lightroom edits into dt. But Lightroom has change and so has dt and that work is not maintained.
So what are your goals? Just to see your images and find them faster? If yes, then I suggest that you export the images as jpg and use digikam or similar as dam. Your other option is to grab the raw files and just process them in dt from scratch. I’ve done the latter one and the results are better since I also evolved in my processing skills and knowledge.
I’m not sure about your older version of Lightroom. In my latest version it works like this:
After you’ve made Lightroom convert your raw files to .DNG the latest Lightroom version has the possibility to select multiple pictures in grid-view, then right click, choose Metadata en then choose ‘Update DNG Previews & Metadata’.
What this does is write keywords and other XMP data into the DNG’s and replace the original camera generated jpeg based preview with a preview based on your Lightroom development.
This means that on darktable’s lighttable your pictures will more or less look as you’ve made them to look. As expected - when you enter the darkroom you will see a more or less un-/half developed image.
Beware: I’ve only just tried this myself - we all picture processor migrants face the same. But now darktable - though showing the processed version of the pictures - appears to be unstable. Do not know why just yet.
Beware two: if you’ve imported pictures into darktable and want to reimport a newer version with update XMP and Preview data in them, you’ll first have to remove de ..xmp sidecar files that darktable has made.
Hello and thanks for your answers.
Well, to be honest my goal was to replace my archive with round about 50.000 photos without reedit every single one I read some german articels about importing images edited by lightroom and the all said, that it will not be 100% but very similar to the result I had in lightroom. Well, maybe this worked with a previous version, but not with dt5.
This was the reason why my second thougth was about converting everything to DNG: I would have an archive with previews of the processed image and in worst case I would only have to redevelop some images but not all of them…
Maybe I will start over with dt for new images and keep LR6 as an archive even if I don’t like it to search in two programms when i look for a special kind of picture…
Hello, is it possible in darktable to stack images with the same name automatically? If so, the idea would be to save all images as jpg and then e.g. have a IMG01.jpg and IMG01.CR2. If stacking is possible I then would have the jpg as a preview…
I don’t know about “automatically” for raw and dng files (it does it automatically for raw and jpg), but the feature is called “Grouping.” There is a lua script that might help: darktable lua documentation - AutoGrouper
Grouping images helps to improve the structure and clarity of your image collection when displayed in the lighttable view.
You can combine images into a group by selecting them and clicking the “group” button in the actions on selection module, or by pressing Ctrl+G. Likewise, you can remove selected images from a group by clicking the “ungroup” button, or pressing Ctrl+Shift+G.
Duplicated images are automatically grouped together. Similarly, if you import multiple images from the same directory, having the same base name, but different extensions (eg. IMG_1234.CR2 and IMG_1234.JPG), those images automatically form a group.
I dont think this is a good suggestion. Keeping the source files is ideal vs any conversion to dng. While in theory the dng should be the same, some of the metadata might be lost (eg camera specific).
OP, if you did your edits in LR or whatever software, you already spent time on those images. I think it is in your best interest to export them fully edited in a format that allows archiving the image for long term access/viewing (eg. tiff/jpg). If you keep the adobe edits in their database or their format, you will always need access to lightroom to see your edited images.
OP has his CR3 files untouched and Lightroom exports them to .dng or .jpeg. As far as I see he is not in danger of losing his originals. .dng files are larger than .jpeg’s. So exporting .jpeg’s and then importing both .CR3 and .jpeg into darktable and grouping them might work without creating a .dng and occupy less space.
When I edit an image in any program including LR, DT or any other software I realise the job is not done until I export a new version of the edited image in my case as a tiff file. Then if I switch programs I start the editing process all over again if I want to try and improve on the edit I have archived as a tiff file. However, the tiff file migrates without problems between programs such as LR and DT. No program is intended to replicate the edits from another program because the tools, modules and algorithms are all different and therefore incompatible.
Speaking personally, I am not worried if my editing steps are lost because I have a tiff file based on my previous editing and if I want to retry or improve on the editing both my skills and the tools available to edit the RAW files have improved over the years so I just start again.
BTW, welcome to DT and in my opinion DT is so much more fun that LR. Good luck with the transition.
I’m not familiar with Lr. The source code reads a bunch of processing parameters and set up processing in darktable, but since Lr’s algorithms are not documented, the results cannot be guaranteed.
If I (and LLMs, which I enlisted for help) read the code correctly, the following modules get enabled, based on Lightroom parameters:
converted DNG files are much larger than the original raws.
If you use “archived” images as mentioned above like tiffs, 16bit dng or whatever you will loose all darktable capabilities with modules working in raw space - highlights, raw chromatic aberration, advanced demosaicing … and i am pretty sure we have options leading to a quality that might be better than what you already got.
If you really want to get darktable’s best possible results, use the initial raw.
I think there has been a misunderstanding. I use darktable only on the original camera raws. I also keep the raws and the sidecar files for later exporting or reediting. Additionally, I archive the final edits as (8 bit) PNG files, because I can’t be sure that later versions of darktable can always produce exactly the same output. The exported PNG files are not intended for further processing in a RAW editor but for display and printing.
But yeah, saving DNG files where darktable can handle the original RAW files doesn’t strike me as very useful, neither as a format for the finished edits, nor to keep the raw format.