Improve Abstract Profile and Color Appearance & Lighting

Hello

As I announced in a previous post, I have made two sets of improvements to the existing processes. I opened a pull request:
Pull Request

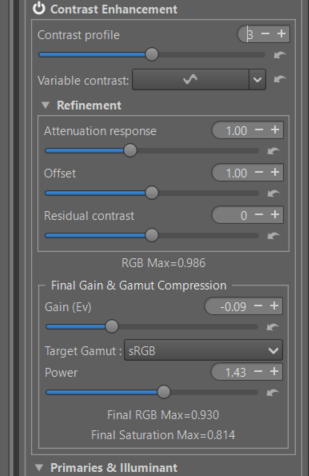
  • Abstract Profile (AP): by allowing control of the maximum RGB value at the end of the processes implemented by AP.
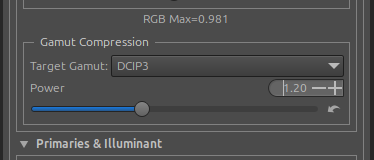
  • Abstract Profile: Gamut Compression : At the end of the process, this allows you to compress the data to fit, for example, into the output profile. If ‘Colorappearance and Lighting’ is enabled, this will be taken into account. This output gamut compression is much simpler than at the beginning of the process, hence the simplified graphical interface. Because unless the user has exaggerated the settings, the gamut is already close to the ‘working profile’.

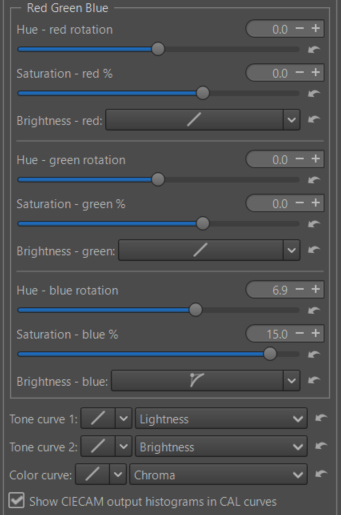
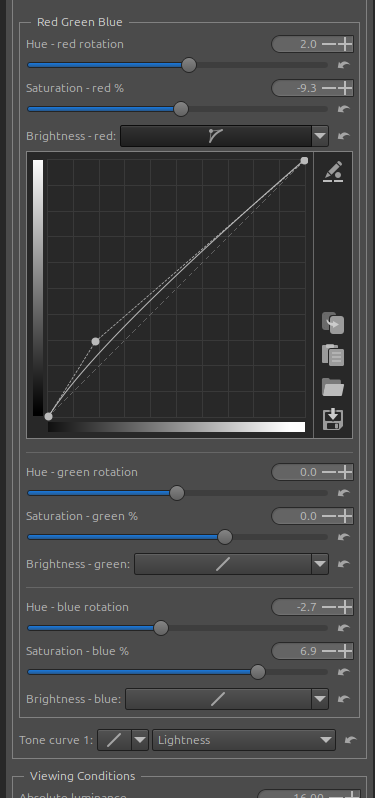
Color Appearance & Lighting : I’ve added an extra control to ‘Red Green Blue’. For each R, G, B channel, in addition to Hue rotation (h) and Saturation (s) adjustments, you can adjust the Brightness (Q) using a curve.

I’m attaching the tooltip (in my English):

‘Red Blue Green’ allows you to either:

  • Correct any color deviations due to either: gamut overshoot following various adjustments in the process, or poor white balance.
  • Achieve a better balance of colors and luminances to satisfy your preferences.
  • Film Simulation.

The system operates after the first process (Scene) which converts the ‘Working profile’ data into that of ‘CAM16’. At this stage, the J, Q, C, s, M, h data take into account the physiological aspects considered by CIECAM, and a chromatic adaptation is performed.
For each main color of CIECAM ac-bc [chroma based] hue plane - Red, Green, Blue - you can perform a slight hue (h) rotation in degrees (sliders) , adjust the saturation (s) as a percentage (sliders) , and adjust brightness (Q) (curves).

As a general rule, small adjustments are sufficient: 1° to 3° for hue rotations (h), 5 to 10% more or less for saturation (s), very limited variations in brightness (Q). Of course, if you are looking for special effects, such as simulating a film, the settings can be more pronounced.

These adjustments are made just before the other CIECAM adjustments: Lightness (J), Brightness (Q), Chroma (C), Saturation (s), Colorfullness (M), hue (h), contrast (J), contrast (Q) and curves and are added to them.

Next, the third process converts the data from the ‘CAM16’ color space to the ‘Working profile’, taking into account the Viewing conditions. Color adaptation is then performed.

These hue, saturation and brightness adjustments do not use primaries. They are based on the principle of CAM (Color Appearance Models) in 3 processes.

The executables are available (except for Windows where the bug is still present).
Binaries

I’ll answer the question about ‘Film Simulation’ in advance. It can only be done manually (but obviously it’s reproducible using pp3), and of course it only deals with color and luminance, which is different from what exists elsewhere. Naturally, it doesn’t use LUTs (3D or not) or ICC profiles like GretaMacBeth’s ProfileMaker 5 did 20 years ago.

Jacques

6 Likes

oh this looks great! I want to see this in RT :smiley:

Hello

These are improvements, particularly those to CIECAM, that I could have made a long time ago… There are no fundamental difficulties other than writing the code; in particular, the curves in RT are not simple to implement (many files are involved).

The difficulty with CIECAM - once the GUI code is writte - is integrating it into the machine code. As a reminder, the system uses (unlike RGB, XYZ, xyY, Lab, …) not 3 variables, which results in typical execution speed and memory usage, but 6 variables (if we had wanted to use all of them, it would have been 9). Processing times and memory usage would have literally exploded (even with 32Gb memory). That’s why in 2012, and then again with Ingo’s help around 2014/2015, we tried to make the system less resource-intensive. By working pixel by pixel, and by maximizing parallel processing and the use of SSE.

This has a drawback, as all the variables are interdependent (which is not the case in RGB, XYZ, etc.). It is therefore essential to perform the conversions each time (for example, from Lightness to Brightness, taking into account Absolute Luminance, from saturation to chroma and colorfullness,…)… and of course, for all 6 variables.

This addition (with brightness curve) allows us to do something similar to what we do with primaries, but in a more reliable and rational way (the result may appear identical). The system is always under control. We modify within the LMS space created by CAM16… therefore, there is virtually no risk. Those who invented CIECAM in 1997 (researchers) were geniuses… I have only tried to understand the spreadsheets, the concepts and translate that into a GUI interface and machine code, and update with the work of the researchers (CAM16 dates from 2020).

I will try to document the code to make it more ‘accessible’ in the future.
For the added part (hue, saturation brightness) by color (Red, Green, Blue) it may be possible to improve a little: a) with overlapping areas, b) with an additional choice (curve) on hue, but this will complicate the use.

The current solution is roughly equivalent to doing as if we had 9 variables LUTs.

The other major and easy-to-implement benefit is gamut compression in Abstract Profile. This ensures that the output data will not be excessive.

This pull request shouldn’t present any coding issues; I asked Copilot, who only found spaces to add or remove. The remaining issues are the label and tooltip text. If you have any comments regarding clarity or English, please feel free to share them.

Thank you

Jacques

5 Likes

Hello

I made changes to improve (slightly) the code reader’s understanding of what’s happening. I added comments, perhaps insufficient, but which might raise more questions.

I also made two changes to the Tooltips in Abstract Profile, at the suggestion of a contributor colleague, regarding RGB value overruns and gamut compression. Thanks to him.

Furthermore, thanks to @Lawrence37 intervention, the Windows executables should be available again, thank you to him. The executables are here (for this PR).
Executables

I would like, even though I have already done so, and it is present in the documentation, to recall why I used certain variables in ‘Color Appearance & Lighting’, regarding “Red Green Blue” modifications.

As a reminder, in a CAM (Color Appearance Model), there are 3 processes which I simplify to the extreme.

  1. Source (or Scene) which takes into account the shooting conditions. There are at least five that are of essential importance :
  • Absolute luminance : To try and translate this concept simply, it’s easy to understand that taking a picture in low light conditions (1 to 10 candela per m² cd/m²) or high light conditions (10,000 cd/m² or more), for example in the mountains on snow, will result in a different image. Even if the camera’s automatic settings “compensate,” the “intensity” of the lighting will vary.

  • Mean luminance (Yb%) . Similar to middle grey, except that it is measured at the start of the CIECAM process, therefore at the end of the process.

  • The white balance Temperature on the one hand, and on the other hand the illuminant chosen by the user to “go” and “compress” the data in CAM16.

  • Taking into account the average difference in luminance between the background of the image and the main subject, and the Surround luminance (i.e. the environment of what is around the image - average, dim, dark)

Starting with the working profile and the resulting data, we “compress” this data into the CAM16 environment (with a chromatic adaptation). During this phase, we use technical terms such as ‘achromatic_response_to_white’ or ‘nonlinear_adaptation’, etc. In short, we take into account the shooting conditions and certain physiological effects (not all of them, some would say…)
Some Ciecam effects (Rawpedia)

This leads to 6 variables (actually 9) which really differentiate the results a lot.

J – lightness – resembles L (in Lab) and is bounded (for example, always in the interval 0…100

Q – brightness - is unbounded and takes into account in particular ‘Absolute luminance’, ‘achromatic_response_to_white’, Surround, etc.

C – chroma - resembles C in LCH, and is bounded

M – colofullness - is unbounded - It takes into account all the effects, but will often have a slightly excessive result.

s – saturation , is unbounded, takes into account M and Q.

h – hue (rotation)

For example C = s * s * Q.

  1. Images adjustments.

To easily see the differences between these variables and concepts, choose one or two images of different natures (for example, an indoor scene and flowers), and try to use the 3 curves ‘Tone curve 1’, ‘Tone curve 2’, ‘Color curve’ which implement J, Q, C, M, s… The differences can be (very) significant.

I chose for the new module “Red Green Blue”, ‘Q’ brightness, ‘s’ saturation, ‘h’ hue, partly for simplification at the code level, and I think they are the most appropriate for this tool… Of course I can change it, but it would be a lot of work.

  1. Viewing (display) - The approach is the same, but reversed as Scene, but of course the user must enter the characteristics of their viewing environment… No calculation can know what conditions you are in, but these are identical parameters.

In short, CIECAM is not a ‘gadget’… It represents the work of numerous researchers over the past 30 years. I’ve tried to implement it. From my point of view, it’s the Rolls-Royce of colorimetry, even if some nitpickers might say – either it’s complex and incomprehensible – or it’s missing this or that. Try it objectively.

Jacques

3 Likes

Jacques @jdc there doesn’t seem to be a tooltip for the Power slider. I assume it’s the same as for the Color > Gamut Compression tool?

I’m probably missing something but I’m not sure how this slider is supposed to be used. It doesn’t seem to affect the RGB Max values or any RGB color-picker values on the images I have tried.

Wayne

@Wayne_Sutton

Indeed, there isn’t one, so adding it is no problem. I will do it tomorrow during the day

I know it’s complicated in terms of the GUI, but I didn’t want to create a new section (a new GUI tool), and where should I put it? I thought putting it in the Abstract profile was a possible and logical solution. The tooltips need to be explicit and the documentation updated (???)

Perhaps it’s not clear enough.

RGB max measures the value at the end of ‘Abstract Profile’. If CIECAM isn’t used, this is the final value. If CIECAM is used, any changes made to RGB max won’t be applied. This allows you to see the impact of CIECAM, on the Preview, but not to RGB max.

Gamut compression is placed at the end of RawTherapee, just before either the screen or the TIF/JPG output. It takes into account everything done upstream, including the Abstract Profile and CIECAM (Color Appearance & Lighting) if it’s used. I didn’t place it at the end of the CIECAM GUI because it wouldn’t be useful for those who don’t use it. But since it is after Abstract Profile (in order to be able to use CIECAM data), it does not modify RGB max.

What I can also do (I’m not worried about a few lines of code, and I have a few days before closing the PR) is add an additional label, “Final Gain” to “Frame Gamut Compression.” This would be very simple to implement… The new label “Gamut Compression & Final Gain”.

This would finally allow the process to control the RGB data. For example, by setting a possible adjustment (Gain) between -2 EV and +2 EV - of course, to be used only when necessary - the user could adjust the final image precisely to their needs. Adjustments of + or - 0.1 would probably be more than sufficient.

I would apply it just before the ‘Gamut Compression’ function. The two combined (Gamut Compression and Final Gain) allow for fine control of the output.

To make it more explicit and clear, I will make these 2 changes: ‘tooltip’ and ‘Gain’ and incorporate them into the PR… It is easier to neutralize code than to add it.

Thank you for this pertinent observation

Jacques

Hello all

Following yesterday’s exchange with Wayne @Wayne_Sutton , which clearly demonstrates that making oneself understood isn’t easy (beyond the code itself), I’ve made a few changes.

  • modified tooltips
  • Add a ‘Gain (Ev)’ slider that allows the entire system, including Color Appearance and Lighting, to be taken into account at the end of the process.
  • I slightly modified the “Gamut compression” settings located at the end of the process. The tooltip explains why it has relatively little effect under normal circumstances. Indeed, earlier in the process, if the user has enabled them, there are various “Game changer” tools designed to prevent the game from going out of gamut. It’s a kind of safety net.
  • Two indicators have been added: the first indicates whether or not the RGB values ​​were exceeded at the end of the process, and the second indicates RGB saturation. Note that these indicators refer to the Working Profile (even if it has been compressed). Therefore, it is important to check the histogram.

Binaries

Thank you for your feedback, both on the content and the format (labels, tooltips, etc.)

Jacques

3 Likes

I’ve made a few minor tweaks to a tooltip. I think I’ll merge this pull request at the end of the week.

Executables
Binaries

Jacques

I have merge this Pull Request in dev.

Few tooltips modifications were made by an English speaker; thank you to him.

I’m preparing a new tutorial on Game Changer.

Jacques

2 Likes