I’ve been working for a while on a new module called neural restore – a utility module that brings AI-based restoration to darktable. It’s available in both lighttable and darkroom: in darkroom it operates on the image you have open; in lighttable it works on your current selection and can launch batch jobs across many images at once.
It’s already in nightly builds, so if you’re tracking nightly you can try it today.
The module has three tabs at the top, in the order they’d appear in your workflow.
raw denoise
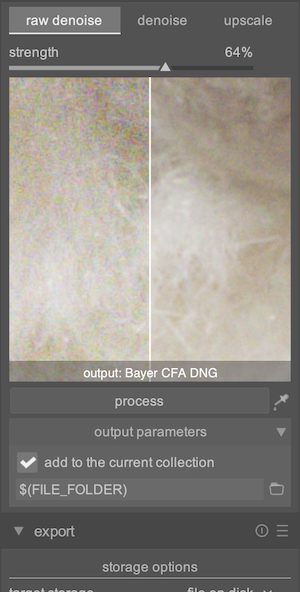
Cleans noise in the raw sensor data before demosaic. Best when you want to start a fresh edit from a quieter raw – pushed exposures, ISO 6400+, lifted shadows – and you’d rather fix the floor before the pipeline amplifies grain.
- strength slider – blend between the source raw (0%) and the denoised output (100%) in raw space.
The path the module takes depends on your sensor’s CFA pattern, and so does the output it writes:
-
Bayer path – for standard 2×2 Bayer sensors (RGGB / BGGR / GRBG / GBRG, i.e. most cameras). The model works directly on the mosaiced CFA, then the result is re-mosaiced back to a Bayer CFA. Output is a Bayer CFA DNG that goes through darktable’s normal demosaic on re-import – your usual demosaic algorithm, lens correction, color profile, and the rest of the pipeline all run as if it were a fresh raw. The preview labels this “output: Bayer CFA DNG”.
-
Linear path – for X-Trans (Fuji), Foveon, monochrome-with-pattern, and any sensor whose CFA doesn’t fit the Bayer pipeline. The denoise routine runs darktable’s demosaic first, denoises in 3-channel linear space, and writes a LinearRaw DNG – already demosaiced. On re-import, darktable’s demosaic step is bypassed (there’s nothing left to demosaic), but everything downstream (color, tone, sharpening, …) still applies. The preview labels this “output: LinearRaw DNG”.
Both outputs are written next to the source and auto-imported into your catalog so you can continue editing from the cleaned raw.
denoise
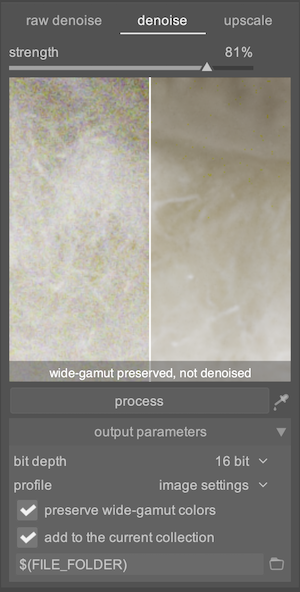
Cleans noise on the developed RGB image, after your edits. Useful late in the workflow when you’ve already made tonal decisions and just want to lift residual luminance / chroma noise without redoing color.
-
strength slider – 100% is full model output; pulling it down brings back luminance texture and grain while keeping color noise suppressed (a wavelet residual puts detail back without reintroducing noise-frequency content).
-
A preserve wide-gamut colors option keeps highly-saturated pixels untouched (the preview labels that as “wide-gamut preserved, not denoised” so you can see what’s protected).
-
Output is TIFF with the bit depth and ICC profile of your choosing, auto-imported.
upscale
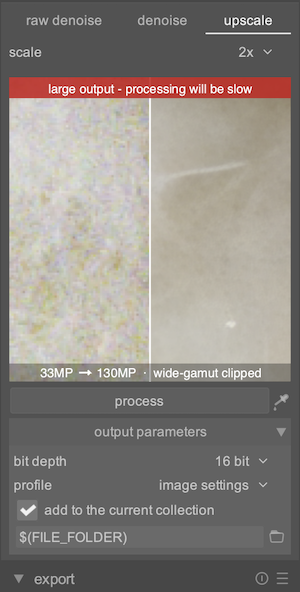
2× or 4× super-resolution for prints and large crops.
-
scale combo – 2x or 4x. The preview shows the resulting size up-front (e.g. 33MP → 130MP) and warns you when the output will be heavy to process.
-
Wide-gamut colors are clipped here (visible in the preview caption) – the upscale model isn’t gamut-aware.
-
Output is TIFF, auto-imported.
preview
Because this is a utility module rather than a darkroom iop, it can’t repaint the main image area to show its result. Instead, the preview lives inside the module’s panel as a small split before/after view of a patch from the image (visible in all three screenshots above). Click the picker button next to process to choose which patch – by default it’s centered on the image. The preview re-runs when you switch tabs, move the patch, or change a slider, so you can A/B different strengths on the same region before committing to a full export. Each tab keeps its own preview cache, so flipping back and forth doesn’t re-run inference.
For the full image, you run process.
output settings
Shared across all tabs:
-
add to the current collection – auto-import the result back into the library
-
output directory – supports darktable variables (e.g.
$(FILE_FOLDER)to write next to the source) -
bit depth / profile / preserve wide gamut – RGB tabs only (raw denoise always writes a DNG)
A standard darktable export panel sits below the module’s own controls.
running it
In darkroom, click process to run the active tab on the currently-open image.
In lighttable, process runs on all selected images – progress shown per image. You can keep switching tabs and previewing patches on other images while a batch runs. Results land in your output directory and back in the library.
feedback welcome
This is still maturing, and feedback from real-world use is exactly what it needs. If you give it a try, I’d love to hear:
-
Image quality – cases where the output surprises you, good or bad. Especially useful: unusual sensors (Fuji X-Trans, Foveon, monochrome bayer), extreme ISO, mixed lighting, deep shadow recoveries.
-
Performance – what hardware you’re on and how long it takes. Helps me tune defaults.
-
UI flow – anything that confused you in the tabs / preview / batch interaction, anything missing from the output settings.
-
Bugs and crashes – please open an issue on GitHub with the log if you can; happy to dig in.
Reply here, ping me, or open an issue – whichever is easiest. Thanks for testing!
 AND… You can get these files here if you (or anybody else!) want to see them: