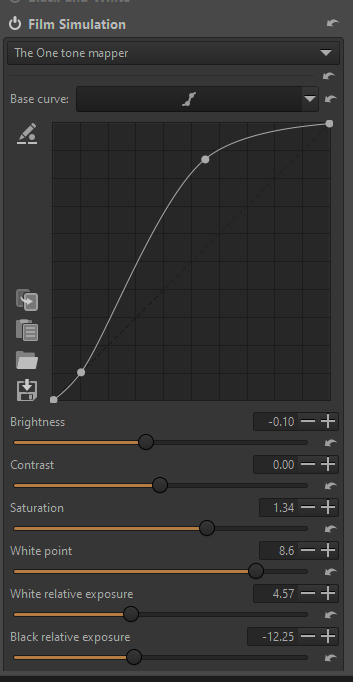
adjust the brightness with LTM using Target gray point (usually increase).
adjust the contrast with White relative exposure.
The tonal values are already very good. I only rarely had to use the “Tone Equalizer” to improve minor details.
Now I have doubts, because “Target gray point” not only makes the image brighter (or darker) but also changes the contrast. And I often have to compensate for this with “White relative exposure”.
Question: Is this process contradictory and does it perhaps ruin the tonal values somewhere?
Or is it completely unproblematic to reduce the contrast with one slider and then increase it again with the other?
Or would the following procedure be better?
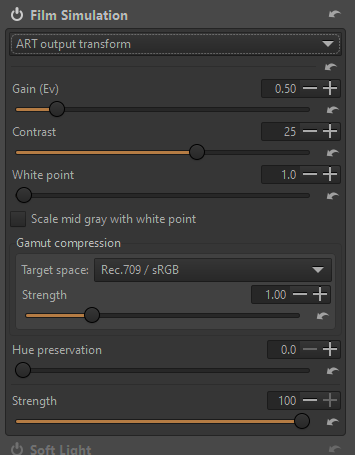
increase the exposure in the first step with “Gain”.
then adjust the contrast as required with “White relative exposure”.
finally, fine-tune the brightness with “Target gray point”.
I feel like you got your answer in a previous thread… at least one proposed workflow by @agriggio Alberto. Which I would interpret as set you grey with the gain slider and map your white and black and if need be you can lighten the midtones a bit with the target gray… but maybe I am missing a nuance …
You might also take a look at some of the options in the scripts…there are now several…
And recently someone shared or uploaded about 6 or 7 others… so if you are still trying to tweak your look or edits and log tone mapping is not quite there for you or maybe in some cases there are other ones that you can try…
Hello Todd,
You are a keen observer. Yes, I had already opened a topic on the subject of LTM. I learned a lot there and have been using LTM almost exclusively ever since - because I’m still really enthusiastic about it.
Your tips sound interesting, but I’m not looking for other tools. LTM alone is reason enough to switch to ART. I want to get to know it better and better.
Specifically, I’m wondering whether I should brighten the image with Target gray point alone, because it also reduces the contrast, which I then have to increase again with White relative exposure.
I also remembered Alberto’s tip: “If you want a recipe, for most images you can get by with just the brightness slider (the top one), and you can leave everything else at its default value.” That’s exactly what I’ve been doing for over a year now.
I also know the principle of ART: you can do anything you want - if you are happy with the results. That’s exactly what makes ART so appealing.
Nevertheless, I am always willing to improve my workflow, hence this topic.
Or to be more precise: What is the sensible sequence of tools/sliders in LTM if you want to use it to the highest standards?
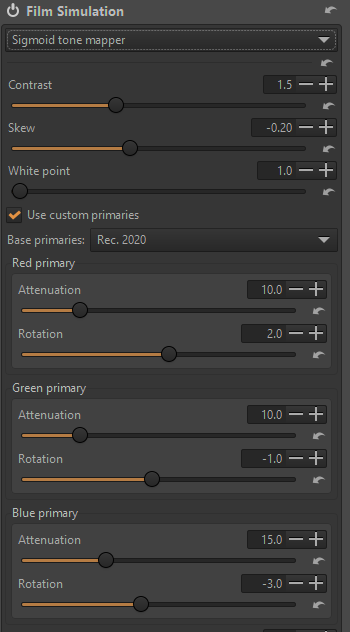
Ya no problem…they are all LTM as well just different approaches… the “One Tone Mapper” lets you tweak the curve so that is why I suggested it. The tool you are using is a lot like filmic in DT and some people like it but struggle to set it and sigmoid is often great right out of the gate and can be maniputated with only two sliders and then some sliders to tweak color when you have weird lights … so all good… sometimes stick with the tools you know …sometimes cheat on them …
I have just realized that “White relative exposure” is a fantastically good tool for perfectly balancing the contrast of an image. If you use automatic, then all the tonal values are drawn (provided they are present in the raw file).
However, if the image becomes too soft due to too much “White relative exposure”, it is better not to simply move the slider to the left again to get more contrast into the image, as this could cause the previously saved highlights to clip again. I think it’s better to increase the contrast with “Contrast” in “Tone Curves”, as you don’t have to worry about clipping again.
So far I have used the combination of these two tools rather rarely and only by chance, this discovery of how well they work together inspires me and I would like to share this with anyone who is interested.
However, I am by no means advocating always making all tonal values visible in the image. That often looks far too artificial. But my aim here is to get to know the capabilities of LTM better and better.
Hello tankist02,
I tried totm.ctl, it’s interesting, it has even more sliders than LTM - but do you really think it’s better? If I use totm.ctl to balance the contrast with “White relative exposure” so that all the tonal values stand out nicely and then use “Contrast” to increase the contrast because the image becomes too soft, the tonal values are lost again. It’s different with the LTM: If I set the contrast with “White relative exposure” so that everything is visible and then increase it with “Tone Curves” using “Contrast”, all the tonal values are retained in the shadows and highlights. This is fantastically good. Try it yourself with Alberto’s mid.tif (3.4 MB) and you’ll see for yourself.
Please report your experiences - I am very interested.
I haven’t played much with it and not with that synthetic image but the contrast of the “look” part or OTM and tweaking the default points 2 and 3 on the curve I could get what looked like really nice tonality and contrast. I could of course have even added some points… I used it in the Filmsim module as that comes more near the end of the pipeline than color and tone I believe… but really I think its probably a workflow preference and you have found a new 1 -2 combo that works for you so you may not need to look any further…