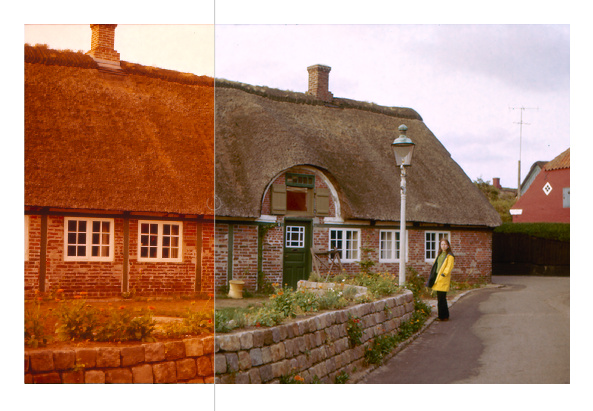
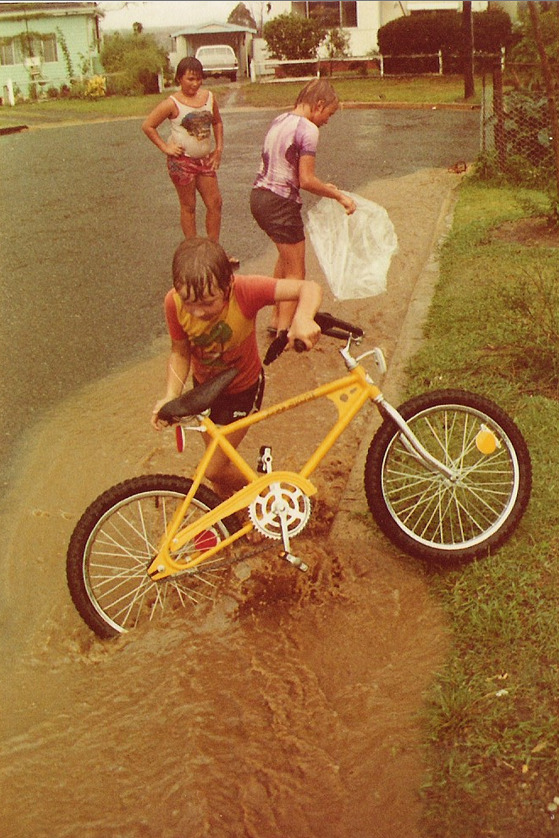
My autolevels Lua script attempts to automate the tedious color correction needed to fix images where colors have been messed up by some non-linear process, in particular when the three color channels are affected differently. The primary use case is scanned analog material with partially bleached or badly developed dyes. Another situation where this can be useful are digital camera JPEGs shot with the wrong white balance. As the camera applies some unknown tone curve after the wrong white balance, this is hard to undo, even if no clipping occurred. Simple adjustments in color temperature or tint will not produce good results for the entire tonal range here.
As long as no color matrix has been applied (and there is enough dynamic range left), the damage can be repaired with the rgb curve module using independent channels. While this works well in principle (see example image), it is no fun and very time consuming (please let me know if you use a different approach). This is where AutoLevels comes in. This python script uses a machine-learning model that predicts the required RGB curves and adds a new history item with an rgb curve instance to the XMP file.
As I described here, this Lua script leverages several of darktable’s unique features (Lua script API, XMP sidecar files) to communicate with an external program. This avoids some potential problems when trying to add ML (or even AI) features to darktable:
Optional add-on, separate from darktable
Safe and open-weights ONNX model maintained outside of darktable’s repo
Model inference is only performed once, not part of the pixel pipeline
XMP file remains valid without model (as long as the rgb curve module is supported)
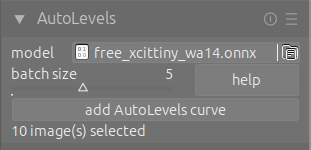
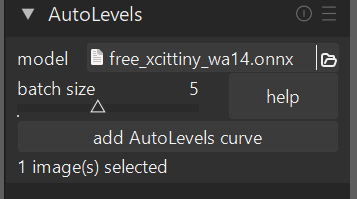
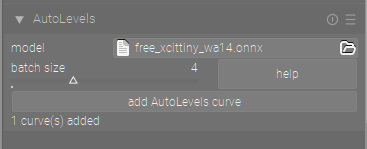
The Lua script adds a widget to the lighttable which lets the user select the model file and apply the curve correction to selected images. It has a help button that leads to instructions how to set up AutoLevels and download the model.
Disadvantages
Python is required, users may need to install it on macOS and Windows
Users need to manually download the ML model and install AutoLevels
Feedback wanted
You can get started with the README. Please share your thoughts on this and let me know if you encountered any obstacles in installing or using this script. Any suggestions or feedback welcome!
It looks really cool and my smartphone photos are often have a cast due to the wb chosen so I will be interested to try and get this going…I’ll let you know if I do and what sort of results I get…Thanks for sharing…
For me it doesn’t seem to work…everything seems to be installed fine and the script runs with no error…The image flashes for a second but nothing happens even though the scipt dialogue says a curve has been added…
I do run DT from the default install location but using --configdir to hold all my config files…could this somehow snafu things??
RAW support could be implemented, but to do it properly would take some thought and experimentation. The module would need to be placed in the pipeline before anything the user would want to change (and before any step I can’t replicate inside autolevels). If you digitize analog material with a camera, RAW would be recommended, though (you don’t want to apply the camera’s tone mapping on an already developed photo). I just wonder if there is demand?
The change was too subtle to see, double click the image to check in the darkroom if the rgb curve instance “AutoLevels” has actually been applied.
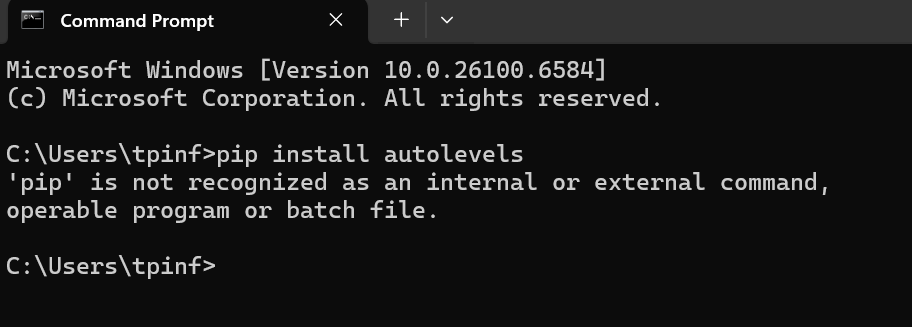
The autolevels executable was not found or failed to run. I just added a check_if_bin_exists to warn the user in that case. If you pip install autolevels, darktable should find it (try autolevels in a shell).
I am not sure how important or successful it would be on a raw file. I don’t digitize with a camera but instead I now use a Epson Perfection V850 flat bed scanner. So I would be working Tiff files. But your script is brilliant from this very old jpg scan done on a $29 3in1 printer form 20 years ago.
Hi. It seems like a very nice functionnality, but I have the same problem, nothing significant happens on the picture when I activate your tool. A slight flash, an indication that a curve was added, and nothing else. I typed autolevels in a shell, and I got this :
Have you checked the image history in the darkroom? If it shows an rgb curve instance labelled “AutoLevels” the script did its job and you can see the applied curves by opening the “AutoLevels” module in the list of active modules. If the curves look pretty linear, the change might be too subtle to notice the difference.
If this is not the case, let’s trouble-shoot it:
Your shell output shows autolevels has been properly installed
Did you select a model file?
Maybe the downloaded ONNX file is corrupt?
Which darktable version do you use?
I improved the status bar: It now reports if the model file was not found or if any processed batch caused an autolevels error. If the latter is the case, you can try calling autolevels in the cmd window on your image file, for example using
autolevels --model “Downloads\free_xcittiny_wa14.onnx” --folder “Pictures” – “my test image.jpg”
This would give you the full output and error messages of autolevels. Unfortunately, the Lua API does not allow me to catch and print these inside the script.
I have not tried it yet, but I just want to say, it looks like a fantastic tool! I like the approach of using AI to propose the values of the sliders/modules, with all the advantages that you have mentioned.
I would be interested to know more about the ML model, did you train it yourself, or is there any more information about it available (what kind of training data etc?).
Hi ! Thanks for you answer. Your standalone app (Retroshine) works very well, by the way.
It does a very good job with old slides. Not that they were badly scanned, I just did it, but the slides were damaged and lost some colors. It’s better in this area than what Negative Lab Pro does with positive pictures (it tries to correct them as well). And just for fun, I tried your tool with inverted but not corrected negatives, and the results are interesting. I prefer the approach of Negadoctor in this area, which provides more consistency between pictures, but your curve approach works pretty well as well for this.
No, there is nothing in the history. Yes, I have the onnx file and selected it. I downloaded it again, gave him a _1 suffix and tried to use the new one, but it still didn’t work.
I don’t know what to expect when calling the autolevels in the cmd, in the end he asks me which software I’d like to use to open the file, I answer darktable and nothing special happens, he runs darktable and no more sucess inside dt.
But I use the last weekly build from Bill Ferguson : here Maybe that’s what causes the problem ?
Interesting, the model was not trained on inverted negatives, but maybe the required tone curves are close to the training distribution of curves.
If Windows asks you for a software for openening a file, you probably forgot or mistyped the first word in the command, which should be autolevels. If found an issue with copy&pasting the above command: the forum software converted the simple quotes into typographical quotes, which windows cmd does not understand. Here is another full example (this time as Preformatted text), please replace the folder name and file name with your actual folder and image (assuming you did not change the current directory and are still in your home folder):
There should be a space before and after the final -- and if your image file is “DSG08253.JPG”, type it including the file extension. Windows hides the extension by default, which is not very useful here, but if you right-click “Properties” on the file, you will see the full file name with extension.
BTW, which Windows do you use?
You use a pretty recent version of Python (3.14), which is not in my testing pipeline yet, let me check if this could cause an issue…
Thanks, I indeed forgot the second space after the --. Here is what I have :
Traceback (most recent call last):
File “”, line 198, in _run_module_as_main
File “”, line 88, in run_code
File "C:\Users\aliau\AppData\Local\Programs\Python\Python314\Scripts\autolevels.exe_main.py", line 6, in
sys.exit(main())
~~~~^^
File “C:\Users\aliau\AppData\Local\Programs\Python\Python314\Lib\site-packages\autolevels\autolevels.py”, line 598, in main
model = get_model(arg.model[0])
File “C:\Users\aliau\AppData\Local\Programs\Python\Python314\Lib\site-packages\autolevels\inference.py”, line 90, in get_model
import onnxruntime as ort
ModuleNotFoundError: No module named ‘onnxruntime’
Indeed, it turns out that the onnxruntime required for Windows does not support Python 3.14. You need to install Python 3.13 (or earlier) to run autolevels and the AutoLevels script for now.