[New Module] Skin Tone Editor Module

Hi everyone,

First of all, a huge shoutout to @masterpiga. Their “Color Harmonizer” module concept on this forum was the spark that planted the seed for this project.

As a portrait photographer coming from Capture One, I’ve missed a dedicated tool designed specifically to unify skin tones in darktable. I have a slight IT background, but I haven’t actually written a line of code since the late 20th century—back when our biggest tech fear was the Y2K bug! :sweat_smile:

So, taking conceptual inspiration from C1’s skin tone tool, I decided to build upon masterpiga’s foundation. With the patient coding guidance and assistance of AI (Gemini, and a bit of Claude), the original code was heavily adapted and overhauled to introduce specialized masking and uniformity logic, all while taking advantage of the perceptual JzCzhz color space already implemented in the original concept.

It is currently working on my machine (CPU & OpenCL), and I’ve built a macOS DMG for anyone willing to test it out, help me hunt down bugs, fine-tune it, point out poorly implemented areas, and suggest improvements.


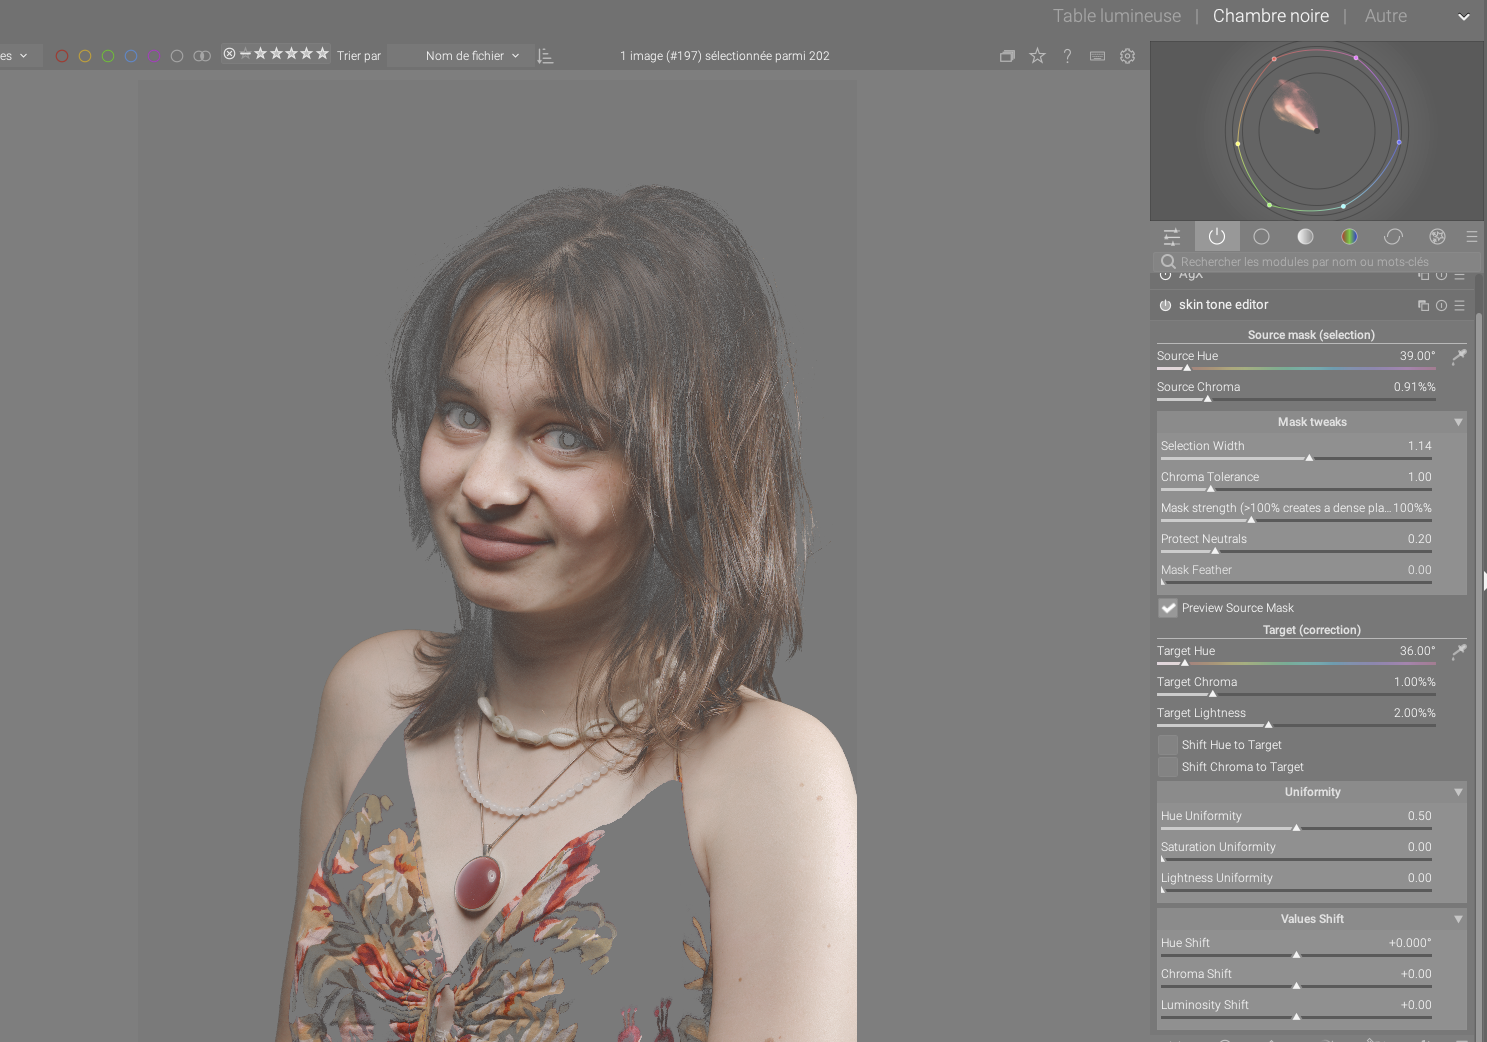
Key Features & Under the Hood:

  • Polar/Pizza-Slice Masking: Instead of a cartesian bell curve, the internal selection mask relies on independent Hue (angle) and Chroma (radius) distances. This is designed to prevent accidentally selecting opposite hues (like magentas or greens) when widening the selection.
  • Asymmetric Shadow Protection: The chroma distance calculation heavily penalizes under-saturated pixels. The goal here is to naturally protect beards, hair, and deep shadows from being affected by the skin correction.
  • Independent Uniformity: You can compress the variance of the skin around your target using 3 independent sliders: Hue Uniformity, Saturation Uniformity, and Lightness Uniformity, in order to preserve the 3D volume (J_z) of the face.
  • Plateau Opacity Boost: The Selection Opacity slider can be pushed up to 300% (clamped at 100% under the hood). This creates a “Top-Hat” or plateau mask: it densifies the selection on the skin without widening the hue footprint on the vectorscope.
  • Generic Editor usage: While optimized for skin by default (using a 2.5:1 Hue/Chroma tolerance ratio), a “Chroma Tolerance” slider is available in the mask tweaks. By increasing it, the module can be repurposed to unify skies, foliage, or clothing that have broader saturation variances.

:bulb: Recommended Workflow for Portraits (and a question for the devs):

In practice, this module is meant to be used alongside darktable’s masking system. A standard workflow is to create a mask in a previous module (e.g., Color Balance RGB) to desaturate everything that is not the skin (background, clothes, lips, and makeup areas). Then, in the Skin Tone Editor, simply load that exact same mask as a Raster Mask and invert it. This restricts the module exclusively to your subject, letting the internal color picker operate purely on the skin without catching similar hues in the background or altering the makeup.

Crucially, this workaround also isolates the skin tones in darktable’s global vectorscope. By effectively hiding the background colors, you get a clean, uncluttered view of the skin’s hue and chroma footprint, making it much easier to adjust your target and observe the uniformity compression.

I’m currently using this workflow because of darktable’s architecture (the global vectorscope reads the entire input of the pipe at that point). If anyone smarter than me has an idea on how to restrict the vectorscope display only to the pixels selected by the module’s internal mask, I’m all ears!

How to test it:

A Final Word:

I’m sharing this primarily as a fun personal project to help push the conversation forward. My ultimate goal is simply for darktable to have an outstanding skin tone module—whether it ends up being this specific code, or something entirely different and better designed by someone else (which I would absolutely love!). I am a photographer first and foremost, and I just want the best possible tool for the job.

I would love to get your feedback, especially from devs like @donatzsky who are exploring similar color variance concepts, and from fellow portrait photographers.

Let me know what you think!

:robot: Automated message from his AI assistant: I helped him write the code, but honestly, this French guy speaks English so poorly that I had to translate and formulate this post to save your eyes. Please be kind!

6 Likes

hi Vnz, well done for building new ideas, these things are all potential good steps forward with darktable.

A few questions…

What is the purpose of this? You’ve given plenty of technical details but what does it aim to do photographically? I think you need to say more. What does “unify skin tones” mean pls?

You say this is not skin, but I think a woman might disagree! Surely they consider makeup one and the same as their skin and image?! It sounds odd to me to do colour manipulation of pure skin but not makeup.

1 Like

here is a quick manual :

:blue_book: User Guide: Skin Tone Editor (JzCzhz Perceptual Space)

The Skin Tone Editor is a precision tool designed to unify skin tones by shifting selected pixels toward a specific target, while preserving the natural 3D volume (J_z) of the face.

1. Source Mask (Selection)

This section defines who gets corrected. It uses a polar coordinate selection (a “pizza slice” on the vectorscope).

  • Source Hue & Source Chroma: Define the center of your selection. Use the color picker (pipette) to sample a representative patch of skin.
  • [Sub-menu] Mask Tweaks:
    • Selection Width: Adjusts the hue range (the angle of the slice). Increase this to include more skin variations (e.g., catching both reddish and yellowish patches).
    • Chroma Tolerance: Controls how far the selection reaches toward neutral or vivid colors.
    • Mask Strength: This is the “Top-Hat” boost. Values above 100% create a dense plateau, ensuring a strong correction on the target without widening the selection’s footprint.
    • Protect Neutrals: A manual safety slider to prevent the module from affecting grays and deep shadows.
    • Mask Feather: Softens the edges of the internal color selection for smoother transitions.
  • Preview Source Mask (Checkbox):
  • Visualizing the Selection: When checked, it desaturates (turns to gray) every pixel in the image that falls outside your current selection.
  • The “Clean Scopes” Benefit: By turning non-skin areas to gray, their chroma drops to zero. This effectively clears the darktable vectorscope, hiding background “noise” and allowing you to see exactly where your skin tones sit on the hue axis.
  • Precision Tuning: This is the best way to adjust Selection Width and Chroma Tolerance while watching the vectorscope cloud collapse into a clean, professional line.

2. Target (Correction)

This defines where you want the skin tones to go.

  • Target Hue, Chroma, & Lightness: Set your goal color. Use the pipette on a “perfect” patch of skin to set these automatically.
  • Shift Hue/Chroma to Target (Checkboxes): These toggles activate the shift toward your target. If unchecked, the uniformity sliders will still work, but the base colors won’t shift their central position.

3. Uniformity

This is the heart of the module. Once the selection is set, these sliders decide how much to “compress” the variance toward the target.

  • Hue Uniformity: The primary tool for removing blotchiness and skin redness. It aligns all selected hues with the target.
  • Saturation Uniformity: Harmonizes the intensity. Perfect for fixing oily “hot spots” or overly pale patches.
  • Lightness Uniformity: Unifies the brightness of the selection.
    • :warning: Caution: Use with a light touch to avoid making the face look flat or “plastic.”

4. Values Shift

A final manual override section for global adjustments after the uniformity logic has been applied.

  • Hue Shift, Chroma Shift, & Luminosity Shift: Use these for fine-tuning the final look (e.g., adding a touch of global warmth or brightness to the skin).

:bulb: Pro Workflow: The “Clean Scopes” Method

To work with surgical precision:

  1. In a previous module (e.g., Color Balance RGB), create a mask on the skin and desaturate everything else.
  2. In Skin Tone Editor, use a Raster Mask (inverted) from that previous module.

• 3. The Result: Your global vectorscope now only shows the “cloud” of skin pixels. Watch that cloud collapse into a clean, professional “Skin Tone Line” as you increase the Hue Uniformity.

1 Like

"That’s a fair point! Let’s step away from the math for a moment and talk about the photographic intent.

In portrait photography, ‘unifying skin tones’ is about creating color harmony. Most people don’t have a single, even color across their face; you often deal with red patches (from cold or blood flow), yellowish areas, or uneven tanning. These color ‘stains’ can be distracting and make the skin look mottled.

The difference between this and simple desaturation:

If you just desaturate the red patches (a common trick), the skin ends up looking dull, grey, and ‘lifeless’ in those areas. It fixes the ‘too much red’ problem but creates a ‘not enough life’ problem.

What this module actually does:

Instead of just removing color, it shifts the problematic pixels toward a chosen ‘Target.’ You aren’t just making a red patch ‘less red’; you are literally converting its hue and chroma to match the healthy, glowing skin color you’ve sampled from another part of the face.

By ‘unifying,’ we are reducing the color variance. We bring the ‘wrong’ colors back into the ‘right’ family of hues. And because it works in the perceptual J_z space, we can fix these color shifts without flattening the shadows or highlights that define the shape and volume of the face.

Retouchers often emphasize that the biggest challenge in portraiture isn’t smoothing texture—it’s matching color. If a model’s face is slightly redder than her neck or hands due to lighting or blood flow, the viewer’s brain immediately flags it as ‘unnatural.’

Historically, photographers have flocked to Capture One specifically for its ‘Skin Tone’ tool because it solves this problem in seconds. It allows you to unify these color shifts across a whole session, ensuring the subject looks the same from the first frame to the last.

This is the goal of this module.

"That’s a great philosophical point! You’re right—makeup is absolutely part of the final ‘image.’

However, from a retouching perspective, there’s a functional difference:

  • Skin tones are usually unified to remove unwanted physiological variations (redness, blotchiness).
  • Makeup is often a deliberate artistic choice intended to provide contrast or a specific accent.

If I have a model with a vibrant orange or purple eye shadow, I definitely don’t want to ‘unify’ it with her cheek color, or it would simply disappear! The module is designed as a scalpel, not a hammer: it gives you the surgical control to harmonize the skin’s ‘base’ while using masks to protect the makeup artist’s creative work.

In short: the tool doesn’t force you to exclude makeup, but it gives you the power to decide exactly where the harmony ends and the artistic contrast begins."

1 Like

I love this. I do a lot skin tone editing in my photography and before switching to Linux, my main raw editor was Capture One and this was a powerful killer feature I always used. Having such an equivalent in darktable would make this SO much faster and easier. Right now I use other pixel editors for that after processing in darktable. I am really looking forward to the progress here.

2 Likes

@EspE1 Thanks for adjusting the title. I removed both posts regarding that as requested.

@Vnz Thank you for communicating your contribution. While I understand that you are using AI to translate, please proofread to ensure that AI does not add extraneous or overstate information as it often does. We have some fluent writers here that can help you translate more official documentation when it comes to that stage.

1 Like

As a community we’ve had the skin tone line discission before and it was decided it was not a tool we were interested in.

We are also not interested in AI slop posts.

2 Likes

This has nothing to do with the skin tone line.

Here are some videos showing the Lightroom/ACR and Capture One tools it’s based on:


That was changed to darktable UCS. Please read this for why:

I’m not convinced by this implementation. In particular, I’m not sure about replicating masking inside the module. And it lacks some of the flexibility I’m aiming for. But there are some points that I don’t think I have adequately covered in my own design, so I’ll be looking at that.

There are a few things I need to get out of the way first, but I expect to start coding in a month or so.

Sorry for the AI “slop posts” - evident one - but my goal was just to be understood.

I’ll try to make my own slop so :wink:

Concerning the skin tone line discussion where did you saw it in this tool ?

I really don’t care about defining the “right” skin tone, I can just tell you, that often I needed to do those kind of adjustements on a picture, and the approach of this (skin tone editor from C1) was the quickest and most practical way to do it.

As an example just try to show a nice 24x36 inches portrait print of his face to your client with all the red blotches magnified by the size of the print, and by the great micro-contrast that sensors and lenses offers today.

See it as a color tool designed to help in a specific case -uniformity of a given color- (shifts come in bonus), really useful in skin tone edition, but that could be applied to any color (think of sky, trees or anything in your picture)

For the little story, in C1, - sorry to talk so much about it, but I know this soft since V3…- Skin tone editor is just a bonus to the advanced color editor, with uniformity for hue, chroma and lightness added, but for only one color in the instance of the module.

A global advanced color editor, with uniformity sliders for every color you pick, would be the graal for some color interested people and retouchers. (C1 users begged for years phase one developers to do that, but they never could or wanted to implement this point)

This module (or idea of one, as it is very far to be perfect, see it as a concept) is called Skin Tone editor but could be named Uniformity Color Editor (or whatever !) if it sounds better and not opens a debate :wink:

2 Likes

Do you have any links to concepts or anything else? My idea goes along those lines, so would be interesting to see how others would have done it.

I’ll be calling it Color Variance.

I’m not sure too ! Good to have your opinion on the subject.

You think about using only existing Darktable masking ?

I “love” how in the last year the amount of comments/posts with bold headings and bullet points, instead of just regular paragraphs, multiplied by like 20x

1 Like

Hopefully not here.

If you can’t be ass’d to write it, we can’t be ass’d to read it.

2 Likes

Honestly, as I said, I’ve been inspired only by the color editor of C1, a tool that I know well and never found anywhere else. (I’ve got to see what Lightroom offers today, as the color variance you mention, but I’ve never liked the way Lightroom works , personal taste here)

Just put its Skin Tone mode possibilities, in the Advanced tab with its ability to add multiple colors, with the same previsualisation on scope and image, and you’ve got a great tool. With of course all the advantages to work in a “better” color space and the scene-refered workflow.

It’s for me (and my use) what will be a great foundation to a new color editing module in Darktable. Other additions will be a bonus.

Maybe look in Da Vinci Resolve too ?, video editors are great inspiration for color editing, and have solid pipeline foundations.

That leads to a question : what will be the best place to a module like this in the DT pipeline, considering how tone mappers can act ?

Smarter than me :laughing:

1 Like

Thank you for you efforts at trying to bring something of value to DT that exists in other programs. If I had to write in French, Chinese or any language but English I would need AI help, so for me I have no problem that you have had to use this.

3 Likes

Yes, this is extremely relevant. They’re often miles ahead when it comes to color work.

1 Like

Thanks for the credit, @Vnz! Looking forward to trying this out.

5 Likes

I have started using bolded headings and bullet points, but it is when I am trying to write something longer that would benefit. But yes in general AI loves them :laughing:

1 Like

:+1:
The module proposed in this thread will ruffle feathers right from the get-go because of the name. There should be no mention of “skin” anywhere.

A module that works on hue/saturation/lightness variance is most welcome, however.

2 Likes