No graduate saturation (example pic included)

Use an input profile which handles artificial light.
http://rawpedia.rawtherapee.com/How_to_get_LCP_and_DCP_profiles

If you have access to a color target, then you can help improve support for the Nikon D7500 for everyone:
http://rawpedia.rawtherapee.com/How_to_create_DCP_color_profiles#Shooting_the_Color_Target

Those Color Targets are some expensive pieces. :open_mouth:

I wish I could mix the Nikon .icm with the Adobe .dcp, preferring the Adobe blue and the Nikon red.

If you use windows or mac, adobe provide a cost free dng profile editor, which should let you tweak the profile. Although I have not personally used it.

A cheap alternative is to generate a dual-illuminant DCP profile by expoiting dpreview’s “studio scene comparison” tool. Just grab the raw files for the two illuminants for your camera from dpreview’s webpage, crop to include only the colour targets, and generate a DCP following the instructions on RawPedia. It won’t be 100% accurate maybe, but on my tests it gives pretty usable results…

1 Like

Try these:

To add on to this discussion, the “Adobe Standard” DCPs seem to cause gamut clipping in images similar to yours. I just had this specific problem and had to do a bit of fiddling around.

It seems that the Camera Neutral DCPs provide a better starting point when you really push those colors through Lab adjustments and LUTs.

RawTherapee’s DCPs prevent gamut clipping.

1 Like

My camera doesn’t have a DCP yet, and isn’t good enough to warrant purchasing a color target (crappy compact). For this case the Adobe-supplied camera neutral profiles provide much better colors than the embedded matrix.

I’m very sure the RT DCP would be good if there was one :slight_smile:

@CriticalConundrum but there is one, in fact two - I posted two variations above. The only reason I won’t ship them with RT is because they’re based on DPReview’s photos which are under an unknown licence. That doesn’t prevent you from using them for personal use.

1 Like

Ok guys thanks for all the tips. I am getting quite confused now.
ICC, ICM, DNG, DCP, etc. Method 1, 2, 3, 4, 5. Is there a complete explanation on everything somewhere?

Reading Color Management - RawPedia now.

DCamProf has a quite lengthy doc page, with a lot of discussion on what goes on inside both ICC and DNG profiles. Specific to this thread is: LUDD - Homepage closed

A bit technical, but there’s enough descriptive prose to begin to understand some of what’s going on with deep blues.

Perhaps this will help.


@ggbutcher
That’s cool. The actual thing that is happening with the picture.

@TooWaBoo
I am playing around with that now and get a better (less dark blue, more gradient) when unchecking ‘Look table.’

I have asked the person in the photo if it would be okay to upload the photo here to learn about colour profiles, and it is accepted! So here we go. :grinning:

The RAW/NEF:
DSC_4099.NEF (24.4 MB)
This file is licensed Creative Commons, By-Attribution, NonCommercial, Share-Alike
(Creative Commons, By-Attribution, NonCommercial, Share-Alike)

My best result while using the Nikon software profile:


Face looks a bit too green. Blue gradient is not at it’s best either.
DSC_4099_RTc9.png.out.pp3 (12.2 KB)
Nkx_D7500_6022567_719_1_0_0_04_12_00_00_01_06_12_12_00_0320_0_7_2_65_476_00ff00ff010002_0000ffff.icm (1.6 MB)

My best result while using the Adobe software profile:


Face is way too red. Blue gradient is restored although it is a bit light.
DSC_4099_RTa5.png.out.pp3 (12.3 KB)
Used “Nikon D7500 Camera Flat.dcp” from Adobe pack here.

I am playing with “Nikon D7500 Camera Standard.dcp” and “Nikon D7500 Adobe Standard.dcp” now. Since I just discovered those DCP-options @TooWaBoo mentioned, I am seeing where that brings me, but I always prefer a systematic approach that is ‘always’ working. Well let’s say a method that I can apply to all dusk/night shots at least. Or is that just a bridge to far to wish for? Should I for each image try about 3 profiles and switch around with the 4 DCP-settings?

Using the NIKON_D7500_neutral.dcp I made, almost default settings except for resizing (there is no need to upload 95MB PNGs), setting highlight reconstruction to “Luminance Recovery” and highlight compression to 50.
DSC_4099.jpg.out.pp3 (10.8 KB)

And you’re free to adjust the lights to taste:

Hmmmmmm…

:bulb:
Thinking back to the link @ggbutcher posted about the blue…
When playing with the ‘Blue Primary’ in Adobe DNG Profile Editor, Color Matrices tab…when moving it towards the left, cyan, gradient comes back. In a lesser extend also when moving it to the right, purple. And also when decreasing the saturation. So I opened “Camera Neutral (Nikon D7500)” and decreased saturation with 20.

Effect:

Not bad. It must be the night scenery that requires a “night profile” really where the range of blue is decreased to bring back the gradient. Don’t know if I used the right method of color remapping though.

1 Like

That photo would be also great to demonstrate the latests sharpening and demosaic improvements in RT.

Do you allow to use the image for showing the improvements?

Ingo

Hi, what would that mean exactly?

@SaturnusDJ He is asking you if he has permission to use your image to demonstrate the latests sharpening and demosaic improvements in RT. If it is okay, add a license to it; e.g., see.

1 Like

Thanks for the info.

Applying CC in original post.

Been thinking a good bit about this one, as I’ve run into the same treatment of blue in shots I’ve taken in auditoriums. I guess cobalt blue is a popular lighting color… Anyway, I read the dcamprof documentation about this and decided to try the fix, manually adjust my camera profile blue Y in the matrix to -0.1. Here’s a link to the dcamprof documentation, a read I highly recommend: LUDD - Homepage closed

I started with the calibrated camera profile I made using Elle’s instructions. Here’s it’s xyY gamut plot:
bluefix1

Yep, bluest-blue is way off the visible, which makes for a long gamut transformation.

First step was to convert the profile to dcamprof’s json format:

$ dcamprof icc2json Nikon_D7000_Sunlight.icc Nikon_D7000_Sunlight.json

which gave me this:

{
“Description”: “Nikon_D7000_Sunlight.icc”,
“Copyright”: “No copyright, use freely.”,
“UniqueCameraModel”: “D7000”,
“CalibrationIlluminant1”: “D50”,
“Whitepoint”: [ 0.780472, 0.809677, 0.634842 ],
“ForwardMatrix”: [
[ 0.756226, 0.222610, -0.014633 ],
[ 0.277954, 1.010818, -0.288773 ],
[ 0.017166, -0.208313, 1.016052 ]
],
“ProfileConnectionSpace”: “XYZ”,
“RedTRC”: 1.000000,
“GreenTRC”: 1.000000,
“BlueTRC”: 1.000000
}

In the “handling extreme colors” section, Anders describes the situation, and points to the Y component of the blue primary as the starting place to address it. dcamprof make-profile has a -y switch that allows you to set the minimum Y for all three channels; me, I figured I could just change the json and turn it back into a ICC. So, I hand-edited the -0.288773 to -0.1 based on the guidance he gives in the “Deep blue handling” section. I figured if that were too much, the process was cheap to iterate. The command to make the round trip back was:

dcamprof json2icc Nikon_D7000_ModBlue.json Nikon_D7000_ModBlue.icc

I moved the ModBlue ICC file to my “profile zoo” and opened a test image using the original camera profile:


(Image copyright 2018 Glenn Butcher; all rights reserved)

Yuck, that spotlight blue just gloms into a single amped color. So, I then assigned the modblue camera profile instead of the original one, and got this:


(Image copyright 2018 Glenn Butcher; all rights reserved)

Much better. Here’s the gamut comparison:
bluefix2

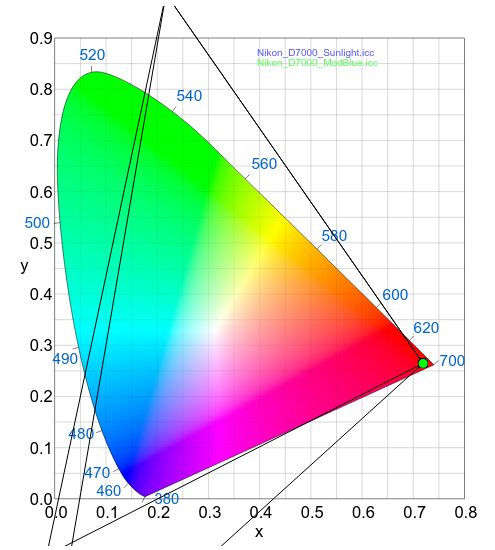
Yes, my gamut plot tool is hobbled in height… But you get the idea, now, the bluest-blue is a lot closer to the visible range and less of a struggle for the relative_colorimetric rendering intent.

There’s probably more to do here that involves a LUT, but I thought this was pretty good by itself. dcamprof is pretty handy in this regard, handles both icc and dcp profiles.

FFT (Food For Thought)…

3 Likes