I’ve been meaning to write something up about doing this process using F/OSS tools, but haven’t gotten around to it just yet. It’s an old idea, and is best illustrated in this post from about 8 years ago from Guillermo Luijk.
The basic idea is to shoot two exposures for a scene. One properly exposed, and another about +4EV.
The two images are then merged, similar to an HDR workflow, but in this case the exposure of the over-exposed image is brought back down -4EV to match the original exposure. The difference is that the now shadow detail came from the upper levels of the exposure and will contain less noise.
Guillermo’s examples include these two shots:
He then blends the two exposures, but decreases the brighter one by -4EV to match the original exposure levels. However, the shadow details are superb:
I’ll probably write a post about doing this shortly using luminosity masks for the blending.
Has anyone else had a chance to try this and have some thoughts/results/workflows to add to the conversation?
Nice technique, but I don’t quite get your example. I assume we want the top picture with clean shadows… But when you show the “shadows” they have the exposure in the +4EV picture, so I assume that the right photo is the +4EV picture taken as is while the left one is the +0EV picture with a +4EV boost for the comparison. But then the noise in the shadows of the 0+4EV images could be just some invisible noise at +0EV which is made visible by the +4EV boost…
Or am I missing something?
Also awaiting with baited breath the technique to accurately give -4EV in the gamma-corrected Gimp, without a grey chart in the picture. Not impossible perhaps, but not so obvious to me.
I can’t really claim credit for the examples, they are directly lifted from the blog post linked that explains his thought process.
I think your spot on about the shown exposure being from the +4EV image. I think the intention is to show that at an equivalent exposure, the +4EV image has significantly less noise. I figure that even if the image is then adjusted down to the correct exposure, it will still have significantly lower SnR in those regions.
I don’t really have an accurate gauge of adjusting the exposure +/- 4EV, other than to eyeball the results in GIMP. I will probably adjust the exposures to more closely match in something like RawTherapee or darktable. Then bring it into GIMP for luminosity masking. Actually, I should check if I can export a parametric mask from darktable…
This is really something I’m going to try out… having a rather old D300 with quite significant noise at high ISO, this could be a neat way to improve the image quality on static scenes.
About the -4EV correction, I agree that the proper way of doing that is to adjust the exposure of the RAW image. Using curves or levels in GIMP cannot really give the same results, and will likely alter the colors in addition to the luminance…
By the way, with a little work on the existing code my photoflow editor would be able to process two RAW files at the same time, so that the exposure correction and luminosity masking can be done without bringing the files into GIMP. All the processing would then be non-destructive and in 32-bits precision.
I gave this method a try, and the result is really impressive!
After a bit of experimenting I got quickly convinced that one should work with RAW files and reduce the RAW exposure, instead of playing with the brightness of a processed image.
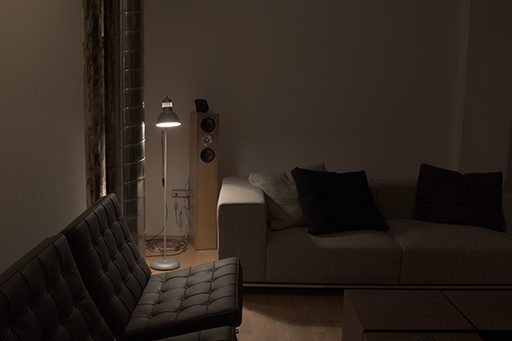
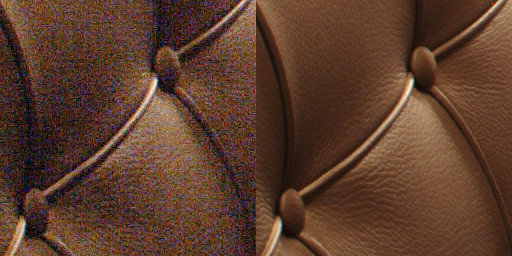
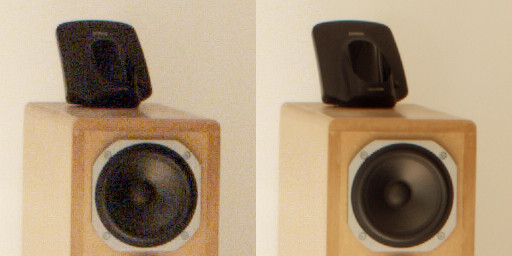
The two screenshots below show a before/after comparison of an image taken with a Nikon D300 at 6400 ISO, zoomed at 1:2 and 1:1 (really not the best shot I’ve taken in my life, but should be ok to showcase the technique). The top part is the 0EV version, while in the bottom part the dark areas have been overexposed by 4EV at the time of shooting, and then underexposed by the same amount in the RAW development.
In the bottom part, the colors are fine despite the strong brightness correction, and the noise barely visible despite the extreme ISO setting.
On the other hand, lowering the brightness of the overexposed in-camera Jpeg introduces very strong color shifts, because the adjustment acts not only on the luminance but also on the color saturation. One could probably do a better job using the curves instead of a simple brightness adjustment, but I believe it is not possible to reach the accuracy of the RAW version. Here is an example:
By the way, the PhotoFlow editor used for the examples is now able to simultaneously process several RAW files, and merge them in one single image via grayscale masks (luminosity masks, gradients, etc…). This feature will be available in the next release.
Pushing the concept further
The +4EV shot only allows to suppress the noise in the very dark areas of the image. At high ISO, the mid-tones still contain a large amount of noise that cannot be removed, because those areas are clipped in the overexposed shot.
However, iterating the same technique with +3EV, +2EV and +1EV images it should be possible to reduce the noise over the whole tonal range… I will try that as soon as I have a better image at hand.
On the other hand, since you can’t change the aperture to over-expose, you have to either increase the ISO or the exposure time (or both), both methods that can add noise (even if noise due to exposure time is only relevant for long exposure shots). So it remains to be seen if you really get less noise at (+2EV, ISO4) or (+2EV, Exposure4), than at the “plain” settings.
I’m just adding some more material to the conversation, an update from the original ETTR article on LuLa:
Where the idea is re-visited, with some notes about the noise levels relative to signal size. As I understand it, the original idea is that each full stop eats up some of the available data, so at 12-bits of data, there are 4096 possible tonal values. Taken across a hypothetical 10-stops of range gives a linear representation of those values as:
Assuming the noise is constant across the image, it should follow that the SnR will be lower the closer to the right you get. I’m going to sit down and take some test images tonight as well to play with.
Yep, I figured this would be a problem (and so did @Ofnuts, of course). I’ll stick to violent push/pulls in raw processing…
In the examples above, I have kept the same aperture and ISO setting (6400 ISO), and changed the exposure time.
The reason for the gain in S/N is actually quite simple: the -4EV correction corresponds to a division by a factor 2^4=16 of the linear RAW values. This means that the noise is effectively suppressed by the same factor, while the tonal range is scaled to match the 0EV shot.
The S/N gain is therefore smaller the smaller is the over-exposure. However, I think that the gamma-ecoding of the final image also plays a role, since it “stretches” the dark tones and “compresses” the light ones… to at least this is my intuition