My photo editing is mostly aimed at producing printed output. I have a fairly good ink-jet photo printer that I use for that purpose. Therefore, soft-proofing is a feature of Rawtherapee (RT) that particularly interests me. It has also caused me to want to learn how to best utilize the Color Management profiling features of RT. With respect to “Output Profiles” Rawpedia says, “For best printout quality, after you have tweaked your photo using soft-proofing, you should select your printer profile as the output profile and save the image using it.”. The results of doing this were both unexpected and as best I can tell undesirable.
The scenario for my initial experiment was as follows:
Perform a limited amount of editing (i.e., Exposure Tab>Exposure>Auto Levels) on a raw file and then soft-proof the result using an ICC profile (CP) supplied by Canon for my printer using a selected type of Canon photo paper. The soft-proof involved some modest amount of Highlight Compression to remove some clipped highlights. While not necessarily optimal the preview of the image looked pretty good. The result was then exported in TIF format to 2 different files. The first version specified “Output Profile = RT_sRGB” (i.e., the RT default), the second version specified an “Output Profile = CP”. In that, the only difference between the 2 exported files was the value used for the Output Profile.
When these 2 versions of the same photo are opened in some other viewers, notably PICASA & XnViewMP, they look conspicuously different. The one with RT_sRGB looks like it did in RT, which I’ll call GOOD. However, the other one does not resemble the file in RT, which I’ll call BAD. Both files looked the same when opened and viewed by RT. By the way, when opening both files in GIMP (without doing the requested conversion of profile) I can see no difference and they resemble GOOD. I realize that Rawpedia says, “The effects the output profile has on the image cannot be seen in the preview.”. However, the whole idea of soft-proof is to see an image displayed on the screen as it will look when printed and that is what I’m calling GOOD.
Next step was to compare what the 2 versions looked like when printed. The result being, GOOD looked like GOOD (i.e., what was shown by RT using soft-proof) and BAD looked like BAD (i.e., as viewed by some viewers).
That leaves me pretty confused and surely not getting what I thought was described in Rawpedia for Output Profiles.
Another point of confusion that this raises is the whole idea of what is intended for Output Profiles to do. For example, the Windows 7 computer on which the above experiment was performed has both RT and the subject Canon printer installed on it. As a result, the underlying OS knows about and can find the subject ICC profiles (both RT_sRGB & CB) whereas that is most unlikely on other computers that might be used for viewing these files. I have gone to other computers, including both Windows and Linux based, on which neither RT nor the printer software have been installed and the viewers I’ve been able to try show no difference between the 2 versions of this photo.
And which version of XnViewMP?
Are you using a monitor profile in RT? If so, what rendering intent?
Are you using a monitor profile in XnViewMP? If so, what rendering intent?
Please upload the ICC file.
XnView MP Windows
Version 0.90 32bits (Mar 4 2018)
Display is calibrated and profile specified in RT Preferences>Color Management>Default color profile. Default rendering intent>Relative Colorimetric.
Prior to this question I was unaware of settings in XnViewMP for monitor profiles but changing it to where the calibrated profile is specified changes the behavior such that both files appear the same which is GOOD.
Learning how the monitor profile affected XnViewMP had the effect of making me suspect that Picasa is the problem. As it turns out Picasa also provides the interface that I’ve preferred for invoking the driver for my photo printer. Therefore, it seemed appropriate to try printing the BAD version of the file from the above experiment using a different method. This in fact produced a good result in that the BAD now looks like GOOD.
While I’m feeling a little better about how RT works I’m still quite perplexed and cannot provide a rationale explanation for everything that is happening in this situation. For example, the Picasa print interface simply calls the printer driver which in this case involves using a pretty complicated setup which includes the means to provide very detailed selections about lots of printing options that I’ve carefully selected and were the same for both cases (GOOD and BAD). The same printer driver is still being used.
While Picasa viewing/printing on the same computer used to develop the photo looks to be an issue, what does this say about how the respective files will be handled on other computers/devices. I’m interested in understanding what this says about how other computers/devices, that know nothing of either RT or my printer software, which represent a future unknown audience are going to handle these files.
When Rawpedia says it is wise to output the printer profile is it also going to be wise for me to keep this file to myself and prepare something else for purposes of general distribution to a wider audience? If so, where does that advice come from? In this case might it be better to NOT use any RT or printer specific profiles?
When saving an image one generally intends for it to be viewed on-screen in a web browser (“for purposes of general distribution to a wider audience”), so the image should typically be in the sRGB color-space, because most people don’t have wide-gamut screens (most people don’t even have sRGB-gamut screens), and those that do usually don’t have correctly color-managed software (web browser, image viewer). A growing number of new screens (laptop, smartphone) have a gamut larger than sRGB, for example AdobeRGB or DCI-P3, but if your image is being saved for general consumption, saving it with an AdobeRGB or DCI-P3 profile would likely result in it looking wrong due to them not having correctly color-managed software.
Three things to keep in mind:
A printer’s gamut varies significantly from sRGB or AdobeRGB, it can be smaller in one direction and larger in another.
An image using a large gamut typically requires more than 8-bit precision to avoid posterization, so you’d use a file format which can handle 16-bit data, such as TIFF.
You can go from ProPhoto to sRGB without loss but you cannot go from sRGB to ProPhoto without loss.
With that in mind, if you want an image to be both viewed on-screen and printed, you have these options:
With the raw file open in RawTherapee, save one image using sRGB, then soft-proof and tweak the raw file still in RT and save another image using your printer profile to a 16-bit TIFF file.
Whenever you need to get an image for viewing on a new type of screen or a new printer, you will need to edit the raw image.
With the raw file open in RawTherapee, save one master image in a wide gamut such as ProPhoto to a 16-bit TIFF.
Whenever you need to get an image for viewing on a new type of screen or a new printer, you need to edit the 16-bit TIFF or the raw image.
Images should always contain an embedded profile, so that the software reading them knows how to translate them. In most cases, an image with no profile will be assumed to use sRGB primaries and gamma. So “in this case” use RT_sRGB in RawTherapee 5.4, or RTv4_sRGB in current development versions which will become RawTherapee 5.5.
The enclosed suggestions are very much appreciated. As you might be able to tell my work-flow is presently very much a work in progress. This post resulted primarily from reading Rawpedia and then experimenting with what I thought it was saying. BTW, my experiments did involve the use of 16bit TIF format. Also, I mostly understand the suggestions.
However, when you say →
Does that mean to specify ProPhoto as the “Output Profile”? If so, I notice that “ProPhoto” is not among the options the way my instance of RT is setup. What setup changes might allow this? What about the statement in Rawpedia which says, “Wide-gamut output profiles such as RT_Large_gsRGB are generally used if you export to a 16-bit or higher bit-depth format for further editing in another application.”?
Based on this discussion it looks to me like the idea of creating a master file to use for printing could be problematic. Another problem is that the printer profile must account for the paper. Choosing paper now for future printing strikes me as impracticle. I think the idea at the root of this discussion is the notion of having RT perform the conversion to the printer profile, which per above suggestions can be done as part of the printing process, rather than relying on the printer driver possibly in combination with software that invokes said driver. At present, even though I cannot explain why, I have to believe that Picasa messed things up when the file contained an embedded printer profile. My test photo was not something I’d say was especially high quality but from I what I could see the Picasa printout of the file with the RT_sRGB profile was just as GOOD as the file containing the printer profile when printed using Canon software rather than Picasa. In that, I have yet to come to conclusion that having RT convert to the printer profile produced superior result. While this experiment was done using pretty good quality photo paper it was done with a small (5 x 7) and therefore less costly size. Is it possible that more noticeable results occur when using using larger size paper? My printer handles and I have a good supply of 13 x 19 paper.
Another problem that arises is that I also use GIMP which particularly includes things like adding text and drawing borders/frames that RT is not capable of doing. In that, even when the raw photo is fully developed in RT I’ll want to use that as one layer in a multi-layer GIMP editing operation. Also, a very surprising problem that I’ve encountered, that might be better left to another post, is that RT seems to be incapable of allowing me to specify an aspect ratio for cropping. As you know GIMP more or less insists on converting everything it opens to its’ version of sRBG. I have read this article by Elle Stone. I think she is saying that, at present, you can expect to get into trouble by NOT allowing GIMP to perform said conversion.
The printer profile is for the printer+paper+ink combination.
If the printer software/drivers are working correctly, it doesn’t matter whether the conversion is done by the printer software or by RawTherapee; it’s the spaces you’re converting from and to where benefits and disadvantages to a given workflow arise.
The advantage of using RawTherapee to soft-proof+tweak the image is that you go from the working space to the printer space, as opposed to first saving a 16-bit image in the AdobeRGB space and later on converting from AdobeRGB to the printer space. The latter workflow is more prone to losing color data when colors go out of gamut.
If the colors fit into the gamuts you’re converting to and from, you won’t see a difference. Try using a test image in a wide gamut with colors which go into the deepest shades of red and blue, for example a rose.
I’m clueless about Picasa and I don’t know whether GIMP-2.10.6 correctly handles colors yet, but things are getting better with every version.
@Claes has practical experience with color-managed printing and managed to make printouts identical to the on-screen preview, so maybe he can offer assistance.
RawTherapee lets you specify an output profile that will be embedded in the created TIFF file. This information can change from file to file.
Then, in the program’s setting, you can specify a profile for the printer+paper combination that you want to simulate with soft-proofing. This setting is used for all edited images.
You should not make confusion between this two profiles. Use the printer profile for soft-proofing only.
It is true that you can export an image using any output profile: as long as the viewer program understands the embedded profile the result will be about the same.
Of course this is not true if the output profile has a gamut that is too small.
The current trend is towards saving the image as a 16 bit file using a large gamut profile such as Prophoto. The will guarantee that all the information contained in the raw file will be there for future processing.
Edit the file with the editor of your choice and print using the desired printer profile. If you change printer or paper just print using a different profile.
I would like to see a comparison using a high quality raw photo which captures a wide gamut, for example that vibrant deep red rose or some blue LED gradients, where the person performing the test proofed+tweaked the image in RT, then saved two images ready for printing: one in JPEG format (no chroma subsampling, highest quality) and one in a 16-bit TIFF, both using ProPhoto.
I wonder whether there would be a visible difference between the two printouts. My guesstimate is that there wouldn’t be one.
My guesstimate is that you could see some difference in smooth gradients, like the sky.
The problem with 8 bit images using a large color space like Prophoto is that you only have 256 shades for each color.
In sRGB that should be enough because the gamut is small: dividing it in 256 steps means that each step is very similar to its neighbors.
Prophoto is much larger, so dividing it in 256 steps is likely to create shades that are rather different from each other. In a smooth gradient you might see some posterization.
Moreover, if the image created by the raw converter is only a starting point and you make strong changes using another editor there is, again, some risk of posterization if you use an 8 bit image, since the discrete tones recorded in the image might be stretched a lot.
In the end I believe that, since storage is cheap, it is better to save the master image as a 16 bit file and enjoy some peace of mind.
Rawpedia is pretty emphatic about always keeping ProPhoto as the “Working Profile” and I’m thinking this has the largest/widest gamut. So when you mention trademark issues and reference this section of Rawpedia I take it those are what you meant when previously saying to save in ProPhoto. My mind was thinking that even though these might be similar to, possibly based on, ProPhoto they aren’t the same. When I said, “What about the statement in Rawpedia …” the idea was that this choice might fulfill your recommendation.
My current understanding, which could easily require some clarification, is that none of the actual profiles referenced as choices for “Output Profile” are going to be known by other software/devices that might be used to view the resulting image. However, RT_sRGB is pretty close to if not the same as standard sRGB which is what will be used to render an image when the embedded profile is unknown/unsupported by the viewing software/device. Furthermore, this might also be pretty close to the sRGB setting in my camera.
GIMP also has its’ own (?) version of an sRGB profile that it prefers for the working profile. I’d have to say that I don’t know what kind of profile GIMP will embed in an exported image. However, from inspecting metadata (I don’t know how to tell what profile is embedded) which I think only provides the name of a profile it appears as though GIMP might revert back to the original profile.
It occurs to me that the purpose of having a preferred working profile pertains to image editing operations. One use I make of GIMP is too only add other layers to an image. In that, make no change to the image other than possibly cropping it. Might this be a case where it would be wise to tell GIMP to keep the original profile when the image file is opened?
Yes, by ProPhoto I mean RT_Large, and by AdobeRGB I mean RT_Medium.
I understand the confusion. The embedded profile is not a piece of text which tells the program reading it “I’m in RT_Large space, do your stuff”, because then, as you guessed, the program would have to know what RT_Large is to do the right thing. No, the embedded profile is the whole recipe. The program reading it doesn’t need to know it, it needs to read it and cook the image as the profile tells it to, so to speak. So none of the RT profiles need to be “known”, but they will all be understood.
Having said that, there is a way to set a piece of text (a metadata tag) which tells the program reading the image the name of the profile without including the actual profile, and it’s up to the reading software to know what to do, but then you’re limited to the well-known profiles (sRGB). In my uninformed opinion it is better to embed the actual ICC profile even if it is sRGB as the profile will exactly describe what curve and gamma and so forth to use, while a name alone is imprecise. For historical reasons, there are various non-identical profiles which are all “sRGB”.
I use RawTherapee to work with color and GIMP to clone out dust and add text, so my “color profile policy” is set to “keep embedded profile”. I haven’t read about GIMP’s “boundless sRGB” approach yet, maybe others can help.
From what I’ve learned to date, when the actual profile is embedded in the image, this should signify that the colors represented in the image array are bounded by the gamut expressed in the profile’s primaries… ?? With that, profile names become distracting and possibly misleading , to my thinking…
As a programmer implementing color management, when I read in an image with an embedded profile, my job is to use that profile to transform colors for subsequent display and output, regardless of the name or standard the profile is purported to represent.
Very good, I feel like we’re all on the same page now. Given the insight provided regarding embedded profiles I’m curious to know if such profiles are required/mandatory. Is it possible to have an image file with NO embedded profile? Possibly it is worthy of distinguishing between photographs and other kinds of image files.
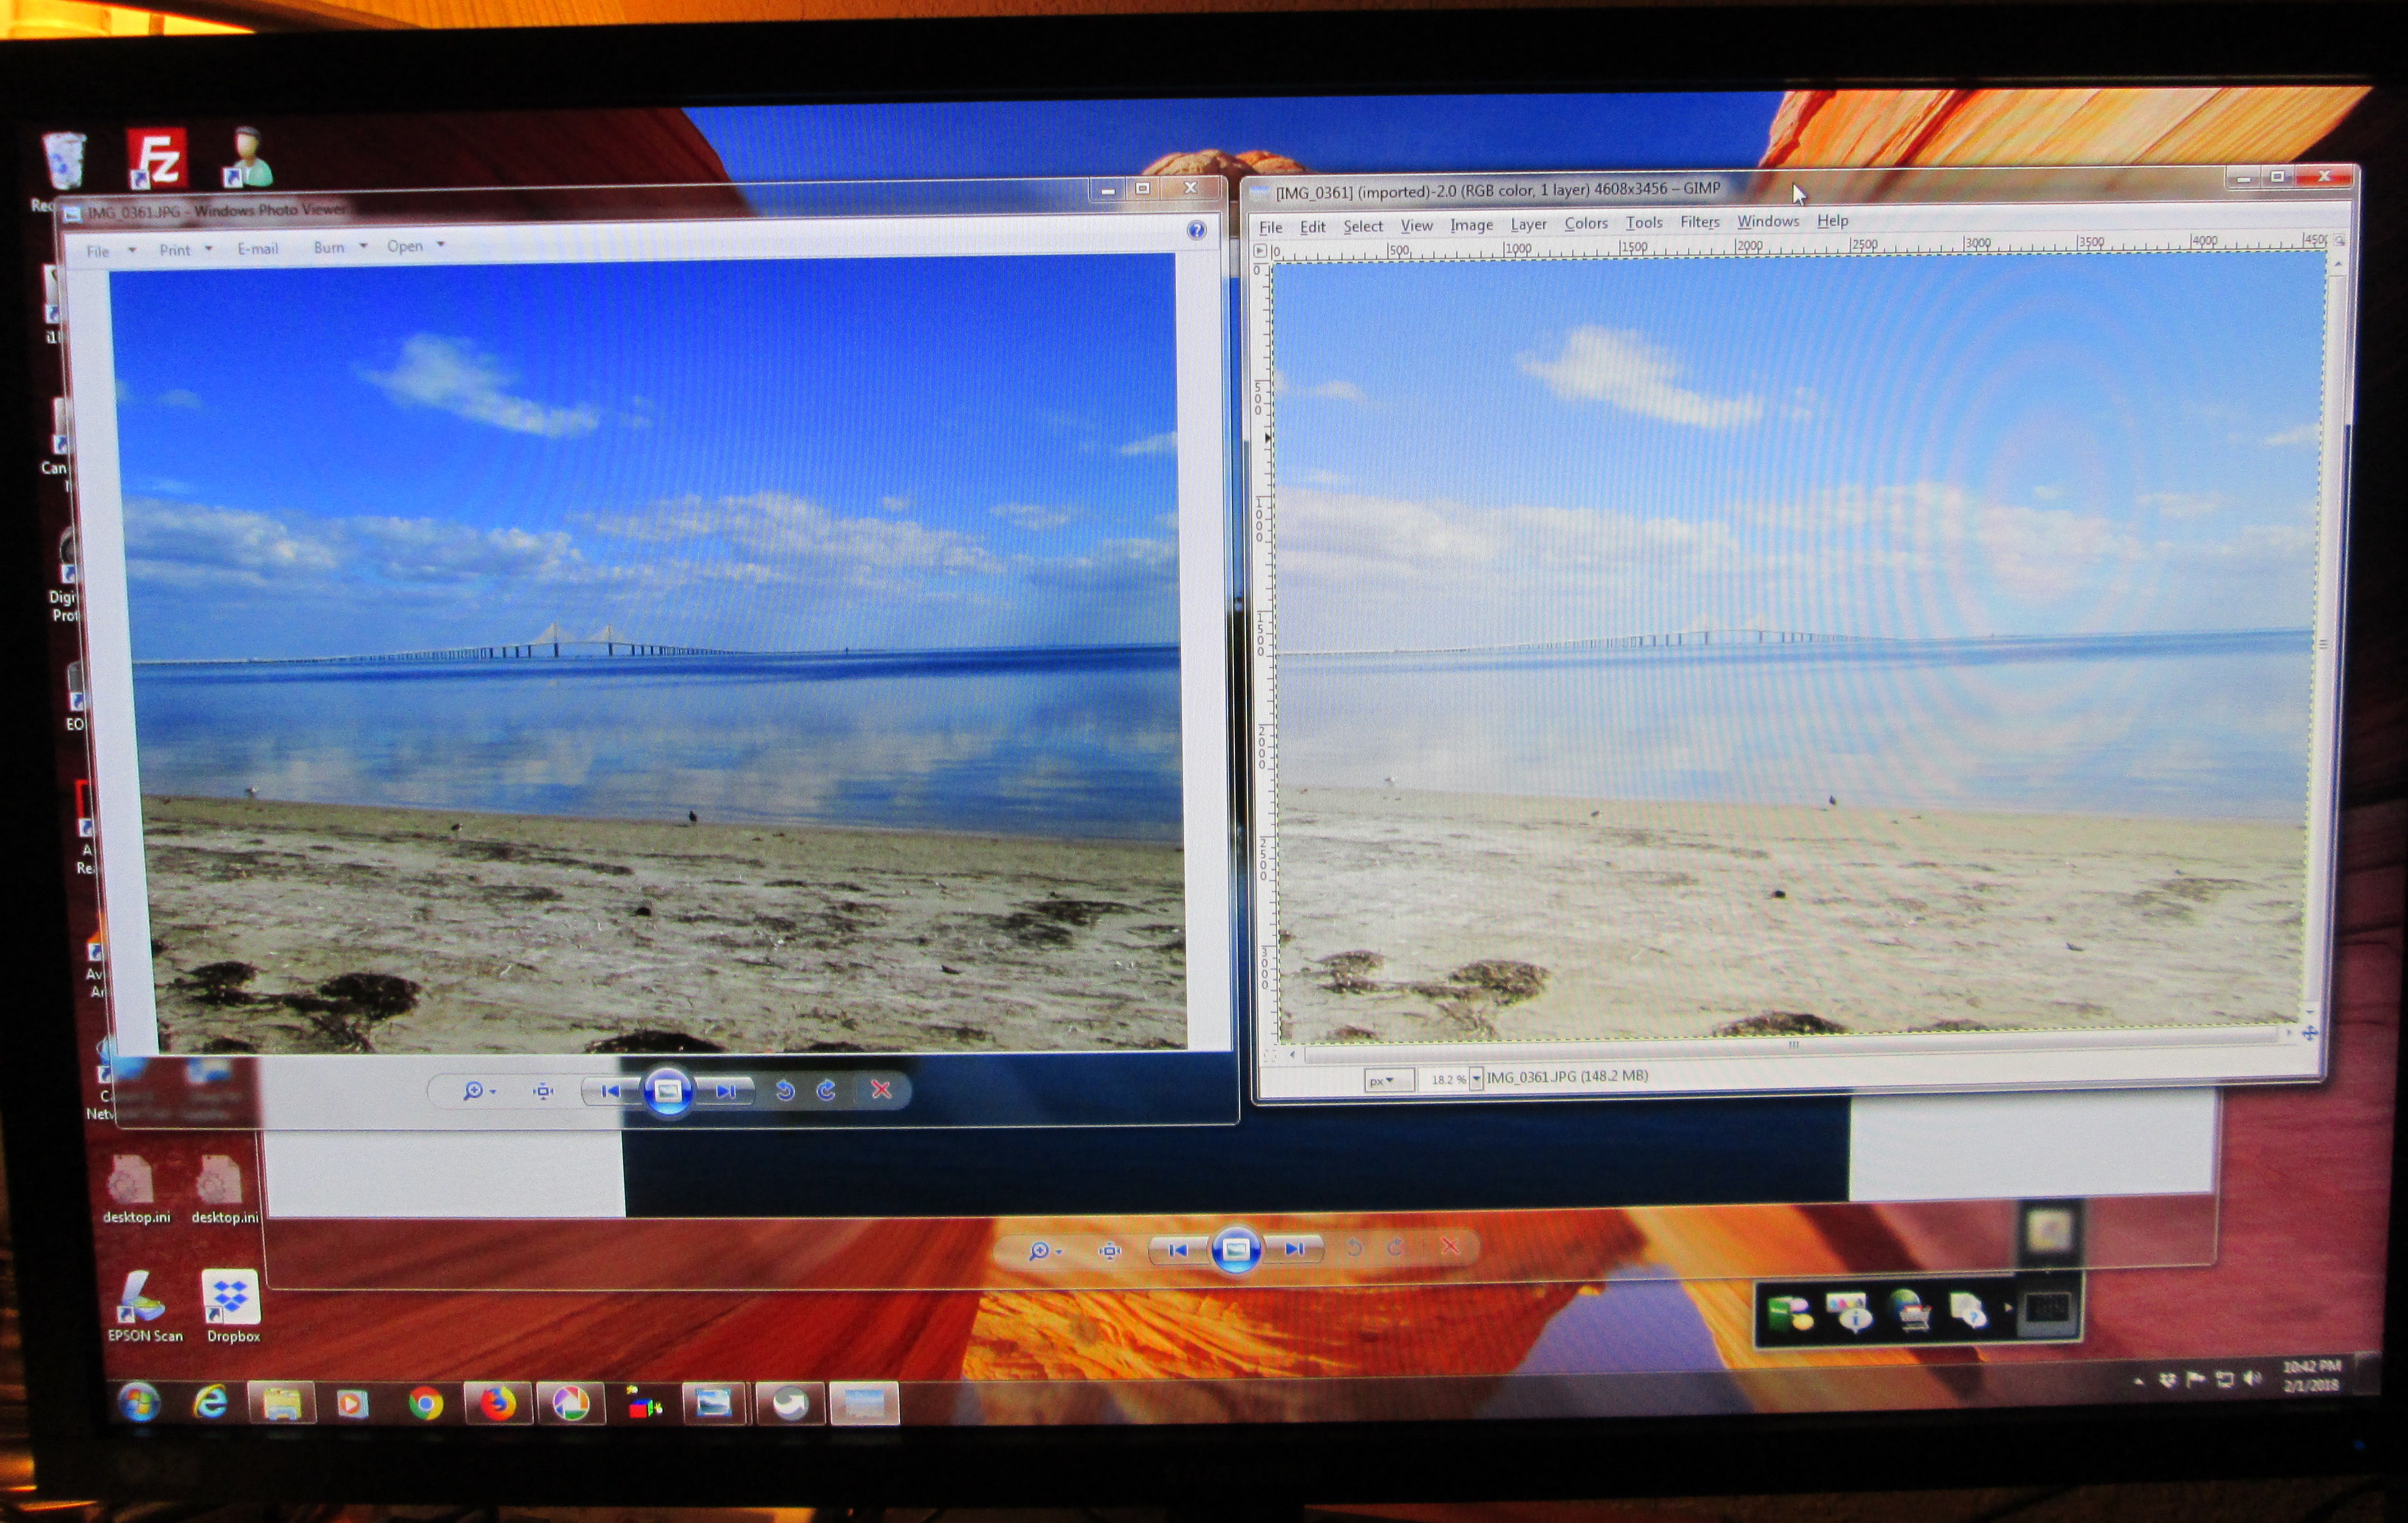
Also, it might be going off topic a bit but I previously noticed something that I thought to be very strange and could possibly be explained by what has been presented herein. I posted a question on Microsoft’s Technet Forums seeking an explanation but unsurprisingly there was none. Windows includes a program referred to as Windows Photo Viewer (WPV). When I open a photograph using WPV what gets displayed appears dramatically different than what is displayed by many other viewers that I use. The image below is a photograph of my monitor when it is displaying the exact same JPG file in 2 different programs.
The image on the left is being displayed by WPV whereas the one on the right is by GIMP. Every other viewer I have (including XnView, XnViewMP, Picasa) produced a result that looks equivalent to the one on the right by GIMP. The JPG file came straight out of a point and shoot camera.
I think this example demonstrates a phenomenon that pertains to digital images in general. In that, there are so many factors involved in determining what any viewer might see on their display that there is no such thing as a correct result for those of us editing digital images. This has a bit to do with my preference for how it looks on paper being a critical factor in judging whether or not the final result can be considered good. Of course I also recognize that duplicating what ends up on the paper is similarly complicated.
Might such a phenomenon be explained by WPV ignoring the ICC profile and instead undertaking some kind of automatic exposure control of its’ own doing?
That’s caused by the program(s) not being correctly color-managed. To look the same, they would need to use the color profile embedded in the image, use your monitor profile, and use the same rendering intent. Some programs detect the monitor profile but have some hard-coded rendering intent. XnViewMP added support for allowing the user to choose the rendering intent because I nagged and nagged.