After a exchange with u/ParanoidFactoid on reddit on a GIMP thread, and with a discussion on Luminosity Mask. I pointed that it is possible to recreate Pat David Luminosity Mask on Krita 4.3. He didn’t understood or knew how to do this in Krita, so I made a tutorial. It’s far more convoluted than on GIMP or Photoshop, but most certainly possible. I tried to make it as simple as possible even though it’s hard to follow along.
For this tutorial, we will use this image:

Krita 4.3 Tutorial
- Load the image inside Krita 4.3
- Right-click the image, then go to Group->Quick Group

-
Lock the newly created group layer, and then select the locked group layer.
-
Hover your mouse over the squared plus icon
 , and then move the cursor to the arrow next to it, then click. After that, click Group Layer.

-
Select the locked group layer, and create a clone layer. Note: It’s on the same menu as the one with group layer found in step 4
-
There is two arrow buttons next to the squared plus icon. Select the up arrow
 .
. -
Rename layers according to below, and make sure your layout looks exactly like this.:

-
Create a black layer and set it below Image Reference while still being grouped inside Luminosity Mask.
-
Change the Image Reference Blending Mode to Luminosity, and then group Image Reference and the black layer. Special note: If you’re using LAB document mode, you can disable A and B Channel instead!
-
Finally, rename the newly grouped layer into L.
-
If you followed steps 8-10 correctly, you should have something like this.

-
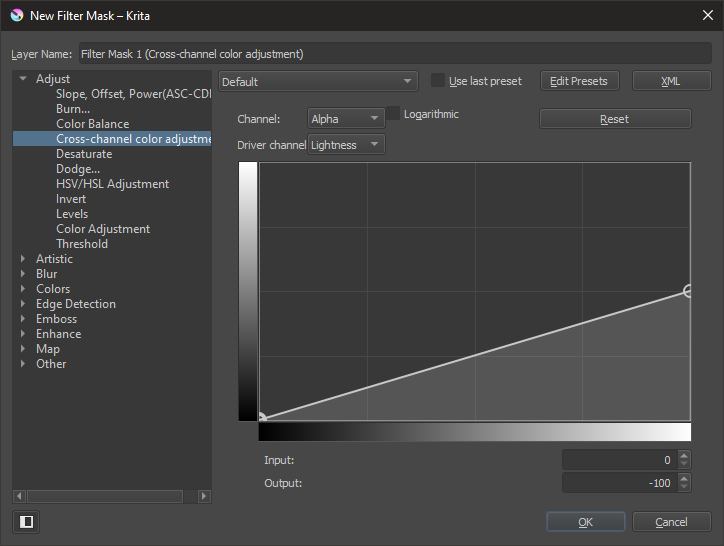
Right-click the L Group Layer, and then create filter mask.

-
Go to Adjust->Cross-Color Adjustment, then use
Alphafor Channel. Finally, the Driver Channel can be ‘Lightness’,‘Red’,‘Green’,‘Blue’. If you’re using LAB mode, you can only use Lightness. If you followed this part correctly, it should look like below.
Special note: You can hide the Reference group layer if you wish, you’d see the transparent mask. Don’t worry if you’re seeing squares or modified colors, that’s part of the process as that image will be used as a clone layer as Destination In mode, but way later on. -
Create Clone layer of L Group Layer. Duplicate the clone layer. Finally, Group the newly created 2 clone layers. Rename the group layer to LL.
-
Set the latest clone layer to Destination In Mode.
-
Luminosity Mask group Layer layout should look something like this so far:

-
Create Clone Layer of LL Group Layer
-
Create Clone Layer of L Group Layer
-
Move the L Clone Layer above LL Clone Layer. Then group the two clone layer. Rename the group layer to LLL.
-
Set the L Clone Layer to Destination In Blending Mode.
-
Your layout should look something like this:

-
Duplicate the L Group Layer, move it to the top. Rename it to D. Then, Invert the Cross-Color Adjustment Curve. 0,0;100,-100 is the right setting. In other words, on the left it should be set to 0 and on the right, it should be set to -100.
-
Do the same step for creation of LL and LLL using D Group Layer instead. Their names should be DD, and DDD.
-
Now, M Mask is going to be a bit different here. Even possibly different from GIMP interpretation. There are multiple ways to do so. 24a-24b are different ways of creating masks. I will not do steps for these as at this point, you should be able to understand how to do these. Note: that you should use the same setting for L cross-color adjustment filter mask.
24a.

24b.

Special note: halfGray means .5F Gray meaning 128,128,128 or .5f,.5f,.5f or .5L* in LAB. -
Do the same steps you did for L and D series, but for M Group Layer.
-
By now, you should have L,LL,LLL,M,MM,MMM,D,DD,DDD. For two and three letters series, they must have Destination In mode on top. Three letter series should have different clone layer. Two letter series must have clone layers which are the same copy.
-
Lock the Luminosity Mask group layer.
-
Create a new group layer above it, it can be named Final.
-
Clone the Reference group layer and place it into Final.
-
Duplicate the clone, and quick-group it. Rename the Group L.
-
Clone the L Group Layer from Luminosity Mask, and place it above the copy of Reference Clone Layer inside the new L group Layer inside Final. Set the L Clone Layer to Destination In mode. You should have something like this.

-
Duplicate the L Group Layer. Then Change L Clone Layer copy as LL after right-clicking and clicking set copy from… Rename Group Layer to LL.
-
Repeat 32-33 following Luminosity Mask Sequence.
-
Have fun manipulating the Final Group Layer. Play with it, and see what you get.
Conclusion
After Luminosity Masking and Filtering

Before Luminosity Masking and Filtering

Additional Info - Tutorial File
If you want how the final layer structure would look like, download these files.
Pat David Luminosity Mask Krita.kra (1.3 MB)
Pat David Luminosity Mask Krita After.kra (818.2 KB)
Special Note: On After, it use a file layer. You can change the file layer to something else to test results on different image. Download the reference image.
