Whow, difficult!
Here is what I could do. Tried to get rid a little of the green stuff. Gimp & darktable.

2 Likes


Kudos to all who had the gall to post a result. I went at the color correction for about 20 minutes in darktable and got absolutely nowhere.
1 Like
Rawtherapee neutral
GIMP 2.10 and G’MIC
only color correction with G’MIC:
“Mixer [PCA]”
“Specific Saturation”
“Curves”

4 Likes
Wonderful image, and tricky to edit!
My take using RT 5.4 (dev) and only four tools: white balance, RGB curves, Lab adjustment to push chromaticity and a flourish of color noise reduction.

9 Likes
Hello,
my attempt to reproduce with RawTherapee 5.4 the results I got with PhotoShop failed.
First I adjusted shadow- and highlight-points in the 3 channels in PS. Then I did the same in RT using the RGB-curves in the colour management tab of RT. The result was quite similar:

Then the next step was white balance with the pipette in PS, which worked fine. But using the pipette for white balance in RT at the same spot in the image ruined the image:

What did I do wrong in RT???
Hermann-Josef
3 Likes
Here is my attempt using a combination of darktable 2.4.4 and GIMP 2.10.8
There seemed to be a lot of green colour influence from what I suspect is some sort of mold on the scanned slide.

2 Likes
Like many have said before me, when you get your hands dirty you’d probably appreciate the works many good people here have done. To you ![]()
![]()
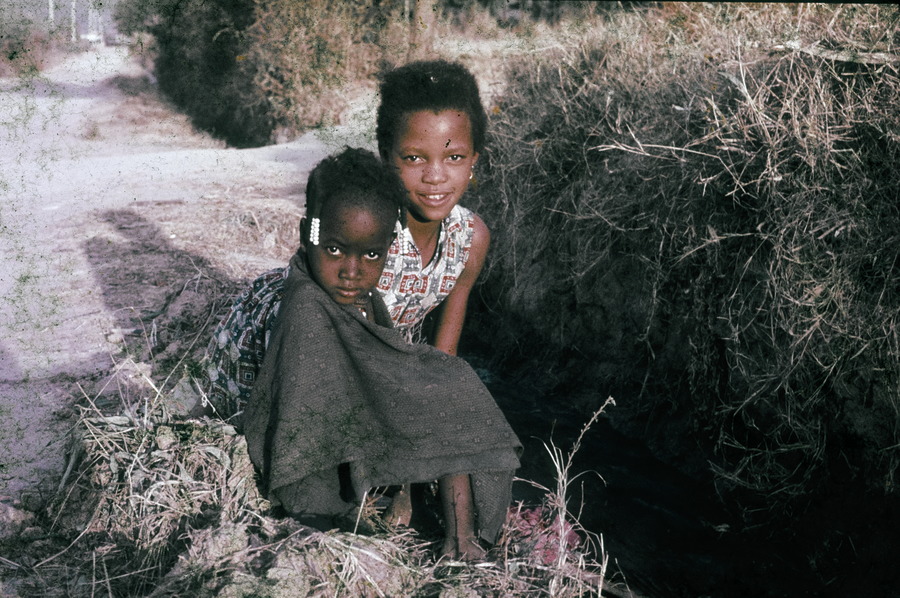
@gadolf thanks for the diapo, it is indeed a nice (what do the men with the stickers call it? ah yes) candid portrait. The composition is not bad at all, with the strong dark diagonal and the little crossing road following ala africain the rule of thirds. Their shadows got bored and are already leaving 'cause this princesses are not in a hurry whatsoever. I find it ironicaly balanced that the little one is all defiance and the older is but an open smile; heartwarming. The issue with the frame is that the ditch is dark and kind of menacing… who knows whas in there!! Regarding the conditions of the film, not also the emulsion is very deteriorated (the chemicals have long started their own hardcore crossprocessed style party), but there is plenty fungus and cracks and… well, you name it.
I did start (like I imagine most of the people) trying to bring a more natural “ambient” to this party of 2.
Of all the software I did choose Lightzone (an added reason was its healing tool) and it was actually doing a decent job till it decided to hang, display the ![]() and faint as ingraciously as possible. If you don’t know LZ, it doesn’t keep a sidecar of the editing, so… bye-bye
and faint as ingraciously as possible. If you don’t know LZ, it doesn’t keep a sidecar of the editing, so… bye-bye
Edit >> as @jacal pointed out below LZ does / should save a
filename_lzn.jpg, containing the editing data in a jpeg preview (1048 px by default, can be bigger or full-sized, or tiff).

So trying not to get sucked into radicalisms, I asked myself this question: what is it the goal here?
The answer was pretty clear, also as my experience with gimp has been a mixed bag with some nasty surprises and I’ve used photoshop for over 20 years, went and did the zing in the later.
I washed a bit the dirt on the girls’ faces and just blured the rest a bit more, blured shit smells less my grandpa; I always took advices too literally. I stopped the colour processing at this point, since the start I knew the crop exactly and that was going to be B&W

And finally got here. Not redemptive at all, but I used photoflow (VIPS) resizing algo from CLI, probably the sharper I’ve ever seen (for some photos even too sharp)
photoflow.app/Contents/MacOS/photoflow --batch --export-opt=jpg_depth=8,jpg_compress=100,width="$1",height="$2",sharpen_enabled=1,sharpen_radius=0.5, profile_type=srgb,trc_type=linear "$f" ${f%.*}_phfrez.jpg

And voilá, I pray for dogmatics to find in their heart a way to forgive me, and ( contrary to how I normally do things and and how I relation myself with… well everybody else ) I do hope that you like it Gustavo.
Cheers
PS
@paperdigits did you take out the sun glasses? Yast messin wicha
5 Likes
Kudos for the crop!
@Thomas_Do and @dazedandconfused As a Darktable user, I’m really curious as to how you guys did your renditions. Could you upload the sidecar, and give a brief summary of your workflow (in terms of what each tool was used for).
Thanks in advance.
LightZone’s sidecar files are saved as filename_lzn.jpg, containing the editing data in a jpeg preview (1048 px by default, can be bigger or full-sized, or tiff).
I had problems in darktable, too and used gimp for the initial color correction. Attached you find a sidecar file containing a single tone curve for color correction in darktable. Could be used as a starting point.

IMG761.tif.xmp (1.5 KB)
2 Likes
ohh that’s good to know, thanks man.
I’m afraid that in this case (probably 'cause of the crash) it didn’t save anything - I did search… on the other hand it lead to the other version.
@Claes tak mate
@gadolf you’re most welcome =) Where did your father take the photo?
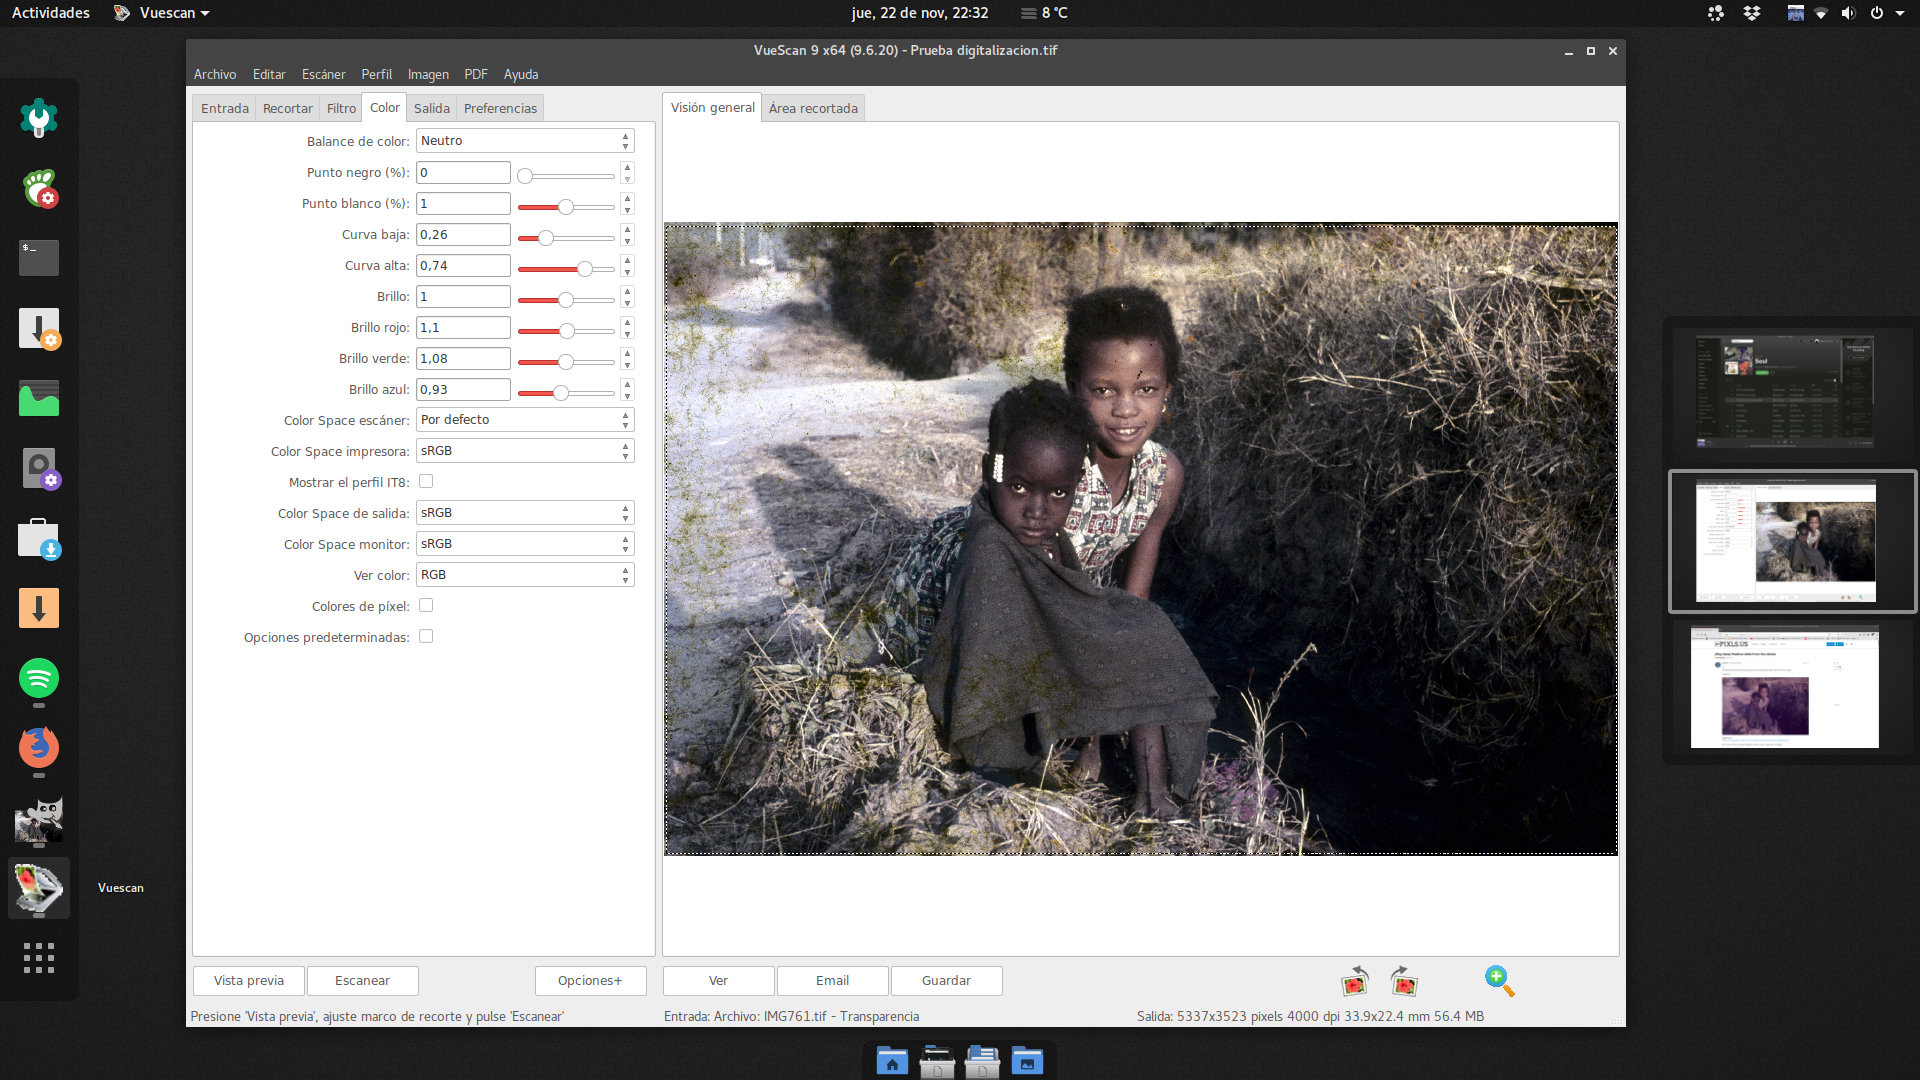
Vuescan for Linux could be an interesting option if you need to do it quickly (Sorry, I know, isn’t open source). Only 20 seconds to make adjustments.
Nice photo by papa @gadolf!
That gives me an idea… that might not be realized.
What are you talking about? That frame is ![]() ma!
ma!
2 Likes
The frame it is, but PS… may freak the doggies
Angola outback (somewhere…)
1 Like
I’ll try to attach the xmp file - 7bba1fd5d34242a335fd21f3cc7e29a2bf1efe7c_1_1380x916.jpeg.xmp (7.2 KB)
Hopefully that will give you a history of the corrections in darktable. If not, here is a quick rundown from what I remember:
Initially, I used the colour picker tool on the girl’s hair beads and adjusted the white balance sliders to get close to a white and get rid of the original colour cast. Then went back and forth with the exposure and white balance…desaturated a bit, some more colour correction to try and get rid of the green/red casts, tried vibrance then went back to exposure and white balance before final saturation adjustment. Exported as a 32-bit floating point tiff to GIMP where I again adjusted the saturation to decrease the reddish hue in the girls’ skin tones and added some sharpness. I was going to try removing the green mold and some of the crud in the image but realized I do not have some of the appropriate plug-ins for the new version of GIMP - healing brush would probably work but would take to long. So, off to get some add-ons and plugins!
2 Likes