Processing a panorama for printing

I wanted to share my processing steps for this photo of Manhattan from Brooklyn (in the middle of the Empire Fulton Ferry Park lawn to be precise), which I think I’ll try to get printed - it might look good in my living room.

This started out with 13 frames shot in portrait orientation with my Fujifilm X-T2 and Samyang 12mm f/2.0, set to manual mode for shooting (ISO 1250, f/11, 2 sec).

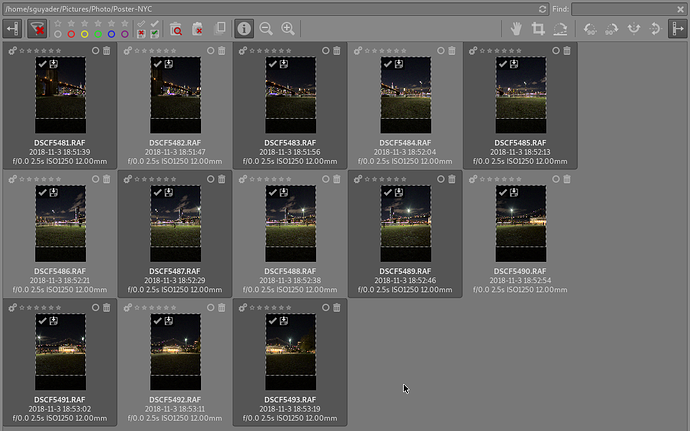
It turned out that when trying to stitch all the 13 frames, Hugin had quite some troubles correcting the images, and introduced a lot of distortions and bad stitching errors. No matter what, I couldn’t get a good panorama. I thought that, maybe there’s too much overlap between the frames, So I decided to try selecting only 1 out of 2 (you can see the selected frames in the above screenshot from Rawtherapee’s file viewer).

I did only light processing of the raw files in Rawtherapee (highlights reconstruction in blend mode, a custom tone curve, bundled dcp profile for X-T20, custom White balance, cropping and 3-pass+fast demosaicing). The center frame looks like this in Rawtherapee’s editor view:
Screenshot_2019-01-16_08-56-06

I loaded the exported 7 files (16-bit TIFFs) in Hugin, asked CPfind to: 1) find , 2) fine-tune and 3) clean the control points for me. Oddly, while my lens is a rectilinear 12mm lens, the only way to get a satisfying panorama was to set the lens type to Circular fisheye (Hugin set the focal length to 17.75mm by itself):

Then after trying several options, the best panorama I obtained was to make Hugin adjust custom parameters instead of just positions:

I also did some masking, to include/exclude some parts that spoiled the final panorama. For example I wanted to be sure that this man in the middle frame would appear in the final panorama (it’s a personal choice, at first I hated the fact he was there, but now I quite like it, he’s a photographed photographer):

The preview, with equirectangular projection, straightened and adjusted crop window, looked like this:

The resulting panorama is a 44 MP, 13547x3283 (which would make a 40x15 inches print at 330 ppi) image that looks quite good already, but I’ve been suggested to turn it into a contrasty black and white image that would look great printed. So I loaded it up in Gimp (converted to 32-bit float, linear light internally), fixed the top corners and cloned out some distracting things here and there. I also used the “illustration look” filter (actually, I used my own script fu, which was the base of the “illustration look” filter in G’MIC) to give some more “pop” to the image, but I applied it only on the parts I wanted to highlight (the skyline, the 2 bridges, the carousel, the river and fences).

Finally, I loaded the resulting 32-bit image back in Rawtherapee, and used the Agfa APX 25 LUT in “Film Simulation” module to render the image to black and white, turned “Local contrast” and “RL Deconvolution Sharpening” on and used a curve to brighten the light tones a bit more. “Et voilà !” (here’s a downscaled version, framed with G’MIC):

What do think?
Do like the presence of the man in the middle?
What could be improved?
Do you agree it would make a nice print?
Any advice for printing (print size, on which medium, in a frame or just bare…)
11 Likes

Nice pano, Sebastien! :+1:

That’s something that drove me nuts in the past, too. Often, that is because of bad points between this and the +2 (or +3, if they overlap a lot) image. Check those for outliers. Nowadays I reduce to 5 CPs per pair, check the +1, +2, +3 shots, and add some points as well as horizontal/vertical lines manually. That works quite well.

HTH,
Flössie

1 Like

Thanks for your insights Flössie. Indeed I realized I had CPs in +2, and +3 frames. I removed all of those. I also checked individual CP’s to make sure to remove bad points, but still it didn’t work nicely with all the frames. Maybe the next time I’ll try to leave less CPs, as you advised, and add some lines.
But I think I’ve done enough for this pano, I don’t have the force to start over again!

It’s a very nice picture. However, wouldn’t it be too dark for a frame on the wall? The bright objects are too small and blown out. So it might be a bit foreboding to keep. Just a thought.

1 Like

The frame I showed is just a quick frame for showing here, without any thought behind it. Maybe should I make the carousel less bright. But I kinda like that it draws attention, and follows the direction given by the man in the middle.

Would it be better on a wall with a frame, if so with what kind of frame?
Or would it be better without any frame?

I’ve never printed my photos before, so I have no idea.

Did you crop before sending to Hugin? Could that have thrown off the calculation?

Simply put: very large photo = very expensive frame.
A less expensive solution could be a triptych

2 Likes

Yeah, it’s a possibility, but I think I’d prefer a “full frame” anyways for this one.

Yes I cropped beforehand, but I think the first time I tried it was without cropping, and it was as difficult.

I print a lot of my pictures for hanging. The standard “gallery style” is: black frame with minimum 2" white mat borders. This is for hanging on a white wall. For prints over ~24", then increase mat size to 3" borders.

When I first started hanging pictures, I would use different colored frames and mats, but 90% of the time these days, I stick with black frame/white mat. If I deviate from that, it’s for a specific reason. Example: a picture that has money has a key element, I put in a gold painted frame instead of black.

The framing and matting visually separates your work from the rest of the room and makes it look bigger and bolder than it really is.

If you go to a local custom frame shop or craft store, you’ll pay $$$. In the USA, arttoframe.com has decent prices, and they will custom cut mats for you. They ship it to you, and you just open the back of the frame and put the print inside. They are near NYC somewhere. Maybe even Brooklyn, where you took that picture. Stick with normal glass, none of that anti-glare or other fancy stuff, unless it will be hung somewhere that gets hit with direct sun, in which case you may want to consider UV-blocking glass. That website will also let you upload your image and render how it will look with your frame/mat combo if you do decide to get cute with different colored mounting materials.

There’s a little more advice I can give, but if interested, it’s probably better to start another thread.

That’s a really nice picture, and I love the way you processed it. Thanks for sharing!

2 Likes

@Stampede The link doesn’t work; don’t tease me with quality, affordable framing!

Arttoframe

1 Like

Thanks @Stampede. Unfortunately, I live in Guadeloupe (in the Caribbean) and ordering a custom framer from NYC isn’t possible (I’d pay at least twice the price of the frame).
There’s a local shop here that does custom frames.

I was wondering if it could worth getting the image printed directly on a board, without framing?

Maybe print on canvas?

It’s my thread, so feel free to share any advice here, that’s what I asked for :wink:

Maybe on metal?

1 Like

Yeah, that’s a problem. I know this is an international forum, so I wouldn’t have suggested normally it but I thought you may live near NYC because of your photo.

All my printing I have done on normal paper, and one time on Giclee canvas, so I can’t say much beyond that. Metal prints sound interesting to me, where they print directly on a sheet of aluminum, but that’s serious money, and apparently a very sensitive process that’s easy to screw up, so you have to make sure you go through a reputable shop that doesn’t cut corners. I’ll probably get something printed on metal sometime this year to see how it looks for myself.

I forget how big you want the final image to be, but you may want to think about getting small versions printed up on the different media. Like 5x10" size or something. So you can look at different options before getting the big one printed. Metallic photo paper (different from metal prints) looks really cool, especially in black and white. Even my non-photographer and non-artist friends will see a metallic paper print and comment on it.

I thought about it too, but I don’t know if I can have it done locally.

I didn’t know it exists. Interesting.

Here’s an updated version: no frame, and the brightness of the brightest spots reduced on the right side:

4 Likes