RC1 Filmic RGB halos and white balance

I’ve been experimenting with Darktable 3.0 RC0 and RC1 for the last week or two and have been noticing strange halo effects with the new filmic RGB module. I was a pretty happy with the old flmic module and thought I had my head wrapped around the workflow. I was getting what I considered to be good results out of it at any rate, much better than base curve the vast majority of the time. I haven’t messed with the ordering of the modules in the pixel pipeline in Darktable 3.0 so they are as they are set out of the box.

In RC0 and RC1 I’ve noticed this strange halo effect with filmic RGB that seems to depend on white balance. Since a photo is worth 1000 words here are a couple of examples. These photos were imported straight into DT 3.0 RC1 without any legacy 2.6.x edits.

These were shot on a Fuji X100s if that makes a difference, haven’t messed with an Nikon RAWs in 3.0 yet. I know X-trans demonstrating can be peculiar compared to Bayer and maybe that has something to do with it? I tried the single and three pass settings included in demosiac and they didn’t seem to make much of a difference.

Super old school base curve edit:

New filmic RGB edit with the same white balance setting as the basecurve edit:

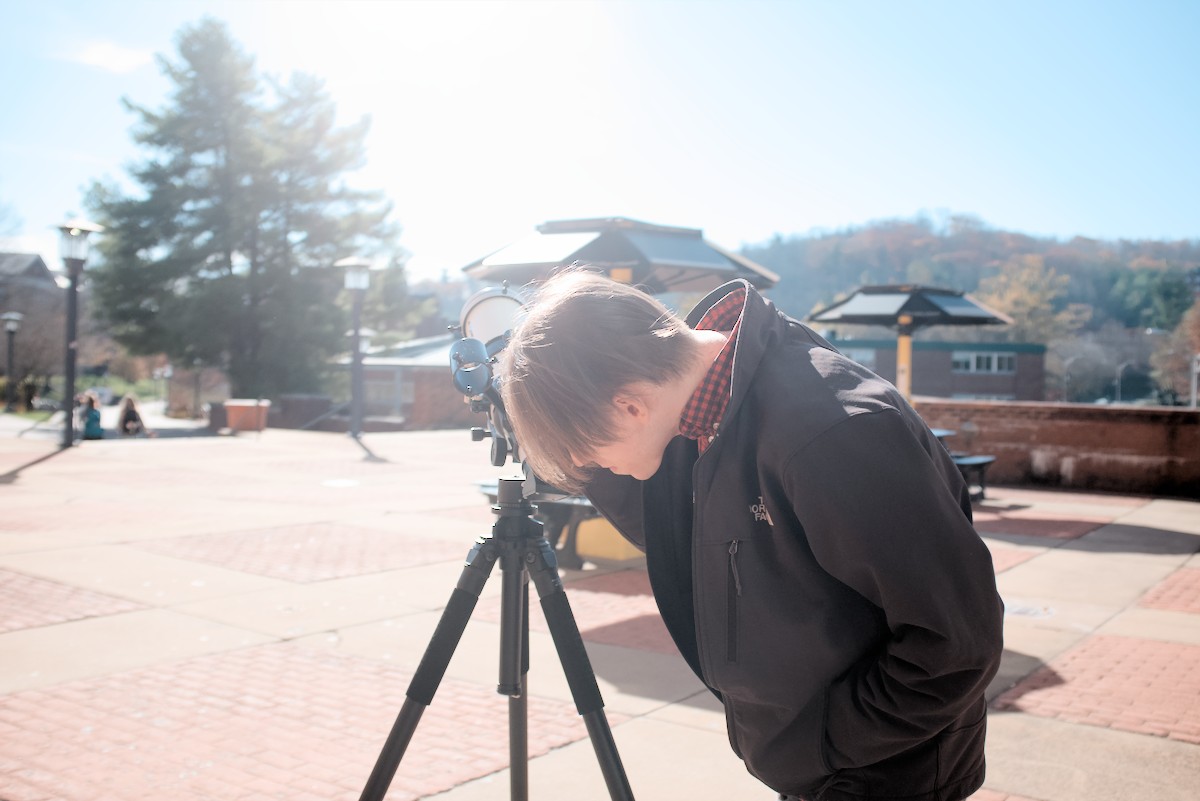
Filmic RGB edit with the white balance adjusted until the halos disappeared. Looks like you’re standing on the surface of the sun but those ugly halos around the tree are gone:

Also decided to tive RawTherapee a shot to see if it did the same thing and it does not.

Out of curiosity I went back and found another semi-backlit photo that I had edited with the 2.6.x version of filmic, duplicated it and tried to repeat the edit in 3.0 with filmic RGB. Old filmic did not produce halos at any white balance setting but the new RGB version wants a very warm looking white balance to prevent halos. Example below. Also shot with a Fuji, this time an X-T2. Please excuse the snapshot nature of these photos as they are just of my friends during some outings! They are not meant to be artistic portfolio-grade images!

Old 2.6 filmic edit:

New filmic RGB (RC1) with same WB and other settings as above:

New filmic RGB (RC1) with WB adjusted until halos disappear:

The effect on this image isn’t as extreme as my solar telescope viewing photo from above but it’s still noticeable. Check out the young woman’s sleeve on the right under the filmic RGB edit for the most obvious artifacting. The amount of warming required isn’t as extreme either. No RawTherapee comparison for this one either.

I’m attaching some XMP files below, along with the RAWs for you fine folks to look at. I’m sure I’m missing something or didn’t read some documentation somewhere! :stuck_out_tongue: Thanks for reading if you made it this far, hopefully something I typed up there is useful.

First photo (solar telescope)
Link to RAW file so I don’t use a lot of this fine site’s storage:

base curve edit
_DSF9414.RAF.xmp (5.9 KB)
filmic RGB with halos
_DSF9414_01.RAF.xmp (10.5 KB)
filmic RGB with extremely warm WB correction but no halos
_DSF9414_02.RAF.xmp (10.9 KB)

Second photo (street fair)
Link to RAW file so I don’t use a lot of this fine site’s storage:

2.6 version filmic
_LGH2119.RAF.xmp (16.4 KB)
3.0 RC1 filmic RGB with halos
_LGH2119_01.RAF.xmp (15.8 KB)
3.0 RC1 filmic RGB with warmer WB and no halos
_LGH2119_02.RAF.xmp (16.2 KB)

My first impression is that it is a highlight recovery problem because it is in areas where channels are close to or at saturation and there is little to no detail. As well, certain smooth gradients (e.g., the sky in the first image) seem to suffer from posterization. I think that filmic only reveals these issues and isn’t their cause.

1 Like

Yes, I think that it’s clearly something to do with blown out highlights. Unfortunately something I probably abuse since I like backlighting so much. :wink: Just curious as to why Filmic RGB either highlights this issue or causes this issue. Again, old 2.6.x filmic seemed to process it fine.

Could you try changing the norm used for color preservation in filmic and see if the halos disapear?

1 Like

I’d also say it really comes from highlight reconstruction. If you reduce exposure and play with different reconstruction algorithms, you can see hard edges forming even without turning on the new filmic. Here’s the best result (as a basis before further adjustments) I can get with DT 3.0 by changing the input profile (with expected color changes), carefully adjusting highlight reconstruction and then applying filmic:

For the girls, it already helps to reconstruct the highlights in LCh and adjusting the threshold accordingly.

_DSF9414.RAF.xmp (5.9 KB)

1 Like

Took the first picture and tried it with my workflow, made a quick screen recording during my edit.

  • Since it’s not my picture I take a look at the image information for sensor size and settings for ISO, exposure time and focal length
  • Then I check for clipped areas in the image
  • White balance
  • Use exposure to get the data into the histogram, keep a small safe distance to the borders
  • Highlight reconstruction
  • Dehaze (forgot to apply it before going to filmic RGB)
  • Filmic rgb
  • Applied a secret anti-clipping hack afterwards

_DSF9414.RAF.xmp (7.9 KB, darktable 3.0rc1)

4 Likes

@rawfiner ah, don’t know why I didn’t think of that! Never really had to mess with that setting in 2.6 filmic but changing the preserve chrominance setting from max RGB (the default in filmic RGB I believe) to basically any other setting really helps. Either setting this to “no” or “power norm RGB” seems to give the best visual results on the street fair with the two girls along with changing the highlight reconstruction module to LhC and tuning the slider.


_LGH2119_01.RAF.xmp (18.5 KB)

@matze thanks for pointing me in the direction of the color input profile. I’ve had to mess with that on some photos before but it has been a while. I changed it to Adobe RGB and used unbreak input profile to get things looking better before doing filmic RGB and achieved a much better result.


_DSF9414_01.RAF.xmp (17.3 KB)

I guess my original question of why this seems to only show up in 3.0 is still floating around though. I’ve never really had to mess with the highlight reconstruction module before and very rarely have I had to change the input color profile. Does this have something to do with fillmic RGB not interacting with old habits very well? I’ve been using Darktable for many years now and have developed a workflow that makes sense to me but may not play nice with the new tools. The old filmic gave me good results without having to mess with the color space too much either.

o.O … well I mean it works I guess, but retouching the sun out of the photo is a bit extreme for an anti-clipping hack lol

As long as nobody knows…:smile:

1 Like

Your problem is this: (enable the raw clipping alert to reproduce)

Your 3 RGB channels don’t clip at the same time and the first one to clip is the blue (which is unusual, but that’s why turning the WB to “super warm” fixes it). Between clipped areas, the transitions are harsh because that’s how digital sensors behave. The “halos” you see are not halos, they just are the hash transitions between valid signal and clipped signal. You see them because filmic RGB with chroma preservation modes retains these wrong colours (and eyes are super sensitive to small shifts in blue shades), whereas filmic RGB with no chroma preservation (which was the default mode in filmic v2) and base curve don’t and just desaturate highlights (but witness the shift to cyan in the sky), hiding the issue.

This what I get with switching the chroma preservation mode in filmic to “luminance Y” and the highlights reconstruction to “reconstruct color”:

_DSF9414.RAF.xmp (8,9 Ko)

5 Likes

Yes that looks similar to what I have in my secondary edit. Usually digital sensors are far more red sensitive than anything else and that channel is the first to clip. I guess I got lucky with this shot! Indeed “halos” is just the colloquial term around these parts, it’s caused by the sharp transition. The tree isn’t lit from the side facing the camera so it’s EV is very far away from the sky and sun behind it. Sensors are linear and once a photosite clips the data is gone and in this image smoothing that transition is the goal. My apologies for abusing backlighting so much. :wink:

Just to be clear filmic v2 you’re referring to is the one in Darktable 2.6? Filmic RGB in Darktable 3.0RC1 defaults to “max RGB” on my machine. I believe the version in Darktable 2.6 defaults to “no.”

I noticed you didn’t mess with the color input profile in your edits and left it on the standard matrix where as others and myself changed it to Adobe RGB. Other than clipping different parts of the color gamut to handle artifacts is there a logic to picking one over the other? I usually leave my cameras in Adobe RGB for RAW as it’s the wider of the two choices (the other being sRGB) so it seems logical to have Darktable use the Adobe RGB value here but that means another step and messing with the unbreak input profile module. Seems easier to just leave it on color matrix and change it if I have an issue with a specific file maybe?

Don’t do that if you can avoid it. Input profile has a specific purpose and it isn’t that. I suggested it in a thread a couple of years back as a break glass solution.

Yes that’s how I’ve used it in the past too. I had a couple of portraits where greens just went bonkers on the standard color matrix. Changing it to Adobe was the only thing that seemed to straighten the situation out. This was years and many Darktable versions ago though, well before filmic. Don’t think I’ve really used it since until this photo. I’ve not had nearly the color reproduction issues out of fimilic as the old basecurve model. I still use the basecurve from time to time for quick edits on snapshots, etc. Basically stuff where I probably would have been fine with an out of camera JPG anyway.

yes and yes.

The input matrix for your sensor is supposed to be the best option, provided your pixelpipe is not messed up somewhere. Using Adobe RGB is a nasty trick so hide issues since your camera RGB space is most likely much larger and has different primaries.

No you don’t. The sRGB vs. Adobe RGB choice affects only the JPG file, your raw file is not colour-corrected in any way (that’s what they mean by raw), and you need to apply the corresponding colour profile in software.

I thought JPG didn’t support AdobeRGB? Maybe that was years ago or maybe some display software/browsers didn’t play nice with it? Wouldn’t the selected color space effect the display and gamut clipping on the RAW? It’s encoded in the exif but I guess that’s to assist some software with displaying a reasonable JPG approximation in preview if you don’t want to use their embedded JPG preview?

Edit: I seem to recall some hub-bub about Nikon cameras doing some automatic dark subtraction or correction that you couldn’t turn off back in the D200/D300 days. Even on the alleged RAWs. Kind of blew up in the astrophotography world and between that and the D20a Canon locked that market down for a while. I was still in school/grad school at the time and using a monochromatic sBIG CCD to gather data so it didn’t impact me much. I just used my D70/D200 to make pretty pictures. I can’t remember many details as that was over a decade ago now! But there was some debate back then over whether a RAW truly was “RAW.”

Indeed, this is how I used it. It was a long shot to try and achieve a reasonable looking result from a file that my normal processing routine didn’t work on. Not sure what the ultimate issue was as I delivered the edit and moved on. The trick produced a usable result. I don’t mess with the processing pipeline and I don’t think you could in that old version of Darktable if memory serves. At least not without a source edit and recompile.

Last night I ran onto this issue, too. I wanted to test-drive the 3.0.0 and took some RAWs from Nikon J1 I used to have, which had crop 2.7 sensor and thus was very prune to clipping. When I start fiddling with them I discovered that I could not use Color Zones together with Filmic RGB at all: even slight adjustments (I sometimes use it to darken the sky or to pop up some details, things like that) immediately led to ugly artifacts (mainly on the sky, of course) due to a strong clipping somewhere in the pipeline. I thought that maybe the module was broken, but having read this discussion I realize the nature of the problem. I think I should probably play with it some more, taking care of clipping.

1 Like

Glad my stupid questions can be of help to some other people too! There seem to be a lot of changes in Darktable 3.0 and some of my old editing tricks do not work as they used to.

As an aside during this testing phase I’ve also been trying out RawTherapee as it’s been a quite a few years since I’ve looked at it. It has been giving me some good results with a little less work on my Fuji files. Not to knock Darktable, it’s still fantastic. I just like to poke around and see what other folks are up to every once in a while.

4 Likes