Shine Stacker at the moment can only read tiff (8 and 16 bits) and jpg. Reading RAW files with python requres care. I have attempted something, but incorporating RAW into Shine Stacker would require a bit of work.
Hello Luca!
Helicon is clearly optimized to use multiple CPUs and GPUs
Yep. I know. No other software can beat Helicon as regards the speed of conversion ![]()
Joking aside, I own also Zerene stacker which I truly appreciate. Sometimes it gives better results than Helicon. Therefore, I use both “in tandem”.
Helicon is so incredibly fast that usually I start with this software to see the result and only later I use Zerene.
In the veeery long past, I took my stacks as RAWs (Nikon D850 plus Nikkor macro lens) .
Afterwards I converted these images as TIFF (16 bits) with RawTherapee.
Nowadays, quite often, to speed up the process, I use only the jpeg (whereas I store the Raws “as backup”).
From my past little (and very personal…) trials and errors there is not such a huge difference, as final results and the whole process is so much easier and fast with jpeg.
After the conversion with RawTherapee every single 16 bit Tiff (from Nikon D850 Nef files) was around 180 mb.
For very big stack (e.g. the head of a dragonfly) my final images numbered often around 200-300 images…
As usual, it ALL depends on how many stacks you have to work with and, needless to say, the time you can spend on them… ![]()
Yep. According to the FAQ [1] on Zerene taking a stack on RAWs is not even the “ideal” way…
Helicon, contrary to Zerene, allows to work with RAWs
As of today, personally, I only use JPEGs for my stack; no longer TIFF 16 bits (from Raws), as I did in the past…
Raws images require a very beefy hardware and a much longer process…
Hello Luca (once again) ![]() !
!
I own a github account myself but, “for public use”, I prefer to post here the links. Maybe, someone else, can take advantage of them…
All in all, these stacks were only some quick experiments of mine to test a new camera (Z6-3) in conjunction with Snapbridge (the app of Nikon to tether you images directly with a smarphone. e.g. Android one)
No password needed to download these ZIPS; you do not need either a personal account with Dropbox: just click on the “arrow icon” (right upper position) and, later, click on “continue with downlod only”.
In a week or so I am going to delete them in order to free some space on my Dropbox ![]()
I have tested myself both of them (Firefox web-browser) and they work (download succesful).
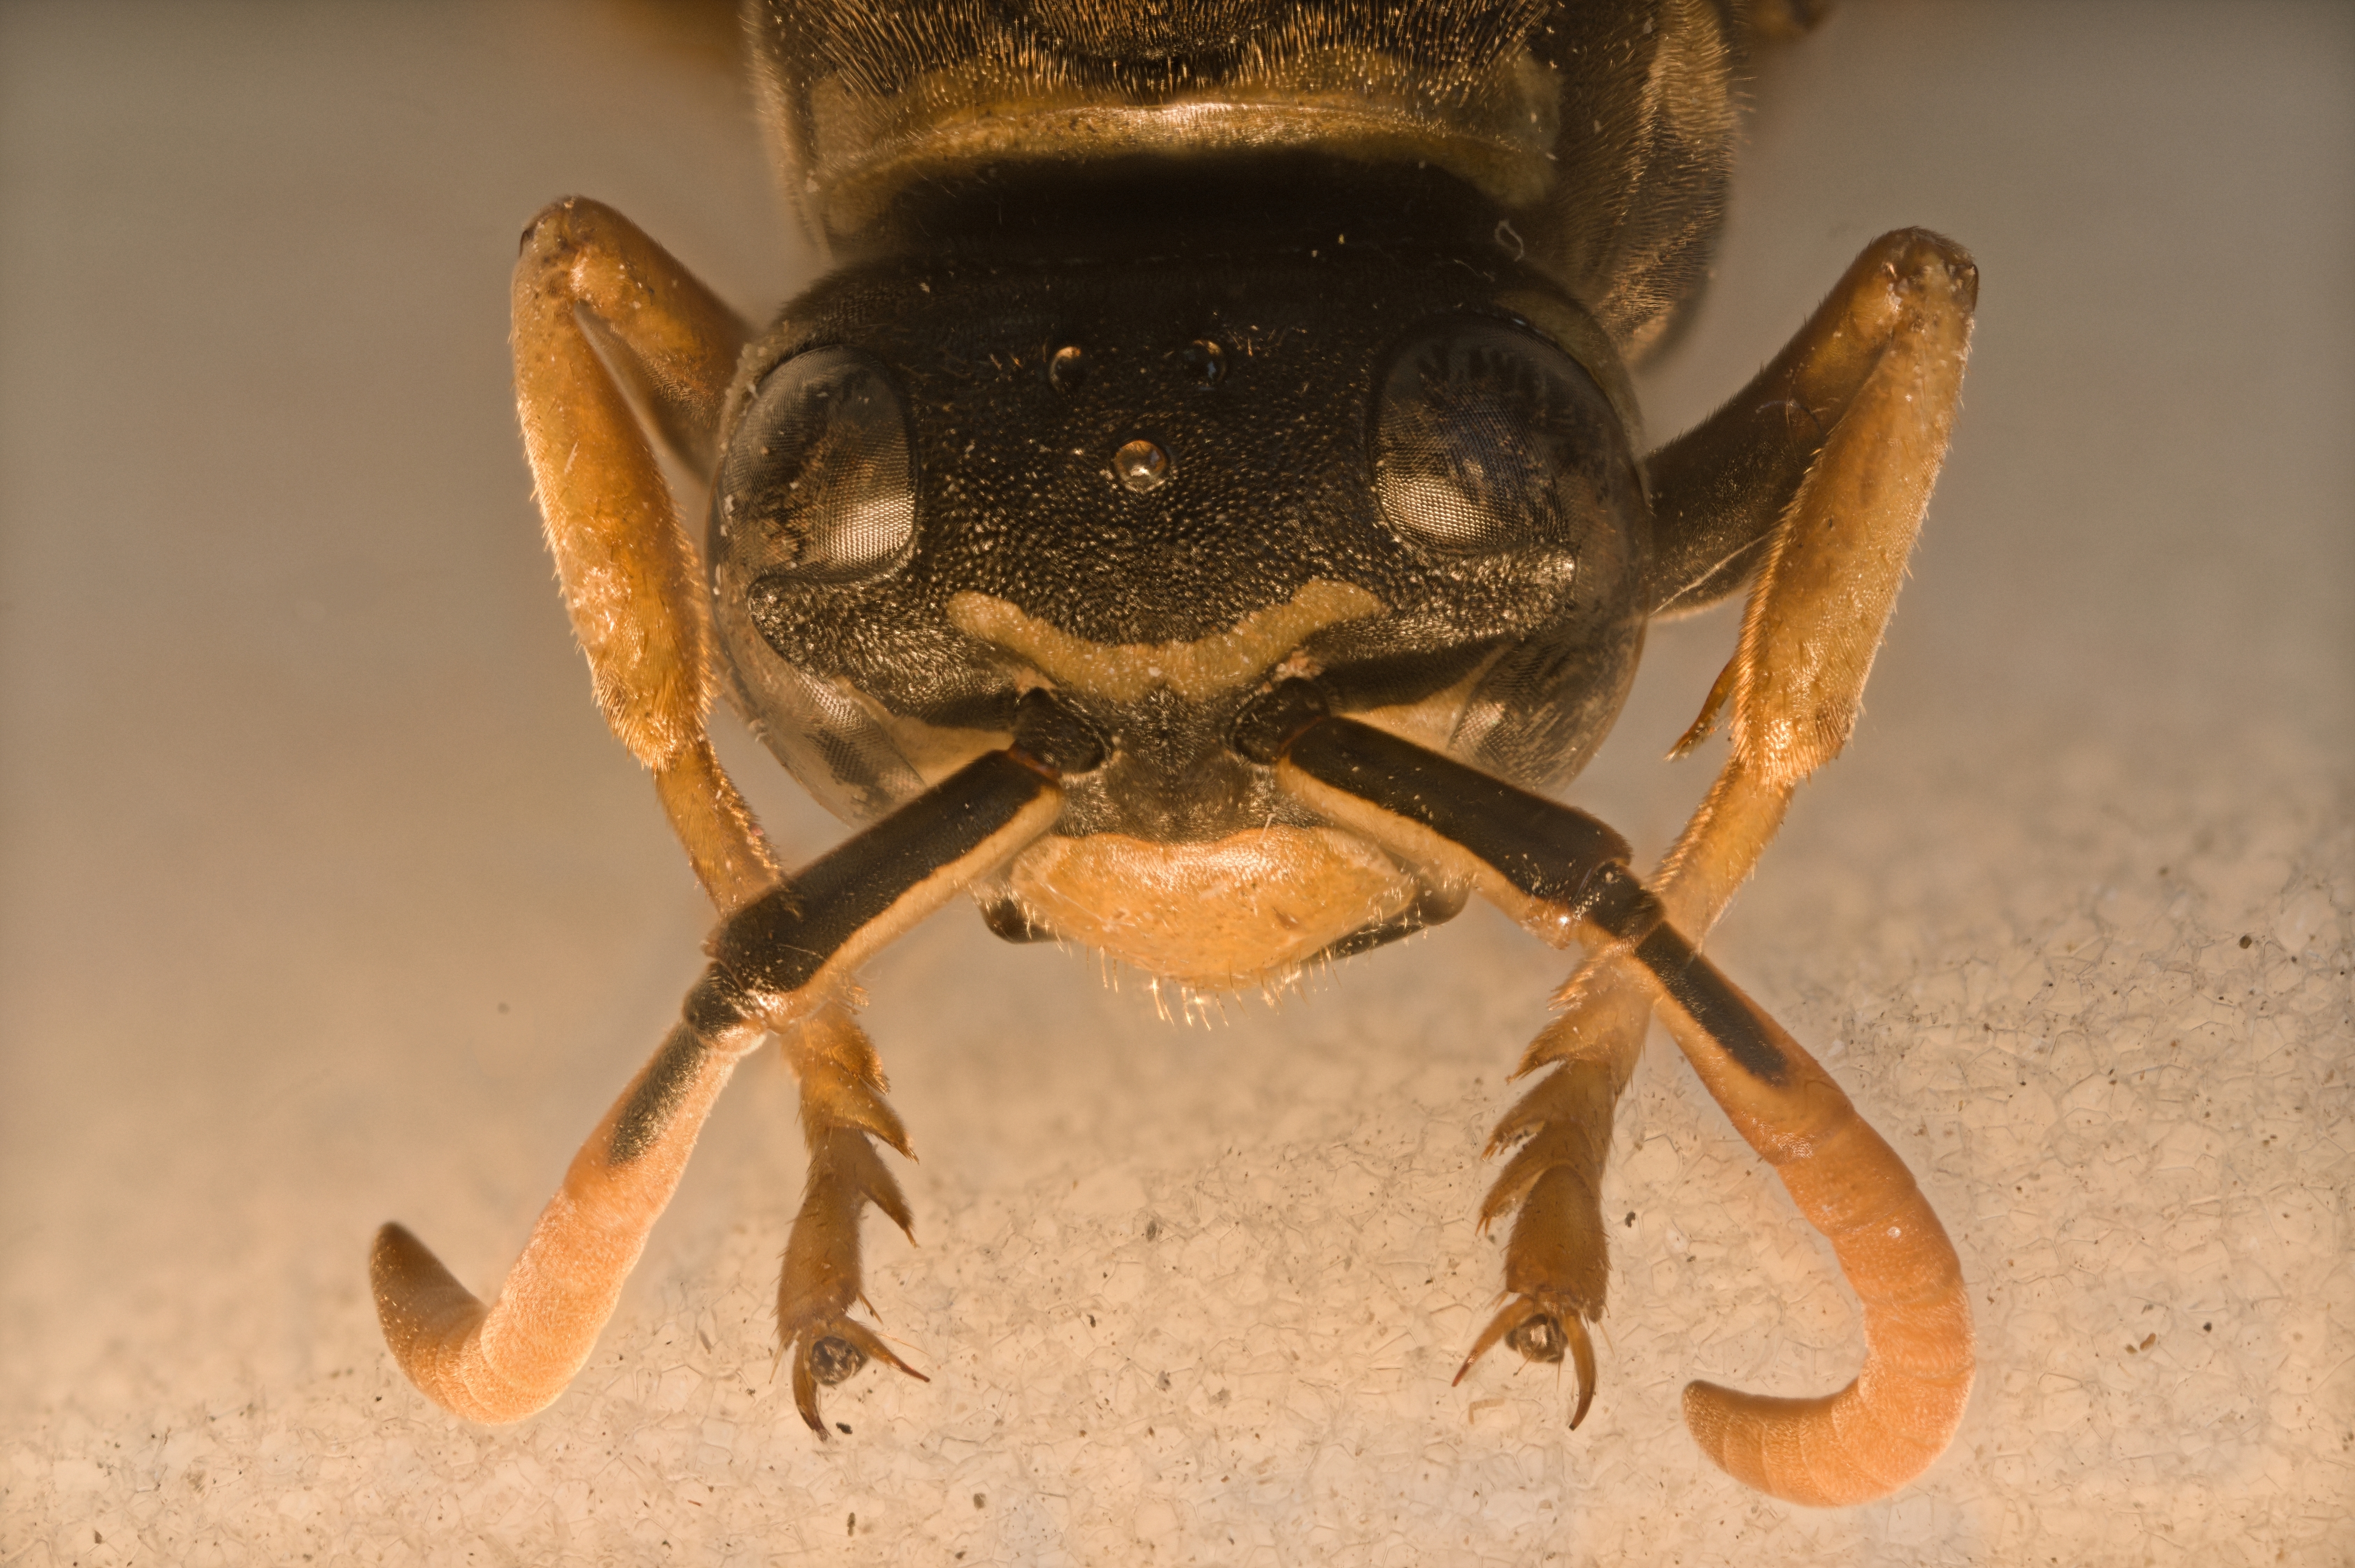
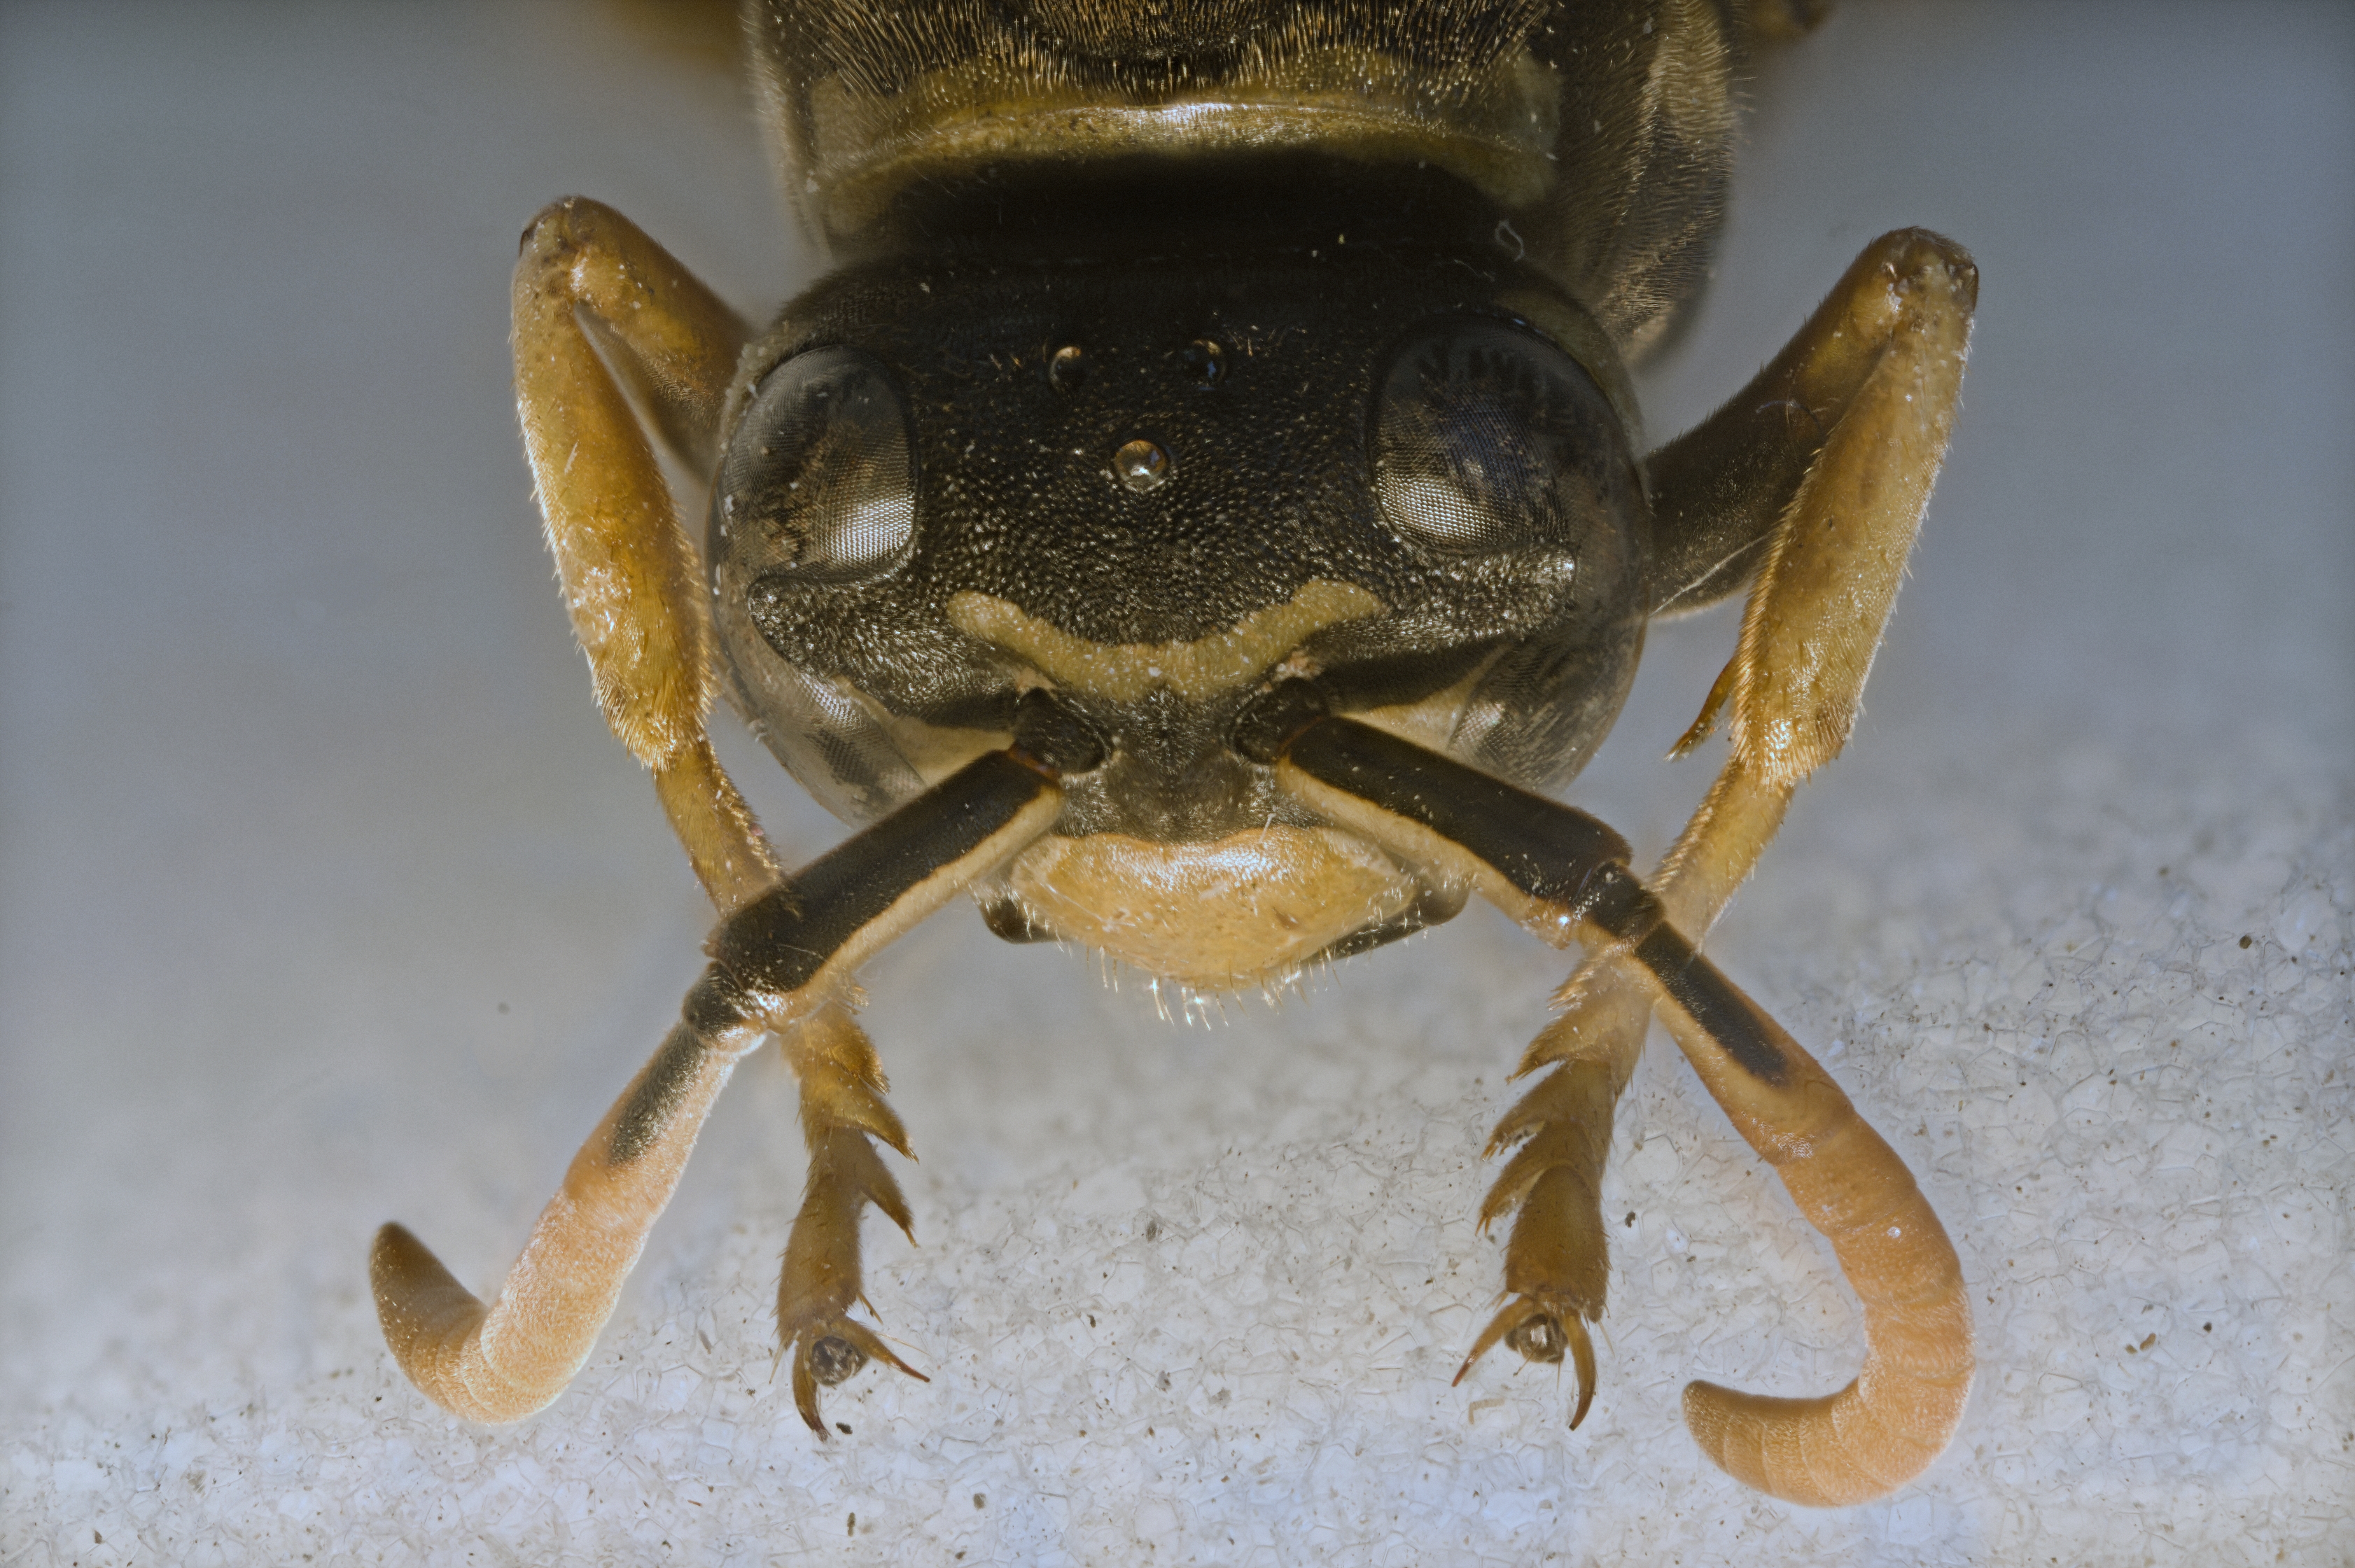
Here is the Dropbox link for the wasp stack (ZIP foder - 605 mb with 88 jpeg):
Here is the link for the fly stack (ZIP 638 mb - 93 jpeg):
https://www.dropbox.com/scl/fi/f0digp3h586hm1uxodg3s/STACKING_MOSCA_CAPO_29-aprile-2025.zip?rlkey=zqsit2fotqi16dx8mwql36vdy&dl=0
1 Like
Silvio, the issue is that each individual frame has a very small focused area. I can reproduce the issue, let me try to tweak the alignment option, when I have a bit of time.
Some time ago I had a similar situation where both Helicon and Zerene failed, and I could only align with PhotoShop, then I passed the aligned frames to Helicon.
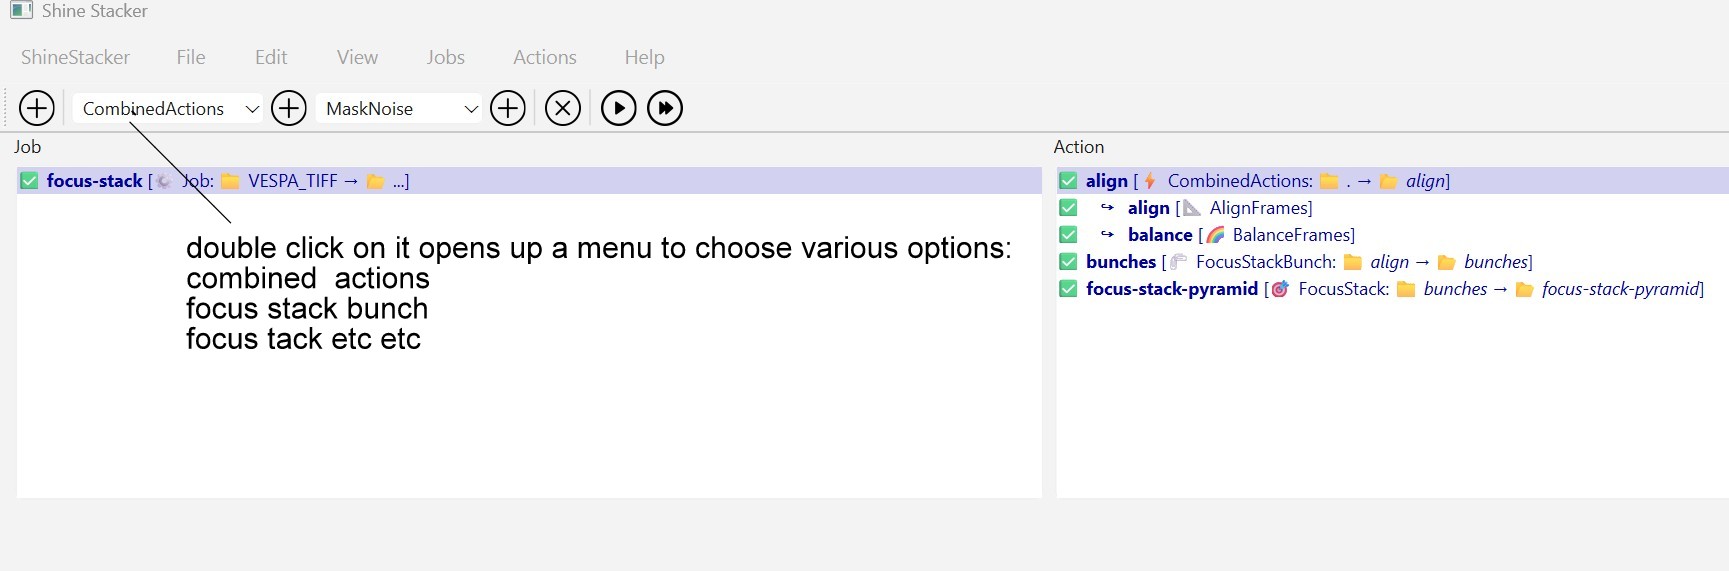
Silvio,
the problem is that the alignment algorithm uses as reference, by default, the middle frame, and probably that is not the one with the best quality.
Here is how I procceded:
- I removed the first 11 images, they are mostly blurred and just contribute with some noise
- Select “View” > “Expert Options”
- double click on “align [CombinedAction]”, and set “Reference frame index” = 76 (start aligning from the last frame, which is the one with more details)
- double-click on “align [AlignFrames]”, and select the following (but probably also other combinations work fine):
- Detector: AKAZE, Descriptor: AKAZE, Subsample factor: 4
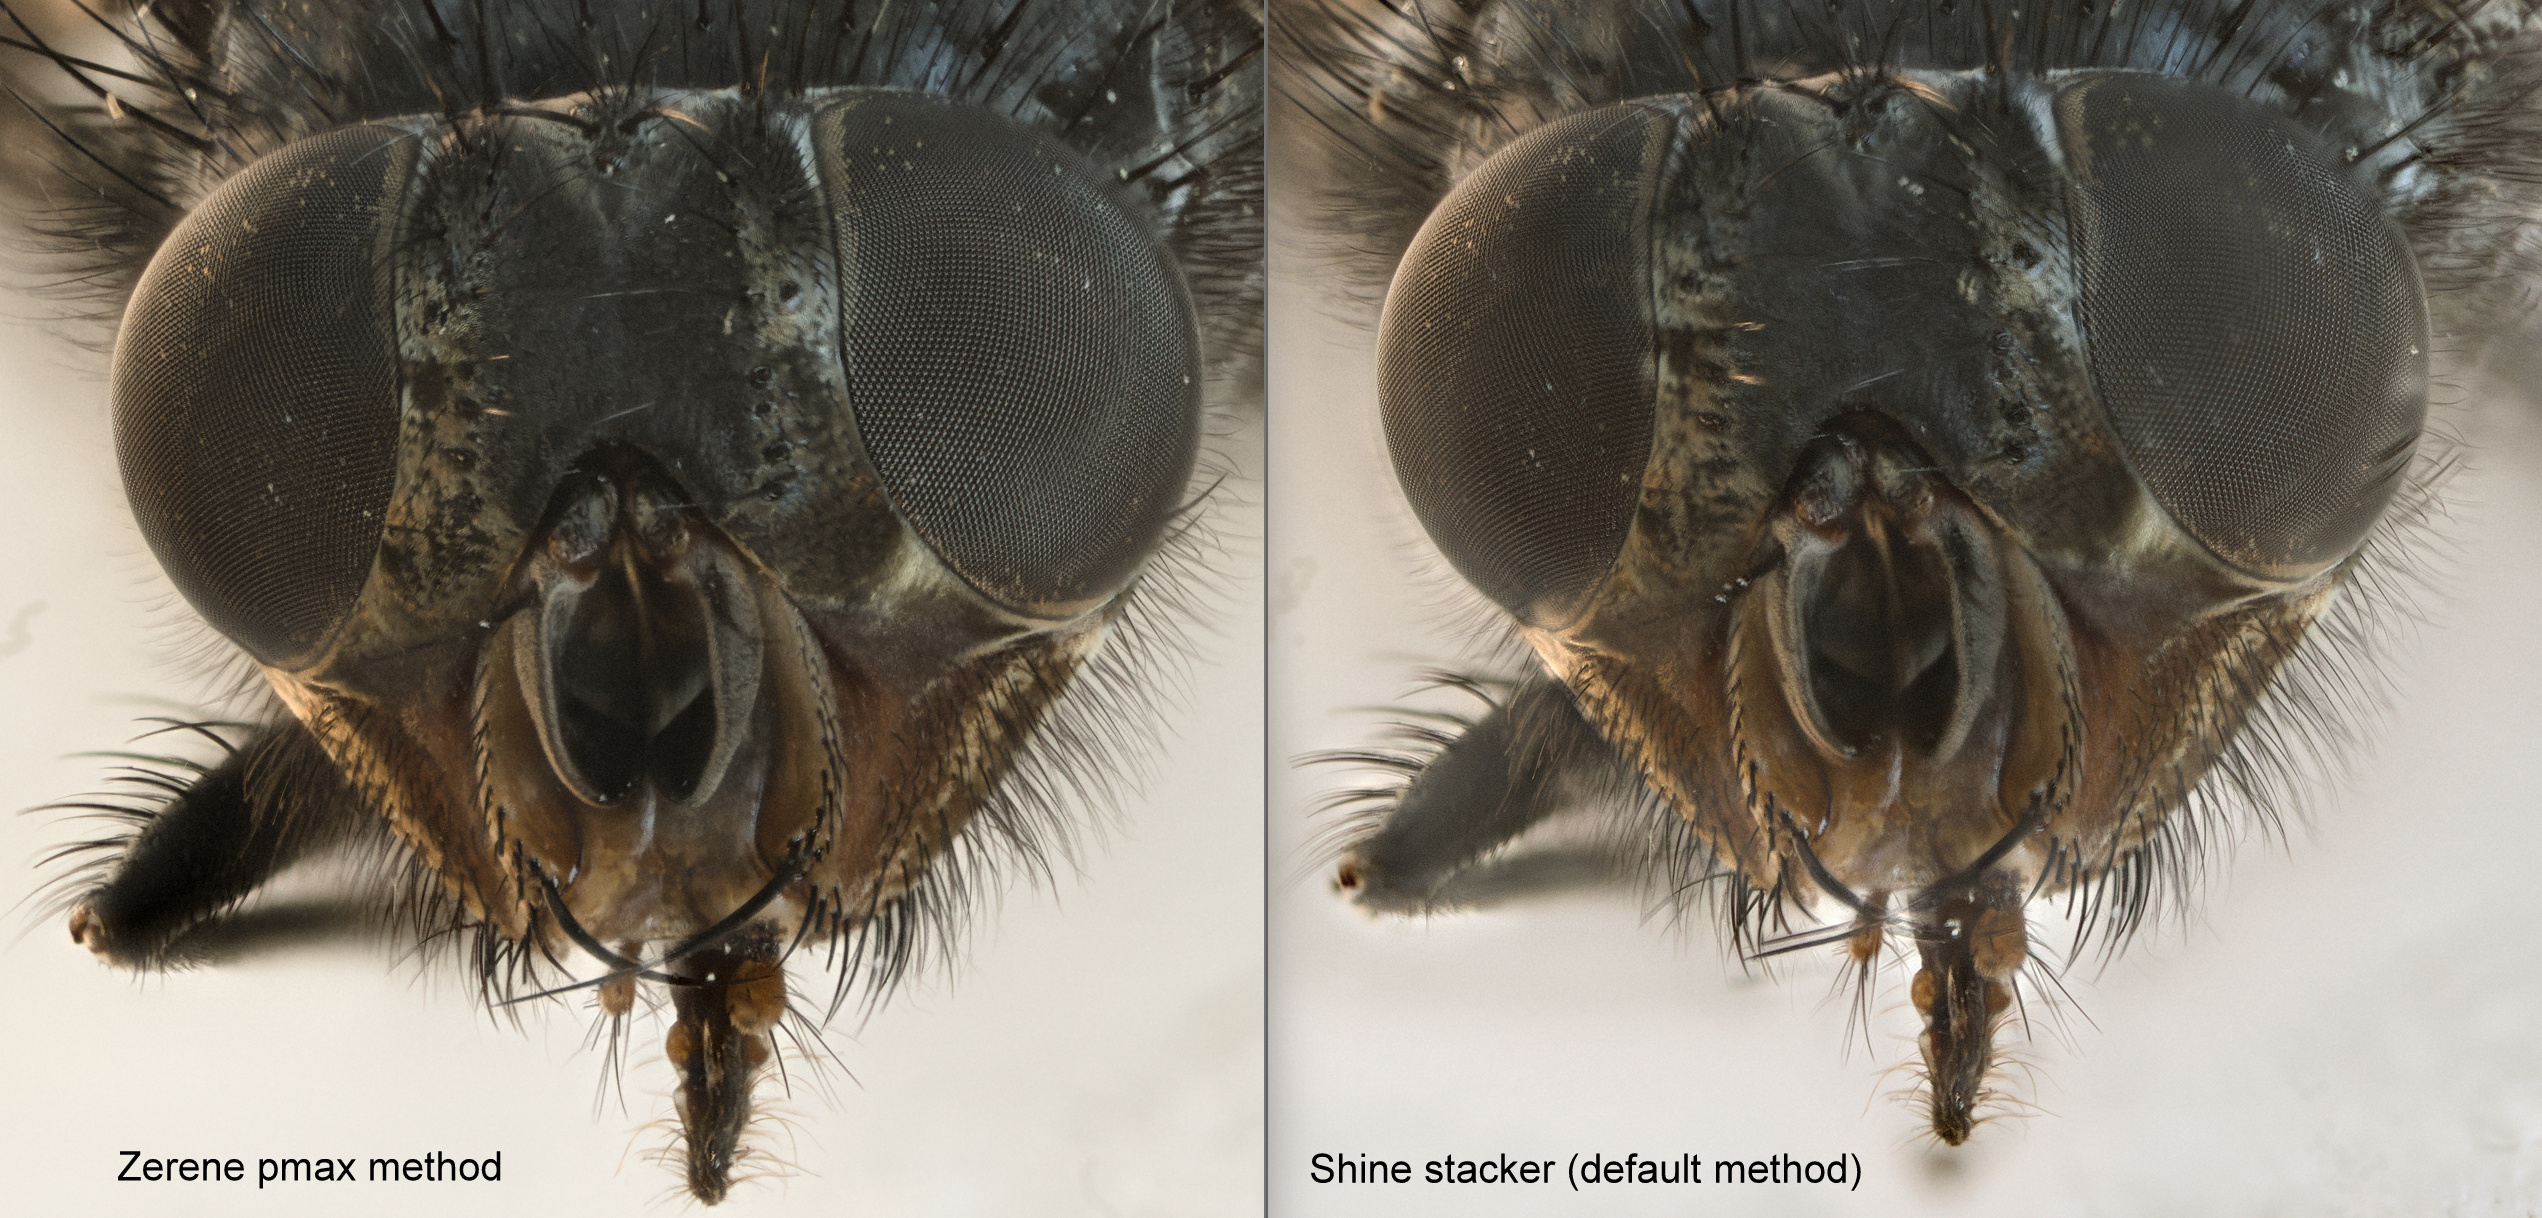
The composite image below is what I got. You can also remove the “ghost” traces of few black spots on the sensor using the retouch interface.
I hope it helps.
Probably there are better ways to automaize the treatment of those cases, I have to think about and I may add more features in future releases.
Thank you for this feedback, it helped me to improve Shine Stacker.
the problem is that the alignment algorithm uses as reference, by default, the middle frame, and probably that is not the one with the best quality.
Wow.
Thanks a lot indeed! ![]()
1 Like
I have just tried (Windows 11) to double-click on CombinedAction but it doesn’t open up the window to set these parameters (detector, descriptor etc).
Instead it opens up a list of options…
Hi All,
thank you again for your feedback and suggestions. It was really useful to improve Shine Stacker.
If you have time, you may want to try release v1.2.0:
I added a number of features, in particular parallel processing and limit to memory usage, and a number of fixes:
- Implemented parallel processing for pyramid stacking algorithm
- Optimized pyramid algorithm: selects automatically the best strategy within the given memory budget to avoid memory issues in case many pictures are selected. Explicit configuration is also possible for specific needs
- Implemented automatic subsample option for alignment, balancing and vignetting, now default
- HLS and HSV corrections now supported for 16 bit images
- Added luminosity correction in the LAB color space
- Alignment module skips frames if transformation parameters are out of a reasonable ranges
1 Like
Hello Luca,
Thanks a lot indeed for this new version
It is really appreciated ![]()
Here are my specs for testing:
Operating System: Windows 11 Home 64-bit
CPU Processor: 12th Gen Intel(R) Core™ i7-12700H (20 CPUs), ~2.7GHz
RAM Memory: 32768MB
GPU Card name: NVIDIA GeForce RTX 3070 Ti Laptop GPU
Samsung SSD
I have tested more stacks (both from jpeg and tiff images) and with the bunch-stack option enabled they usually work great as final results.
Just a few notes though:
Testing the stack of the fly (see my dropbok link above to download the ZIP) this new version runs out of memory.
I am still “forced” to enable the bunch-stack method to complete the process.
Therefore, just out of curiosity: why you do not set “as default” this option to alwasy apply the bunch-stack?
Now you are supposed to enable it (by ticking on its box)
With the bunch-stack there are still more artifacts compared to Zerene.
Unfortunately, I don’t get how to modify the “expert options” (combined-actions) you suggested previously and I am “forced” to use the default methods
Here is the comparison:
I don’t understand how to work with the brush on the retouch module.
I looks like it acts as some kind of “smudging”. For instance, like the brush option with GIMP?
In addition, I have noted that if you white balance the image (with the filter) and you use the brush, later on, after the white-balance you get the colour of the images (layers) not white-balanced (in short at this point you “paint” on the image)
Very minor glitch: In the retouch module you always see some
artifacts (gray lines) when the brush move outside the window with the image. It was present also in the previous version
All in all, great improvements indeed. ![]()
The application now runs much faster and it works great on most stacks I have tried
Sorry for the long post.
I have thought to write this message on your github web-page but maybe, on this forum instead, It might be helpful to other users as well.
Thank you very much Silvio. I will give a look, but not immediately, because this weel I will be back to work, and this is my spare-time project ![]()
I suspect the artifacts you see are due to alignment, I have to download this sample too from dropbox and test it.
The memory estimate is somewhat approximate, you should be able to tune it (but you need Expert options, I don’t know why you don’t see it…).
I will try to test on Windows, so far 99% of my tests are on macOS.
Will update you as soon as I have more news.
Sure! Take your time: there is no hurry whatsoever ![]()
Hi Silvio
just a quick look at your fly stack.
The artifacts are again due to alignment issues. Below what I obtained using again as reference the last layer (#92, counting start from 0. Maybe I have to write this more clearly). I think I have to work in order to automatize the choice of the reference frame. I unerstand that it is frustrating to pick the reference frame by hand if
I had to apply a small patch that will be in next release that skips layers with <2 matches (at the moment the run stops), because the very first frame have almost no focused areas. With 1.2.0, you can take out the very first frames from the folder.
If I set 8 GBytes as memory budget for stacking (default), memory goes up to about 16GB on my macOS with no bunching, so there is definitely some extra overhead that I have to better estimate. But if you have 32GB RAM you should have no problem, so I have to make some tests on Windows and understand if there .
3 Likes
Hey @Luca_Lista I am super glad that you’ve come to share this app with us. Its a bit of a weak spot in the FOSS photographic workflow. Our community is really good at identifying opportunities for improvement. Never be in a rush, all of this is hobby for all of us. Welcome!
6 Likes
I tried to align with no subsampling (8:21 minutes + 3:28 of stacking; alignment is not parallel at the moment, it would require a non trivial work).
The resulting image is not substantially better.
I gave a look at individual frames, and probably you could work on your setup to get a sharper image.
I see you use 1000 ISO and 1/15 s. Maybe you could try to go down with ISO. I use ISO 100 on my Canon 5D Mark II, longer exposure time, so I can play with aperture to have a sharper image. I have a home-made artificial light system with cheap chinese leds.
Thanks for the tip ![]()
Once in a while, I also take advantage of artificial lights (mostly by way of a fiber light)
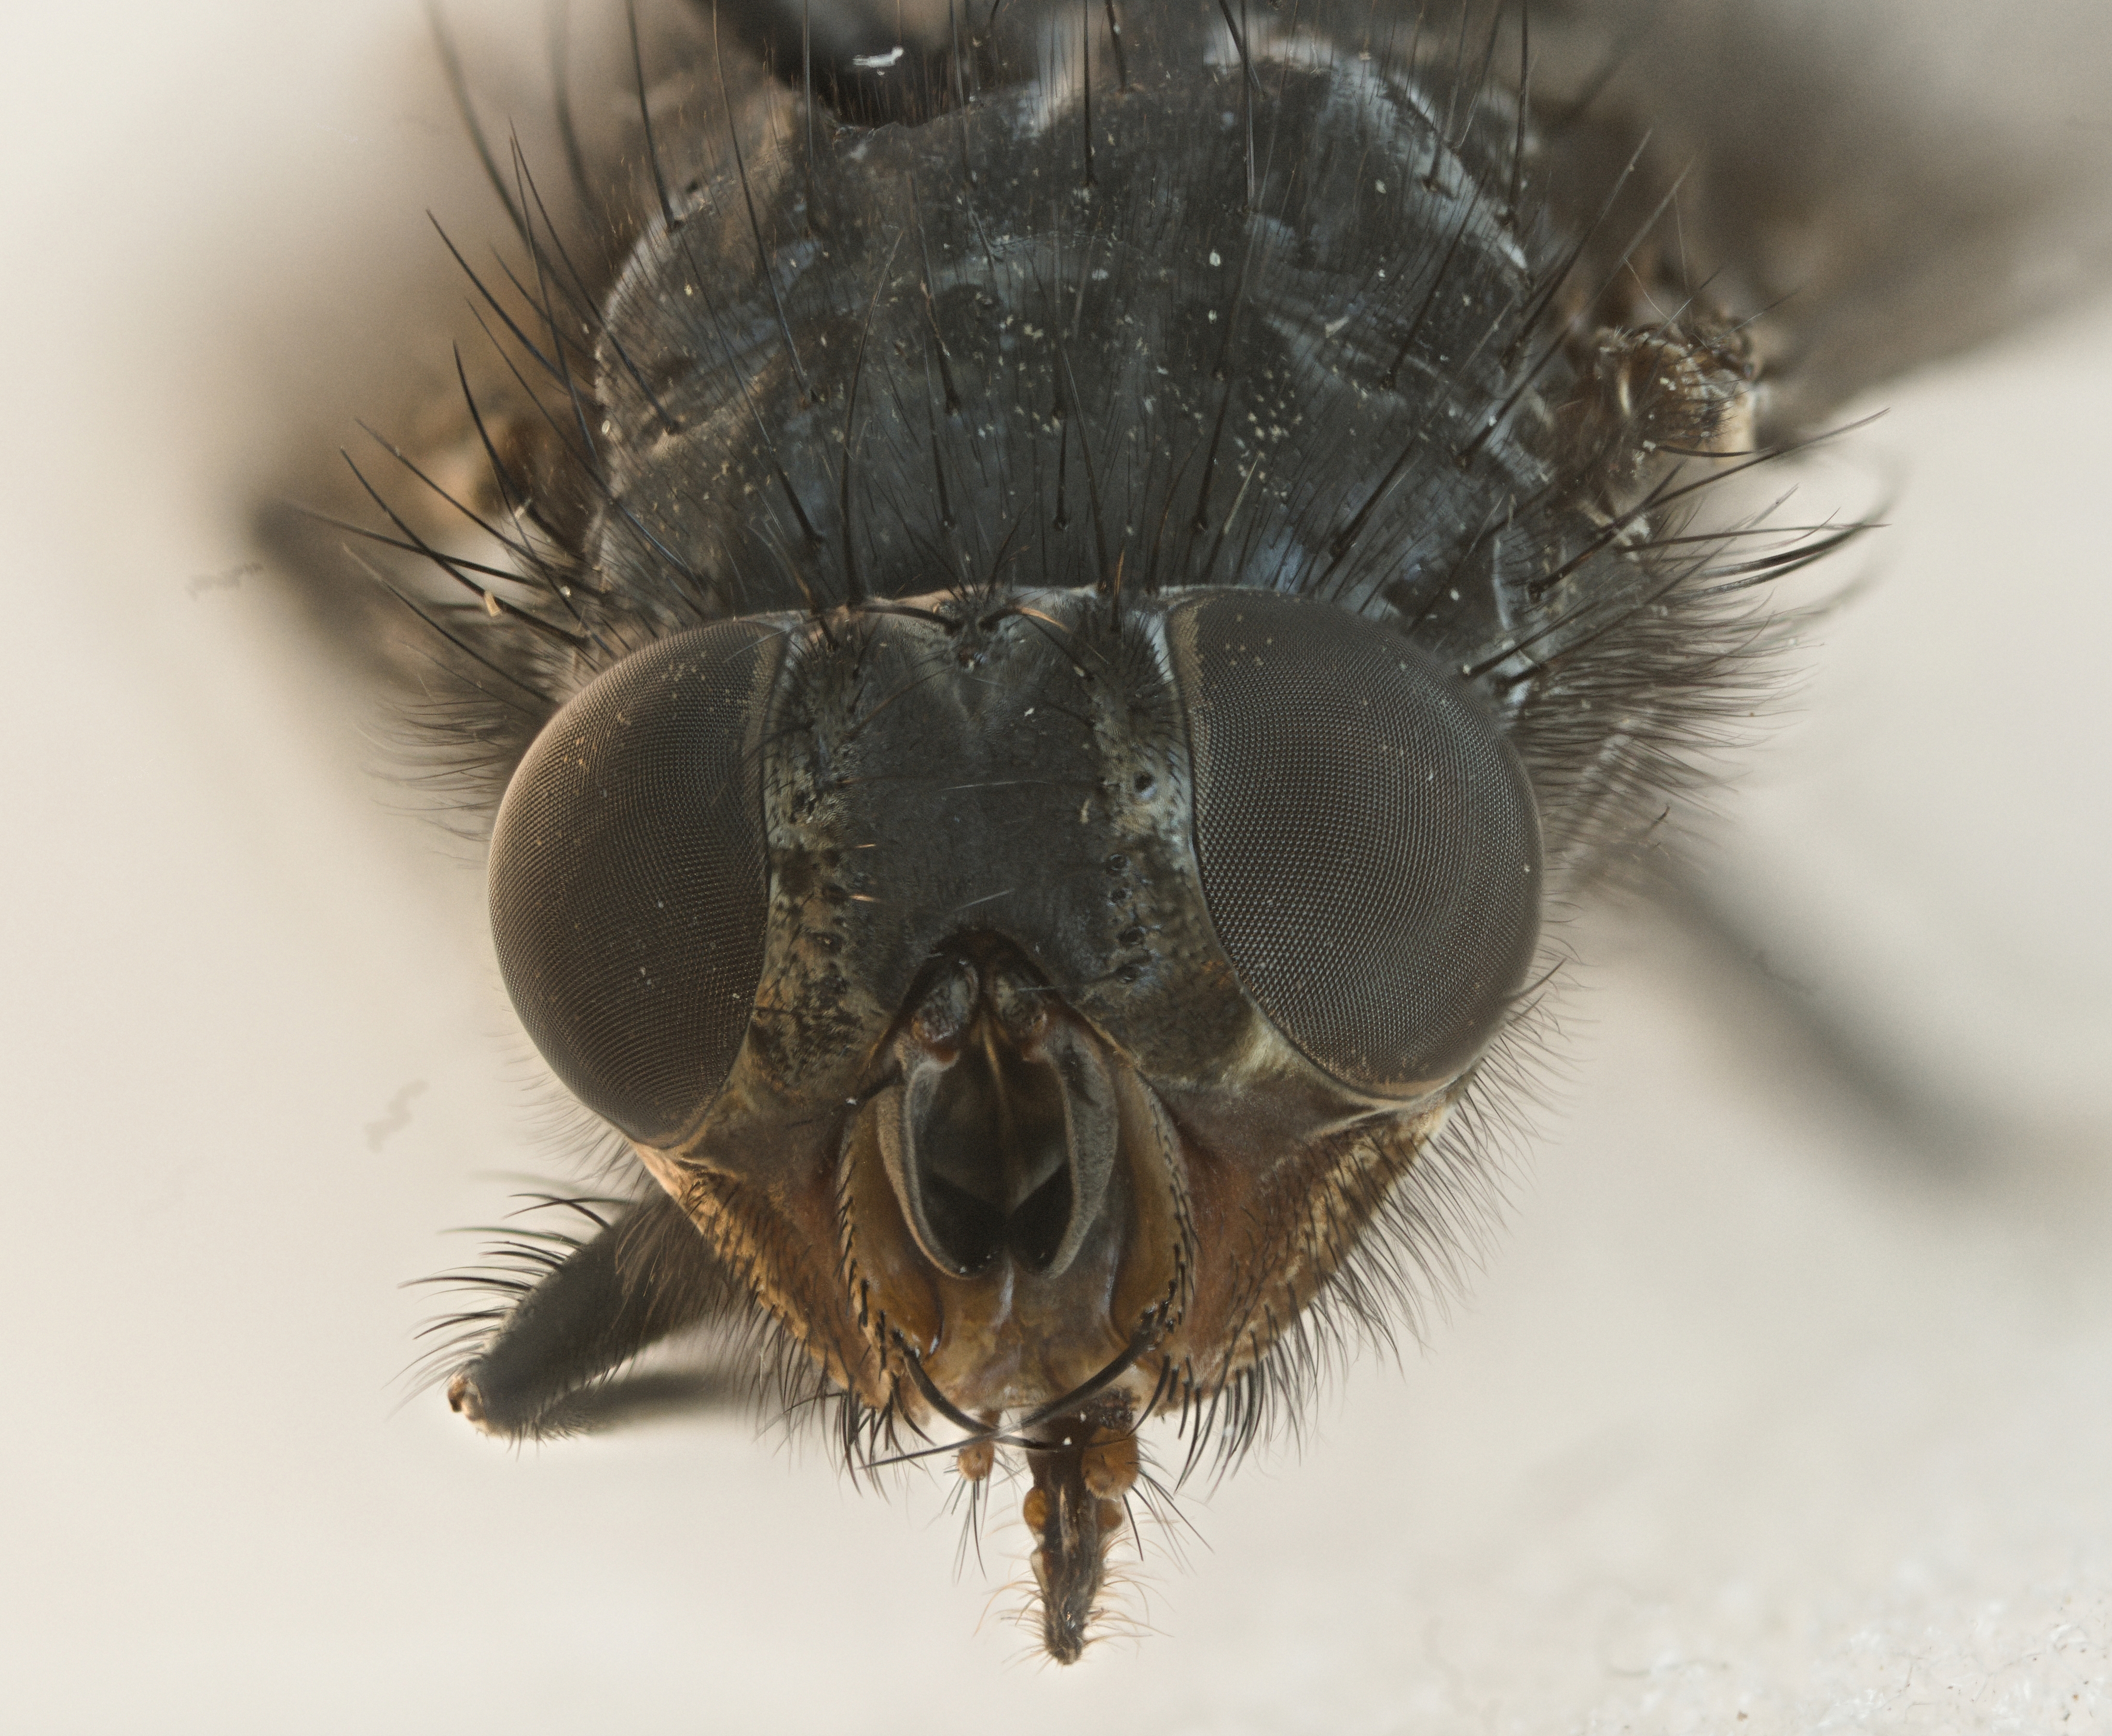
However, this specific fly was photographed with the natural light of the nearby window. Hence the high ISO.
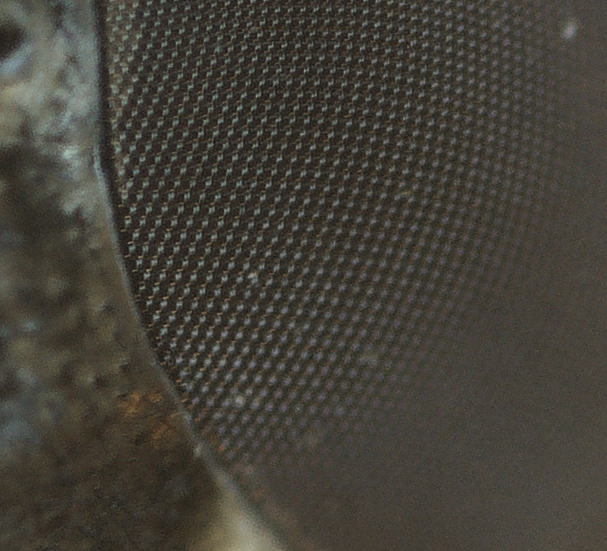
With artificial light, for instance, with insects, I often find it difficult to preserve the structures of their eyes (“onmatidia”). They got “burned” whenever I don’t pay much attention to my setup (power of lights, deflectors etc) .
With artificial lights I often correct the white balance in post-production (Nikon RAW - NEFs with RawTherapee saved as TIFF).
Never used a flash instead for macro stacking (only for photography with Godox stuff). Some of my colleagues do it with very good results.
Hello Luca,
Just tried today’s new version 1.2.1
It works extremely well and it also super fast compared to the previous versions. It is also quite stable on Windows (no crash whatsoever so far).
THANKS a lot for your hard work. It is really appreciated.
For instance, I hav tried with a stack of 80 images (Tiff 8 bit - 45 mb each): nothing fancy, just to test your software. E.g. the initial white balance was off.
I work with a Schoot powerful fiber optic light - its lamp of 250 watts: I find it very time consuming to get the WB right, just out of the box. Having the RAWs images allows me to do some post processing stuff…
Unfortunately I still don’t undertand how to use the expert mode (unable to open the window with their settings…).
Currently, with the standard settings the results are mixed in that I often get “misaligned” stacks
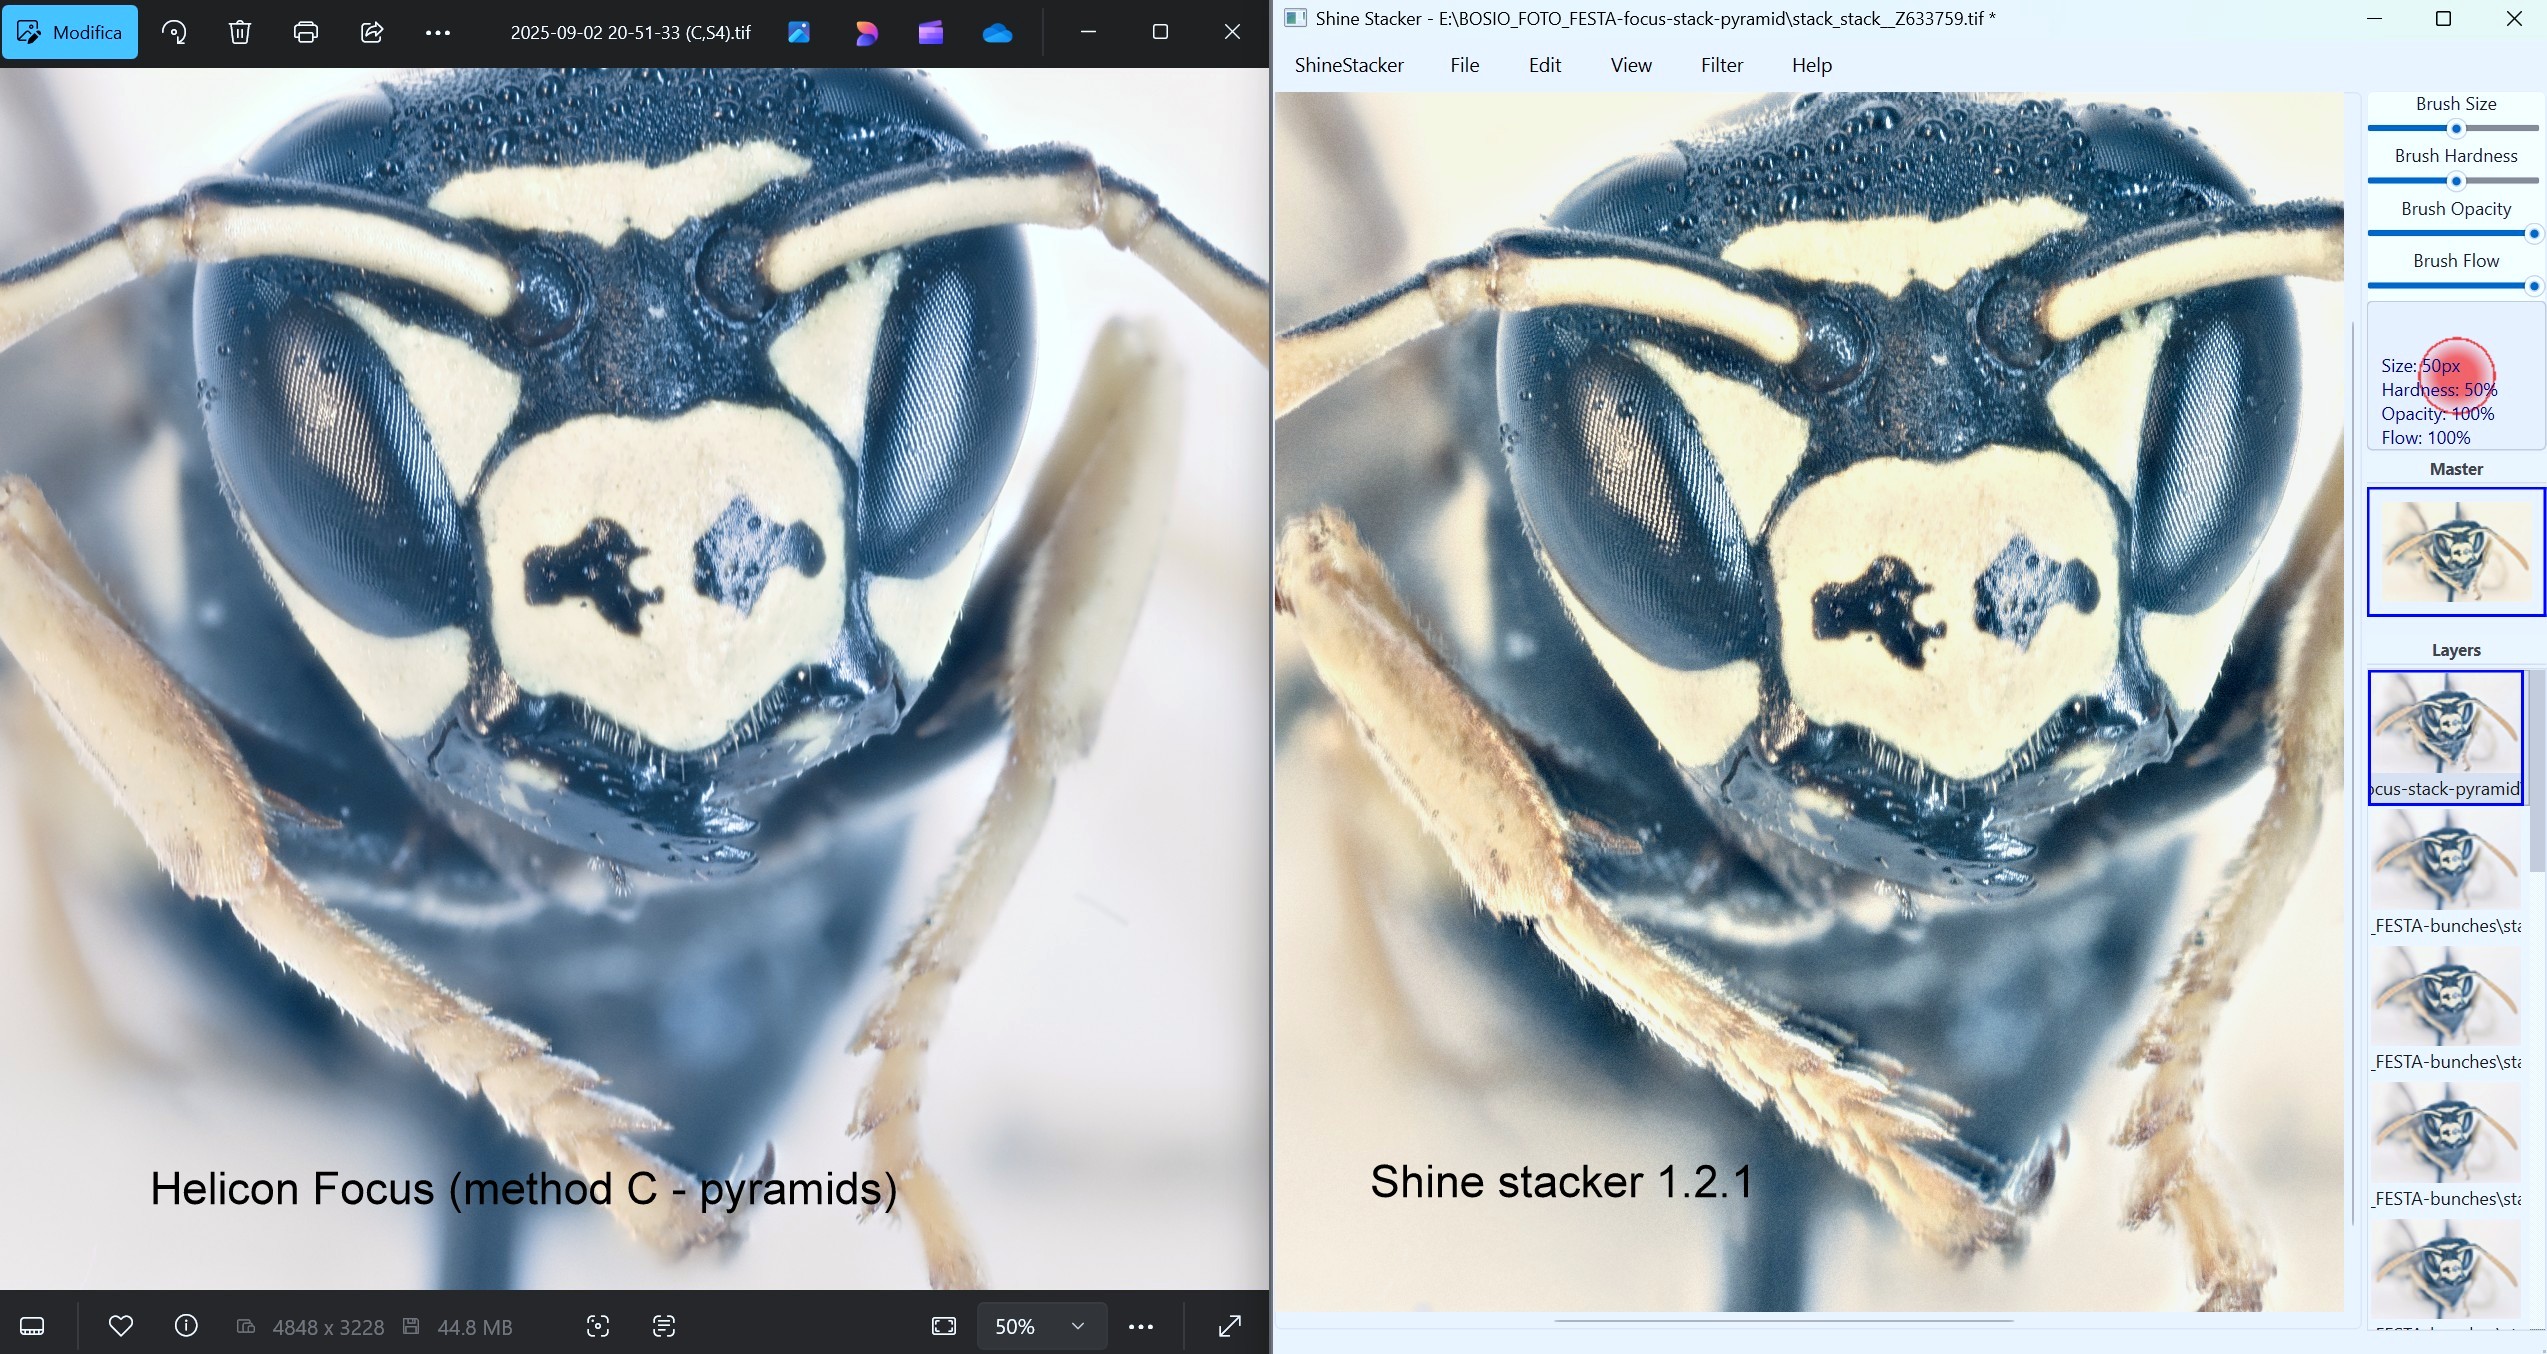
For instance: here is the compairison with the above mentioned stack: Helicon Focus vs version 1.2.1:
Just out of curiosity…
Taking a look at the pictures of your web-site I am wondering whether you also experiment, once in a while, with some “ultra” macro. E.g. 5:1?
Usually it means having 100-200 shots per stack.
Anyway, Thanks a bunch again for your work.
It is incredibly amazing you are developing this powerful software in you spare time ![]()
1 Like
Hello Luca,
Just tried again Shine Stacker 1.2.1 on the same stack.
Now it works in that the images are aligned.
Didn’t know what occured previously…
Thanks a lot again for your efforts ![]()
BTW, I have also tested Picolay (newest version, 31 August) which works extremely well as well with this same stack.
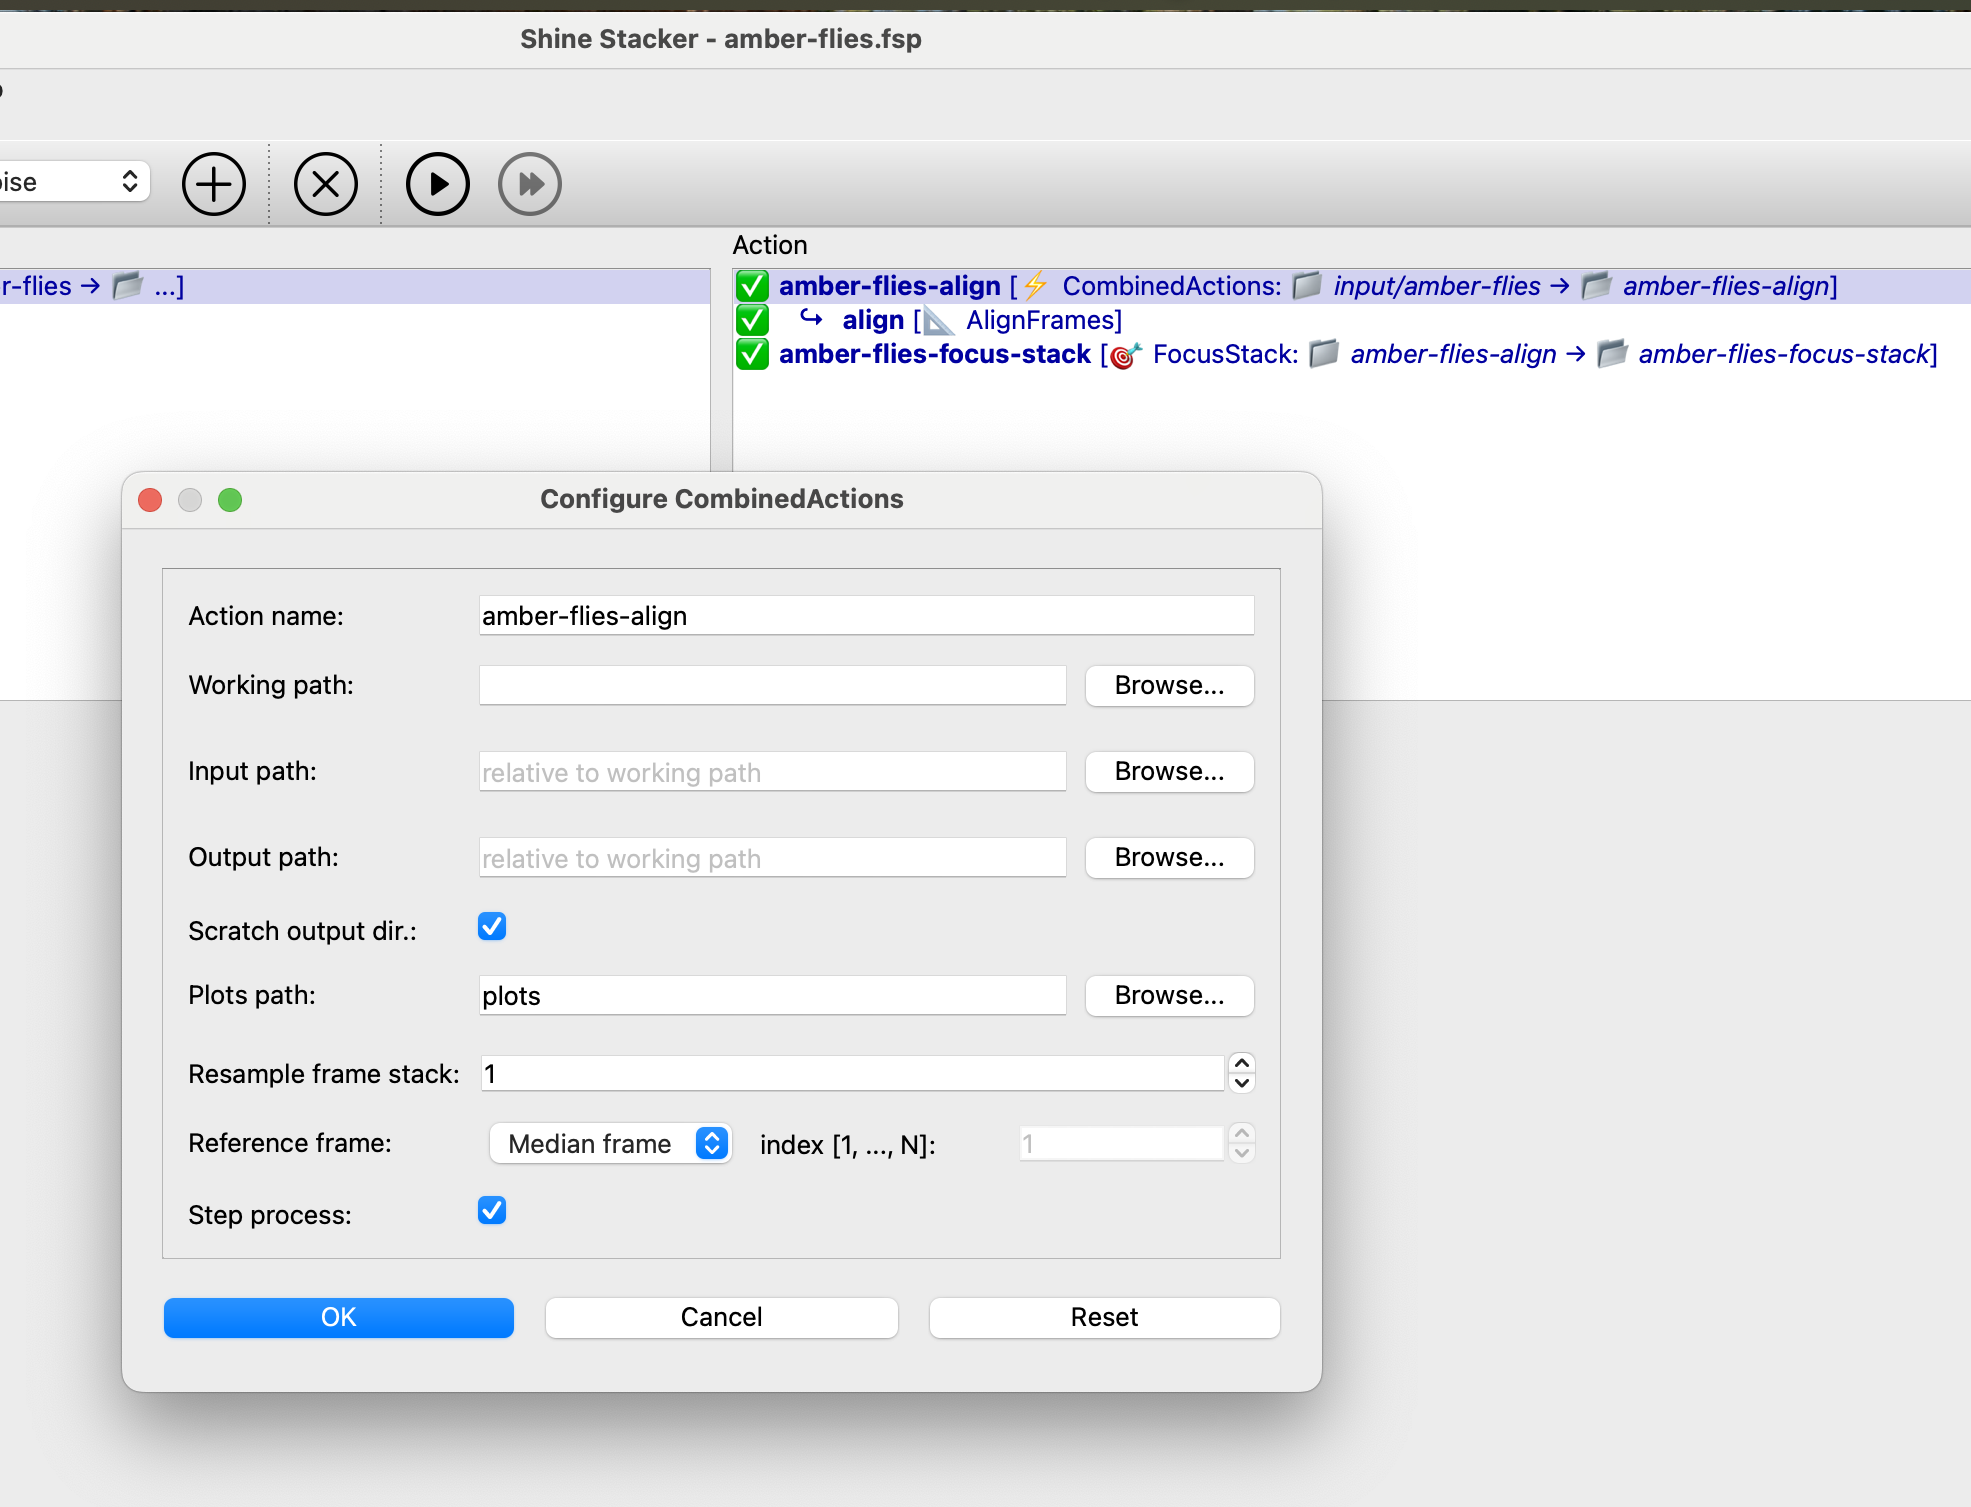
Silvio, just to be sure…
After you specify the folders, ecc., you are in the “Project” window.
You can go to “View” and check “Expert Options”.
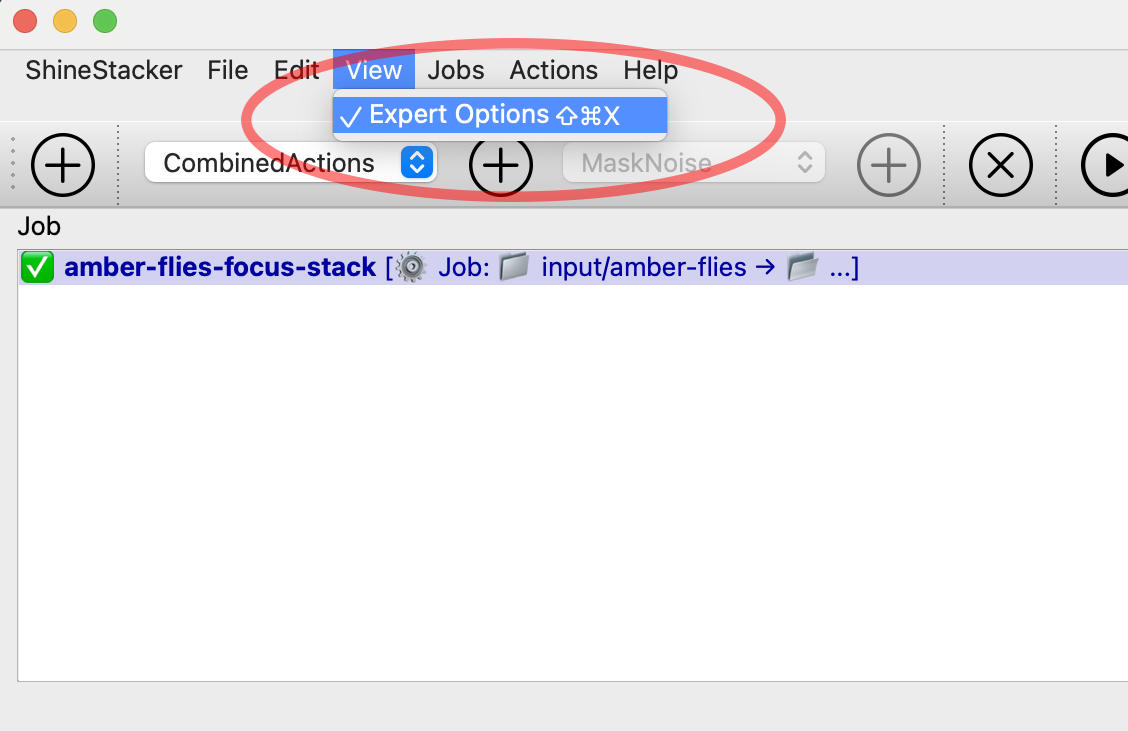
After you do that, you can go to the right side of the project area, and you find the “ConbinedAction” that contains “AlignFrames”, and possibly “BalanceFrame”, if you select it, etc.:
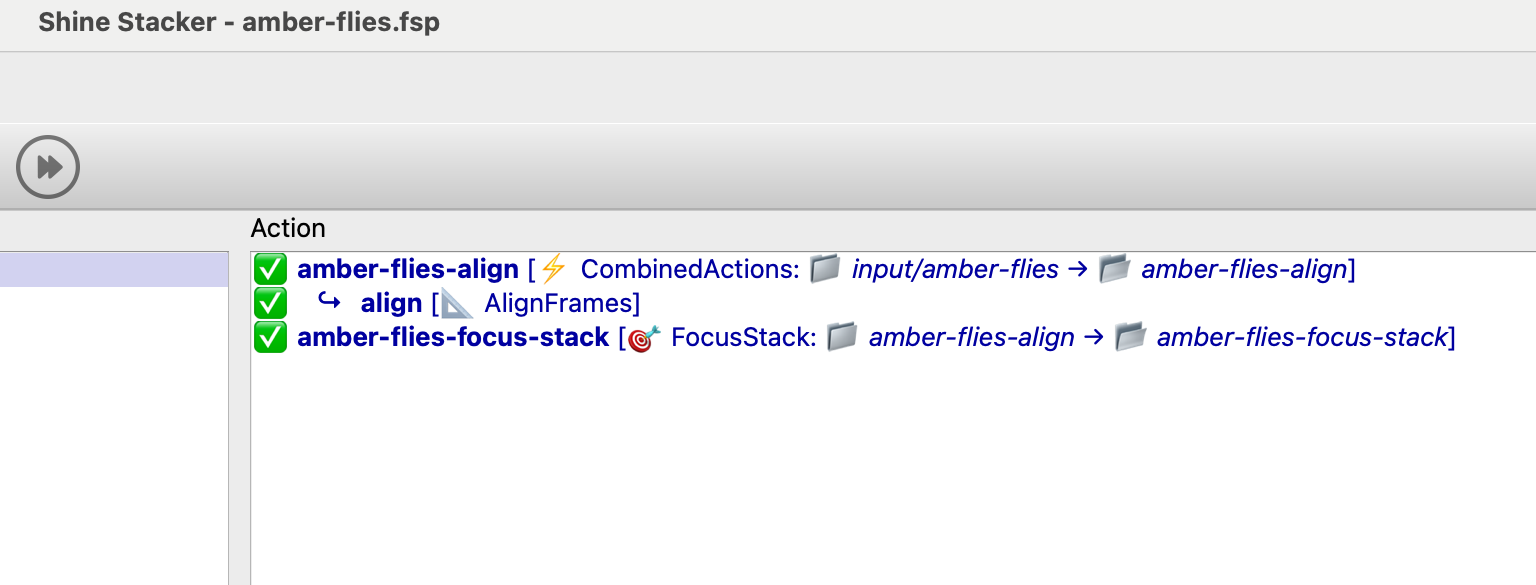
If you double-click the “ConbinedAction” item or the “AlignFrames”, with the “Expert Options” turned on you should see menus like those below, where you can play with parameters.
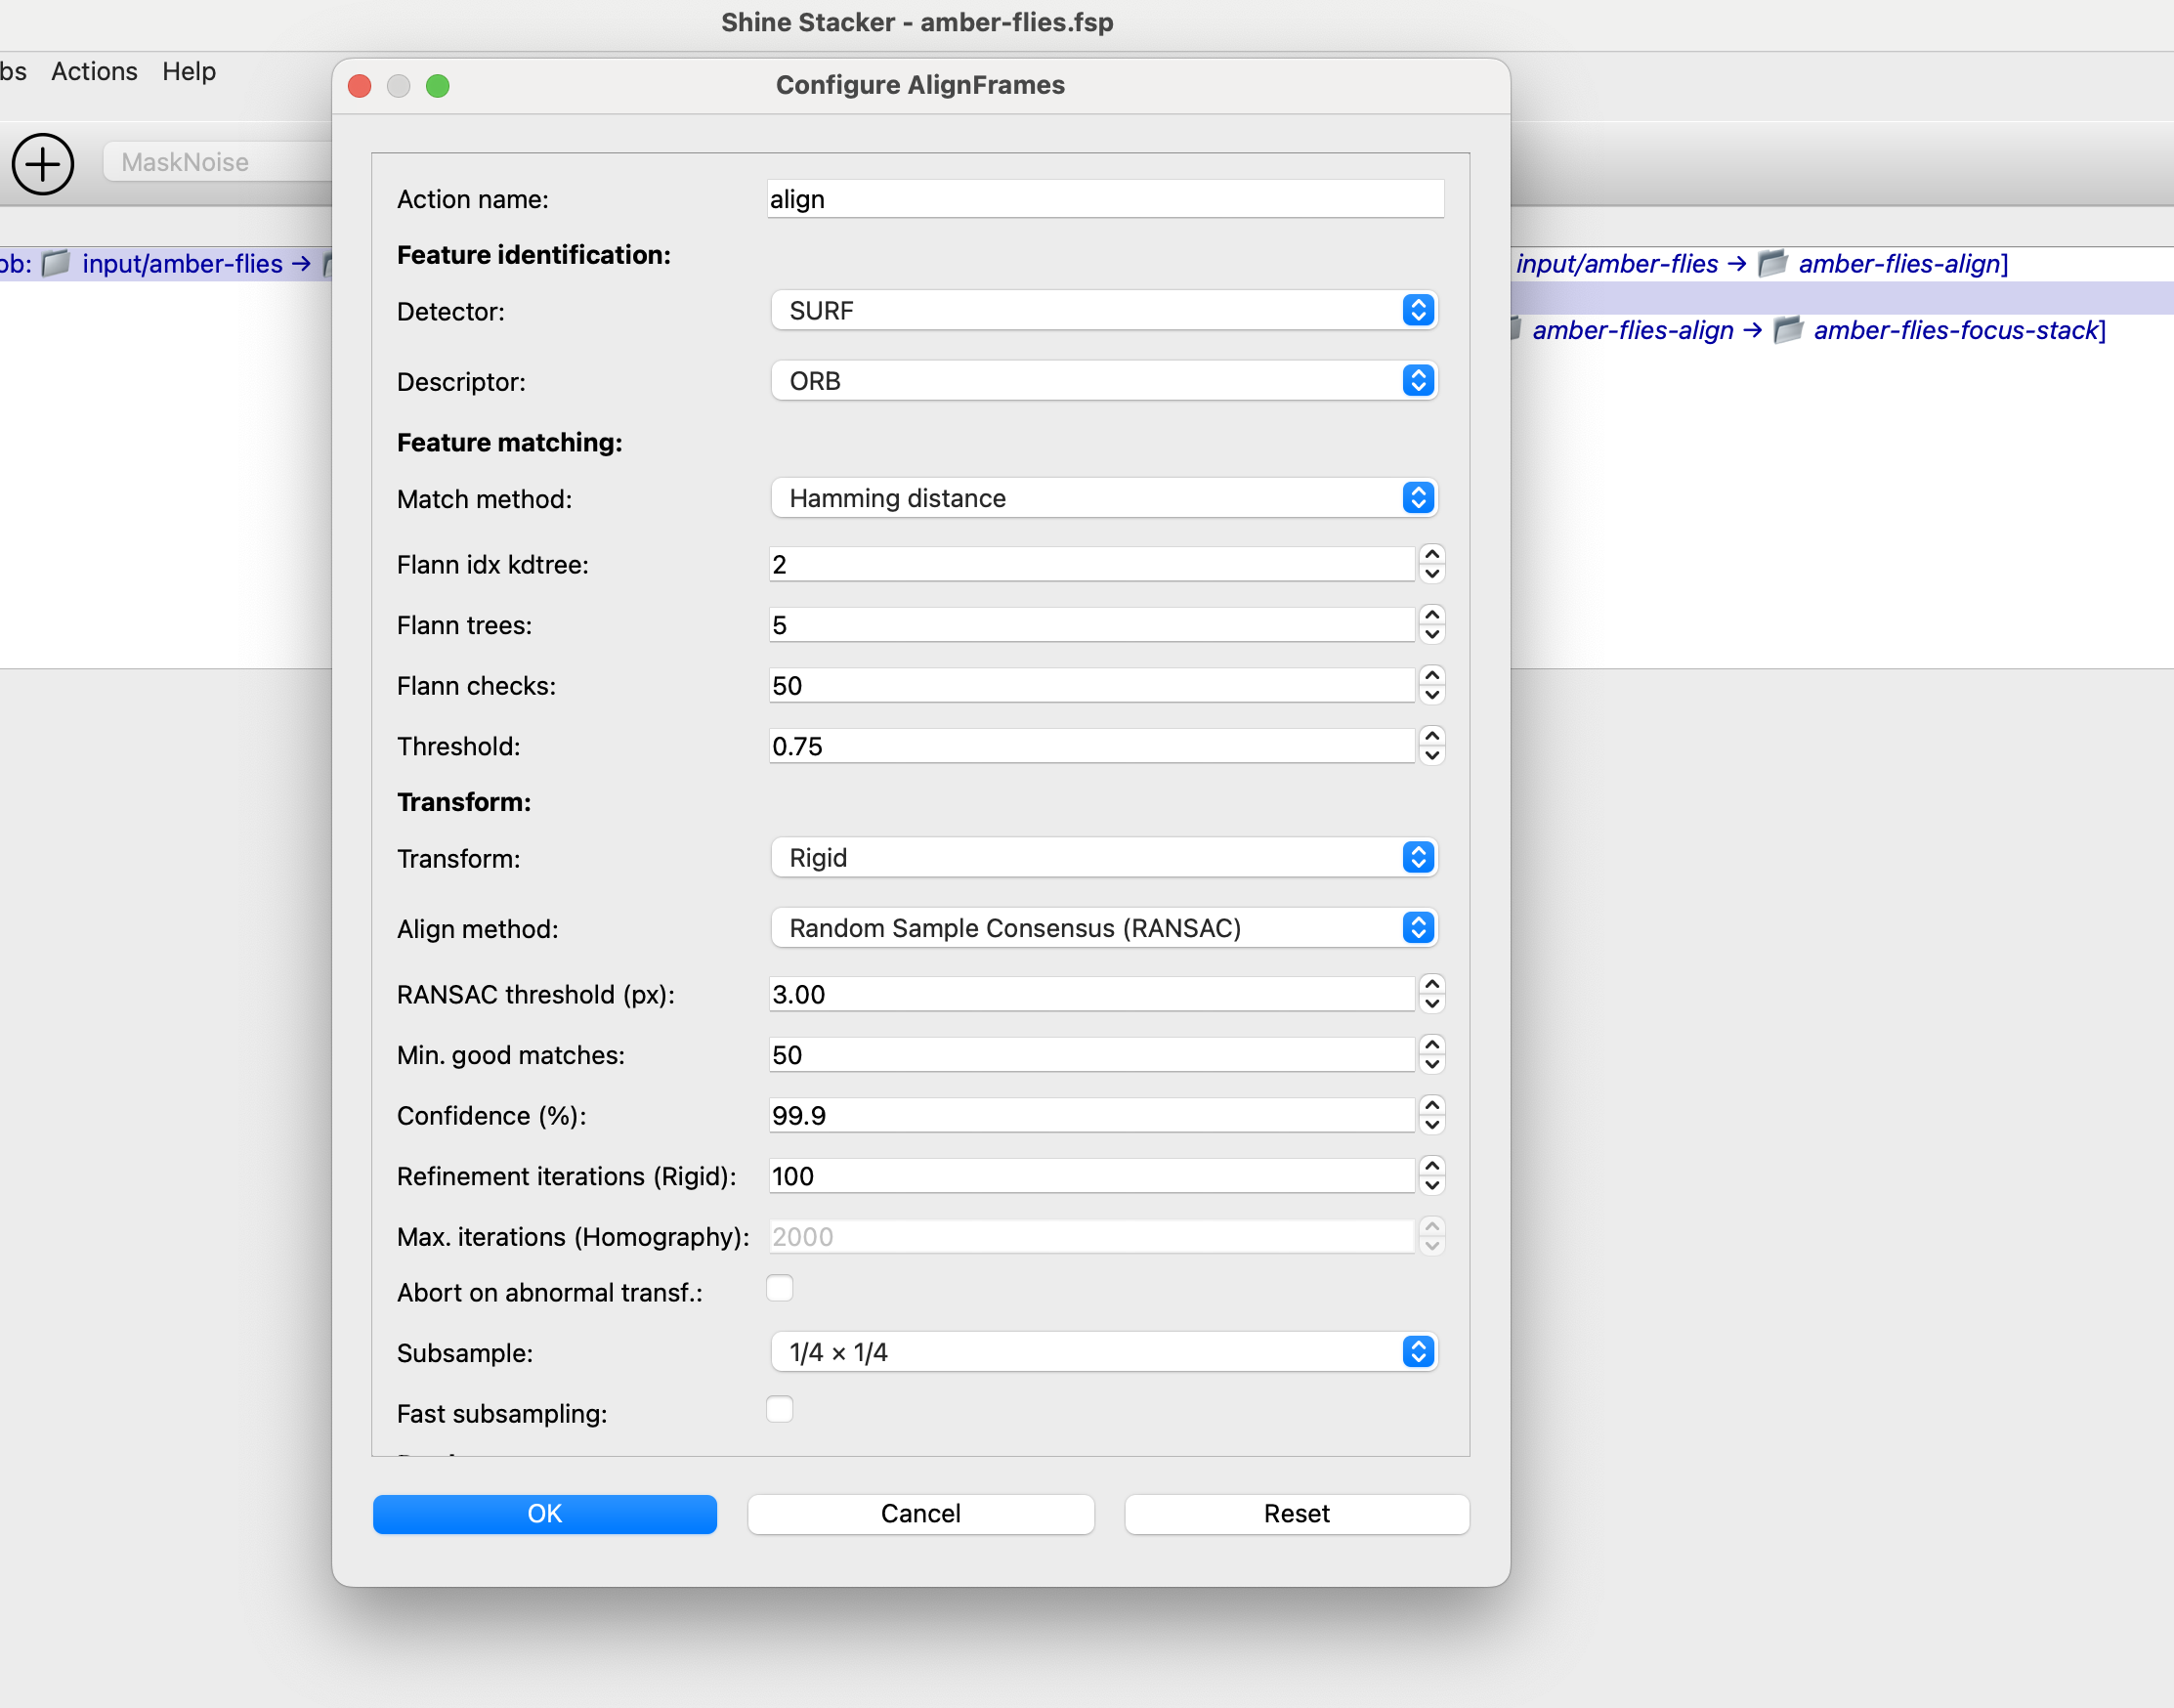
You can find more information about the parameters in the documentation below:
https://shinestacker.readthedocs.io/en/latest/
I hope there is not something terribly wrong with the Windows version, I tested it a few weeks ago, not the recent releases.
Cheers,
Luca
1 Like