Sunday experiments

Accidentally, I found a way to generate nice textures :

  • I start with a set of random points, generated with the noise_poissondisk command (I love this one, thanks again @garagecoder !).
600,600 noise_poissondisk. 5

  • Now, for all these isolated points, I look in their neighborhood what other point is the closest one, and I draw a segment between the two.
  100%,100%
  eval.. "i?(
    siz = 2;
    pmin = qmin = dmin = inf;
    while (isinf(dmin),
      y0 = y - siz; y1 = y + siz; x0 = x - siz; x1 = x + siz;
      for (q = y0, q<=y1, ++q,
        for (p = x0, p<=x1, ++p,
          i(p,q) && [p,q]!=[x,y]?(
            d = norm(p - x,q - y);
            d<dmin?(dmin = d; pmin = p; qmin = q);
          );
        );
      );
      siz*=2;
    );
    polygon(#-1,2,x,y,pmin,qmin,1,1);
  )" rm..

  • Now, I apply the close_binary command, that is used in our lineart “smart coloring” filter in the plug-in.
 close_binary. ,

That’s the step that takes most of the computation time. We end up with:


(this command basically tries to connect lines togethers).

  • Now, a bit of anisotropic smoothing and normalization:
  repeat 3 { smooth. 10,0,1,1,2 } n. 0,255 normalize_local. ,

And we get:

Isn’t that cool ?

And if you combine that with an image, you get something like this:
textured_colorful

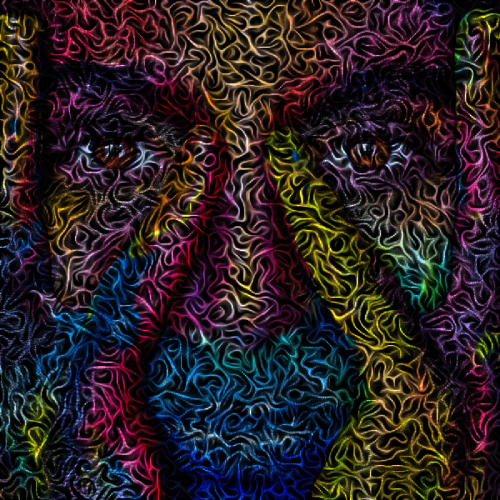
which is quite nice.

The whole process is a bit slow because of the close_binary command. But I like the outcome!

That’s it, that was my Sunday experiments :slight_smile:

7 Likes

Absolutely splendid!!

1 Like

A “spaghetti” variant:

foo :
  srand 0
  600,600 noise_poissondisk. 15

  100%,100%
  eval.. "i?( # For each point, find the closest neighbor.
    siz = 2;
    pmin = qmin = dmin = inf;
    while (isinf(dmin),
      y0 = y - siz; y1 = y + siz; x0 = x - siz; x1 = x + siz;
      for (q = y0, q<=y1, ++q,
        for (p = x0, p<=x1, ++p,
          i(p,q) && [p,q]!=[x,y]?(
            d = norm(p - x,q - y);
            d<dmin?(
              dmin = d; pmin = p; qmin = q;
            );
          );
        );
      );
      siz*=2;
    );
    polygon(#-1,2,x,y,pmin,qmin,1,1);
  )" rm..
  close_binary. 75,1,80,80
  repeat 2 {
    ge. 50% dilate. 2
    repeat 3 { smooth. 10,0,1,1,5 } n. 0,255
  }

spaghetti

2 Likes

Now, trying to draw random minimal paths in a graph, using the dijkstra algorithm:

Code:

foo :

  # Create set of vertices.
  600,600 noise_poissondisk. 10 1,1,1,2 eval.. "i?da_push([x,y])" da_freeze. rm.. N:=h => V

  # Create adjacency matrix.
  $N,$N f. ">y>=x?i(y,x):(d = norm(I[#$V,x] - I[#$V,y]); d<20?d:inf)" => A

  # Draw graph.
  600,600,1,3 => canvas
  eval[V] "ellipse(#$canvas,i0,i1,1,1,0,1,0,128,255)"

  # Draw minimal paths between graph nodes.
  repeat inf {
    start,end:=int(u([$N,$N]))%$N
    start:=round($start,round($N/3))
    +dijkstra[A] $start,$end => D
    eval "
      current = $end;
      xyc = I[#$V,current];
      while (current!=$start,
        dist = i(#$D,0,current,0,0);
        isinf(dist)?break();
        parent = i(#$D,0,current,0,1);
        xyp = I[#$V,parent];
        polygon(#$canvas,2,xyc[0],xyc[1],xyp[0],xyp[1],0.03,255);
        current = parent; xyc = xyp;
      );
    "
    rm.
    if !($>%10) w[canvas] filename frame.png,$> o[canvas] ${} fi
  }
4 Likes

Fun. More worm or brain-like than pasta noodles, so I wish you a happy belated Halloween.

And how was that combination of the spaghetti and the image with withe face done? It looks just cool.

I’ve just multiplied the two images together then renormalized in [0,255].

1 Like

originalimage.jpg spaghetti.jpg m n 0,255?
The resulting image is nicely daunting :wink: I wonder if the background of the spaghetti image should really be a full black. But I think this is a matter of taste. Happy Sunday, David, and thanks for all the effort.

this is my first post here, so please don’t go too hard on me if i’m doing something wrong.

after i saw your amazing picture yesterday, i spent hours trying to achieve the same. i’m a complete noob when it comes to image editing and so i installed gimp and gmic + the gimp gmic plugin…
in order to the first image compiled i put the command snippets together, after i managed to get the command chain right so that my shell doesnt complain about parsing errors, i had my first success and got my first pasta output. now i had to make one image out of 2. i used gimp to multiply them to one pic and “gmic -input multiplied_image.png n 0,255 -output image.png” to normalize it. to be honest the outcome was miles away from yours.
i tried hard but i’m clearly lacking the skills, but i learned something along my way.

can you please explain how you multiplied them together so that the 2 layers look so organic like in your picture, i’m also interested how you achieved the colours?

1 Like

Welcome @pixelnoob

Good to hear people are trying this! Without actually having gone through all this myself, I assume it was a multiply of two images in g’mic, on the cli it would be something like:

gmic image1.png image2.png to_rgb mul n 0,255

I added to_rgb because gmic will happily multiply opacity channels as well, so that removes them.

2 Likes

thanks for the command garagecoder, that was the command i couldn’t figure out. i just had to make sure that the images to be multiplied had the same size.

after experimenting with it, i come to the conclusion that in order to make the output look organic like in David_Tschumperle’s masterpiece i need to get the ingredients right first. a random combination of inputs doesn’t work well.

i’ll do some more digging!

1 Like