There is this misconception in digital photography, inherited from analog photography, that photographs can be either properly exposed or not. And people don’t understand why they should temper with exposure compensation, later in post-processing, when their shot was “physically well-exposed”.
There is no such thing as a well-exposed / under-exposed / over-exposed picture in digital. There is only sensor clipping or no sensor clipping, that is all.
The case of film, the origin of the mistake
(Color) Film is a all-in-one bundle package, that does everything at once:
- mid-tones boosting,
- contrast massaging,
- extreme luminances roll-on and roll-off (smooth blending of clipped and valid ranges),
- gamut-mapping,
- artistic hue shifting.
From https://www.kodak.com/uploadedfiles/motion/US_plugins_acrobat_en_motion_education_sensitometry_workbook.pdf, the sensitometry curves of negative color film are like this:
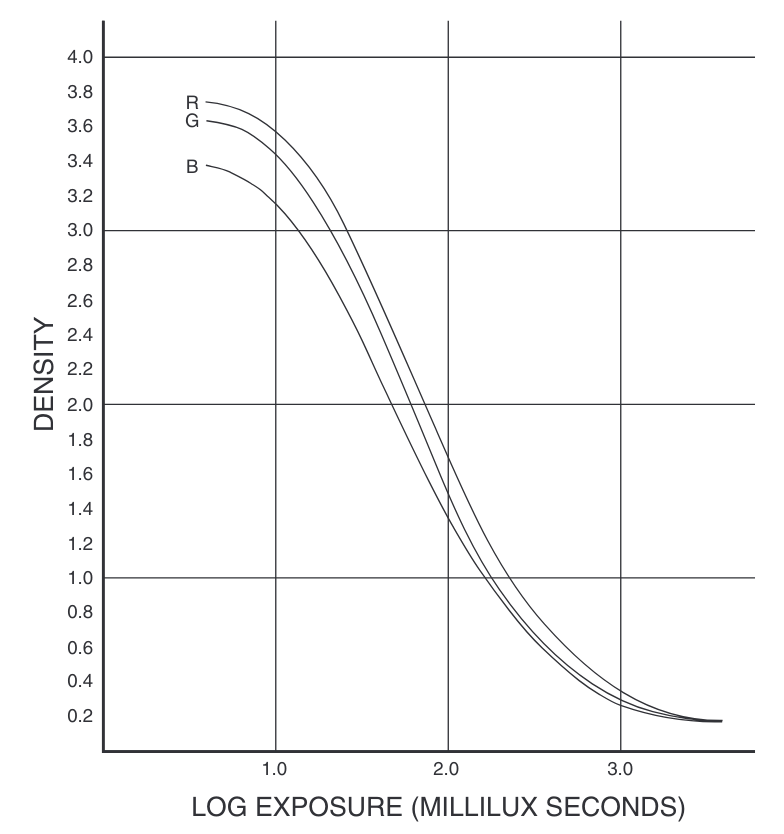
Beware, this is negative densitometry, so whites are at the bottom, and blacks at the top of the density scale. Exposure is the same, though.
Because of the obvious non-linearity of these curves, you can’t freely multiply the exposure in post-processing with a factor and expect the whole dynamic range to scale smoothly without complain. That is, you can’t just play with the exposure time under the enlarger and expect colours to follow. Over-exposure of film means washed, desaturated colours forever. Under-exposure means over-saturated colours and more prominent chroma noise.
So, there is, indeed, a “right” exposure in film, that consists in carefully anchoring the mid-tones in the middle of the latitude, and let everything pivot around this particular value.
However, digital…
is linearly recorded. Meaning the digital pipeline does, step by step, what film does at once, and the digital signal enters the pipeline linear. The great thing is it enables you to create your very own virtual film emulsion. In this context, software exposure compensation is only an harmless proportional scaling (provided clipping is properly handled somewhere in the soft).
Think about a microphone. When you set the hardware gain too high, you might clip the track when the recorded sound becomes loud. That sounds awful, and makes the track pop and crash. So you might be tempted to setup the physical gain to the minimum, just to be safe, and amplify the recording digitally later. But then, what you will hear is a lot of background noise (shhhhhhhhhhhhhhhhh), and that won’t be any better.
So the deal is to anchor the gain so the peak signal doesn’t clip the track, but you still maximize the signal/noise ratio (SNR). That is, anchoring the gain so the peak signal reaches a -3 to -10 dB safety margin below clipping. Then, in post, you might normalize the signal to dynamically compress extreme variations around some average volume.
The hardware gain, in photography, is the combination of ISO sensitivity + aperture + shutter speed. But the principle remains the same : you don’t anchor the exposure for mid-tones, you anchor it to manage clipping and noise at both ends of the dynamic range. Then, in post, you normalize the signal to dynamically compress extreme variations around some average exposure.
(For you geeks, that sounds an awful lot like a variance minimization problem, doesn’t it ?)
Ansel Adams developed the zone system back in the 1930’s to deal with exactly this issue. While the circumstances have changed a bit, his formalism is still up-to-date.
And that average volume or exposure might need some scaling to end up in the middle of your output medium, for better clarity of the reproduction. Then, you roll-in/roll-of both extremes of the dynamic range around that average as much as you can, to squeeze-in all those carefully recorded details.
So there is no over/under-exposure in digital, there are only clipping optimizations strategies for the whole dynamic range, and you decide later what is to be considered as your average level, and how to compress extremes around that level. Hardware exposure only slides up or down the dynamic range window along the luminance axis.
Besides, whatever you see on the back of your DSLR is a massaged JPEG file with some tonal correction already, so a “well-exposed” JPEG only means a “well-handled” raw-to-JPEG conversion in your camera firmware, but doesn’t presume anything on the actual raw (non-)data.
Bottom line, having to push the software exposure compensation, even for seemingly “well-exposed” pictures is totally fine. It’s just a maths trick to anchor mid-tones where you want them. But remember you need some later clipping handling to compress things around.
People have also got this prejudice that heavily under-exposed pictures are difficult to bring back in digital and it’s better to sacrifice some highlights. Well, it depends, but in general, that has nothing to do with the picture, but everything to do with shitty color models used by shitty software.