I recently noticed that Darktable (DT) now recommends using the “tone equalizer” module rather than the “shadows highlights” module. I’m afraid “tone equalizer” is quite complicated and the DT User Manual is not much help when it comes to using it. However, I found this article to be helpful. There is a pretty significant discrepancy between what is shown there and what I see on my computer when trying to follow that description.
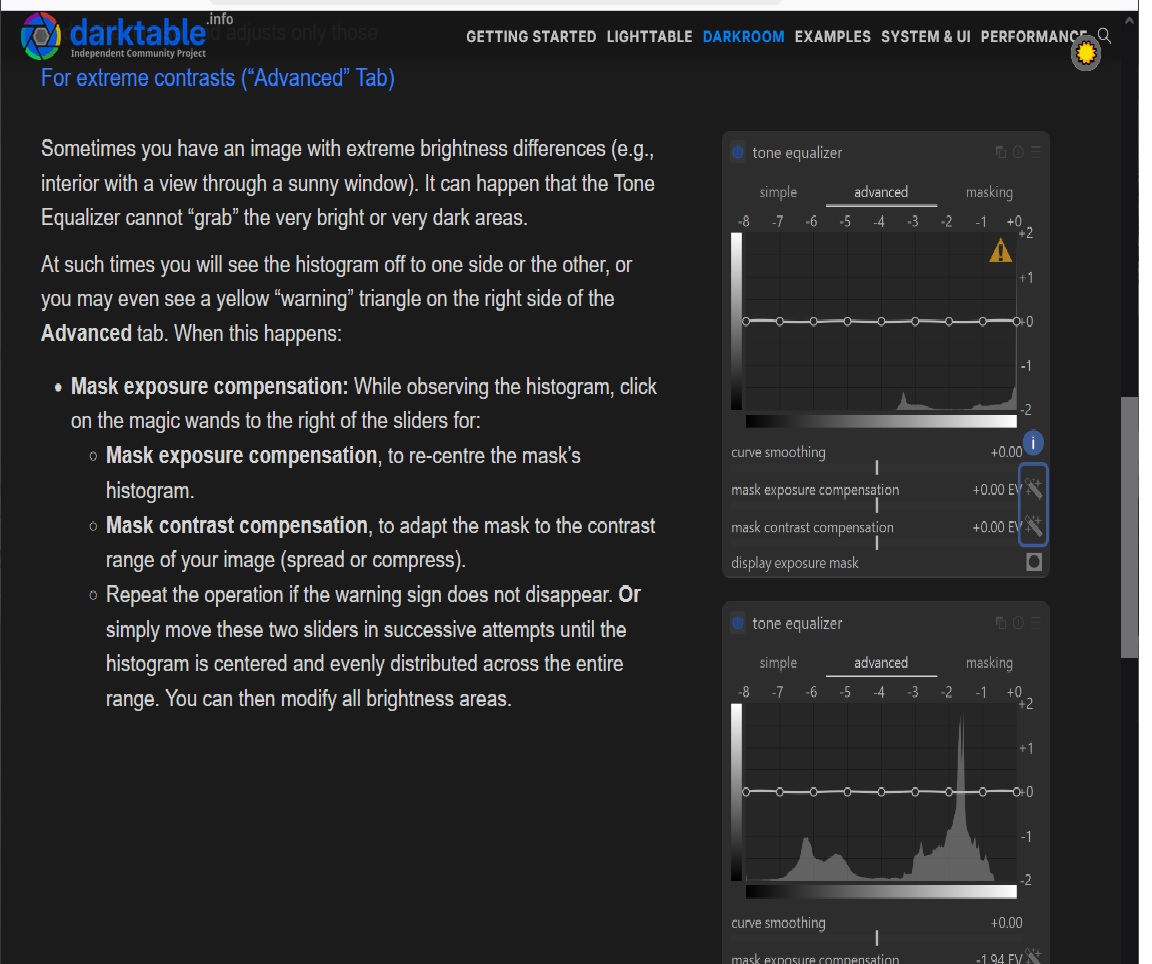
A screenshot which contain images of the tone equalizer module from that article follows:
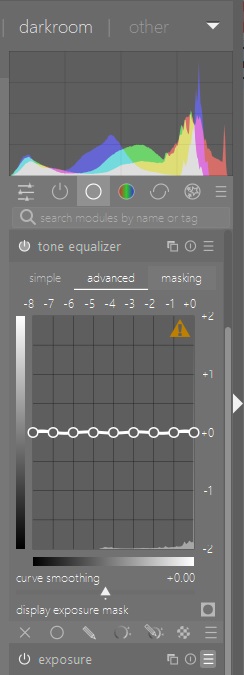
The 2 lines referred to in the article as “mask exposure compensation” and “mask contrast compensation” are no where to be found in my case. I’ve spent a couple of hours trying to figure how I might turn that on but so far no luck. I have noticed that those lines do appear on the “masking” tab on my computer but please notice that the article is referring to the “advanced” tab.
Can someone help me to figure what I’m doing wrong?
Another question that arises regarding the switch from “shadows and hightlights” to “tone equalizer” has to do with what is called “white point adjustment”. This is something that I pretty always need to apply. If I don’t use “shadows and highlights” how is that done. As yet I haven’t recognized anything in “tone equalizer” that does it.
Also that information might lead you to think that you always need to center the mask and use one instance infact often you can use the skewed mask to use more of the mask in the HL or the Shadows so its a warning and not an error…
Boris does extensive coverage of the tone eq in a few video’s I would suggest that you watch those and you should be off to the races…
As noted by others you must be using a bit older version of DT as the TE UI was updated to move those two sliders from the mask tab to the advanced tab where the curve is…
Well I’m using Version 4.6.1 currently which, as best I can tell, is the most current with a printable User Manual. However, I do have a working installation of Version 5.0.1 which produced the same results.
I would recommend going to DT V5.4 because it has numerous improvements. Also I use shadow and highlights a lot. The creator of tone equalizer preferred his module over shadow and highlights, but that is his opinion (and some other users as well).
I use both TE and shadow and highlights. TE comes before the tone mapper, which for me is now AgX in DT 5.4. While shadow and highlights comes after the tone mapper. I use shadow and highlights more than tone equalizer, but when I have challenging dark shadows I tend to use TE first, then color balance RGB’s shadow brilliance slider and finally shadow and highlights. I use this approach because each one defines the shadow slightly different and sharing the burden between three modules produces less artefacts such as halos.
I wonder if this is really relevant or at least something to worry about, esp when using the tone eq…It has access to all the data and you will manipulate the entire tonal range with the settings of the module as determined by your mask placement.
Looking at the description in the manual for SH module
white point adjustment
By default the algorithm of this module leaves the black and white points untouched. In some cases an image might contain tonal variations beyond the white point, i.e. above a luminance value of 100. A negative shift in the white point adjustment can bring these values back into the proper range so that further details in the highlights become visible.
It seems to me that this slider was likely in play for the most part when the legacy workflow was the default way the image was processed.
With that the basecurve was used and its position was before the input profile and SH came well after that…so you could with a properly exposed image still need to manage the highlights that might be blown with the basecurve…
With the TE and the tonemappers coming before SH module then I don’t imagine, if you set exposure correctly, set the tonemapper as well to map the data to display white point that you will need to worry at all about this and you will be able to control those “upper” highlights or areas “over” 100% with those settings as intented in the scene referred workflow…
You can still use that setting I guess to finetune things if you use the module but its not likely needed…
Per Terry, I to use “shadows and highlights” (S&H) in just about every image and have thought it produces very desirable effects. What drove me to look into “tone equalizer” is that the 4.6 User Manual recommends doing so because of issues with S&H. Based on your advice I won’t ditch S&H which does allow white point adjustment to be done quite simply and I still haven’t figured out how else to do it.
As mentioned I have no knowledge of Agx but per your suggestion will definitely look into it. I do find “color balance rgb” module to produce good results but it is quite complex when compared to the now deprecated “contrast brightness saturation” module which I also found very useful.
I suppose the idea that you won’t need to do any “white point adjustment” (WPA) if you properly apply those other modules is good. However, the WPA slider allows you to move it around in a manner that you can tell by looking at the histogram that it is good to go. That strikes me as very desirable. In that you don’t assume you don’t need to change it but rather can verify that it is as desired.
One of the things that I notice in my now outdated 4.6 User Manual is that “tone mapping” became deprecated at least by then. Given that I’ve never used it this caused me to be looking for something else.
You should be able to manage the histogram with the tonemapper and tone eq but you can also tweak them with global brilliance for white and global offest luma in the 4 way tab of rgbCB for the black level… those sliders do a nice correction
I now have Version 5.4.1 installed and usable. Insofar as Agx is completely new to me I’d like to use the Duplicate Manager to do different edits where one is based on filmic rgb which I’m somewhat familiar with and then do another using Agx. It would be helpful if there were a simple way to specify which one to use when I create the duplicate. Is that possible?
I certainly don’t want to have to change the setting in preferences prior to making a duplicate but would like to get what I think would be the same effect.
To use agx and filmic you can set up both to be applied in the inactive state using an auto preset then you just enable the one you want or toggle. Both modules need tweaking after exposure is set so you have to make some adjustments in with module to see the full impact…For Agx this simple approach is where you can start…auto set white and black like you would with filmic…then selection a point on your image where you want the most contrast by drawing a box after selecting the second picker in the next pair. Then adjust that second slider ie the one that starts at 18 percent as needed Finally then tweak contrast to taste and then you can exit with the look sliders… That is a basic approach…There are other sliders to tweak the curve and sliders to manage hue shifts but that can come later once you get the basics
Here is a comparison of AgX, filmic and Sigmoid. I picked this simple image because of its colors and deep shadows.
The top image is AgX and I used the picker for auto tune levels only. This tends to give a nice starting point with 99.9% of my photos. But there are lots of controls and options if I want to tweak the image, but I don’t usually have too.
The middle image is Filmic. In comparison to both AgX and Sigmoid the colors are dull. This is by designed since the creator of filmic expects the user to work the colors in Color Balance RGB module. Filmic doesn’t give me a nice look out of the box and requires more work. Also the auto tune picker often overshoots the white relative exposure adjustment on many of my images. Filmic requires a higher level of user intervention than AgX or Sigmoid in my view.
The bottom image is Sigmoid. Sigmoid is the easiest module to use because it just gives nice results straight out of the box. When Sigmoid came along it replaced filmic for most of image processing. However, there are limited user controls compared to AgX and Filmic. The controls in AgX are what won we over from Sigmoid, although most of the time the controls in AgX can be left alone, but they are there when needed.
There is no one-click solution but here is how I did it when I switched:
create a sytle with filmic + corresponding colour balance rgb activated and agx deactivated (!).
When I want to compare I hit STRG+D to create a duplicate and then it is just two clicks with the styles-quick-access to the lower left to get the filmic version.
I would say that is still a bit of a generalization…The current filmic uses a very low setting for contrast, I think 1.0 so just changing that can make quite a difference. It has always been lower than sigmoid which runs at I think 1.5 and AGX might even be set steeper?? Older versions of filmic were set at 1.3 for contrast I believe. Also the version and color preservation mode used can matter, if you were using say v5 of filmic…use some latitude and then boost midtone saturation you can have a very intense and colorful image with no intervention from CB…Filmic also uses rgb ratios and not per channel curves so it will have a slightly different look from that as well… For sure AP always intended that the CB module would have a big role in grading the image but filmic doesn’t have to be dull without the CB module it can have a range of looks with a few simple tweaks and using the right version it can have much more colorful defaults…