Tone Equalizer: lifting shadows from -15 EV

I’m glad someone asked this question, as I have been seeing the same issue on many photos!

And thanks for the explanations as I had not registered that the Tone Equalizer mask only covers an 8EV range. If I use the auto-adjust options for mask exposure compensation, and then mask contrast compensation, very often dark shadows will show as -15EV - for exactly the reasons that Kofa states.

As an example, here is an image of a Red-breasted Goose taken at the weekend in a wetland park in London. It’s part of a collection of waterfowl from round the world so it has clipped wings to keep it inside its designated area - and therefore you can get good close up photos. (I’d prefer to photo the bird in the wild, but its basically an arctic bird that winters in Ukraine so not much chance there)

The sun was clouded over for this shot, so the overall contrast is weak, but its a black and white bird, so there is still a big exposure range, and worse the white feathers are clipping.

Auto mask adjustments with the TE “magic wands” will show the dark feathers at -15EV

With a better of selective masking and Tone Equalizer, I can get detail in the dark feathers, and some highlight recovery, but even Highlight reconstruction with guided laplacians struggles here.

ER6_3357.CR3 (27.8 MB)
ER6_3357.CR3.xmp (13.0 KB)

These files are licensed Creative Commons, By-Attribution Non-commercial.

Are you using multiple TE instances?? That can be useful…

No special tricks here. Just careful use of filmic reconstruction and not using the highlight reconstruction module (or in mode “reconstruct in Lch”) to remove as little information as possible. No selective masking, just make sure the tone equaliser mask is about correct for the zones you want to change (here: not clipping in the blacks)

But for the top of the white band on the wing, there’s not much you can do: at the best of times it’s a low contrast area, and it has at least two hard clipped channels.

Also, you only have so many levels to play with, you can either go for general contrast in the midtones (compressing the highlight and shadow detail) or for more detail in shadows and highlights (lowering overall contrast). Adding local contrast only helps up to a point. Personally, I often prefer somewhat less global contrast and better detail, but that’s a matter of taste (and also depends on the subject).

If you are using filmic also be sure to try color preservation at none. I find it can exaggerate issues in highlight areas with blown channels making them harder to correct

Yes I was using multiple TE instances, but I had filmic color preservation on MaxRGB. Much better for the white feathers to turn color preservation off - I’ll add that to my tips and tricks list.

You can see how each mode shifts the color channels by looking at the histogram and cycling them. I find that setting it to no produces less shift and thus less impact on those extreme highlight areas that seem to get exaggerated as one or more channels can be weak or clipped.

You can also reduce filmic contrast to say 1 and use almost a linear filmic curve or at least shift the latitude section towards the shadows and you might squeeze a bit more out of the highlights

Good advice!

Couple more questions on recovery of blown highlights:

I’m running the latest daily version of DT 3.9.

  1. What is the strategy for using filmic 6 reconstruction? Do you turn off the highlight reconstruction modules and/or reduce the exposure to give room for contrast?

Presumably first step in the filmic module is to set the threshold to pick out the blown areas (normally just under 0 for me) ThenI just go down the sliders to see which slider produces a good effect on the blow areas.

  1. Going back to highlight reconstruction, has anyone worked out a plan to optimise use of Aurelien’s guided laplacian option?
1 Like

My understanding was for #1 off or sometimes LCH would actually help As for # i have tried to turn it on a couple of times but I currently don’t know how to manage it for a good or controlled result…

So not much help from me… :slight_smile:

I have an image here which has a similar issue: There are regions in the image where the tone equalizer mask goes well below -8EV. Further, I had weird artifacts in the image - even though I only did minor adjustments. For my particular image, a fix was to use the guided filter instead of eigf.

Here is the mask with eigf:

and with the same settings but guided:

See the artifacts in the flowers, which are created by the eigf mask (left) vs guided (right):
image

I have not much knowledge of the internal working of the tone equalizer, but IIRC in one of the videos of Aurélien, he mentioned that the mask should be “smooth” (or better to say, the frequency of the mask should be low, such that the whole region of an image is boosted and not local details) - which is clearly not the case for eigf. Even if I increase the number of filter diffusions.
In my noobish understanding of the tone equalizer, more diffusion should result in a smoother mask, but for eigf it seems to work differently. I have not understood so far what eigf should do better or why it fails to produce a “good” mask for my image and it also might not even solve the TO’s particular issue (if the region of low EV is too large) but I found myself now switching back to guided several times, because I could not figure out how to remove the very low EV spots from a mask generated with eigf.

tone equalizer is equivalent to using several instances of exposure, each one masked for a specific brightness range, where the ranges correspond to differently lit areas (e.g., the sky, the shadows, and so on). In order to maintain contrast in each area, you want to apply the same exposure adjustment, which means you want to have a smooth mask. However, simply blurring the whole image to produce the mask is often not the right solution: the different areas bleeding into each-other will cause the adjustments (e.g., brightening the shadows or pulling down bright highlights) to also bleed into the surrounding areas, and lead to halos. That is why tone equalizer has the control edges refinement/feathering. Unfortunately, when you have small details within the areas, you can have problems. An example would be bright flowers and darker leaves and stems, all under the same general light (one sunlit patch of vegetation, another in the shadows). I find it very hard or impossible to adjust the edge detection in a way that it detects real boundaries (eliminates halos) and preserves uniformity within the uniformly lit areas. In such cases, using several instances of exposure with drawn masks may be your best bet.

3 Likes

As with filmic I find the norms also have big influence on the mask you end up with…the top one above is clearly too contrasted…Ironically I think you posted on topic a month or two back and you had one of the best TE masks preserving the details in the leaves in the forest trees and it was one of the ones with the most blur or perceived blur from the screen shot…

Use more instances…for some images it is easier than trying to get one mask that works for the entire image. I often use as many as 4…one for shadows one for highlights one for contrast and maybe one blended in a color channel to tweak the shadow or highlights cast … I was stuck in the early days on trying one mask, spreading it and also keeping the end points near zero… After noticing how it was being used by many others and moving to multiple instances I have begun to use it more rather than less which is where I was headed… The different norms also make for different masks so they are worth a try… I often try rgb sum or rgb average for a different mask to work with … so much room to experiment in that module…

1 Like

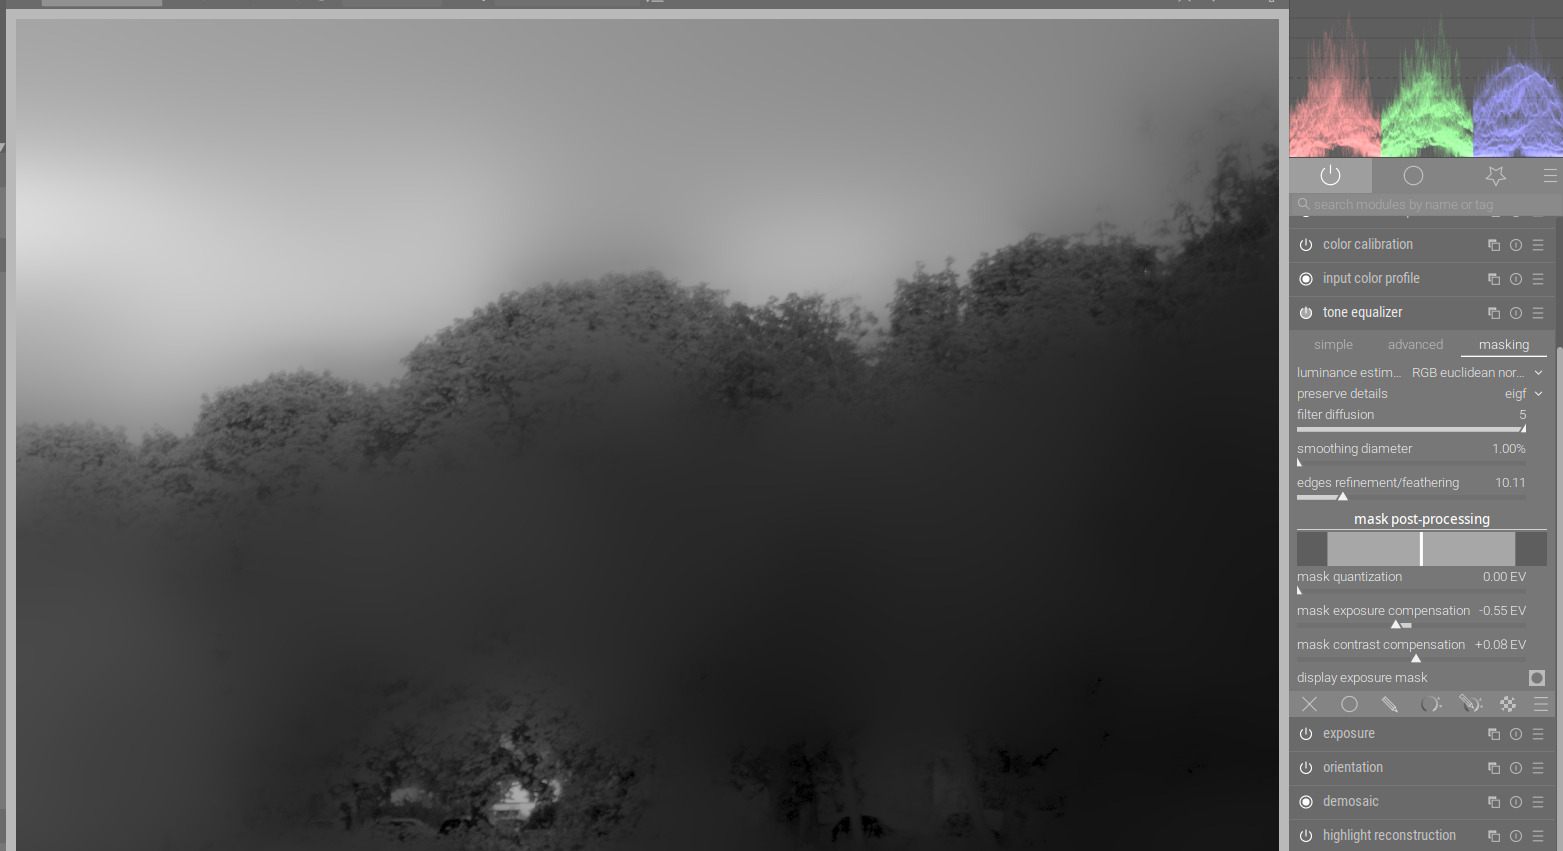
I believe you are referring to this one:

There, I managed to create a satisfactorily blurred mask (→ uniform adjustment → contrast maintained) over the foliage and the sky, and maintain the edge (→ avoid the halo) on the boundary:

That was it you got a really nice result I thought

Took a quick effort…didn’t really use the tone eq that much on this edit…


ER6_3357.CR3.xmp (9.8 KB)

It sounds exactly like the issue I saw in my image. Thanks for the hint with the multiple instances - I’ll try that!
However, in my experience, eigf seems to be a bit harder to work with than guided. I was able to produce a reasonable looking picture with guided much easier than with eigf. But as I said, that might just be my noobish understanding of the module :sweat_smile: I think I have to do some more rtfm :smiley:

For me, it’s a clear case of user fault. I hadn’t really understood, what I was doing, adjusting the mask. Therefore my mask was way too harsh and didn’t get the area I was targetting.

It’s a good idea to watch Boris’ Video in the Module. It’s much clearer about what one has to do to adjust the mask.

1 Like

Just toying with single image fake HDR using contrast mask (luma invert overlay) and re-introduced details via a convolution technique that I’ve been experimenting with (under GEGL, smooth by domain set to Grain Extract then merged down for the convolution layer and setting that result to Grain Merge to introduce the details). Could use some more retouching, but keeping it simple (12:26am not to mention I’m tired and rusty as well as have to get to work in the morning; lol). :slight_smile:

Maybe repost against your normal workflow or edit so the merits or changes resulting for that method can be compared…on its own its hard to see what is gained … at least for me…