Yes, please.
3 Likes
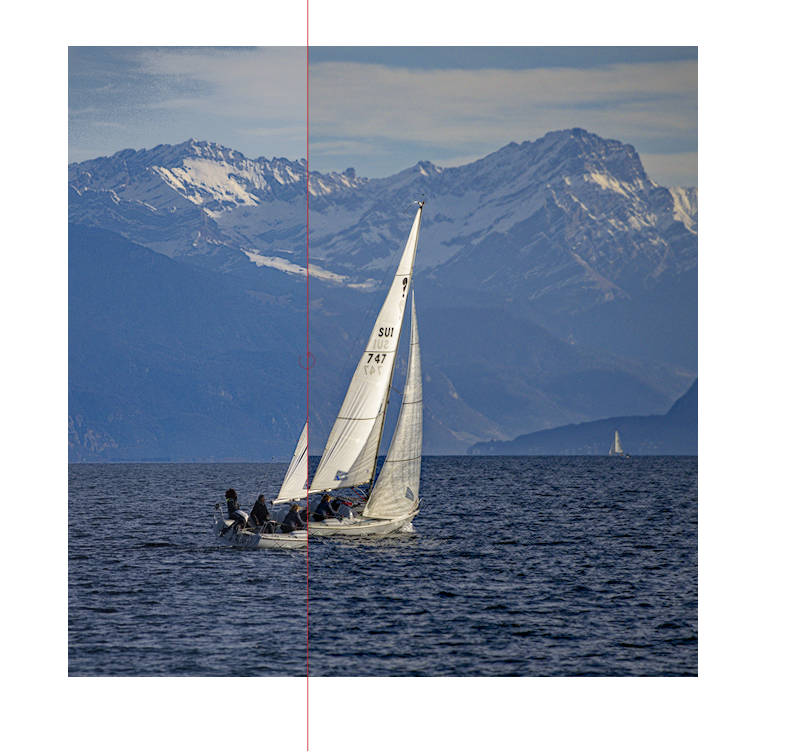
As an example, I’ll show you two photos I recently took. The photographs were taken in broad daylight, with some haze. There are the raws and a sample edit.
https://drive.google.com/drive/folders/1B2spkHbf0lFiB7qD-1Kjkt0HZE_hsR7N
1 Like
Apart from the video, I find the idea of having a Darktable <-> Lightroom translation table very interesting. Aside from understanding Lightroom guides, such a table would make it easier for users to switch from Lightroom to Darktable.
I realize that these are different programs and approaches and that there is no way to achieve exactly the same result with Darktable as with Lightroom. But it is just as difficult to get exactly the same result with a different image using the same program. The values set for image a may not match image b and must be corrected.
And despite all the differences between the two programs, there are also many similarities. Ultimately, both programs are used to edit photos. Adjusting the white balance or exposure isn’t something Darktable or Adobe invented.
So the question shouldn’t be: How do I achieve exactly the same result with Darktable for a certain image that was edited with Lightroom. But rather questions of the kind: In Lightroom there is a module to adjust the white balance. Which module do I use for this in Darktable?
I don’t know Lightroom at all. That’s why I borrowed a book about Lightroom and looked at what modules there are and what Darktable has to offer. Unfortunately I only have the German names of the modules. So I hope google does a good job:
white balance - white balance, color calibration
crop and straighten - crop + rotate and perspective
exposure - exposure/exposure
contrast - filmic rgb/Contrast
black - exposure/black level
highlights - filmic rgb/white relative exposure
shadows - filmic rgb/black relative exposure
clarity - local contrast or contrast equalizer
structure - local contrast or contrast equalizer
haze removal - haze removal
gradation curve - tone curve, rgb curve
HSL - color zones
black/white, mixed black and white - color zones
split toning - split-toning
sharpen - sharpen
noise reduction - denoise (profile)
lens correction - lens correction
transform - rotate and perspective
vignetting after cropping - vignetting
grain - grain
camera calibration - ? (I think it’s not the same as color calibration)
area repair - retouch
red eye correction - ? (Darktable does not work with cheep flashes :))
color grading - color balance rgb
Not perfect and I’m not sure if it’s true for all modules. But I think it’s a first approach.
I’m surprised there are so many similarities. The other direction (Darktable → Lightroom) is much more difficult because there are many modules in Darktable. (Is it true that Lightroom doesn’t have a channel mixer?)
1 Like
@herbert-50 I would take it a step further that it’s not so much which module translates to Lightroom, but how you would use the modules to create the effect in Lightroom.
What I mean by that is that a Lightroom control might have one-for-one module in darktable, such as split-toning from your list. But there are newer modules such as Color Balance RGB that can serve the same function with more control and better results. Or instead of the Vignetting module, which I think is pretty limited, its easier and in my view better to open a new instance of the Exposure module apply a drawn mask around the subject and take the exposure down from -1/3 to -1/2.
So for me the challenge is to figure out which modules and controls give me the effect I’m seeing in Lightroom
Yes, exactly this is what I’m looking for. Then I can watch a video, where someone explains how he edits a photo in LR and apply a similar effect in DT.

EOSR0266.CR3.xmp (15.7 KB)
I prefer this one
EOSR0266_01.CR3.xmp (20.5 KB)
EOSR0929.CR3.xmp (23.4 KB)
But I prefer this one
EOSR0929.CR3.xmp (25.9 KB)
Hmm, why would you do that?
More control also means more complexity and if a simple module does the job satisfactorily and there are almost the same settings in Darktable as in Lightroom, why use a different one? And for those switching from LR->Darktable, simple modules (which work almost exactly as in Lightroom) would be better.
I would rather have seen Lightrrom Color Grading as a counterpart to color balance rgb.
But yes, it’s good to know that vignetting is also possible with the exposure module and split toning is also possible with color balance rgb. But that’s good to know regardless of Lightroom.
An exception for me would be the white balance, because (in the new workflow) it is set via color calibration in darktable and not via the white balance module, as one might assume.
But you can add one or more “Alternatives” columns to the list.
For example:
vignetting after cropping - vignetting - Alternative: color balance rgb
IMO it’s pointless.
There are no equivalents, even if something has the same name, like Exposure - it’s not doing the same thing. And you will never know what exactly LR is doing when you push slider, as it’s closed source program…
In one word: masking.
Split toning and vignetting requires masks (even if you don’t set them, they are used internally). Older modules work in a display-referred space, which is troublesome with masking (ugly transitions, halo forming, etc.). And the alternative modules which allow to obtain the same effects are more generic, not dedicated to one effect.
If you want the full story, look up the initial posts on the introduction of filmic.
I’d say the decision is entirely up to the user. For me, the ability to use a few basic modules with flexibilty is actually simpler and gives me greater creative control than a specialized module. Also, the newer modules have improved color science so they may give you better results.
Here’s an example from a snapshot I took last summer at the Isaak Walton wetlands in Rochestor, Minnesota. Here’s how the Vignette module appears on the pathway:

Its just a circular mask, where I can adjust its basic shape, fall-off, and saturation along with a few other things. It’s not bad, but I could do a lot more with Color Balance RGB:
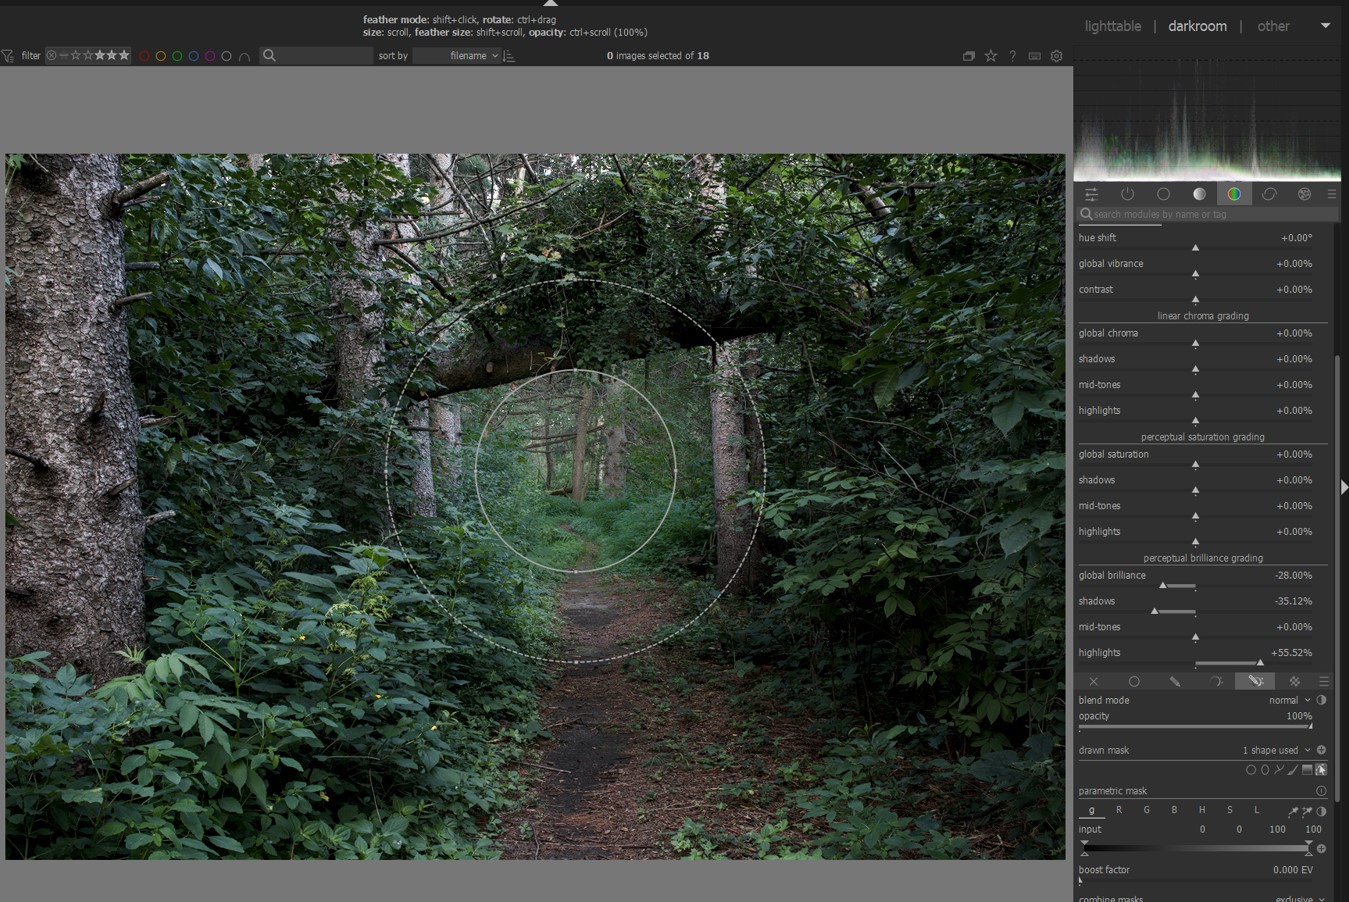
All I did was add the same circular drawn mask, but instead of a simple exposure fall off, the module allows me to darken the shadows and brighten the highlights. I think this photo is more interesting. But unlike the Vignette module, I have the option to go beyond simple shapes:

With a free-hand drawn mask I have complete control over the photo. Plus I have all the other tone and color capabilities in this module. Doing the same edit with the Vignette module would actually be much more work, so that’s why I lean towards a few basic modules over a lot of specialized features. It also makes translating from Lightroom or Capture One a bit easier ![]()
1 Like
A reminder that darktable is not a lightroom clone. The less users think that, the better of they’ll be.
The less that users think they can just port their existing workflows from LR to dt, the better off they be.
The “equalvent” modules are all display referred.
3 Likes
I reached out to Christian Moehrle, the author of the YouTube video, and he was kind enough to allow us to upload his raw image and try out our edits. So here are the files from his Google Drive and a screenshot of the final image from his YouTube video:

DSC00773.ARW (47.1 MB)
DSC00774.ARW (47.0 MB)
DSC00775.ARW (47.0 MB)
Photo courtesy of Christian Moehrle. Persmission granted for non-commercial use only. Please visit his video at 7 Pro Photographers Edit the Same Raw Photo: See the Transformations! - YouTube and consider subscribing to his channel at https://www.youtube.com/@ThePhlogPhotography
5 Likes
One good example of where this idea of translation breaks down is in the most simple module exposure… Take an edit in DT and you might add 2-3 ev of exposure depending on the shot…you won’t likely add near that in LR and someone will say what the hell is DT doing? If I add x in LR it looks nothing like what DT did… Its what I was referring to as trying to learn from mimicry…
Or because DT works in a scene-referred way the various fulcrum sliders that define cross over points for module adjustments and things like contrast… and how this can be leveraged to impact the resulting effects …
In LR you are likely to start out with a bright saturated image unless you use linear profiles and neutral processing which would be a closer starting point to what you will experience in DT. If not then the path to the final product wont be nearly the same. In DT you will be adding back lots of saturation etc etc and in LR this might seem excessive… So again following a recipe from LR might not come close to a similar result in DT due to the different ecosystem and starting points for the image.
Its not like a general comparison might not be useful esp if someone has a lot of previous experience with LR… but learning DT from translation/mimicry from LR videos would seem like time not so well spent. DT has so many little nuances around how the modules interact and good or bad many paths to the same result whereas LR takes a lot of development shortcuts with profiles and presets the exact nature of which might not be obvious or would require considerable effort to decipher. This offers a starting image that usually will not resemble the one you have in DT unless maybe you use the basecurve in DT …
For general concepts like blending modes there are tons of good videos out there in Affinity Photo Gimp and Photoshop that can be really helpful to demonstrate use cases and the math. This would extend to other concepts around color, tone and color management. But a focused attempt at module or slider level translation to get a similar result in a different environment that supports a different workflow and approach to processing the image IMO might actually hinder and delay true mastery of DT and the tools it provides…
Everyone has comfort zone for learning and perhaps this, ie the translation approach is the ground truth for some…
I think to a degree I tried a bit of this when I first started to use DT and if anything I think it complicated my understanding and mastery of DT by trying to work in this translational way. I found it better to just get on with learning how and why DT behaved as it did and to follow DT users and observe their experiences and advice …
4 Likes
Yes if you venture out into the greater internet photography community, the amount of “My mom’s cousin’s dog’s friend told me dt is a drop in replacement for lightroom so I tried it, but it isn’t that at all” is too damn high.
1 Like
When I started using darktable around 8-10 years ago I was also new to RAW editing. What I did was to watch a lot of Lightroom tutorials to learn what I was able to do and then I watched the few available darktable tutorials and read the manual and the articles on darktable.org to learn darktable. That worked pretty well for me, and I was pretty much able to translate the general concepts and figure out which darktable tools to use for different things. I have never used Lightroom for anything serious. I have access to it through work, but I only play with it from time to time just to see what it’s all about. I must say I feel constrained when using it, darktable makes me feel much more free.
2 Likes
I must say by gross omission I recently gave a shout out to @s7habo and @Bruce_Williams as mentors that pushed me along and got me through the teething pains of trying to learn DT and I should have also mentioned you. You produced an excellent set of videos a few years back and they were a really clear and concise set of videos that provided a nice companion to the work that Bruce and Boris were introducing us to…Thx very much you answered many a question…
Thanks Dave for doing that!
I’ll upload my version a bit later.
1 Like
Now that we have permissions to post the photo from the YouTube video, I’d like to share my attempt at following along with Christian’s edits using darktable:

DSC00774.ARW.xmp (16.3 KB)
I basically took his choice of edits and applied what I felt was the closest analogous approach in DT. I think this looks pretty close to his final version. BTW, here’s how the image looked when I first opened the raw file, with Sigmoid activated:
1 Like
This is the edit I did when I started watching the video, before I saw Christian’s result. I was surprised that it wasn’t more dissimilar.
DSC00774.ARW.xmp (15.1 KB)

1 Like
Thanks a lot @Dave22152 ! Now is time to make video. ![]()
Stay tuned!
10 Likes