I have this picture of my cat from a few years ago, and while all other photos are fine, I’m unable to get correct color on this photo with the color calibration module.
After importing, with default setting (but with sigmoid) the picture looks like this:
The sofa should be red!
I have tried all settings and sliders in the color calibration module, but I cant get correct colors when using it, the only option is to enable ‘bypass’ or disable it altogether, and just use the while balance module with ‘as shot’. This way the image looks like this (correct):
My question is: Am I doing something wrong or is this some edge case where the color calibration module just does not work. And if so, why is it the default if it doesn’t always work?
You haven’t provided any detail about what you’ve tried, so its hard to give advice. You should give some details and maybe screenshots about what you’ve tried.
Any automatic thing generally won’t work 100% of the time or else we’d just make the 100% working thing the default.
Custom (Looked at a bunch of different hues with different chrome values)
Tried the ‘adaptation’ option but those did not affect the results.
Changing to ‘camera reference’ in the white balance node doesn’t do anything but does change the sliders. The other option here gives an error when used with the color correction node.
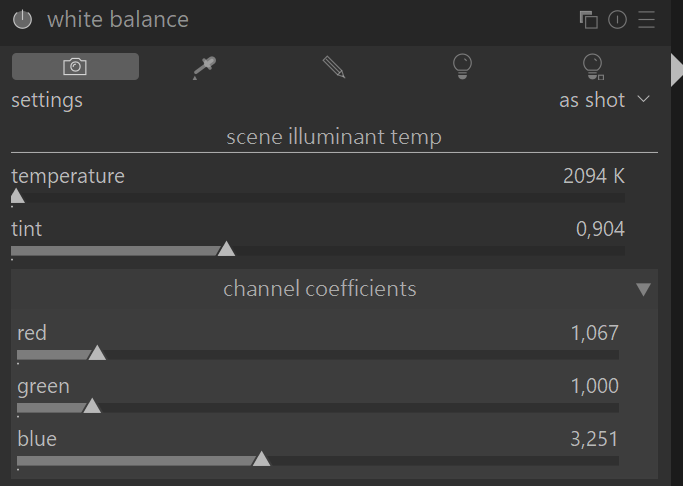
These are the while balance option when set to ‘as shot’ (and thus when it looks correct):
It is a Samsung A52 4g (I do not know which sensor the main camera has.) And the .dng files were probably produced by lightroom mobile (exported as ‘save original’). I will look at this section, but I have never had strange colors with this phone/camera its only these 4 photo’s of my cat on this sofa.
Changing the channel coefficients in the white balance module causes the color calibration module to be disabled though.
Can you look in the CC module and be sure that you have not altered the default color mapping settings…they should be 50 for L and 0 for Chroma and Hue…
This can sometimes give altered results with the CC module…
These seem to be the default settings.
Here is the raw file: (With metadata removed, but it looks the same.) LRM_20230228_194436_1736800089832.dng (30.6 MB)
Edit: XMP file: LRM_20230228_194436_1736800089832.dng.xmp (8.0 KB)
Licence for these files: Please just use them for solving this color ‘mystery’ and nothing else, these are personal photo’s. I am not a lawyer.
If the default as shot in camera aim point of the CC module didn’t work, but the as shot in camera option worked in WB module alone I would regard that as the best way to go with the image because you mentioned it as a rare event. If using the CC module I would try some of the drop down options such as daylight. If the drop down options didn’t work I would expect the CC module to be able to set neutral color on a black and white cat so I would use the eye dropper restricted to the cat’s fur. If the lounge was included in the area being read the color will definitely go off. But aiming for grey means that chroma has to be zero in the area color mapping.
Maybe with your cat’s permission you could share the original raw file with suitable licence so others can look at the problem of color balancing this image and if you include your xmp file we could check what you have done.
Looking at your xmp file you had set the WB module to as shot in camera, but it needs to be set to “as shot to reference” and then the CC module can do its intended job to match the as shot in camera. Let me know if this resolves your problem.
Technically L should be 50… this setting like a couple of others in DT is sticky, ie you can only manually reset it by resetting the sliders…a module reset does not reset these nor does moving to the next image or closing and opening DT… there is a reason for this related to the embedded color matching function of the module…nevertheless its something to watch for because if you tweak those values and then use the picker for wb with CC module you will get distorted colors…
Interesting!
It seems like the colors look correct for this picture when the input profile and the working profile are set to the same value. (For example ProPhoto RGB for both also looks good.)
And indeed seems to have something to do with the really low color temperature, Darktable reads the file as 2094K, while the built in camera app does not lower than 2300K. (Even in auto mode.) An app like Lightroom mobile DOES go lower in auto mode, and that does not work well the the color transforms apparently.
I am able to reproduce this issue by taking a picture of an orange screen (with a red square on it) and set to WB to auto, in darktable the image looks like this:
While this is an extreme example it shows that it is possible to recreate the scenario.
Anyways, as a (short therm) solution I will manually correct all photos with a measured white balance lower than 2300K by not using the CC module, as I do like the CC module for other scenarios.
I played some more with the original image. Changing the illuminant to A (incandescent) gave a red couch as well as different choices of F (fluorescent) and LED (LED light)
I extracted the hue maps in the GIMP: Colors>Components>Decompose. In a Hue map, which is grayscale where both 0 and 255 are pure red; all other levels represent degrees of hue 1 to 359.
I think there is still something maybe in the input profile because as you say you can get the red couch but the white fur is still a dingy yellow at least for me…