Variations on Symmetric Nearest Neighbor Smoothing

Hi everyone!

A while ago I wrote an Observable notebook where I experimented with variations on Symmetric Nearest Neighbor Smoothing (as well as explain what that filter does to begin with). I thought that the people on this forum might be interested:

https://observablehq.com/@jobleonard/symmetric-nearest-neighbour-all-the-things

(warning: the notebook is pure JavaScript and makes extensive use of worker threads to render the filtered images live on the page, plus the code is also not very optimized. So it will likely slow down the browser tab for a bit while it does a lot of work. Sorry about that :sweat_smile:)

I’ll give a short summary of how it works. The general concept is very easy to grasp:

  • start with a basic box blur
  • instead of just averaging all surrounding pixels, select the least different from each symmetric pair:

For center pixel C, P2 is selected and P1 is discarded
image

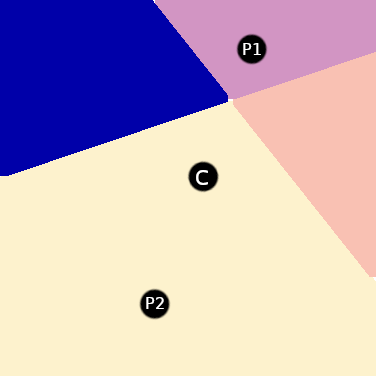
  • average the selected pixels.

Congrats, you have just implemented a symmetric nearest neighbor smoothing filter!

Example images: (note: the forum seems to show a downscaled version of these image, to really see the differences you might have to open these images in their own tab or save them, and then compare them side-by-side)


Box blur:


“Box blur” SNN Smoothing:


This explanation glosses over quite a few implementation details, like how to determine which pixel is nearest (I ended up using the Kotsarenko-Ramos YIQ color difference metric).

Now here is the fun part: we can easily “remix” this filter, for example using a Gaussian blur instead of a box blur, for slightly improved image quality:

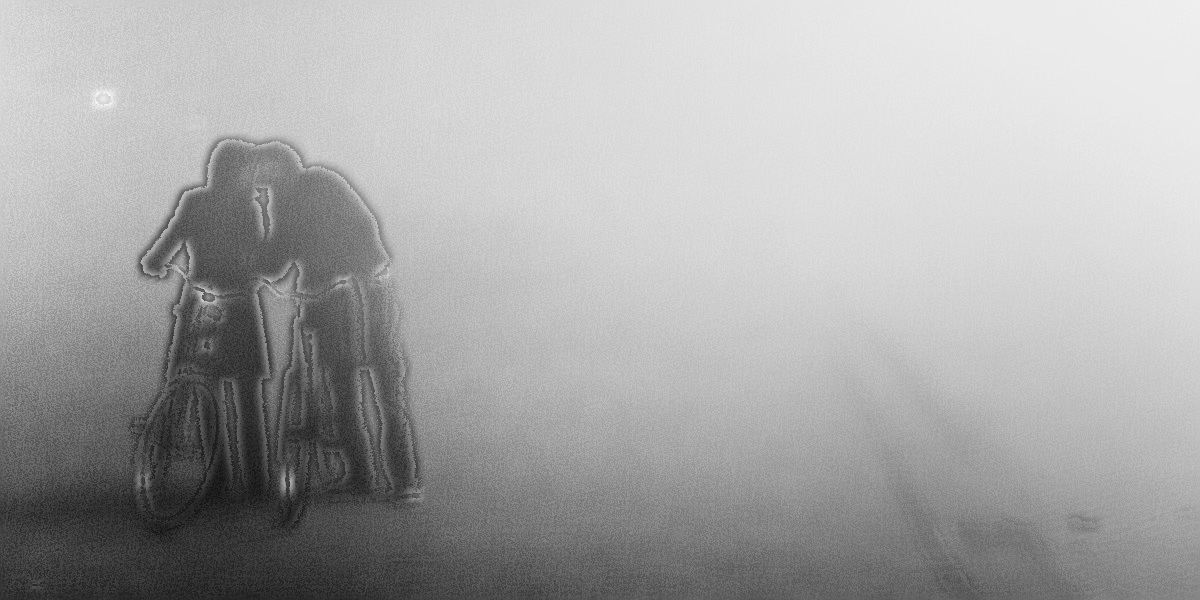
"Gaussian blur SNN Smoothing:


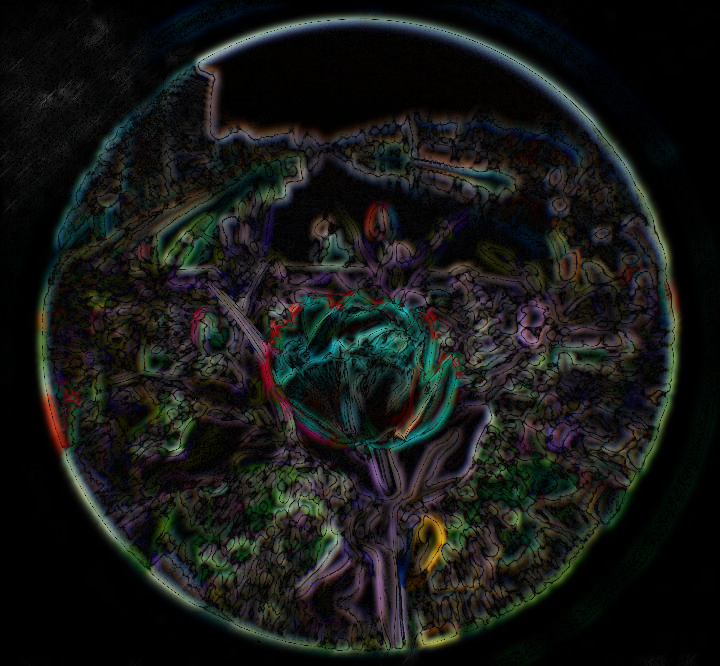
Or how about selecting the most different neighbour instead of the most similar one?


… then using that as the basis for simple edge-detection:


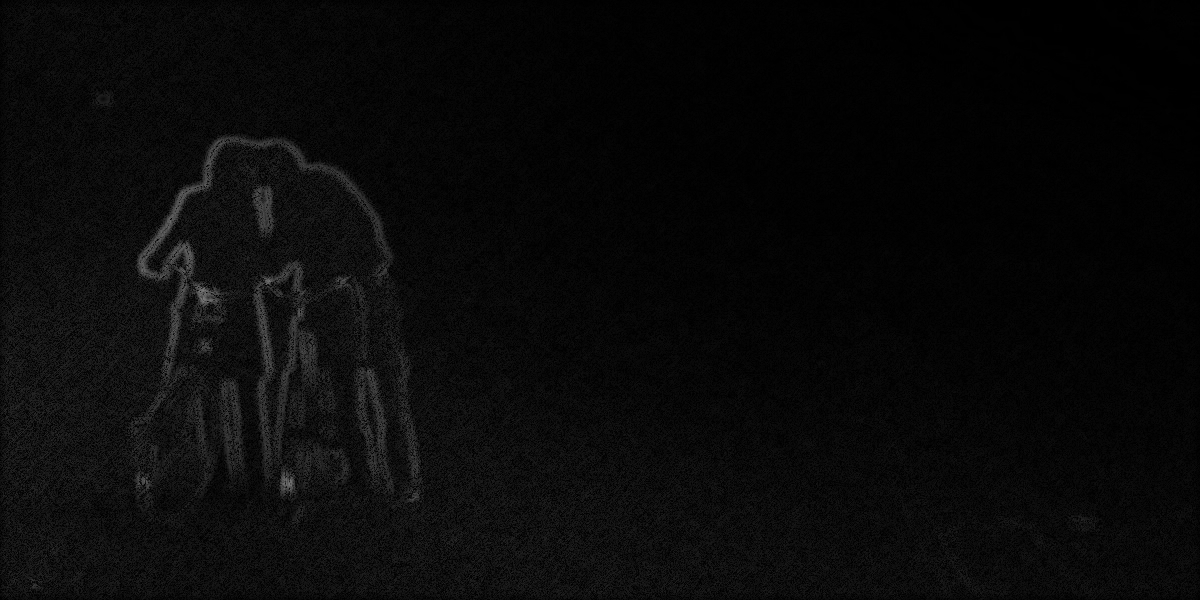
And once we have edge-detection we can build a sharpening filter:


… and finally, we can combine it all together: pick both the nearest and furthest neighbors over a Gaussian kernel, normalize the furthest neighbor by nearest neighbor, average over nearest neighbors, and subtract (normalized) furthest neighbors. The result is a detail-preserving smoothing filter:


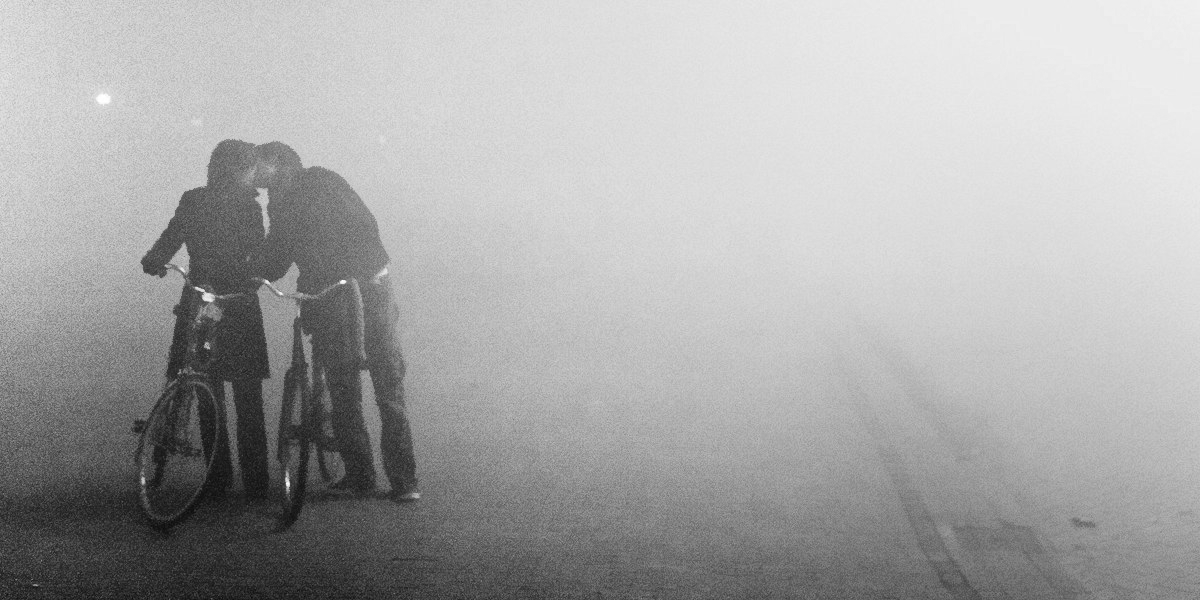
(note the dust in the upper-left corner of the tulip picture, and the highlights on the bikes in the kissing photo)

So anyway, after playing around with this for a bit it turned out that this was quite a versatile technique, and I was thinking that the more experienced image processing people here probably can do more interesting things with it than me ;). Hope you enjoyed the brief write-up,

Job

5 Likes

Unusual indeed! Here’s G'MIC version (not optimised but it’s ok):

gcd_symmetric_blur : skip ${1=3}
  repeat $! l[$>]
    +srgb2rgb rgb2yiq. sqr. compose_channels. add
    f.. "begin(const boundary=1;const K=$1;const D=K+1;const N=2*K*D+1);
      ref(crop(x-K,y-K,z,c,D,K,1,1),TL);
      ref(crop(x+1,y-K,z,c,K,D,1,1),TR);
      ref(reverse(crop(x-K,y,z,c,K,D,1,1)),BL);
      ref(reverse(crop(x,y+1,z,c,D,K,1,1)),BR);
      ref(crop(#-1,x-K,y-K,z,0,D,K,1,1),MTL);
      ref(crop(#-1,x+1,y-K,z,0,K,D,1,1),MTR);
      ref(reverse(crop(#-1,x-K,y,z,0,K,D,1,1)),MBL);
      ref(reverse(crop(#-1,x,y+1,z,0,D,K,1,1)),MBR);
      X=i(#-1,x,y,z,0);
      A=(abs(MTL-X)<abs(MBR-X));
      B=(abs(MTR-X)<abs(MBL-X));
      (dot(TL,A) + dot(BR,(1-A)) + dot(TR,B) + dot(BL,(1-B)) + i) / N
    " rm.
  endl done

Edit: found a couple bugs, probably some more but it’s a start…
Edit 2: think that’s it now!

2 Likes

Thanks for sharing. Wasn’t aware this was implemented in GIMP.

Remarks

I need elaboration to appreciate what I am seeing.

Merely looking at the results (in particular the last two images), it looks like the edges are sharpened while the rest of the images get only a tiny bit of blurring. By sharpen, I mean that the once blurry edges in the input images are now high contrast edges, so much so that we see aliasing.

It reminds me of my experiments on selective smoothing where edges are not touched or only touched by the smoothing filter. What I described in the previous paragraph seems to not do that. Rather, edges are enhanced (sharpened) and so many details are kept that the smoothing isn’t really that noticeable.

GIMP’s implementation is found under Filters → Enhance rather than Blur. I guess that is where it should be after all. From GIMP, this is a comparison that makes more sense to me.

1 Like

@JobLeonard is there a link to the paper about colour difference? Reason I ask is it appears to be the square of L2 norm in YIQ. But if you’re only comparing less than greater than it makes no difference which basis you’re in, so may as well just do that in RGB.

1 Like

Do you discuss those experiments anywhere on this forum? I’m curious now…

You should know that the filter applied to the last two images was a bit of a rough experiment by me, and that it has fundamentally different behavior than all the other ones. I’ll get into that in a bit.

Anyway, you are entirely correct that in general these are both smoothing and edge-enhancing filters. This makes a lot of sense in the context of what the original filter was designed for: removing noise from data sets, and not necessarily photographic ones:


source: https://subsurfwiki.org/wiki/Symmetric_nearest_neighbour_filter

In the quick summary I gave here I forgot to mention that. In my defense, my post was getting rather long and I didn’t want to lose everyone’s attention. The notebook I linked goes into far more detail about what happens. Describing the effects of the basic SNN filter for example:

And just like that our general blur turns into a filter that both smooths and (somewhat) enhances edges! For example, the dirt in the upper left of the tulip photo is mostly smoothed away. At the same time, the edge of the outer ring of the fisheye lens is more defined. For other examples of the edge-enhancing effect, look at the blurry buildings in the horizon. While there is no fine detail to recover, what used to be a blurry transition to the sky changed into a sharp edge. Similarly, the couple in the second photo has a sharper silhouette, while the overall amount of grain is greatly reduced.

However, it’s not all good. If you look closely there are some strange “inverted area” effects happening. For example, some of the small leaves in the bottom background of the first photo: their edges are enhanced, but their centers are actually blurred with the pixels outside the leaf. A similar effect can be seen with the bright spot in the upper-left of the kissing couple. It is much more muted than before.

What causes these “inversion” effects? Well, I set the blur radius to 10 pixels, so the total pixel area being averaged over is 21 by 21 pixels. If a leaf has a smaller area than that, say 15 by 15 pixels, then a pixel in the middle of that leaf will have many instances where all four selectable neighbours are outside of the leaf. Meanwhile, for a pixel on the edge of the leaf there will always be one selectable neighbour inside the leaf. So counter-intuitively, pixels at the edge of an area have a better chance of only selecting neighbours inside that area!

It is the selection for most similar pixels that results in gradient edges being sharpened: the pixels on the edge of an area will be averaged to the pixels on the interior of an area.

So about those last two images. What is happening there is that it combines both the “unsharp mask” variant with the “standard” (Gaussian) variant. I’ll copy the code I used for that below and describe what it does here

  • in crosswise selection, we pick the most and least similar colors, as well as keep track of how different the colors are
  • we keep four running sums:
    • most different color
    • least different color
    • total “max difference”
    • total “min difference”
  • after selection, we normalize the most different color sum, as well as the least different color sum (that is, we get the average color)
  • we scale the average most different color to average least different color, basically `avg most diff color * (sum of max diff) / (sum of min diff).
  • we determine the final color by adding the average most similar color, and subtracting the scaled-down average least similar color

What this results in is that when most and least similar colors are almost identical, they cancel each other out. That is why a lot more fine detail and noise is preserved than before. It also almost completely avoids the inversion-effect I mentioned.

There is probably more to discover with some experimentation but this is as far as I got :slight_smile:

function symmetricalNeighbourSharpenNoHalo({source, width, height, radius}){
  if (!(radius > 0)) return source.slice();
  let target = new Uint8ClampedArray(source.length);
  let totalWeight = 0;
  const kernel = bellcurvish2D(radius);

  // because we're dealing with quadrants again, we only want
  // 1/4 of the kernel weights plus the central pixel.
  for(let x = radius ; x < kernel.length; x++) {
    const row = kernel[x];
    for (let y = radius + 1; y < row.length; y++) {
      totalWeight += row[y];
    }
  }
  const centerWeight = kernel[radius][radius];
  totalWeight += centerWeight;

  const norm = 1 / totalWeight

  const {min, max, abs, round} = Math;
  for(let y = 0; y < height; y++) {
    const line = y * width * 4;
    for (let x = 0; x < width; x++) {
      const cIdx = x*4 + line;
      const r0 = source[cIdx];
      const g0 = source[cIdx + 1];
      const b0 = source[cIdx + 2];
      let rf = r0 * centerWeight;
      let gf = g0 * centerWeight;
      let bf = b0 * centerWeight;
      let rn = rf;
      let gn = gf;
      let bn = bf;
      let diffF = 0;
      let diffN = 0;
      for (let dx = 1; dx <= radius; dx++) {
        const row = kernel[radius + dx];
        for (let dy = 0; dy <= radius; dy++) {
          const {minPick, minDiff, maxPick, maxDiff} = selectDipole(x, y, dx, dy, source, width, height);
          diffF += maxDiff;
          diffN += minDiff;
          const weight = row[radius + dy];
          rf += source[maxPick] * weight;
          gf += source[maxPick + 1] * weight;
          bf += source[maxPick + 2] * weight;
          rn += source[minPick] * weight;
          gn += source[minPick + 1] * weight;
          bn += source[minPick + 2] * weight;
        }
      }
      const diffscale = (diffN > 0 && diffF > 0) ? diffN / diffF : 1;
      rf = (rf * norm - r0) * diffscale;
      gf = (gf * norm - g0) * diffscale;
      bf = (bf * norm - b0) * diffscale;
      rn = rn * norm - r0;
      gn = gn * norm - g0;
      bn = bn * norm - b0;
      // instead of neutral grey, we now apply
      // the difference to the original pixel
      target[cIdx] = round(r0 + (rn - rf));
      target[cIdx+1] = round(g0 + (gn - gf));
      target[cIdx+2] = round(b0 + (bn - bf));
      target[cIdx+3] = 255;
    }
  }

  return target;
}

@garagecoder: well, as you can see I do use it near the end to “normalize” a difference, but in a completely unscientific fashion. There probably is a more appropriate metric to use there.

Here is the original paper:
http://riaa.uaem.mx/xmlui/bitstream/handle/20.500.12055/91/progmat222010Measuring.pdf?sequence=1

If that link ever breaks, look for: Measuring perceived color difference using YIQ NTSC transmission color space in mobile applications (2010, Yuriy Kotsarenko, Fernando Ramos).

Thanks, just on the lookout for optimising and user selectable channels :slight_smile:

Is there any srgb to rgb “gamma” conversion to linear (assuming srgb inputs)? Probably need to account for that at least in the colour space conversion. Also applies to the blur itself, but there are differing opinions on that…

1 Like

No, I haven’t. I am usually mum about these things because there is not much to share. The basic idea is do accurate edge detection and use it to weigh the influence of the smoothing filter.

True. I found the notebook hard to follow, mostly because the body text area is smaller than the code blocks and images. Contrast that with this forum’s, which is much more readable.

While I find this unnatural, I imagine this would be useful for object detection and masking.

YIQ Not so sure about this one. :sweat_smile:

No, this is excessively slow in JS, and the notebook was slow enough already. There definitely should be possible improvements via a better choice of color space.

You and me both :wink: