Weird edges after filmic's highlight reconstruct

The images are indeed screenshots, but I think it’s likely a processing issue because JPEG exports of the RAW retain those edges if the quality is high enough. The kit lens is a 16-50mm.

Which HL reconstruction method did you use? Looks like it might have been clip highlights. Make sure to try the others.

Aurélien talks about the purple fringing in this video:

I think this one also has something on it:

The red line down the left edge is either bad data or a bug. Try again to post the RAW here so we can see if it happens for others.

The mentioned video is simply outdated.

The purple in the clouds is definitely not chromatic aberration.

OP, what version of darktable are you using?

I have seen this often. I call it magenta hell.

When working with problems like this in the past I discovered I needed to just lower the clipping threshold in the highlight reconstruction module. But don’t go too far or the saturation in the blue sky would be lost. Easy fix and not an uncommon problem in DT.

I would not use Filmic’s highlight reconstruction on this image. I just noticed opening up an example image of ‘magenta hell’ that the new default inpaint opposed setting in the highlight reconstruction module works better than the previous options and just needs the threshold reduced. So thanks to the developer of inpaint opposed. Great job yet again by the DT team.

1 Like

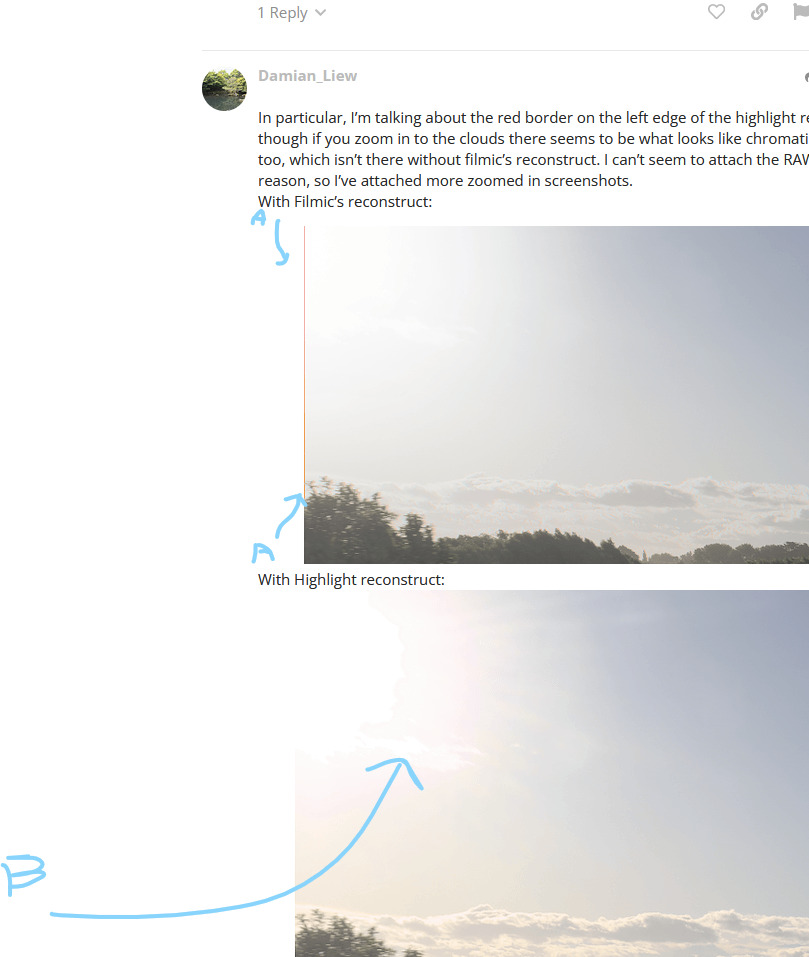
I believe there are two different issues under discussion here. See screen shot below… I think @kofa (and myself) is referring to (A), thye very fine red line at the edge of the image, while @Terry I think you are referring to (B)?
I understood the OP’s question to be about (A), but there was a reference to (B) as well.

Apologies if I misunderstood.
Edit: for got screenshot:

I don’t know what the red edge is in A…
In B lower the reconstruction threshold so this magenta part disappears.

I used inpaint opposed. Results for HL reconstruction were fine too, the problem only arises with Filmic. I’m finally able to attach the RAW so here you go.

DSC00057.ARW (23.7 MB)

Yes, I was indeed talking about the red border. Solving the magenta problem can easily be done by adjusting thresholds, transitions and grayness sliders in my exp., as mentioned by @Dinobe and @Terry . Though even for this, I’m not so sure if I should be adjusting settings in HL reconstruct or filmic’s reconstruct? Playing with inpaint opposed mode’s threshold doesn’t seem to give much better magenta removal for me.

1 Like

I’m using ver. 4.2.1 on MacOS Ventura 13.2.1. Device uses arm64 architecture if that’s relevant.

My bad. I misunderstood. I will look at the raw file later

My view on this is start with the HLR module, then if it’s still not right, add the filmic reconstruct as well. I think thats how it’s intended to work…

Opening the image with defaults:

Disabling filmic and dropping exposure shows that there is magenta in the highlights. filmic will then take that as input and tone-map it. Maybe this is less visible with sigmoid due to it desaturating the highlights.

Dropping the recovery threshold does not help in this case:

Changing the method to clip highlights or reconstruct in LCh still produces coloured highlights.

Since recovered (or clipped) highlights in the output of those modes is guaranteed to be neutral (R=G=B), we can deduce that this is a case when color calibration, when adapting the white point from D65 (camera reference in the white balance module) to the value read from the camera shifts the colours.

This is a known problem of the modern chromatic adaptation method.

Falling back to the legacy white balance method (disabling color calibration and setting white balance to _as shot) results in neutral highlights with recover in LCh:

Switching back to inpaint opposed, restoring exposure and turning on filmic, after these changes:

I never got the bright red line on the edge, though.

You may also try guided laplacians as the reconstruction method (it really needs a GPU, or lots of patience, though). The following screenshots were made with the modern chromatic adaptation method, so white balance set to camera reference and color calibration enabled. The trouble is, we have 2 magenta spots: the Sun and the lens flare, of different sizes:

The radii that work on the lens flare (64 or 128) do not work on the Sun:

Large radii, which (more or less) work on the Sun propagate false colours don’t fix the lens flare:

The following is the image with defaults (modern chromatic adaptation, filmic as tone mapper), filmic auto-tuned, then preserve chrominance set to no. Note the desaturation:

Conclusion: all those clever algorithms cannot fix the data that is gone (due to sensor clipping). You can choose between different methods and pick the one that provides the best compromise.

3 Likes

My version…

DSC00057.ARW.xmp (17.6 KB)


DSC00057.ARW.xmp (23.3 KB)

In my hands this image worked best in Sigmoid (see top image posted here). This shot is a crazy ask for any software to handle. I am not surprised when we ask software to fix totally blown pixels that something will go wrong. I don’t see any bugs with the software, just asking too much of DT or any program with an image like this.

@kofa sorry for misinterpreting your previous comment. BTW, I could not replicate the red line and suspect it may be some user settings that created it. The bottom image is using filmics highlights reconstruction in my hands. I feel it did reasonably well under the challenging circumstances.

Sigmoid version.


DSC00057.ARW.xmp (5.9 KB)

Filmic Highlight reconstruction


DSC00057.ARW.xmp (5.9 KB)

Thanks for the note. Perhaps I’ll reinstall my version of darktable and see if the issue with the red border persists. Are there any preference files that I should try and purge manually considering I’m working on a mac and downloaded darktable via homebrew?

I’m not aware of any related preferences.

If you want to try that route, don’t reinstall darktable: that is unlikely to fix anything. Simply rename darktablerc in your .config/darktable directory. To start anew, rename the directory itself.

Ok. Just out of curiosity, what actually does this do?

If you are responding to @kofa…I think he is just suggesting a way to not have to reinstall but to check things out with a new fresh database and config files…

There are a slew of command line options you can add when you run DT … one is --configdir “path” if you run this you can use it to 1 specify where your config files live instead of the default location… B run DT and point it to a new clean folder and it will create fresh brand new config files…this can be good to test for an issue with corruption… or you can use this to run multiple versions of DT on the same machine… directing each to its own config folder… most common would be when you have the release version install and also you check out the current master code and or any PR that you are interested in testing…