I would say from limited experience they are more flexible and powerful including parametric and brush masks
I would say that masking is where ART has gone down its own different path from RawTherapee so reading about RawTherapee wouldnt be so helpful in this case.
There is some info about how to use masking in ART on this page if you scroll lower down.
https://bitbucket.org/agriggio/art/wiki/Home
Perhaps start with the colour correction tool as you will easily be able to see the effects of the mask. A few tips
Use the show mask box to see what area you have selected.
A mask won’t have any effect on your image on its own, it is just selecting a region of the image to apply an effect.
Use the feathering control to soften the edges of your mask, this usually makes the effects look more realistic.
The ‘delta E’ mask has now been renamed to colour similarity mask. I find this mask one of the quickest to use. You use the pipette to select a colour on the image then turn on the show mask and you will see that it has selected all parts of the image that are a similar colour. You can adjust the range setting to select a wider or smaller range of tones. Don’t worry about the other sliders for now. This could be used to select the sky or some grass in an image which you could then change the colour or brightness using colour correction.
Hope that helps.
That’s where the articles I referenced are located. Without some help figuring out what/where the “Add Polygon” button can be found I don’t think I’m going to make much progress.
Get an image of a color chart and expt masking things…
Its quite easy
For the 4 modules in LA in art you can keep adding masks and each mask can have multiple elements set to add subtract or intersect…
So add a new mask here…

As for your question…that would be an area mask…add gradient polygon or rectangle with the icons with the “plus” signs…

So for this mask you could start with a polygon

and then add elements to that polygon…choosing how they interact…
Here are three brush strokes …one in full erase at 100% a second erase at 30% opacity and a third stroke set to add at 30% opacity…collectively the yellow bits are your mask and strength…
Its just a dumb example but it give you and idea…when combined with parametric and color selection masks you can create very complex masks…

Ah I see what you mean now. Just on my phone so can’t send screenshot but if you look at Todd’s post above, the 2nd picture down, 3rd top button from the right which is a pencil and a polygon shape, that is what they mean. Most of the buttons have a tool tip if you hover above them but perhaps not all.
Draw polygons by pressing control and click to add points. There are ways to adjust the corners so they are round rather than pointed but not got that info to hand right now.
HTH
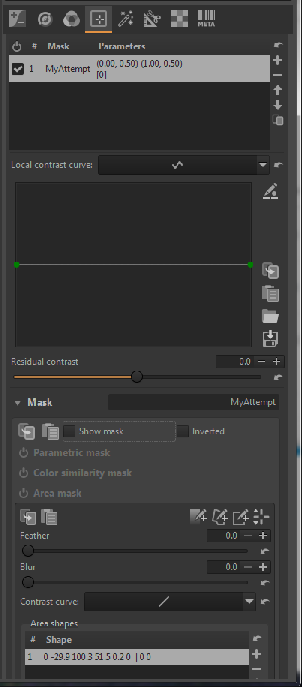
Todd’s screenshots are helpful. Apparently, I had NOT yet figured out how to open that Window where the “Add Polygon” (and other) button is located. Now I’ve succeeded at doing that and have elected to draw a rectangle for experimentation purposes. That all seems to work but apparently there is some trick to making it active. When I check the box that says “Show Mask” it appears to cover the whole screen.
The screenshot that follows shows the mask I created (i.e., parameters) at the bottom but it looks to me like those parameters are NOT what is being used which I believe is what shows up near the top of the screenshot.

If you are curious and you understand French or can work with subtitles…there are a nice set of videos including mask by this YT creator
https://www.youtube.com/channel/UCXqw9EmSynpR-Tbl5qH5jDA
Including this one and the few that come before it on using masks in ART

Yes! When I do that my rectangle is displayed when checking “Show Mask”. I should point out that I thought I’d already done that as it seemed to be the way to open the screen for creating an “Area Mask”, which is where the “Add Polygon” button was located. Also, I was sort of expecting to see some change in what I think are parameters associated the mask I named “MyAttempt” (i.e., confirmation that revisions were in effect), that is displayed up top right under “Local Contrast”, but nothing changed there at all.
Also, based on this little gain in knowledge, I’m thinking, it looks like what is called a mask (i.e., singular), such as what I called “MyAttempt”, may contain a combination of all of the types of masks (i.e., Parametric, Color Similiarity, Area, Brush). However, under “Local Contrast” it looks like it is possible to keep adding masks using the + (plus) button on the right side. This begs the question, “what are those and where do they come from?”.
The mask singular is the final mask that you end up with. All elements will contribute to this. I think each mask at the top allows for a different LC curve to be applied and the mask elements for that Local adjustment below can be combined to create the “mask” for your selections in the top panel… so say one mask adjustment for the sky and a different one for the foreground…make sense

There is now a very similar question.
Alberto has given a very clear answer:
Yea, they (ART- Local Contrast and RT’s Advanced > Wavelet levels > Final Touchup > Final local contrast) are the same.