I followed the instructions here for making a custom camera profile for my camera. I’d like to try it out now, but I’m not sure what the “normal” processing workflow is like with this.
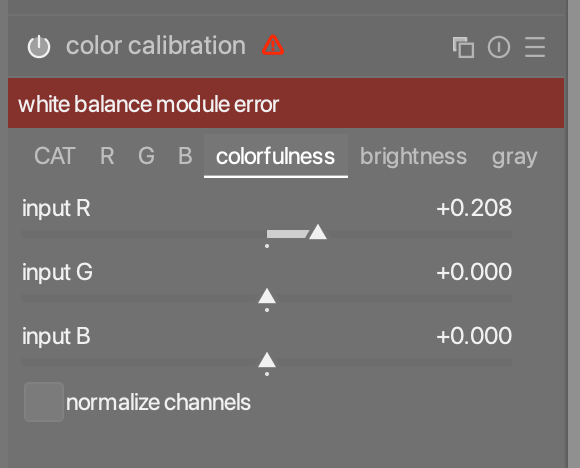
I was able to create the color profile, then import the profile in to the styles module in light table. I can successfully apply the style to an image, but if I try to change anything in the color calibration module, I get a “white balance module error”:
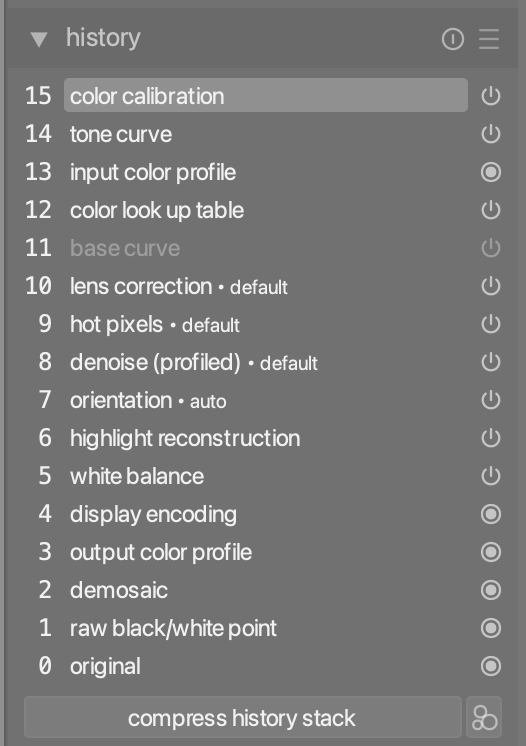
I’m using a prerelease version of Darktable (v5.3.0+229). In the preferences section, I changed “auto-apply pixel workflow defaults” to “none”. Here’s a screenshot of my history stack:
I think making your style you might have altered WB and when you apply that to a new image and making changes to the first instance of CC will flag that as a double wb correction possibly… You can add CC with the channel mixer preset…does that fix it??
I’m not exactly sure how you get the most out of this in the scene referred workflow…you can try it with both the tone curve and the CLUT instance that gets created…did you make it against the color chart or a camera Jpg for a match…
EDIT
Maybe just keep the CLUT part of it…and see what that looks like
Do you mean you want to continue using it for white balance? Then you probably shouldn’t mess around with these profiles. Color calibration CAT expects D65 balanced data from the white balance module, and may not work properly if that’s not the case (hence the error).
That also disables the tonemapper. So you will either have to activate it manually or be sure to handle the dynamic range in other ways.
The history stack isn’t very useful for knowing how the image is actually processed. We need to see the list of active modules.
In any case, these profiles are really intended for a display-referred workflow. The tone curve, for example, works in Lab and may have issues with high dynamic range. Is that what you want?
I think most of these come out with an instance of the TC and the CLUT module…I think when you choose the option of the jpg instead of a color chart you get something like the RT automatching TC starting point or I think that is the idea so I think to make much use of this after going through all that you have to go as you say to a more display centric approach or otherwise the modules produced in the style likely wont produce the result expected…
I think the channel mixer preset does just what the FAQ suggests ie set the CAT to bypass…
If TC is essentially intended to be used as a tonemapper with these profiles, then they should really not be used with modern cameras with their huge dynamic range. That Lab curve could do some ugly stuff.
Ya I agree thats why I said I wasn’t sure what you could get out of it…I feel like this was talked about on the forum a couple of times and someone said they just use the CLUT part for some color adjustment but I think you could likely get something similar or better and working with the scene referred modules by making the adjustment in the CC module using the color checker there…
Thanks. I think I understand where I’ve made a mistake. When I took the image, I had accidentally set the WB incorrectly, so I fixed it in the whitebalance module rather than color calibration. It’s totally my fault, so thank you.
Got it, thanks. I’ll know better next time.
In the past I’ve mostly been using scene referred workflows. From what I understood, calibration with a color checker would improve colors in my final images. Is this not applicable for scene referred workflows?
I would expect to get better colors than only using a grey card. I admit I’m very much a newbie when it comes to this stuff though.
That’s correct, but it’s not what you’re doing here. These profiles are intended to get a starting point that’s similar to the camera JPEG look, and have nothing to do with actually accurate colors.
Thanks @priort, this video is very helpful. I kind of wish the video had comments enabled so I could ask questions though. Fortunately I have a monitor calibrator so I can follow along.
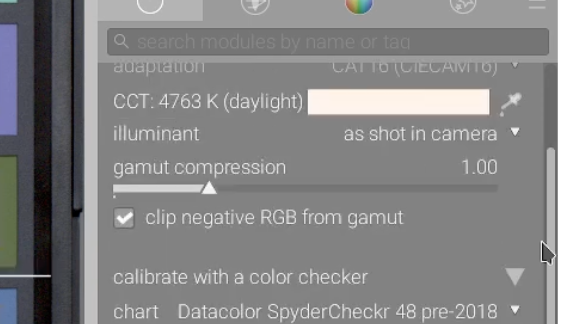
However, at one point they enable the color calibration module (to use with the color checker), but they also specifically call out enabling the custom white balance preset. In the video, they’re using “as shot in camera” for the illuminant in the color calibration module (this is a screenshot of the YouTube video):
But when I do the same thing, I get the “white balance” error (which makes sense given the info in the FAQ). Later on in the video, the demonstrations make use of both the custom white balance as well as the color calibration and there is no white balance error (but I’m getting white balance errors).
The video says I should take a photo of the color checker in “daylight” light. Should I take this to mean D65 light? Or does it matter?
This part of the video talks about changing the exposure module will impact the normalization values in the color calibration module, but I’m not seeing that.
I can make a screencast of my process, but I feel like I’m following the video pretty closely. Given the wording in the FAQ, I’d expect to get WB errors, but they must be doing something different in the video to not get them. I’m not sure what I’m doing wrong / differently.
Sorry for all of the questions, but I’m having a rough time reproducing the video.
Indeed ICC says that white balance is part of scene-referred encoding:
Also, scene-referred files typically include demosaicing, noise reduction, camera blur removal, white balance, and some transform from camera sensor values to colorimetry.
It’s more about what this function does. It’s an older tool ie DT chart that uses 2 options. You save your raw test shot and optionally a jpg version exported to PFM. You can then choose to have it craft a style for DT that has a TC in LAB and an instance of the clut module.The options are to use the JPG as the reference to try for a correction to more closely align with that or you can choose the reference values and match on those for color accuracy.
This style is hard to work in to the modern workflow in DT and retain its role or perhaps desired out come…and then there is managing wb either legacy or using CC module to do a CAT.
A better way now in DT is the tool added to CC module. In the end you get a color optimized matrix as a set of channel mixer setting that can be used to improve color accuracy for a given input profile and lighting conditions.
This can easily be introduced.
You can also add to that the traditional creation of a custom ICC from the color checker but unless you are doing studio or reproduction work the standard starting profiles should suffice much of the time…esp when you correct them with this provided correction
A couple of small things have changed. I will have to go back and watch the video to be sure to answer you correctly. At one time the modern wb workflow used reference values in the CC module. For some cameras this was not the best as those values introduced a color cast. One solution proposed by Aurelien was to take a shot of a white screen on your calibrated monitor and use that as your d65 reference values…So that may be part of what you are talking about… Also when done he would set the module to asshot so that it could be used on other images…but let me suggest another video I have seen in the past just for more context and I will watch it again with your queries and try to address them… The exposure value is what you need to set exposure to for the profile/matrix to be accurate. I think the math uses gray patches to adjust for WB and exposure and that is taken into account for the matrix that results
There was a change at some point…Originally the exposure value calculated was to be added to the current exposure…but after that and for some time it is the exposure at which the calculations for the applied matrix will give the reported accuracy… as I understand it…
The process is described pretty well in the manual…