Why use filmic?

I’m leaving home now, so I’ll leave one example.

Default 12%

Bringing it down increases saturation on the horizon. Maybe not the best example, but you can see it changing. I’ve worked on images where the change was more prominent.


EDIT: While preparing this image for this post, I noticed that increasing White in the scene tab also increases saturation, but at the expense of loss of contrast. I particularly prefer to set White as bright as possible and then recover colors with the shadows/highlights slider if that is the case

6 Likes

I have finally come to terms with Filmic (RGB). It has been a long process but my end product has improved and my processing time diminished. Here is how I now do my processing.
The pixelpipeline is a remarkable help. I can preset most of my processing in the knowledge that dt will ensure that the correct order will be maintained. With that in mind I preset standard settings for ‘local contrast’, ‘LUT 3D’, ‘sharpening’, ‘raw+profiled denoise’ and ‘lens correction’. All that is really left to do is to apply my Filmic RGB.
What I find in the latest versions of Filmic is that the spot picker for middle-grey-luminance does a wonderful job of finding a very good starting point for setting this module. Yes, it may need a bit of final tweaking along with the black and white sliders but on the whole I am generally 90% home with this single click.
Of course, a decent exposure helps immeasurably and yes I do tweak other settings if the contrast is tricky but this general approach does get most of my processing done in a very satisfactory way and in short order.
One thing more that I do notice … the look of my images has changed with this system. I believe it is a more ‘natural’ look with less signs of processing.
I still perform local adjustments on special images that deserve the extra treatment but basic pprocessing is now a ‘breeze’!

9 Likes

Hi’ @gadolf

Thank you for your quick response. You are right, the saturation along the horizon has been improved a little bit by changing the shadow/highlights setting………:grinning:

2 Likes

If you pull up the display on the current DT 3.4 if you have it and show the ev display not the curve you will see better what happens…That slider shift the latitude region ie the saturation protected area and so shifting it left ie the slider shift the latitude tone mapped area into the highlights…it is very easy to see in that display…I am not on a PC with DT so I can’t put a screen shot…

EDIT pulled this from the blog…using this display play with the sliders…it really is the best way IMO to see what filmic is doing …when you move the slider you will see the latitude shift…

image

There is a lot to be gained in DT by moving modules around filmic. Boris Hadjukovic does it quite effectively. Often moving instances exposure, colorbalance or local contrast after filmic. As filmic comes later in the pipeline it can be better to introduce color and contrast changes after letting it do its work…just an observation…

The color preservation mode used in filmic has a strong effect…I think it defaults to power norm…it warrants checking from none through all the options…

1 Like

Hi’ @priort

Thank you for your input. I will test it when I have installed 3.4…

Sometimes an example in a slightly different context can really help…I find this a good demonstration of why filmic is used…its a blender video but sometimes the videos in DT don’t necessarily show things in a way that everyone might understand …here is another spin on filmic that you might find useful to wrap your head around it…https://www.youtube.com/watch?v=m9AT7H4GGrA&feature=emb_logo

This is a good point that I think is often overlooked - filmic does (in the general case) make it very fast and easy to get an image processed (and in a consistent manner) which is a feature in and of itself. I’ve outlined the workflow I use here (though I need to update it for the changes in 3.4 and other things I’ve learned recently) and for most images I am able to get to a finished result very quickly largely due to the work filmic does

Anyone feels that quite a few shots end up looking a bit tonemapped with filmic?

A soft look like @RawConvert above Why use filmic? - #9 by RawConvert a sort of luminous softness seems where it works best?

I’m sure it’s a matter of tweaking but when I do an edit with dt filmic and then with RT (not using log) and compare the former often looks a bit tonemapped. Is this just me?

If I understand what you mean by “looking tonemapped”, might that be due to exposure being set a bit too high, perhaps? I know that even with exposure set 1-2 EV too high, filmic is quite able to push everything back in display range. But of course, the results won’t look the same…

If you want to recover the sky, you should go to the options tab → preserve chrominance and select ‘max RGB’

  • max RGB (gives you more color in the blues)
  • luminance Y (gives you more color in the reds)
5 Likes

To be honest,

Filmic makes it so I don’t have to mess with shadows, highlights, masks…

I use it by default on everything, basically like it’s recommended. White balance, exposure to set my middle gray, then in fimic move black and white sliders to determine how much dynamic range I want to use.

In images with lower dynamic range, filmic can be everything I do to an image (my scaling and output sharpening is outside of darktable).

In images with higher dynamic range, nothing maps it are smooth and quickly as filmic…Well maybe Filmulator.
Images can come out looking a bit flat (because a lot of range is stuffed in them) but a little local contrast can fix that. If I think the shadows are too dark I can raise them with shadows/highlights or the tone equalizer.

Before almost all my images had base curve,curves, exposure, shadow highlights, local contrast, velvia.

Now they have exposure and filmic like the scene-referred default, and I only add others if the image turns out to be a bit problematic:).

So,1) I think it’s makes way more sense to work in an unbounded space until your image is done. No clipping or limits from module to module, only at the output stage (just like a DAW in the audio world.

  1. I don’t care about the default look of my camera.

  2. filmic reduces slider dragging by a lot in my experience. Specially compared to my attempts in rawtherapee and even Adobe Camera Raw.

I’m kinda surprised to see people ‘needing to come to grips with it’ but that’s just me being in my bubble. I embraced it directly since it ‘clicked’ in my head. Of course not everyone is having that reaction.

I really advice to try a few times with troublesome images with lots of dynamic range. Try to ignore old instincts, slam that exposure high if you need to to get skin properly exposed (ignoring any blown out highlights). Then activate filmic and start to bring the blacks and whites to your liking.

8 Likes

I use Filmic as part of my regular workflow, and I find that I can just leave it at the default settings unless I have an odd photo that’s skewed heavily towards shadows or highlights.

Hi’ @priort

I finally came around to install 3.4 and yes, the dynamic range mapping display shows clearly what filmic does…:grinning::grinning:.

I also watched the video on “Blender”, a piece of software that I had no prior knowledge of. The video demonstrate very convincingly, why you should use filmic and the scene referred workflow.

However, the more information you (I) receive and try to digest the more questions arise. The video recommend that you should never use lift/gamma/gain in Blenders color balance module since lift/gamma/gain are mend for display referred workflows and will not correctly hold on to your colors! Furthermore you should never use the blend modes multiply, screen and overlay for the same reason!

Does this hold true in DT as well?

Likely yes.
If you look around here, you will find a post by aurelienpierre (author of filmic) explaining, which modules and blend modes to use / avoid or the unrecommended ones at least after filmic in the pipe. (sorry, in Homeoffice, otherwise I’d lookup the link for you)

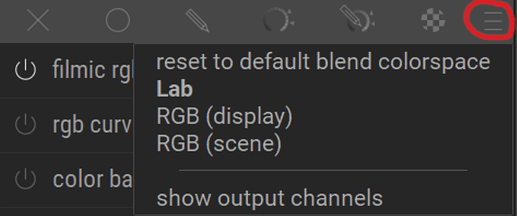
There is a hamburger for blend modes now with a preset for scene referred ones you can select that…I thought multiply is actually okay but overlay and softlight could case clipping I believe

Could you please explain what you mean by the phrase “a hamburger” and where it is to be found?

I can understand why a blend mode of multiply (or other blend modes) can change the colors in an unwanted way since it is just some manipulation you turn on/off (with the possibility of adjusting the opacity) but I’m a surprised that you should avoid the lift/gamma/gain-mode in the color balance module. The sliders are grouped into sections named lift/offset, gamma/power and gain/slope, so you get the impression that it more or less the same thing. The manual does not explain why lift/gamma/gain should be avoided except that offset/power/slope-mode is better suited for scene-referred workflows.

The hamburger button.