Hello, everyone!
Is there a way to manipulate modules from Lua scripts in the darkroom view? More precise, to adjust exposure, calculating it on the fly, where style copy-paste will not do. The final goal is to create a timelapse-helper script to make smooth light to dark transitions.
Trawling the Lua API docs and Internet didn’t help at all, unfortunately.
Hi @donda, and welcome!
I am not sure that I understand what you are after…
but perhaps the fujifilm_dynamic_range.lua script in
Home/.config/darktable/lua/examples might help you?
Have fun!
Claes in Lund, Sweden
1 Like
You can manipulate sliders and comboboxes (and some other widgets and commands) from lua in the same way as you can via the shortcut system, using the darktable.gui.action command.
In 4.2 the exact command will be shown in the tooltip when in shortcut mapping mode.

Used like this, the command will trigger the default action, which is to show the popup. If you want to change the value you can specify the “set” effect (in the last but one parameter). Then the last parameter will be used to set the slider value. Or, if it is empty, the current slider value will be returned.
For convenience, you can create the shortcut, set all the values as you want them (and test if it works as expected) and then press ctrl+C (while the shortcut is selected) to copy the exact lua command needed to the clipboard.
This:
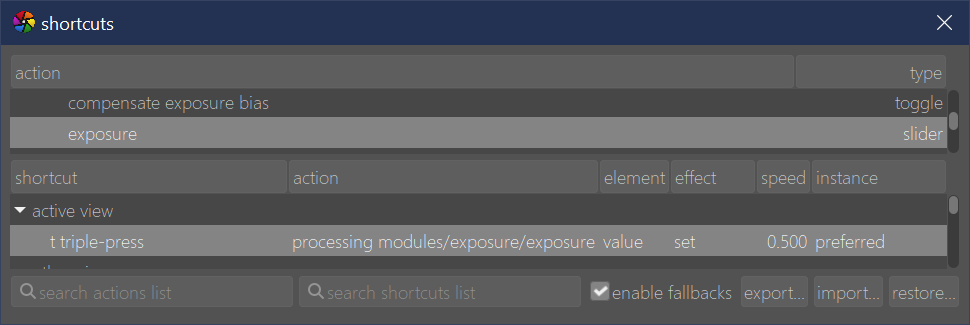
would give this:
dt.gui.action(“iop/exposure/exposure”, 0, “value”, “set”, 0.500000)
If you have multiple instances of a module, the second parameter (normally 0) can indicate which one to affect.
4 Likes
Oh, thank you so much, that’s exactly what is needed!
Seems like the official documentation lacks this extremely valuable information.
1 Like
That’s because this is new functionality that will be released with 4.2.
The dt.gui.action call does exist in 4.0 but received very little use/testing and randomly triggered crashes. @wpferguson has done a lot of work there!
1 Like
I think it’s not documented, because it is quite new.
@dterrahe @wpferguson Perhaps someone can push an example script to the example here: lua-scripts/examples at master · darktable-org/lua-scripts · GitHub
@donda please post your script as soon as you have something usable. Then we can improve it together. I’m very interested. Perhaps the best thing is to create an pull request here: Pull requests · darktable-org/lua-scripts · GitHub
I see, looking forward for the new release!
You can already test it with the developer release:
1 Like
Apologies in advance. This is going to be long, but I’ll break it into sections so you can jump to what interests you.
Preface
A couple of years ago I started thinking about “smart” styles; i.e. styles, or parts of styles that could be applied based on the image. I didn’t really know how to do it, but the idea was simmering in the recesses of my brain waiting for a solution.
Then…
@dterrahe rewrote darktable’s input system to accommodate controllers other than keyboards and mice. While he was doing that he came up with a way to expose the input system to lua, thus dt.gui.action() was born. At the time he wrote it I wasn’t really sure how or what to use it for.
Then…
A couple of months ago I was editing a bunch (100+) images that had blown specular highlights (lights reflecting off of helmets). My fix, to get rid of the ugly flat blue area caused by filmic chrominance preservation being set to max rgb was to open filmic and set the chrominance preservation to luminance y then open the highlight reconstruction module and set the mode to segmentation based.
So, to fix the highlights I would click to open filmic, click to choose the options tab, click to drop down the chrominance preseveration list, click to select luminance y, click to open the highlight reconstruction module, click to drop down the mode list, and click to select segmentation based.
Each image I was spending 45 seconds to a minute just clicking around the UI, while visions of a carpal tunnel brace danced through my head. About halfway through, as I’m thinking there has to be a better/smarter way to do this, I thought of dt.gui.action().
Early Steps
The first GUI automation I attempted was blown highlights.
This is the result
local dt = require "darktable"

local mods = {}

mods.colorbalancergb = "iop/colorbalancergb"
mods.color_calibration = "iop/channelmixerrgb"
mods.diffuse_or_sharpen = "iop/diffuse"
mods.denoise_profiled = "iop/denoiseprofile"
mods.exposure = "iop/exposure"
mods.filmicrgb = "iop/filmicrgb"
mods.highlight_reconstruction = "iop/highlights"

local function select(mod, item, instance, value)
  local inst = instance or 0
  dt.gui.action(mod .. "/" .. item, inst, "selection", value, 1.0)
end

dt.register_event("blown_highlights", "shortcut",
  function(event, shortcut)
    select(mods.filmicrgb, "preserve chrominance", 0, "item:luminance Y")
    select(mods.highlight_reconstruction, "method", 0, "item:segmentation based")
  end , "blown highlights"
)
I assigned the keystroke alt+b to the shortcut. I used the shortcut and in less than a second I had performed the same function that took 45+ seconds and 7 clicks.
Next I went for a bigger step. I like my verticals to be vertical. I use the rotate and perspective module then right click and draw a line on something vertical to straighten my image. I had a thought that if the image had enough detectable vertical lines, then the rotate and perspective module could be automated to straighten the image.
Developing this is where we ran into bugs that caused some sudden and violent darktable crashes. @dterrahe found and fixed the bugs, and IIRC the fixes are in darktable 4.0.1.
The code looks like this:
local dt = require "darktable"

local function button(mod, item, instance)
  local inst = instance or 0
  dt.gui.action(mod .. "/" .. item, inst, "", "", 1.0)
end

dt.register_event("auto_straighten", "shortcut",
  function(event, shortcut)
    dt.gui.action("iop/ashift", 0, "focus", "on", 1.0)
    dt.control.sleep(500)
    button("iop/ashift", "structure/auto", 0)
    dt.control.sleep(1500)
    dt.gui.action("iop/ashift/fit/vertical", 0, "", "", 1.0)
    dt.control.sleep(500)
    dt.gui.action("iop/ashift", 0, "focus", "off", 1.0)
    --button("iop/ashift", "structure/auto", 0)
  end , "auto straighten"
)
Again I assigned the keystroke alt+s to this and in a couple of seconds it will automatically straighten an image if there are enough detectable vertical lines. If not, it distorts the image and you just have to reset the module and do the right click method.
In this module I had to use 1/2 second sleeps to allow the module time to process the image, otherwise the line detection didn’t complete and the result was garbage.
Here’s a picture that has enough verticals to work
100R7LR3_3J6A0329.cr3 (34.9 MB)
This file is licensed Creative Commons — Attribution-ShareAlike 4.0 International — CC BY-SA 4.0
Load the script, assign a shortcut, open it in darkroom view, make sure rotate and perspective is visible in your module list, activate the shortcut, watch the image get straightened.
I have a style that I apply that has the modules I use, in the order I want them, with most of them turned off due to the amount of CPU/GPU they require (i.e. multiple instances of diffuse and sharpen). I adjust exposure, rotate and crop, then activate the modules that are turned off to complete the image. I shoot sports, often in bad light, so depending on ISO different modules are turned on. I set up several different shortcuts to handle automatically turning on those modules just using a shortcut. It took @dterrahe answering MANY questions until I learned to traverse the history stack and turn on the correct modules.
Smarter Steps
When applying my final modules I would look at the ISO of the image and then trigger the appropriate shortcut to turn on the correct modules. Between fat fingers and sometimes forgetting to check the ISO I decided the next target was to add some “smarts”.
The ISO is accessible for each image, so my current version of enable final modules checks the ISO of the image being edited and activates the correct set of modules.
Next Steps
In order to have “smarts” we have to have image information. darktable has a module that will show me if an image is over/under exposed, but it only provides that information in a visual format. I need to be able to query the function and get an response back that can be evaluated by a program. So for instance the script could query and get back over exposed, 30% and then the program could change the filmic chrominance preservation and select the appropriate highlight reconstruction method (probably segmentation based since it’s a large area).
The more we try to automate, the more we can figure out what information needs to be exposed to lua so that we can use it to make smarter scripts.
@donda as I doing the first automation I thought about the timelapse crowd. In the goodies below there is a shortcut to look at the current exposure level, then adjust it by some EV. Unfortunately dt.gui.action() works only on the image in the darkroom view when adjusting exposure. But, there are functions available from lua, dt.gui.views.darkroom.display_image(), that loads an image into darkroom view for editing so you could select a set of images then have a script load each one into darkroom view and adjust the exposure. This might be another of the items where you need more information than what’s currently available to make the correct adjustment.
To Do
-
Figure out how to make this accessible to the masses. If you can code, you can automate you workflow and achieve some remarkable speedups. I used to spend 3-5 minutes per image and now my workflow is ~30 seconds per image. If you can’t code then you are out in the cold. I’ll start a library of usable functions, but we need to figure out a better interface than just shortcuts. And we need to figure out a way that a user can set up an automation (maybe something similar to a macro recorder?).
-
Figure out how and what information we can expose to lua so we can make smarter scripts.
-
Figure out how to document this function. There are so many different ways to use it and do things but describing them isn’t going to fit in a page or two in a manual.
Goodies
I’ve talked enough so here’s some toys to play with. One is my starting point style that the scripts are designed to work with and the second is the script itself. It should work on darktable 4.0.1, but will definitely work on master.
The script is a snapshot of my work in progress. There are several useful shortcuts in there and some code that should be deleted, but is still hanging around. Of particular note is the last function which creates the starting point style all in the darkroom gui by activating modules, putting them in the correct place, then turning them off. It’s slower that just applying a style since it has to manipulate the GUI, but you can see how it’s done.
Starting Point 1.dtstyle (4.9 KB)
smart_styles.zip (2.1 KB)
Final Notes
Thank you @dterrahe for creating this and educating me in it’s use.
28 Likes
Wow…very cool and thanks for sharing… the more people that get poking around with this the more cool scripts that are sure to emerge…
Thanks for the long writeup! I’m glad it is really working for you and hope it will inspire others.
The ctrl+c function in the shortcuts dialog should be a big help, especially for the simple unconditional automation of multiple simultaneous commands. This exposes all the options per action type and allows a more interactive testing of commands before adding them to a script. For the beginner, there is then still a bit of work learning what skeleton script is needed to set up a shortcuttable command and where to put it so it gets initialised correctly.
I’m wondering how hard it would be to support an approach where there is a directory that you can put files into that contain just a series of commands (without any functions or initialisation needed; dt already being defined) and that then will be automatically added to a list of buttons in the lua module. Those could then have shortcuts assigned via the visual method (or via the shortcuts dialog) as usual. This would take care of the simple case where you just want to change a bunch of different things with one command (and maybe even some slightly more complicated cases). I had intended to support multi-shortcuts (i.e. one key press triggers more than one action; or in other words “shortcut → action” being a one-many, or really many-many, relationship). But so far haven’t because it would make things even more confusing for users, who are probably already struggling with the “many shortcuts can be assigned to same action, i.e. don’t overwrite” aspect of inputng. And users would want to enforce an order in the execution of the actions (first press that button, then wait and then adjust those sliders…) which would make the whole management of those shortcuts overly complex. Having easy access to quick-and-dirty scripts might be the better approach.
Other thought triggered by your writeup; could the ui interactions be made robust enough that the sleep(500) commands aren’t necessary? They are brittle when scripting, but it also means that the actual direct user interaction of those commands can also cause (hopefully obvious, but maybe sometimes not) surprises.
1 Like
What if you were able to leverage something like the way you can currently edit and add elements to the QA panel but instead of making a module or a panel you are entering a series of commands or actions and these could then be saved as a script from there and also opened back up and modified… Use this as the skeleton??
I will test further and see what happens if I remove the sleeps. I did it to get it working, but it could have not been working for other reasons. Once it was working I didn’t revisit it to see about the sleeps.
I think the first tries at it will probably be in lua since there’s fewer moving parts to change and it can evolve faster.
I could come up with a limited syntax built around the helper functions in the script I provided. You could add a shortcut name, then add a set of actions. Assign a keystroke value to it in the shortcuts module and you have a macro.
Second version could add conditions, so then you could have smarts
2 Likes
Anything that you can do to simplify it and provide wider access to non coders would certainly be a massive contribution…
Huge thanks to everybody for the long and inspiring answers, they are of real help!
@dterrahe, @wpferguson, I’m an amature timelapser, so I’m not sure I can speak for the whole timelapse community, but yes, there might be specific demands.
Haven’t tried it yet, but setting the exposure as in the script attached here seems to be exactly what is needed. What is confusing a bit is using sleep commands. @dterrahe, is dt.gui.action() asynchronous? The point is that typical timelapse series can be hundreds and even thousands images long so every second spent on an image mean many minutes per a series.
May I ask you another question? Is there a way in Lua API to evaluate an image lightness somehow, no matter based on the whole image or on a fragment? The final goal is still related to timelapse and can help me to fully automate the image processing: let’s say there are two images taken within seconds, and therefore quite similar, but with different exposure. Now we shoud adjust the exposure of an underexposed one so they both look similar. At the moment it is done manually, but if there is a way to compare image lightness programmatically, that can be automated. Its totally enough just to know which of the two images darker.
The potential of the darktable interface API is enormous, the more people know about it, the more useful scripts and libraries will follow.
It’s there already. You can use spot or image exposure mapping. Select your key image and click measure in exposure… then change to correct and apply to all other images and it will attempt to map them to the same exposure,
Edit:
I was on my phone …sorry for the terse reply
this is the feature…

Now in DT but explained here…
")
lua routines are running in separate threads, whereas all dt.gui.action calls are handled in the main thread, so yes, it is asynchronous in some sense. Also, the effects of slider moves are handled when the gui thread is idle, in order not to flood it when multiple scroll events, for example, are received. Then they often trigger a recalc of the whole image pipeline, which the call is not sitting around waiting for either.
At the moment, lua submits gtk (including gui.action) calls to the main thread using g_main_context_invoke, which means they get G_PRIORITY_DEFAULT priority. This could possibly result in an image recalc starting immediately after one slider is moved. It is possible that raising this priority (using g_main_context_invoke_full) would allow changing a few settings in one go and only then have the recalc start. This could prevent the need for an immediate recalculation after the first premature one finishes.
@AxelG has also been looking into these kinds of use cases. He judged dt.gui.action to be of little value to his cause and instead wanted, I believe, to manipulate xmp files in a human readable form and process them from the command line. But support for this is lacking.
I’m not sure there is much overlap or anything to lever. The shortcuts dialog has all the knowledge of available actions and associated elements and effects, so to me that would be a more logical place. There could be a “save as lua” button added there which could export a skeleton routine including the currently selected shortcut(s) to a file in the correct location.
But I don’t see value in building a whole IDE to assist programming scripts. Some handholding to make people aware the functionality exists (which is the main reason I added the “lua:” info to the widget tooltips) and to get them started is worth it. But after that editing a script file is not too hard, especially when copying individual commands from the shortcuts dialog, and gives most control.
@dterrahe could we capture actions to a log file as dt.gui.action calls?
Example:
- Start “recording” - darktable opens a action.log file in it’s tmp_dir
- I click to open filmic
- I click the options tab
- I click the preserve chrominance dropdown
- I select luminance Y
- I cllick to open the highlight reconstruction module
- I click the mode drop down
- I select segmenation based
- I stop recording
When I open the action.log file it has a set of dt.gui.action calls to do steps 2 through 8.
Ideally I would have a lua command to start and stop recording, then I could grab the file, throw out what I don’t need and make the rest into a shortcut. In the above example I would just keep steps 5 and 8.
1 Like
I didn’t read yet all the things here.
For xmp I slightly updated my mind since I learned, backwards compatibility do not allow to get rid of the bin-blob. So I am thinking to have a second sidecar file, which with a helper-program could be written into xmp after external modifications. ----however, let me read first, what you guys discuss here and maybe I can provide my two cents