X-veon: a better demosaic for X-trans (100% less worms!)

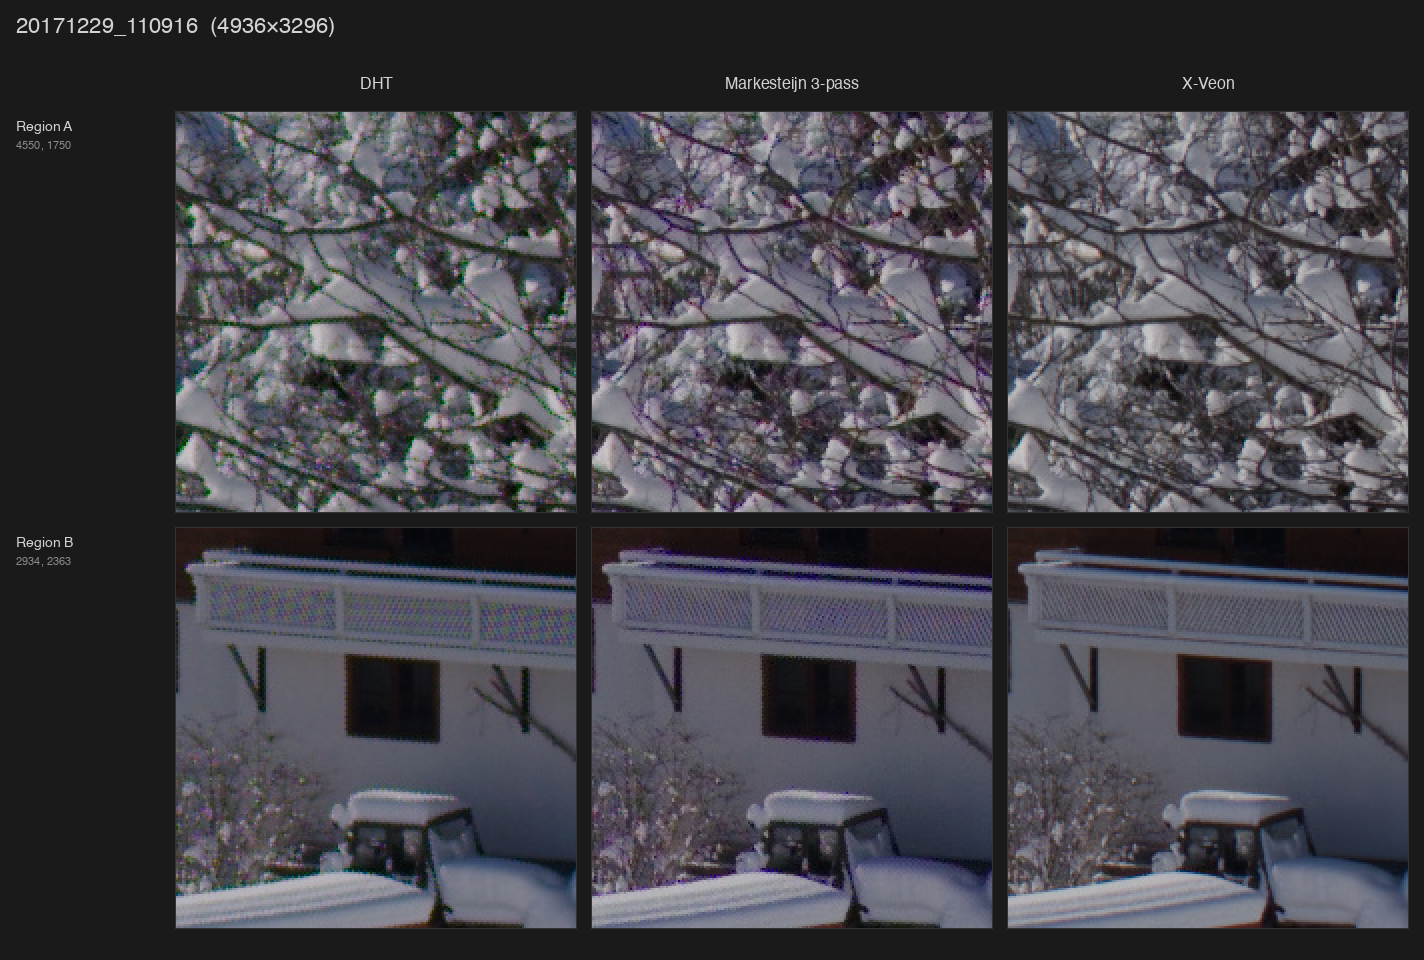
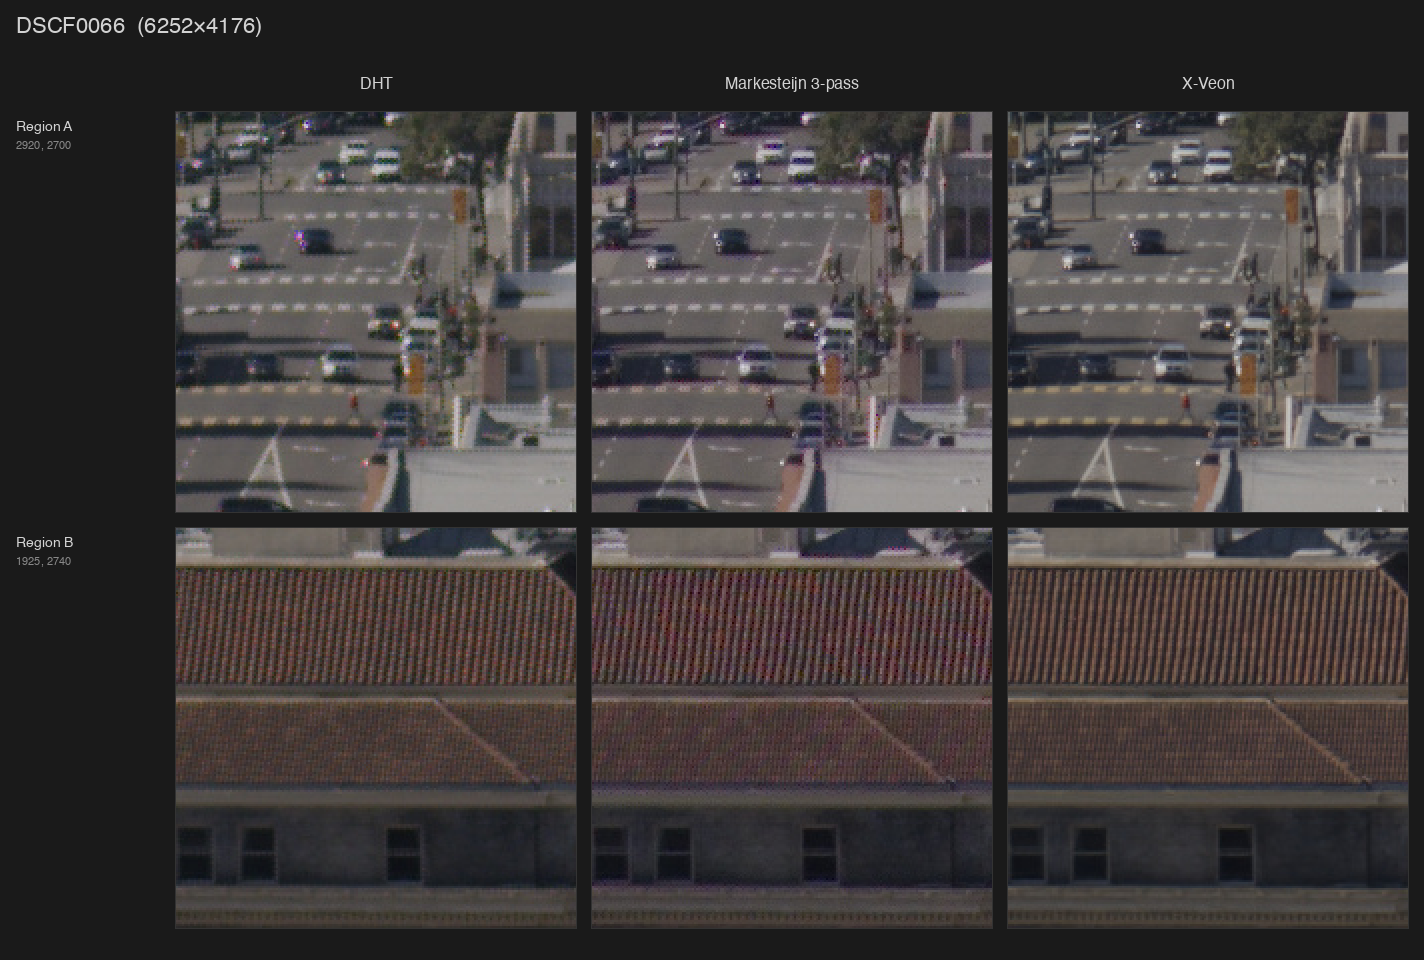
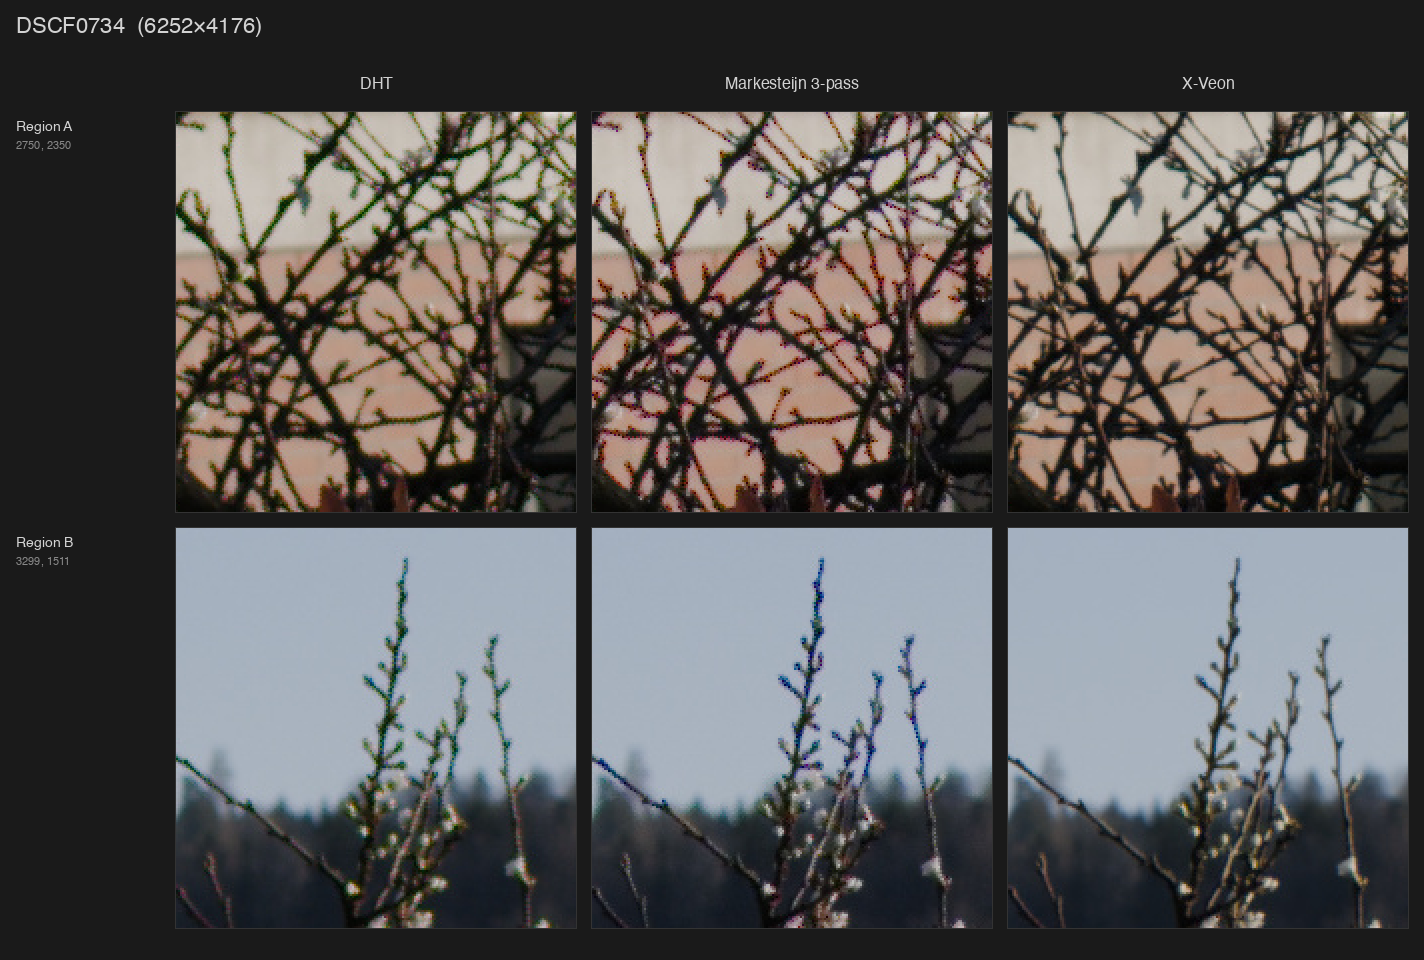
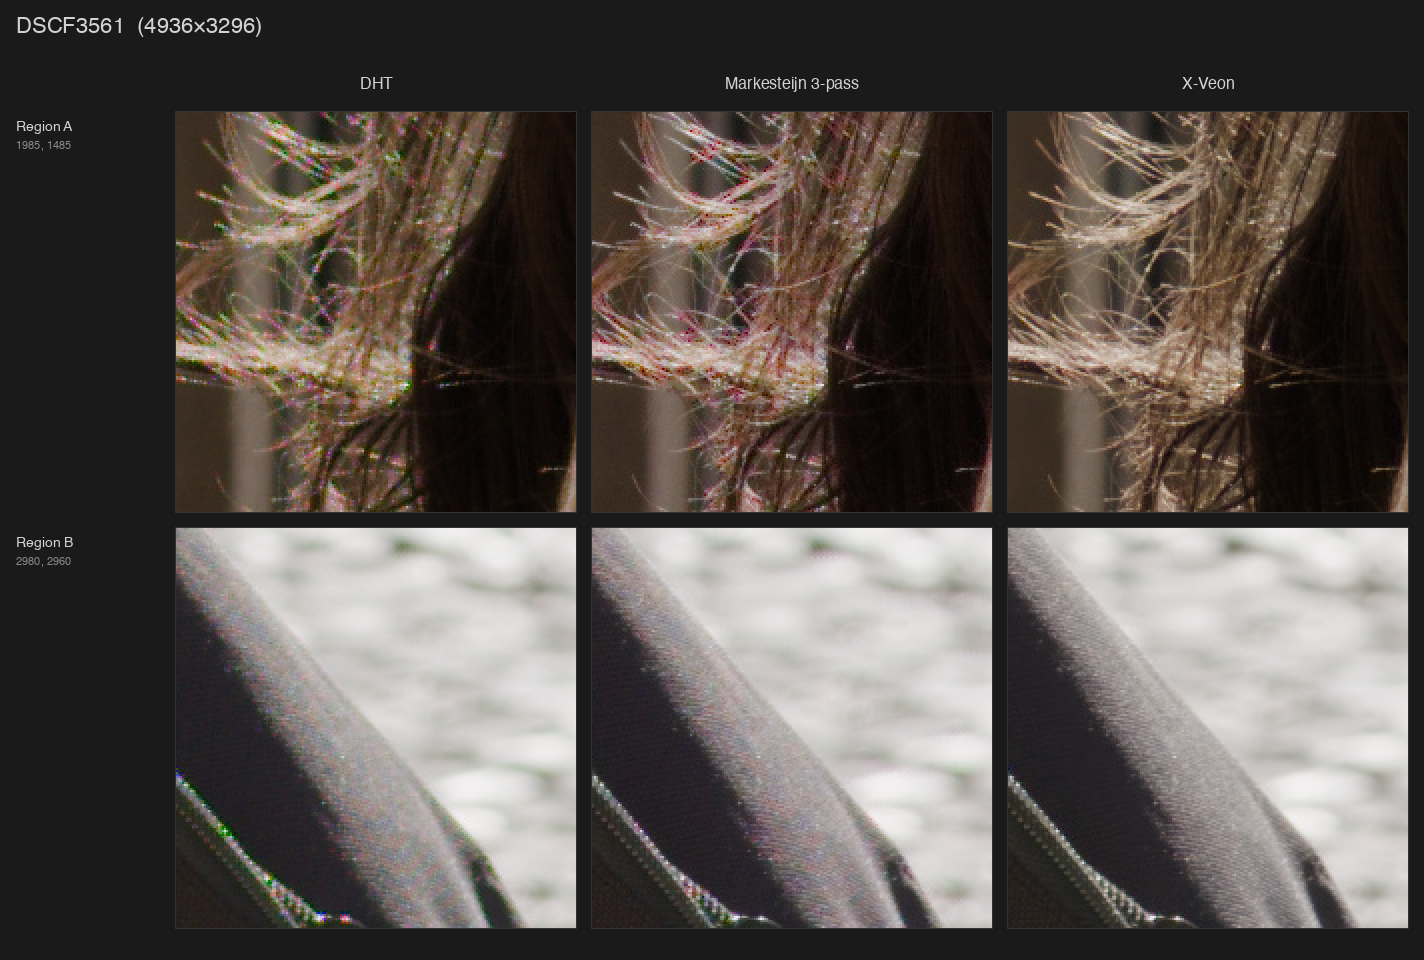
First, the comparison:

Link to Google Drive folder with full-size images:
https://drive.google.com/drive/folders/1IpCJJfi_YwuyZydaCxW501rwFsn9StJG

I’ve been twiddling around for years with various tools to process Fuji RAFs with mostly no to moderate success. Traditional algorithms produce quite a lot of artifacts, especially when it comes to extremely fine details, of which there’s an abundance of due to absence of optical low-pass filter (absolutely killer move on Fuji’s part, but a nightmare to process). More modern approaches such as DxO PureRaw do a decent job at demosaicing, but slather the result with a lot of additional filtering, which isn’t always desirable.

Then there was this itch called HDR. I really like how Apple renders raw files as HDR, but their processing is the worst. Even worse, Photomator Pro, being a pretty decent tool, uses Apple’s RAW processing pipeline, which results in the same artifacts.

Both of these problems pushed me towards building my own thing. It started with training a neural net I eventually called X-veon (because when I first looked at the results I was impressed how close it is to a certain niche Japanese manufacturer’s CFA-less sensor), but now I don’t know where to stop.

So, here it is, check it out: X-veon

Everything works inside your browser with the help of WebGPU and Web Assembly. My reference machine for this is 2021 M1 Pro Macbook with Chrome and processing one 24MP photo takes less than a minute. Files are stored in the browser (OPFS) even after you close the tab so the workspace gets restored once you open it back, but each photo may take around 400MB of disk space (demosaic result is stored as barely compressed float32 array).

Bayer sensors are supported too, but I wouldn’t say the improvements are as drastic compared to X-Trans and it might not support the latest cameras at all.

Current limitations:

  • It doesn’t do lens correction. I’m working on integrating Lensfun database for that

  • HDR headroom detection requires very broad permissions, apparently there’s no other way for now

  • There’s no way to manually set HDR headroom for tone mapping, it’s inferred from the display

  • AVIF export is extremely slow and has wrong luminance curve because HLG is applied over OpenDRT-tonemapped result (OOTF/OETFs are hard)

  • EXIF data isn’t being passed through, I need to find a way to cull it so that it won’t affect the rendering

While I did build and train the model myself, there are things I couldn’t do alone, so my extreme gratitude goes to:

  • darktable for being open-source and allowing me to learn more about the whole processing pipeline (I spent a few days bashing my head against highlight reconstruction and the order of operations)

  • Jed Smith’s OpenDRT and ART CTL by agriggio: tone mapping is something I couldn’t do by myself

  • pedrocr’s rawloader Rust crate: most ergonomic way to read raws in the browser

Source: GitHub - naorunaoru/x-veon: Camera RAW processor powered by neural networks and web tech

Weights are included as .onnx files: x-veon/web/public at main · naorunaoru/x-veon · GitHub

Datasets used:

  • 2000 of my own images ranked by high frequency/high amplitude content

Plans:

  • Fine-tune on the RAISE dataset, produce half/quarter/eight-width models for both X-Trans and Bayer

  • Release the weights in PyTorch format, float32 instead of float16

  • Tile-based rendering for the web: smaller model for the entire image, process tiles with larger models on demand when zooming

  • Desktop app with disk access, better export and batch processing support

If you want to take just the model and plug it into your software, go ahead. There’s no license attached yet, but I’ll pick the most permissive one. Training process will also be documented soon, but in general it takes about 20-30 hours to train this model to a usable state on a dataset of 2000 downscaled images on a M4 Pro Mac Mini.

15 Likes

Apart from demosaicing itself, the app allows you to adjust the processing to some extent.

Specifically for HDR mastering there’s a histogram with two modes: scene/display linear with additional tinted region for brightness distribution beyond 1.0 (up to 1.2, because otherwise it would take up a lot of screen area) and a Log2 EV mode.

3 Likes

Would love to see this in darktable as a demosaicing method but I fear that will be impossible right now

Those results really look nice!

1 Like

nice work! and such a simple architecture. do you absolutely need the batch norm elements in there?

Actually no, they aren’t strictly necessary. I’d say it’s more of an ossified part of an experiment, perhaps I should yoink it out and see if anything improves.

yes please :slight_smile: that would have the advantage for me that i have code to run simple u-nets (nearest upsample, pool, 3x3 conv)… i think from your description that you don’t need more?

1 Like

(but don’t put stuff upside down just for me)

i have one question: how does it behave in the presence of noise? seems to me your network arch + size should be capable of denoising at the same time. do you have noise in the training data?

1 Like

Actually yup, it does. Because the CFA is simulated, I can do other nasty things to image pairs, one of which is adding noise. I kept the values rather low during training, but it’s possible to just crank it.

It’s in the dataset builder: x-veon/dataset.py at 12675d6d1a7264ba8080c5d10f1fd1b1329f63dd · naorunaoru/x-veon · GitHub

2 Likes

I can’t into grammar today, sorry. Friday night syndrome.

1 Like

Hey and welcome! This looks interesting and its awesome that you made your own dataset, props for that. Its also awesome that you’re on github, but I noticed that the code is not licensed. Is there any plan to do that?

5 Likes

@paperdigits ^^

Yes, I’m just procrastinating on it because it requires more consideration than I can usually spare. Something for me to deal with during the weekend.

1 Like

It is extremely important to us here on this forum. Seems that AI also needs open data sets, if that is something you’d consider.

1 Like

Just kicked off a training run without BN and it hit 40 dB in 7 epochs. Couldn’t believe it, ran a test inference – looks pretty great already! Thanks for suggestion!

2 Likes

Could you integrate this into darktable with [AI] AI inference subsystem with ONNX Runtime backend by andriiryzhkov · Pull Request #20322 · darktable-org/darktable · GitHub

1 Like

@piratenpanda Oh man, this couldn’t be more relevant, thank you for finding this! I left a comment there, hope it’s possible to integrate.

@hanatos BN-less model plateaued at around 1200 epochs with PSNR of 47.31 dB. It produces really good results, but there are still some artifacts in high contrast areas like street lamps at night so I’m running a fine tune on augmented data to see if it would help. Also I tweaked the noise model and while fine-tuning on it dropped PSNR significantly, I can see a lot of improvements in low-light denoising, so I guess there would be two separate branches: one just for demosaic and the other for denoising too because I can’t guarantee detail preservation yet.

Thank you so much for support and suggestions!

3 Likes

nice progress! really interested in your dataset too once you’re ready to publish. thanks for the idea with the one-hot cfa encoding btw, i can demosaic a 16MP xtrans in 19ms with this :star_struck:

as to noise degeneration: we have a lot of measured sensor data to model noise accurately. i didn’t go as far as that yet, but used some of the intuition gained from messing with noise measurements to dial in gaussian, poissonian, and impulse noise. here’s my code if you want to try:

input_image = mosaic(target_image, self.msc)
# add shot noise
xi = rng.uniform()
poissonian_noise = xi*0.05
pn = rng.normal(loc=0.0, scale=poissonian_noise, size=input_image.shape)
pn *= np.sqrt(input_image)
input_image += pn
# add gauss noise
gaussian_noise = xi*0.05
gn = rng.normal(loc=0.0, scale=gaussian_noise, size=input_image.shape)
input_image += gn
# add impulse noise
impulse_noise = xi*0.002
noise_value = 1.0
h = input_image.shape[0]
w = input_image.shape[1] 
random_indices = rng.choice(h*w, np.clip(int(w*h*impulse_noise),1,w*h),replace=False,shuffle=True)
input_image.flat[random_indices] = noise_value
2 Likes

So it seems possible. Looking forward to testing

@piratenpanda It seems so, but the proposed approach doesn’t allow for operating on linear CFA data yet. While it’s unquestionably useful in a sense that it provides inference infrastructure, it would require deeper integration with darktable’s pixel pipe.

@hanatos I came up with a slightly different approach. While your code draws one random xi and uses it to scale both shot and read noise, mine draws them independently – read and shot noise are independent after all. My code doesn’t add impulse noise though, good idea!

1 Like

… i had them independent, but results weren’t that great. in fact high iso usually means both of them increase. but for really informed correlation between the two we’d need to data-mine through all the various noise profiles for all the sensors and sample from that distribution.

1 Like