This will be a series of posts, maybe spanning several days.
So, what are the mysterious “inset/outset” (primaries attenuation, purity boost) and the “rotations”?
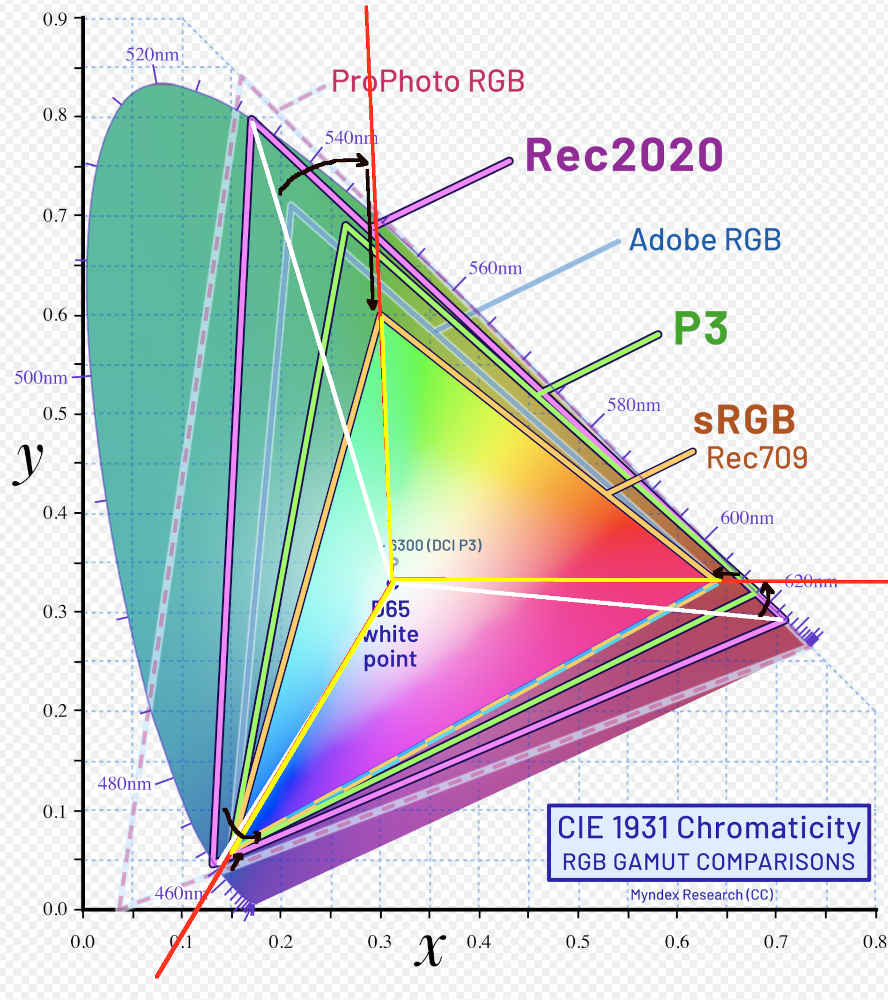
We start with the selected “base” space. In this figure, it’s Rec 2020, the original big black triangle that touches the edges of the horseshoe-shaped diagram, which represents the colours visible to humans. The primaries of that space are the vertices of the triangle.
Then, we take the lines that connect the primaries with the “white point” (also: achromatic - this diagram does not represent brightness, only colour (in the “hue” and “saturation” sense, but those quantities do not correspond to the axes or anything else on the diagram)). These are the white lines.
We rotate the the lines (see the curved arrows), introducing a hue shift. These are the red lines (mostly covered by yellow, see below).
Finally, we move the points where the rotated lines intersect with the sides of the original triangle (intersections of the red and black lines), determine the distance of that point from the white point, and reduce the distance according to the “attenuation” value. These sections are marked in yellow. The ends of the yellow lines are the primaries of the new space, its boundaries shown also in yellow.

Then, we take the input RGB value, and without a colour space conversion, “reinterpret” the meaning of the RGB values as if they belonged to a colour in the smaller colour space (introducing the hue shift caused by the rotation, and the desaturation introduced by pushing colours towards the achromatic (white point)). In Gimp, this operation is called assign profile.
We then convert that shifted / desaturated colour back into the original “base” space. The colour remains shifted / desaturated, and we get new RGB values in the base space, which represent that shifted / desaturated colour.
As an illustration, the effect of assigning the sRGB profile (much smaller space) to an image whose native space is Rec 2020:

That would be achieved using the following rotations and insets:
Why is that important?
Let’s fire up AGX Color Transform Simulation, and examine what happens to a single primary colour (that’s the simplest example).
If you look at this chart, you can see we only have red; no green, no blue: it’s a primary. No matter, how bright I make it with exposure, the output value cannot raise above 1 for red, and remains 0 for green and blue. There is no white:
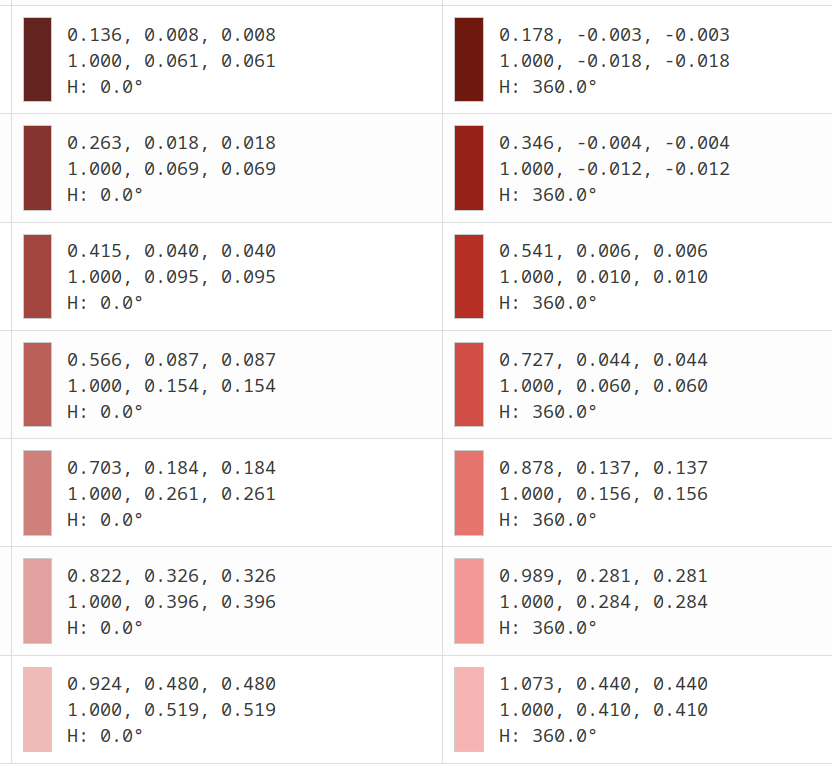
If you examine the table below the charts, you’ll see that even if shifted up by 6 EV, the output is just red:
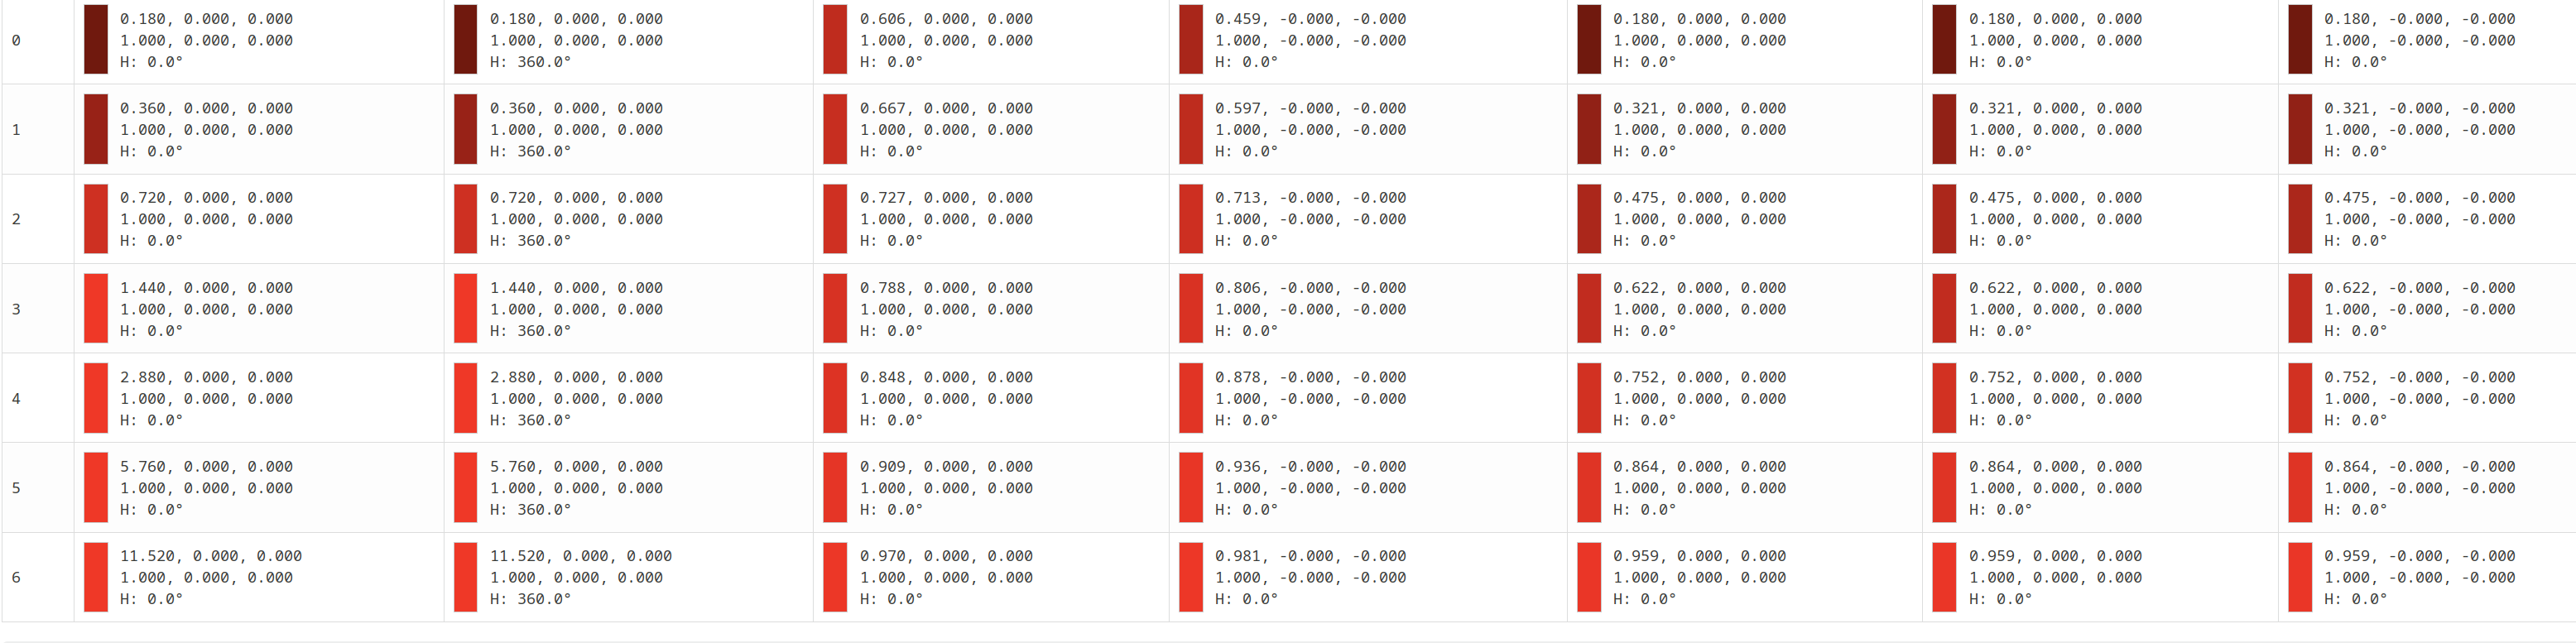
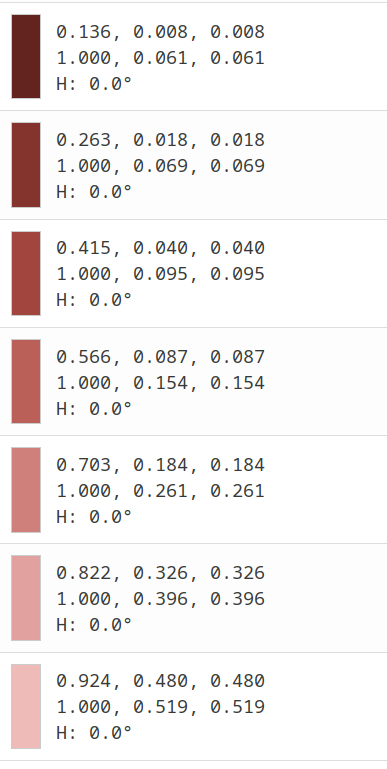
Now, let’s set all the insets to 30%. On the log → linear chart, we can now see blue (green is also there, but is covered by the blue dot):
And if we check the table (first column: original, second: with inset applied), we can see that now we have values in the green and blue channels! That’s because of desaturation – remember that R = G = B means black, grey or white: neutral, achromatic.
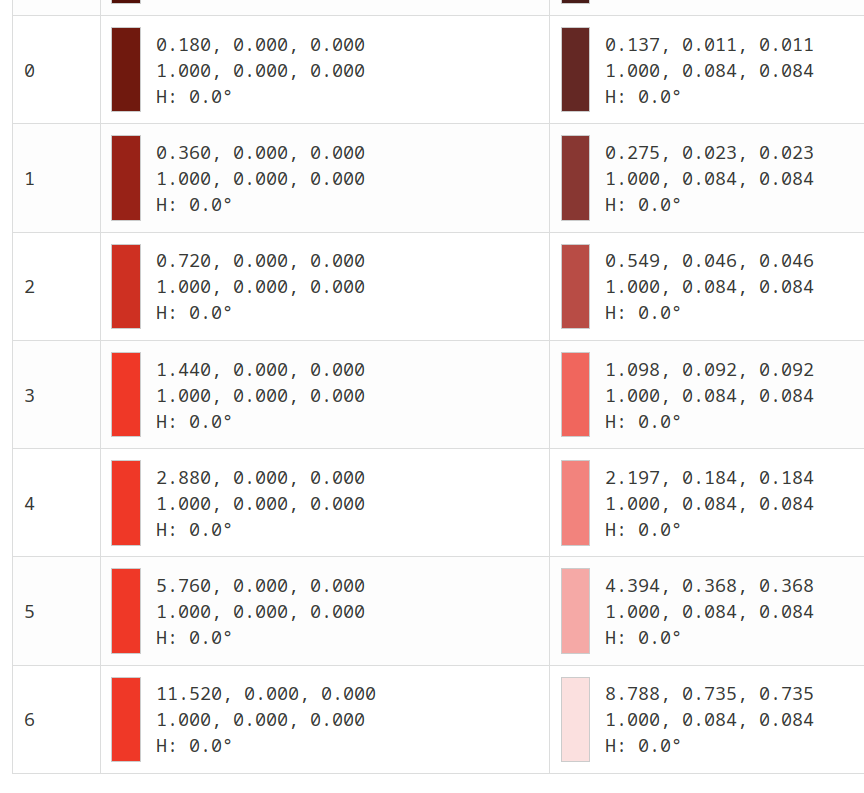
If we check the other end of the table:
As exposure increases, the ratio of red to green (blue) increases. In the last row, +6 EV, we have more than 50% of the red value in the green and blue channels – we are no longer stuck with red = 1, green = blue = 0 (red), we are going towards white!
Why is that?
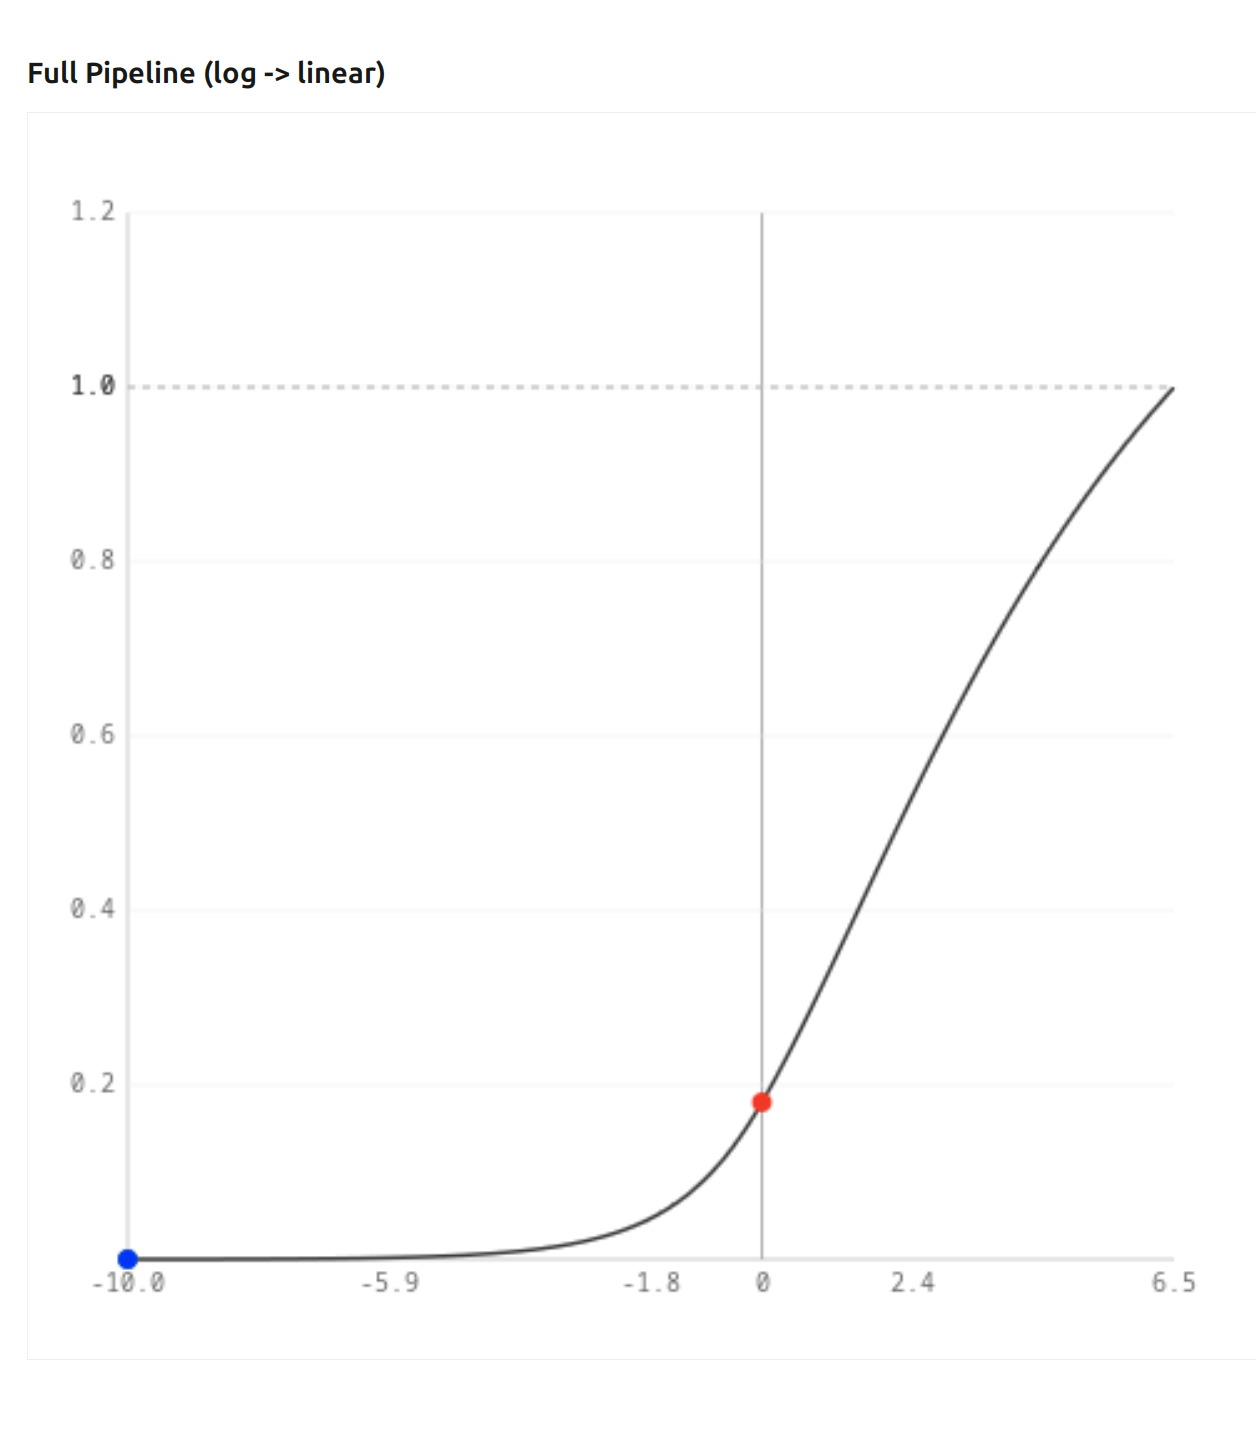
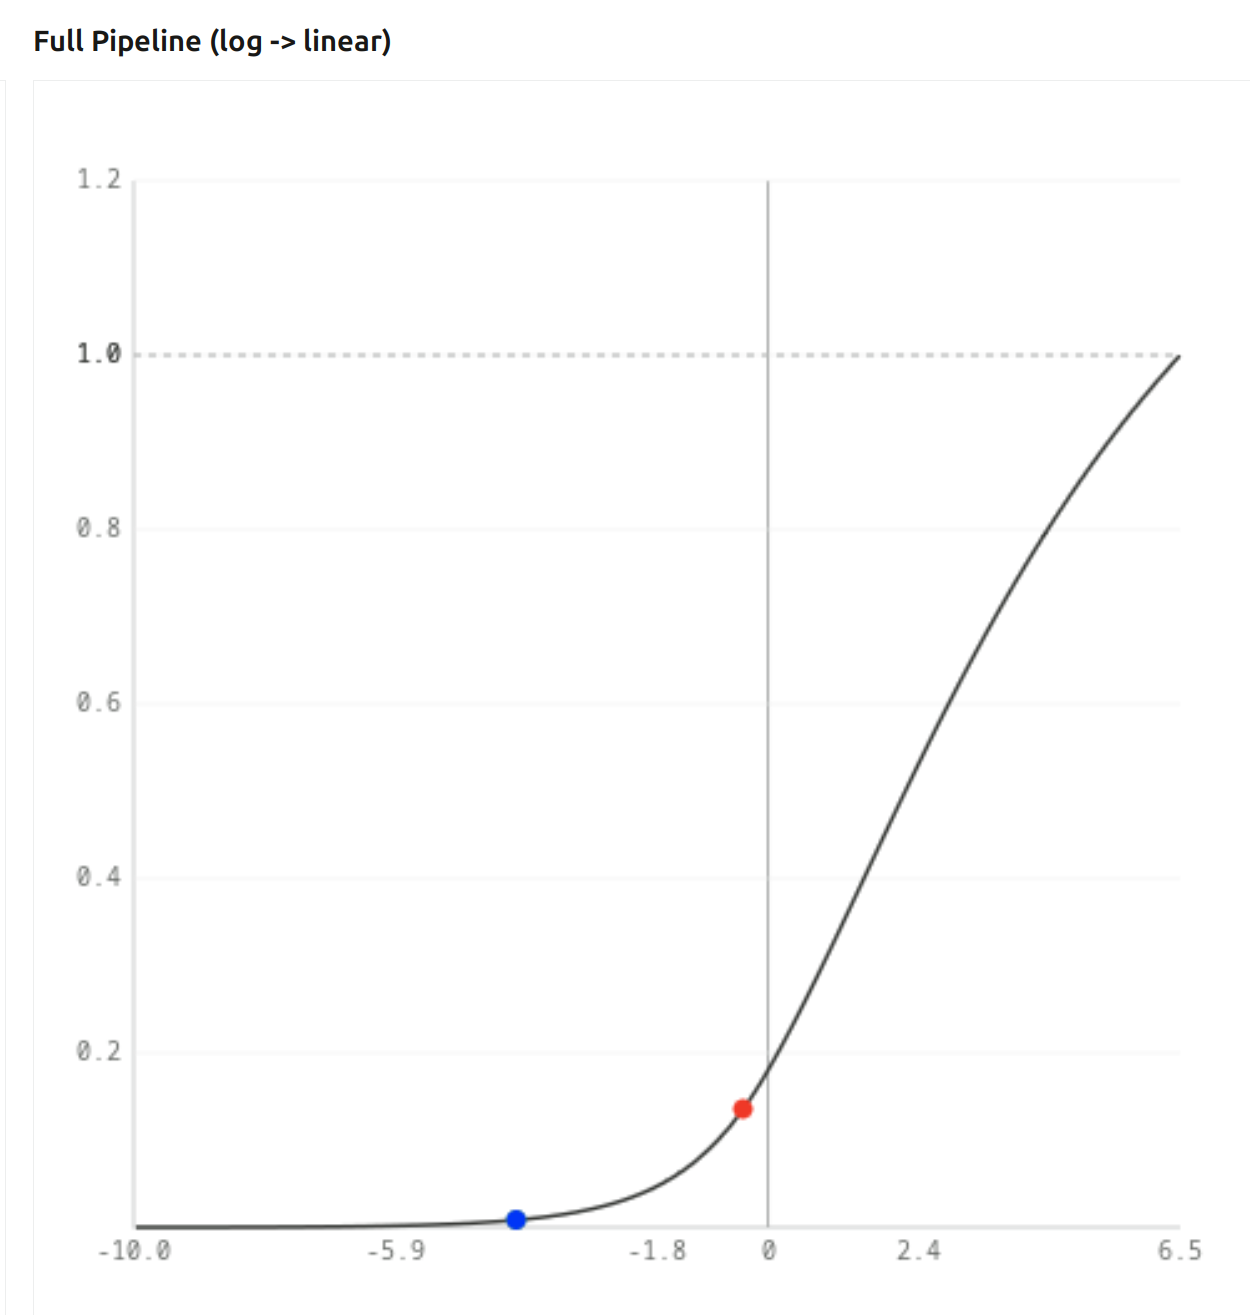
Let’s have a look at the “Full pipe (linear to linear)” chart. I told you it is very important that it starts out steep, and then flattens. With the previously mentioned 30% insets, at 0 EV, our (0.18, 0, 0) gets mapped like this - green and blue are very low, red is more or less unaffected:
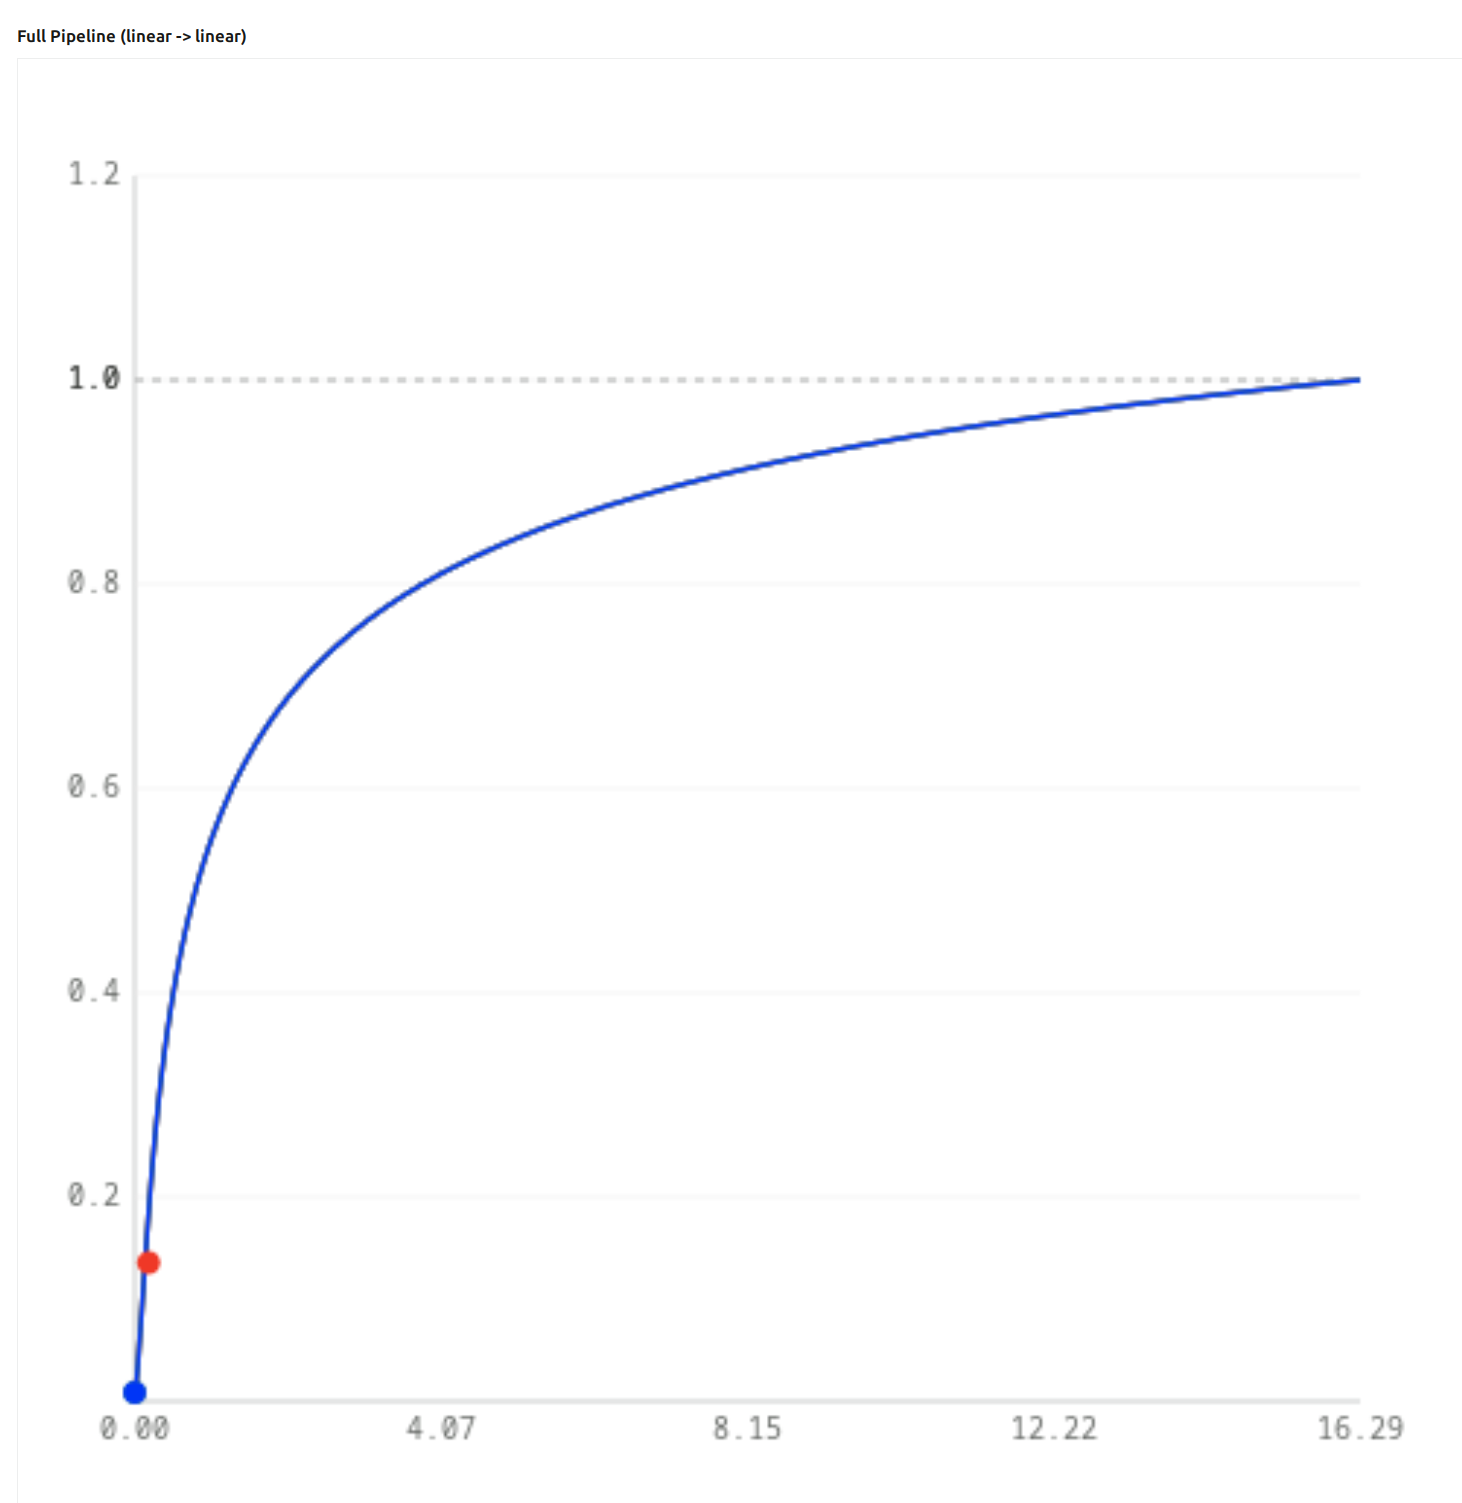
At +6.5 EV exposure:
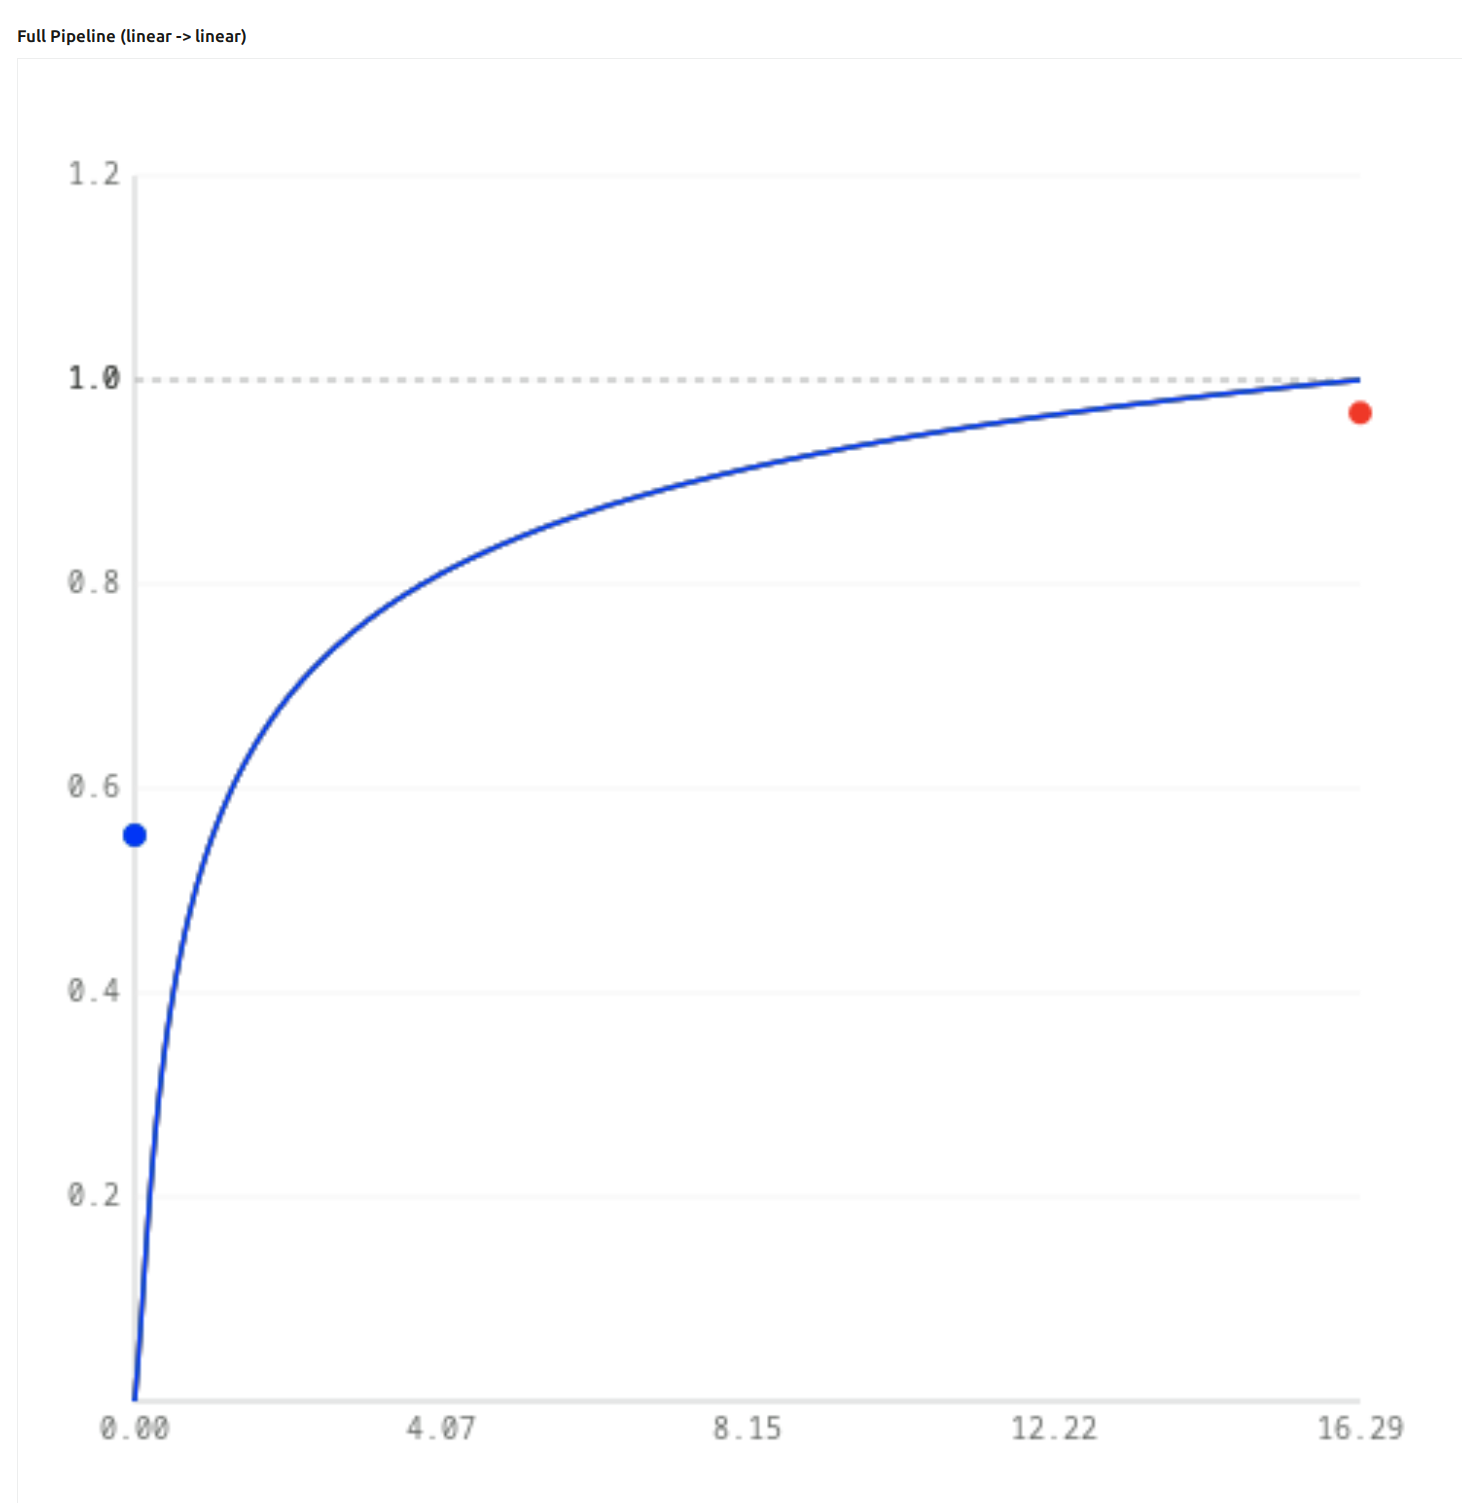
Why is blue floating above the curve (and why is red below it)? Because the inset, as we have seen above, has “pushed some of the energy from red into blue” (and green). Our initial blue was 0, but with the inset, the RGB triplet was pushed from (16.292, 0.000, 0.000) to (12.428, 1.040, 1.040) – and the overall curve (log mapping + tone curve + linearisation) pushes that blue = 1.040 to 0.554 (but the blue dot is plotted with x = original blue = 0). At the same time, red already had a high value, it was on the flat part of the curve. No matter, how high we raise the exposure, red cannot exceed 1, while green and blue, still being on the steep part, can increase rapidly.
OK, so we have desaturation and go towards white in the highlights. That’s desirable, but what about midtones? After all, the insetting (desaturation) affects all colours.
That is true, but the desaturation is increased by the curve pushing small values up by a lot, and limiting high values (they slowly increase towards 1).
Now, if we use 30% for all the outset values (which does the inverse, going from the small triangle to the big triangle), we’ll resaturate colours (boosting purity), and that means increasing the difference between the components.
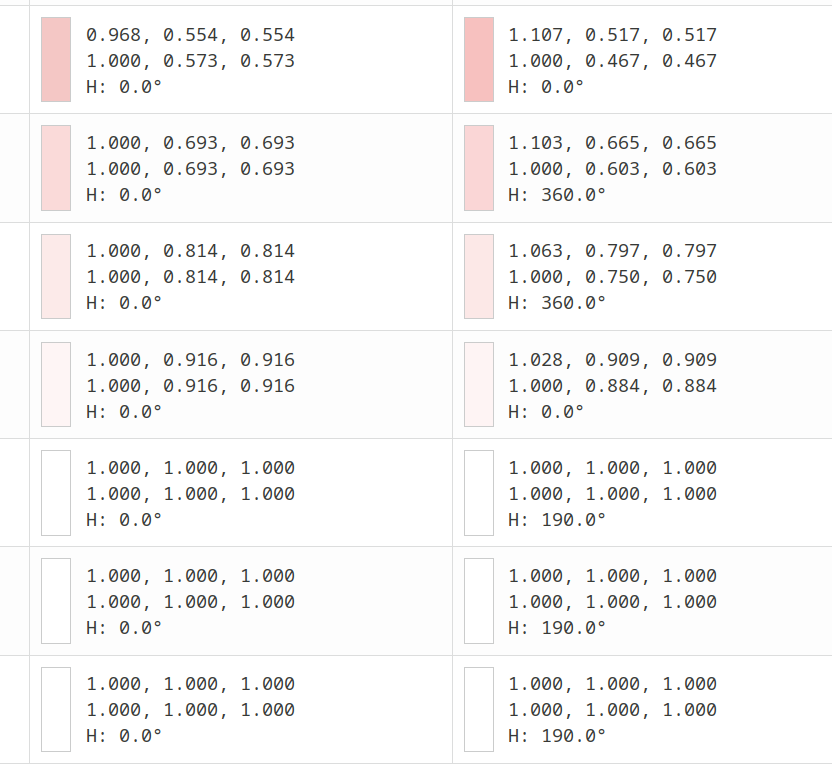
This is the end result of mapping (0.18, 0, 0), first before, then after the outset:

Our red has been darkened a bit, the negative blue and green (results of the saturation boost) will be clipped, we get a red pixel back.
But for high brightness values, the curve has greatly reduced the distance between red, green and blue, and that is not reversed by the purity boost. Check how the values change with exposure (before and after the outset):
Pushing even higher:
So, this is how the outset resaturates midtones and shadows, but not highlights: it’s helped by the very flat section of the overall curve already squishing the output RGB components close together for bright colours, but keeping the contrast between components of darker pixels.
To be continued with rotations. Let me know if you have questions. Was this helpful / readable at all?