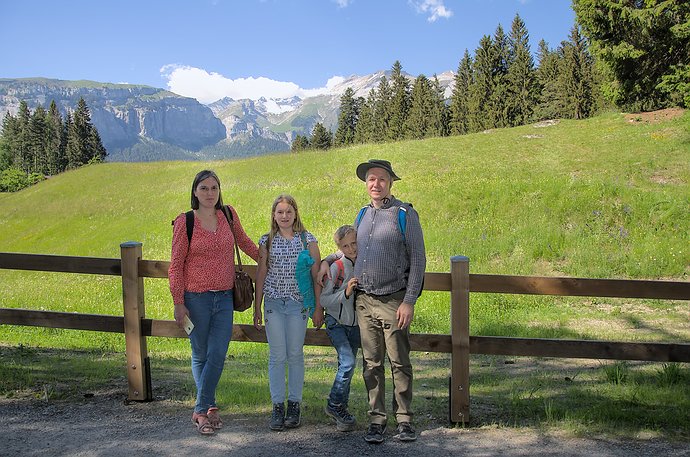
Backlit snapshot

That is a nice crop.

Here’s my quick go using mostly dodging with exposure instances. A more satisfying effect could definitely be obtained by massaging the dodging for longer. I usually use LUTs for tone-mapping rather than filmic, but you can swap that out pretty easily.


2020-06-01_16-43-35_DSC_0252.NEF.xmp (127.6 KB)

2 Likes

DT 3.4.1.1

2020-06-01_16-43-35_DSC_0252

2020-06-01_16-43-35_DSC_0252.NEF.xmp (19,9 KB)

1 Like

A demanding one, thanks for sharing. Well suited to test the sigmoid module :wink:.

2020-06-01_16-43-35_DSC_0252_02.NEF.xmp (35.6 KB)

2 Likes

It’s tough walking the fine line between making the family visible and keeping the whole scene looking natural.
I used RawTherapee Dev and whole image spots to darken the grass, trees, and mountains, then one to lighten the family. I downloaded the LUT I used from here https://freshluts.com/luts/683 and converted it for use in RawTherapee.
2020-06-01_16-43-35_DSC_0252-2 2020-06-01_16-43-35_DSC_0252-2.jpg.out.pp3 (22.2 KB)

1 Like

@kofa,

I am quite pleased with the result, hope those in the image like it.

100% done in darktable 3.5.x a dev version. I know its customary to explain how I achieved this, but it would take too long, cos I end up writing a lot of details. But its 100% darktable.

It might be more productive to understand my broad logic for image editing, in dt, which I’ve outlined here, and its how I edit any image :

A process that starts with global changes and moves on to local changes, and then minor changes to both local and global until the image is completed.

For this image. To address the problem areas

  1. Reduce highlights - with an instance of color-balance rgb + parametric mask(on grey level). This gives more headroom to brighten the whole image with exposure module., which also brightens the dark areas a little bit. - using highlight luminance slider - negative value.

  2. Lift shadows, with an instance of color-balance- rgb + parametric mask (on grey level) - using shadow luminance slider - positive value

  3. Brighten the people
    a) A 2nd instance of exposure mask, which has a shape drawn mask, shaped around the people. Make this invisible, by feathering and mask blur so it blends in.

  4. Brighten their faces a bit more. Just a bit more with a drawn mask on faces + another instance of exposure. This is really important, but done with taste, so its not visible. Like a ray of sunshine.

  5. Adjust filmic and exposure (3rd instance with no mask), to taste, before and after steps 1 to 4.

Xmp is attached. I think there is much value in explaining the principles, cos that way, advanced users who need no explanation can find what they need in the xmp, and others who need a bit more assistance, obtain a better grasp - much better than just dumping an xmp at them, for them to figure it all out by themselves.

2020-06-01_16-43-35_DSC_0252.NEF.xmp (46.7 KB)
1 Like

The usual custom is to include the xmp file from darktable so people can load it into their own copy and see what you did. Unless of course you’re using non-merged modules like sigmoid (though you could still include it anyway).

@OK1 It may be a good idea to retain more of the detail. At 100% zoom, it feels lumpy and harsh. Good first PlayRaw though. You have tons of back catalogue to play with. :wink:

Thanks, it’s quite nice. There’s a loss of detail in the grass, but you handled the people, who are the primary subject, really well.

BTW, the darktable history stack is usually also included in the exported JPG, so if you don’t attach the XMP, it’s no big deal, really.

@afre: no need to pixel-peep :slight_smile:

Two more from me, one with ‘straight’ filmic (contrast = 1), the other almost the same, but with the ON1 LutifyMe ‘Skin Tone Shaper’ LUT applied after filmic. Stack embedded in the images (but you’ll need the LUT).


I’ve just realised that I did Backlit snapshot - #42 by kofa with a similar approach.

1 Like

I like the second one more. Right level of saturation. :+1:

That’s the one with the LUT.

Gave it a try with filmic, i kept contrast between foreground and background, but lit it up a bit. (also i believe some of the clouds are raw-clipped)

also same with filmic but I added a bit of brightness in the shadows with tone equalizer, but i find it less natural fast. i dont use tone equalizer a lot

1 Like

Thanks,

We aim to please. I am thrilled that you like the enhancements.

I focused only the aspects you had indicated as issues, in the initial post.

Stuck to the script, with only one creative decision - I assumed a viewing audience/target display of social media, laptops, phones, and desktop computer viewing at full screen size as the maximum magnification!

Not that this was an objective of my edit, but detail is definitely improved in comparison with the jpg, which is the assumed benchmark, to beat.

Formatting for social media informed the detail treatment choices made, for a target environment where color and contrast is primary, and certain details would be impossible to appreciate. And hope you agree, the edit fulfils, for this assumed target audience.

If formatting for print, or large format display, the detail enhancement would be treated in a different manner.

To quote you, from an earlier post - no pixel peeping was expected.

But I’ll go one further - the detail is a relatively easy fix. Turn off the local contrast, and any detail lost by this module (assuming there was any loss - typically only visible at pixel peeping magnification), is restored.

The local contrast is what gives it the slightly vivid, social media, instant gratification enhancement (kind of like an OOC-jpg). And this can be disabled.

For large print, or large display, kindly adjust sharpen settings, to taste.

The list of further enhancements is infinite. I’ll stop here.

Good to know. Never had to do this before, but I found some online websites which assist with the jpg to xmp conversion, and I was able to import that into darktable, and apply to a copy of the raw file.

Would you know of any desktop app/tool (maybe darktable itself) which does the jpg to xmp conversion?

Yes, there’s clipping in the clouds, but since there’s no colour or fine details, they can be recovered relatively well.

You just load the jpg as if it was an xmp…no conversion …DT will pull the history stack …you may have to change the file selection box to all to allow you to select a jpg instead of an xmp’

Loading the JPG as a sidecar, I seem to be posting this quite often: darktable 4.0 user manual - history stack, under ‘load sidecar file’ (just switch the selector from *.xmp to All files):

Images that were exported by darktable typically contain the full history stack if the file format supports embedded metadata (see the export selected module for details of this feature and its limitations). You can load an exported image as a sidecar file in the same way as you can with an XMP file.

I think the loss of detail in the grass on the left is apparent even on the screen, without pixel-peeping.

I do love a challenge, if it re-enforces learning, as in this case, or a nice break from the usual.

Regrettably, there’s only soo much one can do to challenged images, with digital tools, Each fix, creates new problems.(side effects), somewhat like pharmaceutical medicines.

Occasionally, not a problem. The more I work with images, though, the more I cull, before bothering to invest any time to bring out the best in the few images that are worth the effort to edit to perfection.

Could this area on the left, already be slightly out of focus, optically. cos you’ll find in all the various versions, on the thread, including the OOC jpg, that left side of the grass is consistently less distinct than the grass on the right.

With local contrast turned off, there are no modules settings which could have introduced (added) any defocussing or haziness, so the observation on detail, may be one based on the actual image/rawfile itself, and there’s a limit to what can be enhanced/repaired in this aspect.

Of course an attempt can be made to artificially sharpen it, but that has its own side effects - no free lunch, only trade-offs.