I hardly ever move those sliders. I use the picker to choose my region of interest, and a scroll wheel shortcut to change the y coordinate (brightness), if needed.
But sure, open an issue, and we can gather feedback once the release is out.
And then there will be those who oppose that view:
I noticed something else - the target_pivot_x → shift conversion is non-linear (piece-wice linear). That is, shift=-1 and shift=1 are at different distances from the mid-gray exposure.
[…]
As far as I understand, it originates from the desire of having the pivot input shift slider with a 0 in the middle and with a [-1:1] range. But is it really required? If either the range or the mid-gray point could be moved we could have a linear conversion between the pivot shift and pivot exposure. Blender AgX in darktable (proof of concept) - #2294 by ndrw
As many have said, there’s no solution that everyone finds perfect.
I admit, a made the change to EV (which I still find more descriptive than an arbitrary decimal number) without posting yet another poll, but the release deadline was/is approaching, and polls take time. So we’ll do another poll in the spring, when we have time to (potentially) change this.
I fully agree with it being in EV. I think EV is more correct approach and easier to explain. The only part I don’t like is the slide. A slide with a fixed range of +/- 3EV would be my suggestion.
Also, don’t worry about this. Life is too short to worry about the small details. It is a great module.
I defer to what you decide to do. You have done a great job bringing AgX to DT. It is very functional and when it is in 5.4 and its final UI is hopefully finally decided upon we will just all learn to accept what terminology you have chosen to use.
I’d just like to second others here - thanks again a ton to @kofa for pushing so much, asking the community for feedback on each and everything that was possible to be included, taking over so many of the suggestions made into the module, never tired to improve and explain even more down to the level of finest detail. I can only guess how much of your private energy you have put into this. Thanks, thanks, thanks. And now it’s time to let it settle, work with it and love the wonderful output - I’m so happy to have this great module available…
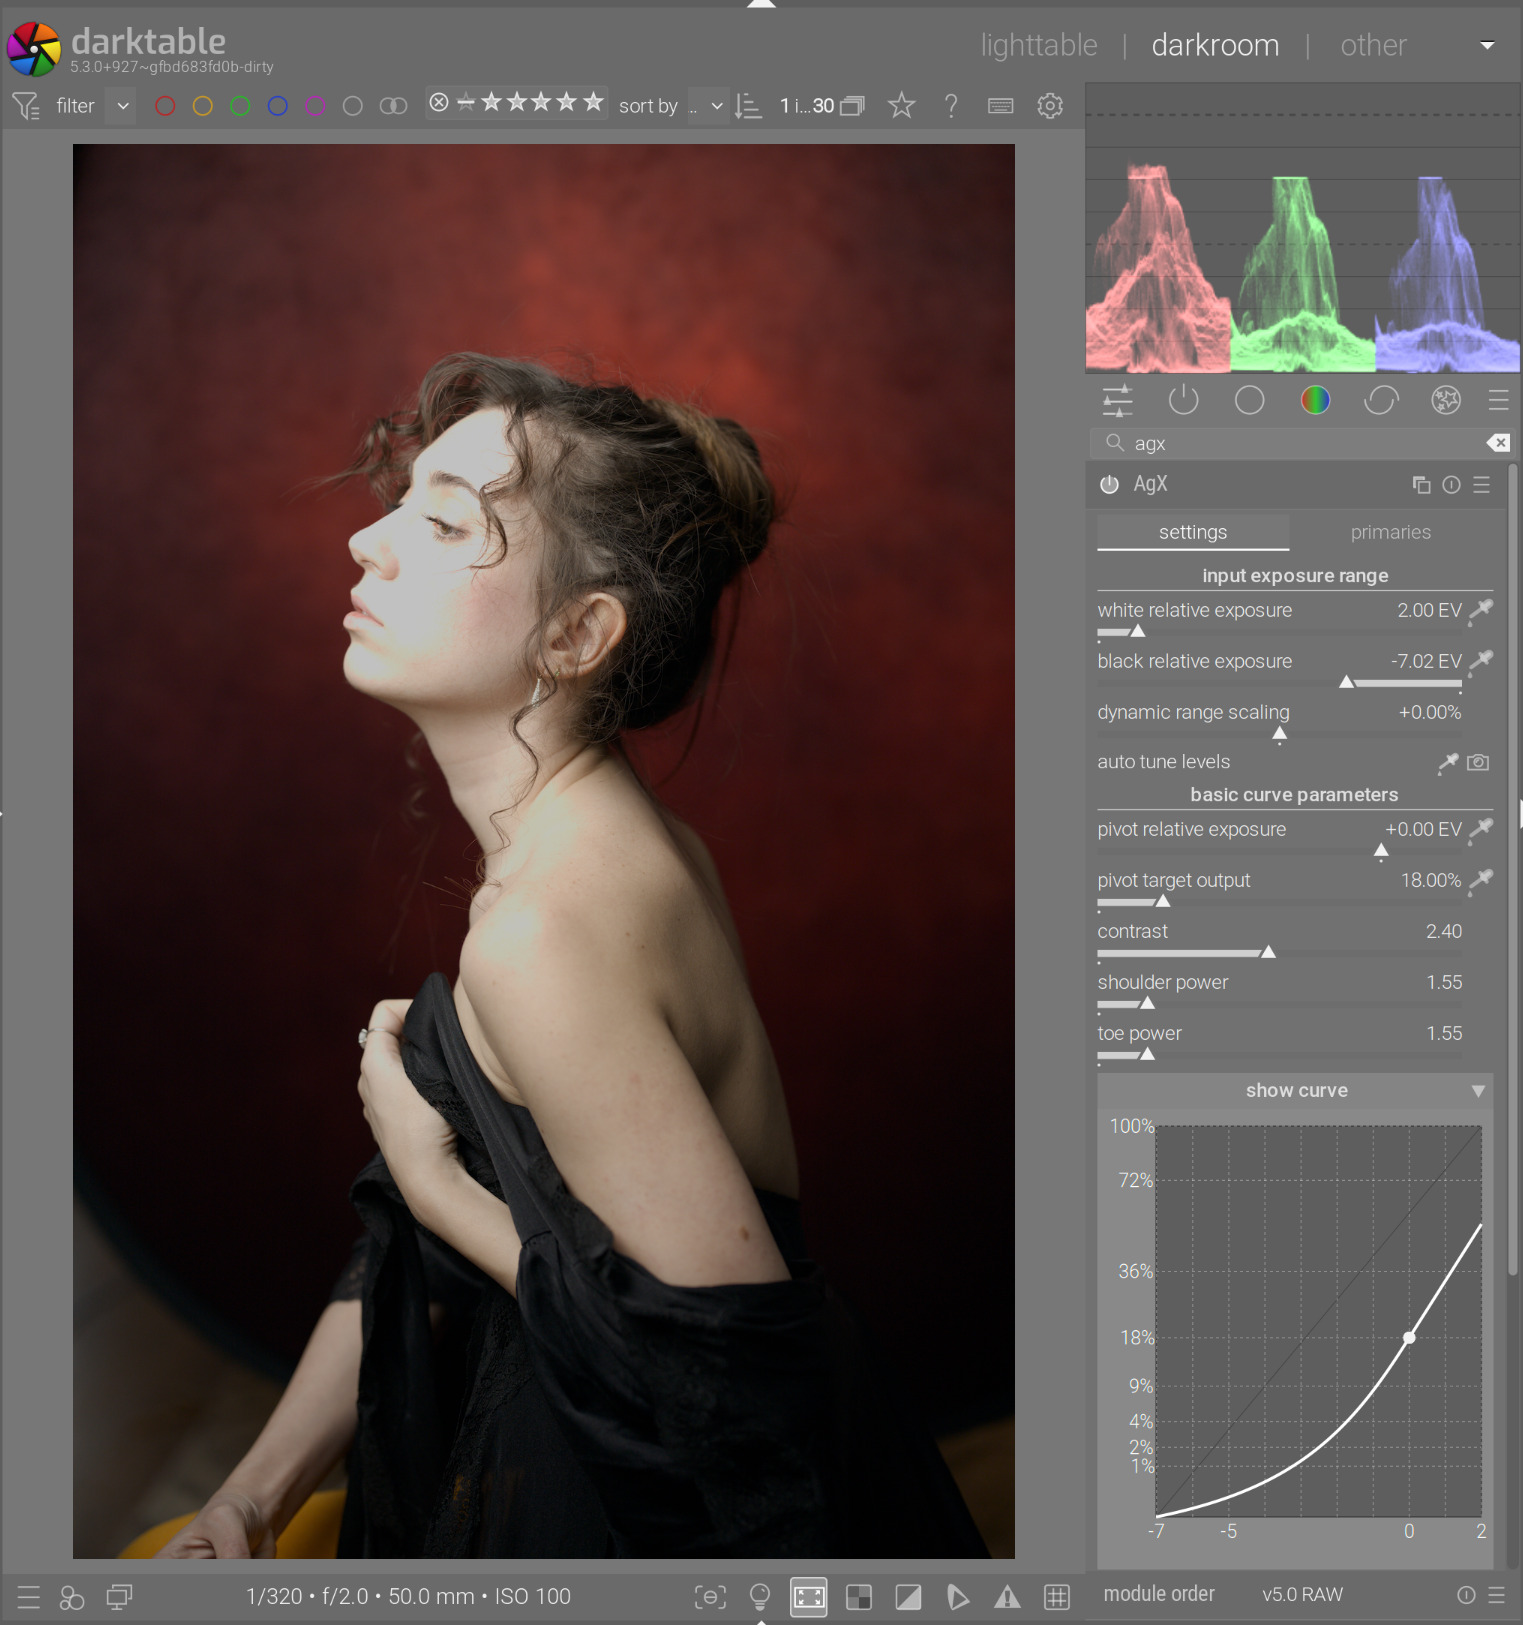
A few remarks on my first tests [Win11 - 5.3.0+915~g4611f7d690 - “smooth (base)” preset & primaries “set to export profile”]:
It’s awesome that AGX can auto-tune the dynamic range by grabbing information from the Exposure module, a function whose lack I lamented about Filmic RGB.
Questions:
Is saturation clipping a problem, or should I ignore it?
[with clipping indication, set to “full gamut” or “saturation only”, “-12.69” & “100%”; “high quality processing active”].
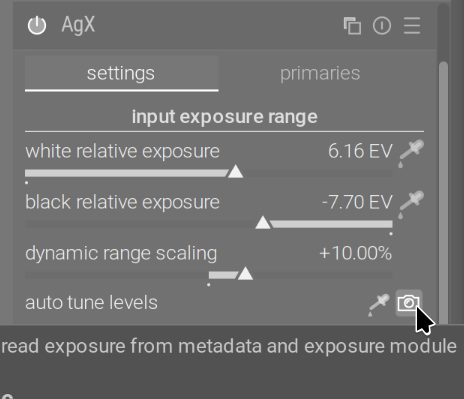
While the “dynamic range scaling” slider should help us avoid clipping, it is currently without effect in the moment of activating the exposure module-based auto-tuner. The values just get pasted in, regardless of the scaling value being at 0 or 50%. So I currently have to re-adjust it everytime afterwards, ideally after setting it to 0 before letting auto-tune paste in the values.
When working with “flat” scenes (low dynamic range, e.g. mountains in the distance, covered in mist), and I want to retain that flatness, the color-picker-based auto-tuning is pleasantly less aggressive than that of Filmic (though- of course - more aggressive than the exposure-based auto-tuner).
But: Should I ignore the curve-shape warnings here, since in “flat” scenes, it is acceptable to me that “target white/black cannot be reached”? Or does this allow certain bad effects that I’m currently not seeing? Or should I simply use the exposure-module-based auto-tuner instead?
By the way, the tooltips for curve problems are really well explained!
My approach is that if you have visible artefacts, then it’s a problem, otherwise not.
What happens is, the curve maps colours to be between 0 and 1. The clipping indicator does not like 0 and 1. What’s more, as purity is boosted, or saturation is increased via look, those coordinates may be pushed even further, below 0 and / or above 1. One way to counter that, while still keeping saturation, is to use ‘white’ and ‘black’ targets < 1 and > 0, respectively; or to use more lax black/white relative exposure, or for blacks, to add a bit of lift. I think we’ll have to experiment with those options, as a community.
In fact, in the AgX module, all those ‘black’ and ‘white’ labels are actually wrong, as the curve is applied per channel. The picker for white relative exposure actually picks the highest value of any channel; similarly, black relative exposure picks the minimum value of any channel. I guess they could be re-labelled as ‘relative maximum/minium EV’, but then ‘EV’ would normally refer to a relative tonal (luminance) value, not a channel value. If we picked the luminance norm (Y) instead, the problem is, blue has a really low Y coefficient, so a very bright, saturated blue could still have a Y of less than 1 EV (Rec 2020 blue’s Y is less than 0.06); picking the ‘exposure’ limits with Y, but applying the parameters to individual channels would be totally wrong.
Unlike the ‘eyedropper’ picker, which analyses image content (data) (it’s a kind of measurement), the exposure-based adjustment is a heuristic estimate based on metadata, taken from filmic rgb. I trust that Aurélien is a clever guy who experimented with that setting before coming up with the scaling factors. People liked it, so I kept it, but I don’t use it myself.
‘of course’? And what does ‘aggressive’ mean here?
Is white/black cannot be reached with the given settings, the module will ‘invert’ the toe and / or shoulder, so its slope will increase, instead of decrease, as it approaches black / white, to force it to reach that point. The reason for that is that without that behaviour, you would not get e.g. white, even though you picked some value. Then, you’d think ‘oh, my white is too high, let’s reduce it’, which then would end up darkening highlights even more, while, at the same time, clipping them, completely ruining highlight contrast. Since I thought this would be extremely confusing for users, I went for ensuring the desired black and white.
Example, if I turn off ‘inversion’ in the code - note that the waveform shows that no channel reaches 1, and that’s because, as the curve shows, the max. output cannot reach 1 at this contrast setting:
If I now reduce the white relative exposure, expecting that would help us reach 100%, by bringing clipping lower, things just get worse, as there will be less space on the right side of the curve, and the maximum will be even lower. There will be clipping, but not to white, but rather to a low value like 60%:
As for the warnings, sure, you can ignore them, if the result is nice. There’s nothing wrong not using an S-curve, and keeping high contrast in e.g. the highlights:
The warning does not say ‘your curve is broken’. It says: the curve has lost its ‘S’ shape, shoulder power cannot be applied. - so don’t be surprised if dragging the slider has no effect. I’ll actually have to update the end of that tooltip, as it says: ‘target white cannot be reached with the selected contrast and pivot position’, which is not true: with the inverted shoulder, it can be reached.
I observed this too. Filmic tends to crush blacks into oblivion for me. AgX pickers give me more predictable results. I suspect @Neutral_Gray has a similar experience.
First of all, thank you, @kofa , for the thorough explanation!
I’ll try to keep it short.
What did I miss? IMHO exposure-based adjustment is precisely what Filmic was lacking! This feature is fantastic!
I know some extreme (creative) adjustments before AGX may cross the boundaries of your heuristic estimates. Still, in my test images, the exposure-based auto-adjust worked really well. Only the clipping indicator made me worry, and as you say, without visible artifacts I shouldn’t overestimate the problem.
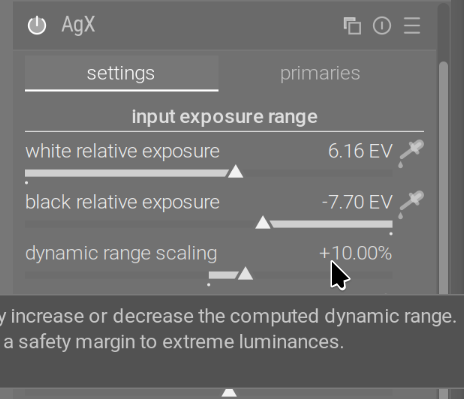
One thing I don’t know I explained correctly is the non-effect of the “dynamic range scaling” slider in combination with exposure-based adjustment. If I want to be on the safe side, I’d like to keep that at, say, 10%, and when I click on the exposure-based adjustment logo, the “multiplier” of the range scaling percentage should instantly be applied on the numbers of the relative exposure levels being pasted in - as it correctly happens when I activate the color picker adjustment. Right now this doesn’t happen. Though it is at 10%, the effect (i.e. the numbers appearing) is the same as when it is at 0% before I click the button. When I then move the slider above 10%, it is as if I had started at zero. Don’t know if you can replicate that.
@mino Precisely! The whole module is, as @priort said elsewhere, much more “graceful” in its transitions.
(black_point_source is assigned a default of -8 EV, white_point_source’s default is +4EV, that code is only the adjustment)
However:
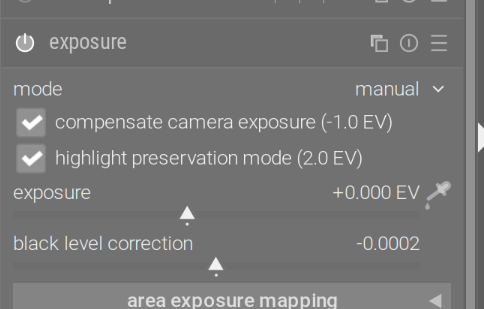
it uses a fixed 0.7 EV instead of reading the exposure module (with automatic application, when the module is initialised, it’s not possible to read from another module, that’s why it’s not done in AgX, and the reason why you have to click a button)
it reads the in-camera exposure compensation from EXIF. Since it does not read the exposure module, it has no idea if the setting is enabled there via the compensate camera exposure checkbox; it assumes the checkbox is ticked.
it was written before a recent enhancement in darktable enabled compensating for the highlight protection/retention modes, so it does not take that into account.
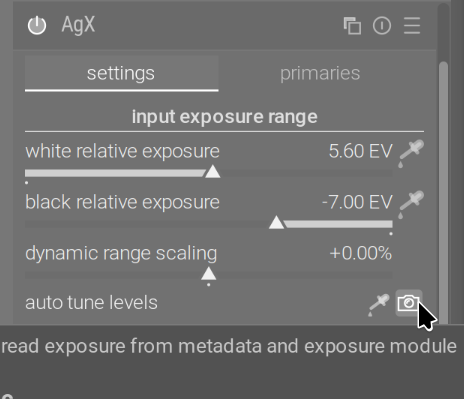
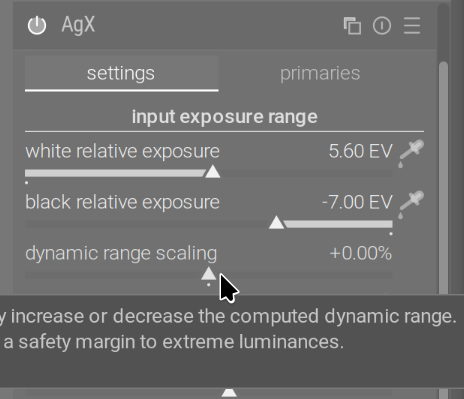
In 5.4 (and current master), exposure provides the total resulting exposure adjustment (compensate camera exposure, if enabled; highlight preservation mode, if enabled; the actual value set via the exposure slider), and AgX reads that when the button is clicked. However, it still remains an estimate: suppose your camera’s red is at 0.9. It not uncommon to have a white balance multiplier of about 2 for red, so the value becomes 1.8. To simplify the calculation, let’s ignore the camera input profile, and say the incoming Rec 2020 red is still 1.8, and let’s also ignore color calibration. If you have your exposure module at the default, with no highlight preservation and no in-camera exposure compensation, this 1.8 is multiplied by 2^0.7=~1.62, to give you 2.92, which is about 4 EV above mid-grey.
The exposure-based guesstimate will give you white relative exposure = +4EV + 0.8 * 0.7 EV = 5.6 EV.
So, for consistency of behaviour, I’ll add code to take the dynamic range scaling into account, but that 10% is really nothing compared to the amount the heuristics can be off at any time. People like it, so it will remain, but you have to be aware that it ignores image content completely, as far as extreme luminances are concerned.
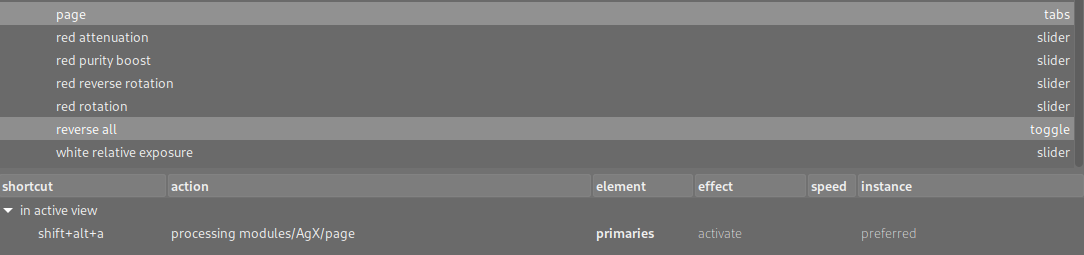
Is it possible to set a keyboard shortcut leading straight to agx primaries page? Thorugh fiddeling about with the shortcut settings I have not been able to get it to work.