Blender AgX in darktable (proof of concept)

Thanks again, I begin to understand now.

However, my original question about how to ensure that midtone contrast is maintained when using AgX remains unanswered :innocent::

Say that I’m editing a portrait. I adjust exposure such that the skin tones fall onto midtones. Now, if I’m using filmic (and keep contrast at 1, and don’t make the curve too weird), I can rest assured that the relative luminances of the skin tones will be represented faithfully on the display device.

If I’m trying to compress a lot of dynamic range, I might have to reduce contrast somewhat, e.g. to 0.8. Then I know that the skin tones will be rendered with slightly less contrast than in reality. I can also increase contrast above 1 to make the image more punchy (although Aurélien wrote that filmic’s contrast should not be used for artistic purposes).

My point is that it’s important to know whether the effective midtone contrast is above or below 1.

With AgX, I feel uneasy when modifying contrast, because I don’t know (other than visually), where I am relative to neutral midtone contrast.

Am I overthinking this?

1 Like

As demonstrated above, 2.4-2.5 means no change in contrast, neutral. It’s exposed as a raw parameter instead of an actual contrast (e.g. 1) because it never occurred to me people would care about the number, if the image looks right.

1 Like

Myself, I would find it very helpful if that slider was normalized in the way described above, and if double-clicking would reset it to the neutral value. This would have the nice effect of keeping the meaning of the parameters “white relative exposure”, “black relative exposure”, and “contrast” consistent between filmic and AgX.

Dimensionless values are easier to understand than values with some arbitrary dimension.

Sigmoid also uses a raw value on the UI, so it’s not unprecedented. Scaling would require yet another change, yet another migration code, when we’ve just cleaned out the old ones.

We can do this the next time we update the module’s parameters, but not before that.

1 Like

@alpinist I feel like with AgX I am able to dial in way more contrast compared to filmic. Conversely I find AgX often increases contrast in facial features compared to more flat/soft/glowy mid-tones I was used to with filmic. I find this issue can be remedied by putting “pivot relative exposure” on the skintones of the subject.

Don’t the alternate views in filmic show the output mapping expressed on a log or linear scale… Maybe I don’t understand them either

I’m glad that you are open to this change.

Perhaps the contrast parameter in sigmoid could be given a consistent meaning as well on that occasion? That would make Darktable’s three tone mappers a little easier to understand.

One final question, if I may:

So the horizontal axis of the tone curve has a logarithmic scale, and the vertical axis has a power scale, and it is with these scales that it has a linear portion / simplest form. Is there a theoretical reason why the curve is not expressed with log-log-scales? I’ve read somewhere that visual perception is better represented by a power law than by a logarithm, so perhaps that’s the reason? Or is it simply that originally AgX was implemented as mapping directly to gamma-encoded RGB values?


Or, put differently: in filmic, the central part of the tone mapping curve is linear before applying gamma. In AgX, the central part of the curve is linear after applying gamma. Probably it doesn’t matter, as long as it’s some smooth S-shaped curve that is roughly linear in the middle…

As @kofa phrased it above is there nuance to encoded vs output? … but the manual states

However, at the output of filmic rgb , the signal is logarithmically encoded, which is not something ICC color profiles know to handle. As a consequence, if we let them apply a gamma of 1/2.2 on top, it will result in a double-up, which would cause the middle-gray to be remapped to 76% instead of 45% as it should in display-referred space.

I love being able to do that. AGX’s mix of tools is brilliant. So much control!

2 Likes

I’ll answer tomorrow evening, but I think I’ve managed to confuse you with gamma. I don’t mean to say that what I wrote is wrong, but I probably did not express it well.

From what I can see, filmic and AgX apply the same linearisation (a power function) to the curve’s output. out = power(y, p), where y=curve(x) and x=log_mapping(in).

The curve is different, and to what it is applied is different (‘in’ being a norm in filmic, or a primaries-processed channel in AgX). And the post-processing (building the output RGB from input ratios, the ‘out’ value (processed norm) + filmic colour processing vs RGB from processed channel values and primaries post-processing) is also different.

But it’s late, I may be wrong.

It’s only morning, not evening, :slight_smile: but checked again.
In filmic rgb, the output of the curve (the tone values, leaving colour aside) is adjusted using the same power function as in AgX.

The flow is the same for both modules:

  • apply the log mapping (black … white relative exposure → 0…1)
  • apply the curve
  • apply a power function (neutralising the curve’s ‘built-in gamma’, if you wish)
  • use that + colour processing to provide the final, linearised output
  • which is then ‘gamma-encoded’ by the output color profile.

I think the phrasing in the filmic rgb docs is somewhat misleading.

So:

No, they behave exactly the same way. They take log-encoded data, apply a curve, which has a certain contrast at the pivot (and maybe has a linear section, depending on parameters).

2 Likes

Thanks! I see now that the filmic plot “look only” and the AgX curve plot use the same axes: log of the input on the x axis, and power-law of the output on the y axis. And it is in these plots that the central section appears linear (if the curve is configured to have a central linear section). As you said, I can adjust filmic’s “gamma” through its “hardness” parameter.

Yes, filmic’s documentation states that the “look only” plot does not include the “output transfer function”, which is the one that features the “hardness” parameter. This is what made me believe that while in the case of AgX the complete mapping features a linear section, in the case of filmic it is only a partial mapping (“look only”, i.e. without the output transfer function) that features a linear section.

The filmic documentation seems to imply that the full tone mapping is only shown in the following plot:


Here, the central section no longer appears as a line. The x axis here is still log-scaled (a part of it is hidden), I don’t know what scaling is used for the y axis.
Indeed!

Perhaps in filmic documentation “including or not the output transfer function” only refers to how the y axis is scaled? If this is the case, I consider it super confusing: Plotting the same function with different axes does not modify the function. This would be the same kind of confusion that we discussed above for the tooltip.

Commenting on AgX – Darktable.info – Alles für Darktable Anleitungen, Themes & Shortcut (see [DE] darktable.info – A new resource for the German-speaking community (Modern Workflow & AgX)) - but let’s not start yet another AgX thread, I won’t be able to keep track.
@Qor thanks for the site and the description.

I’m afraid there’s some confusion regarding the Notorious 6. It’s a problem of per-channel curves; filmic does not have this issue.

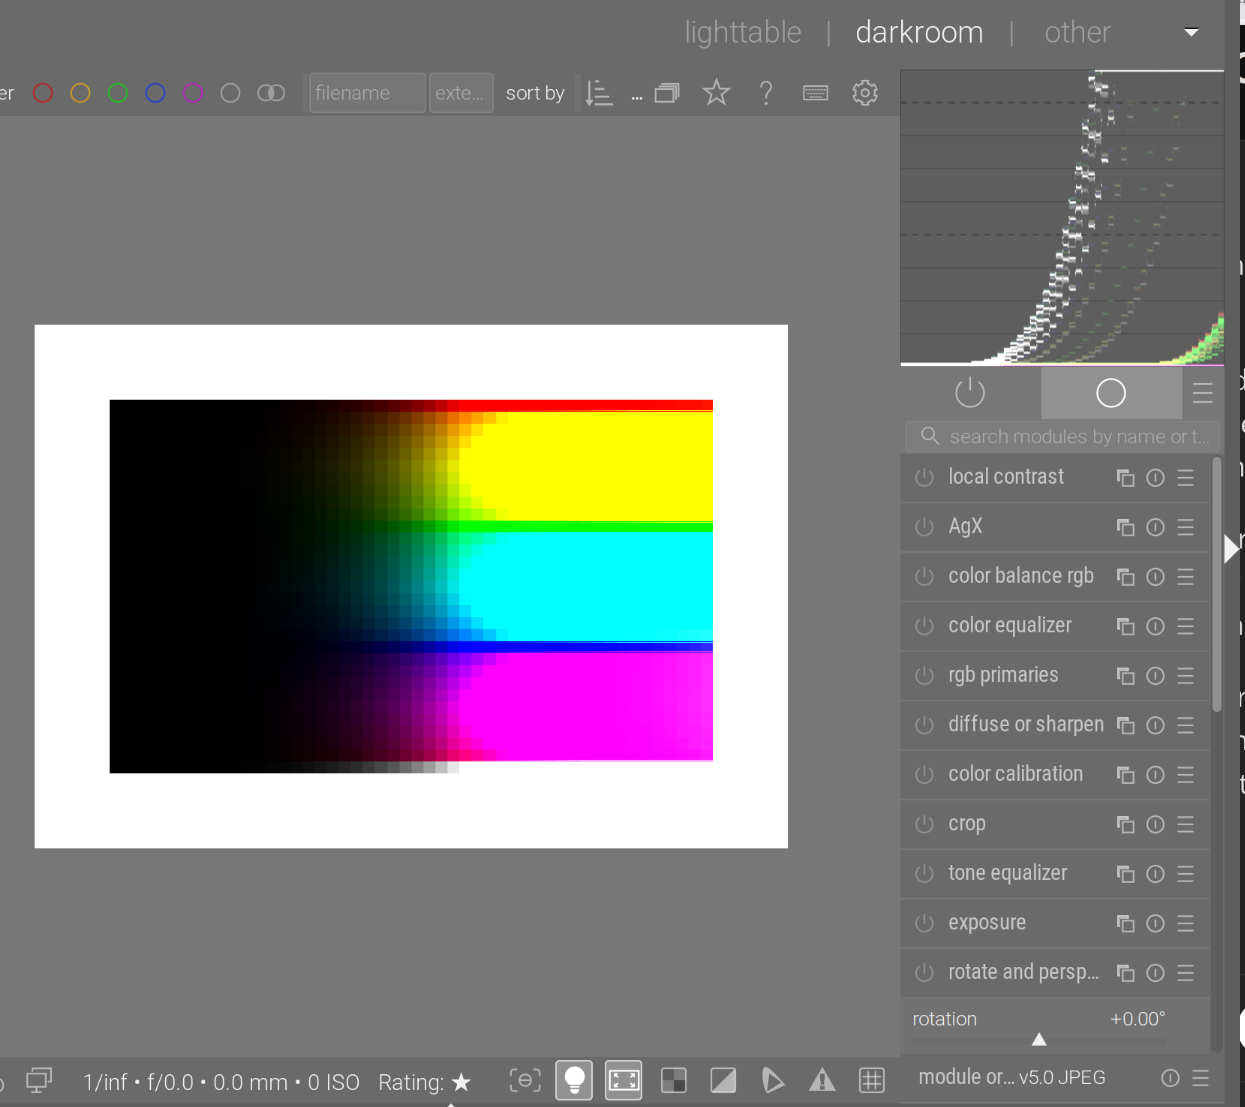
This is pure clipping (no curves, no tone mapper). We see the N6 ‘beautifully’:

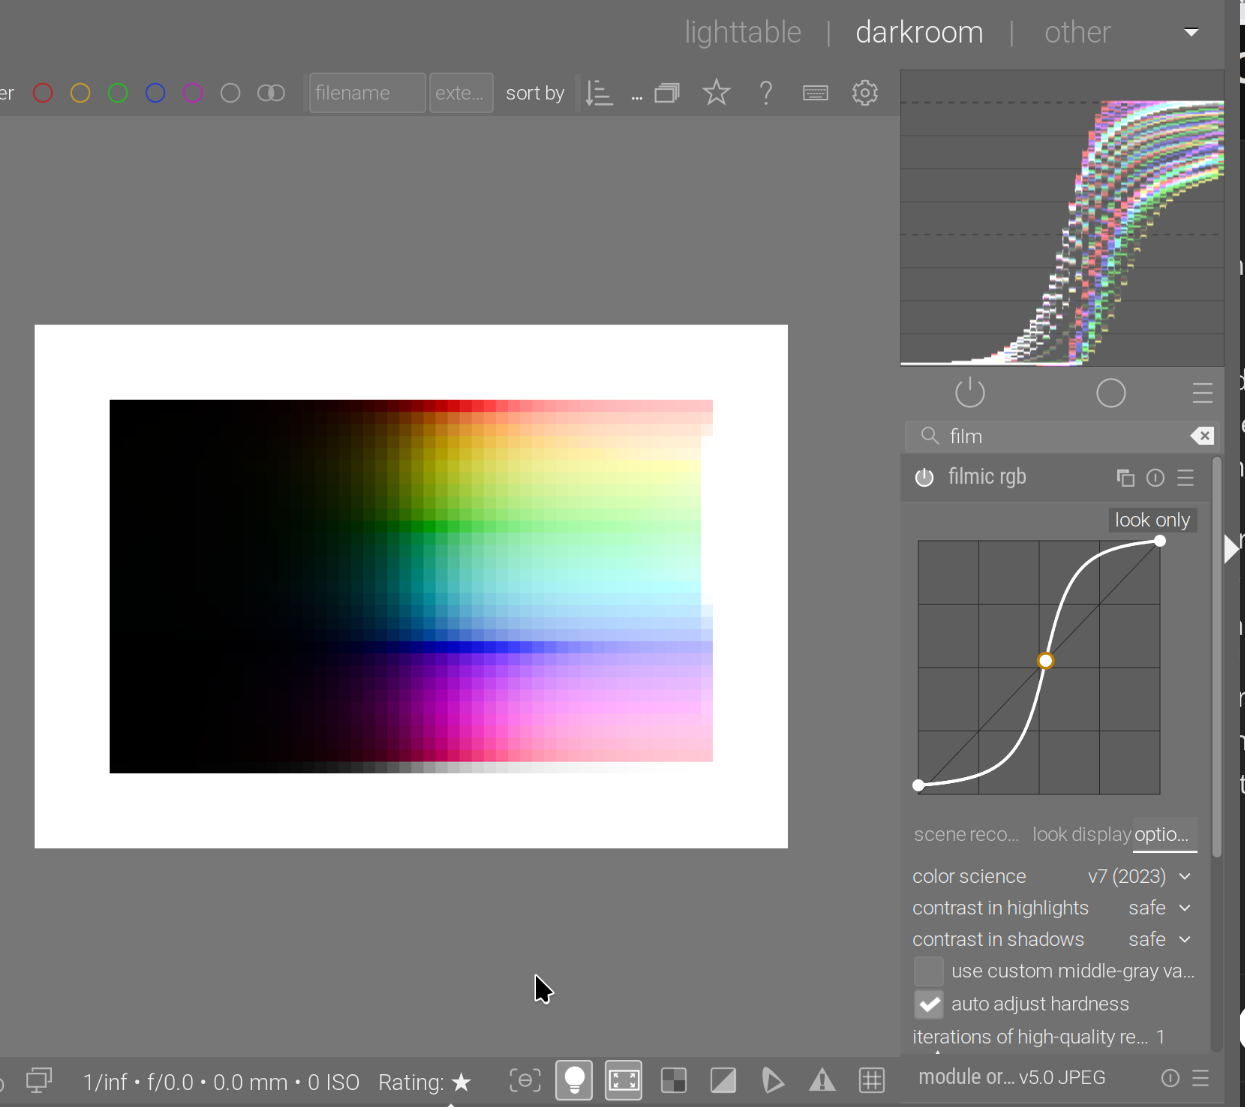
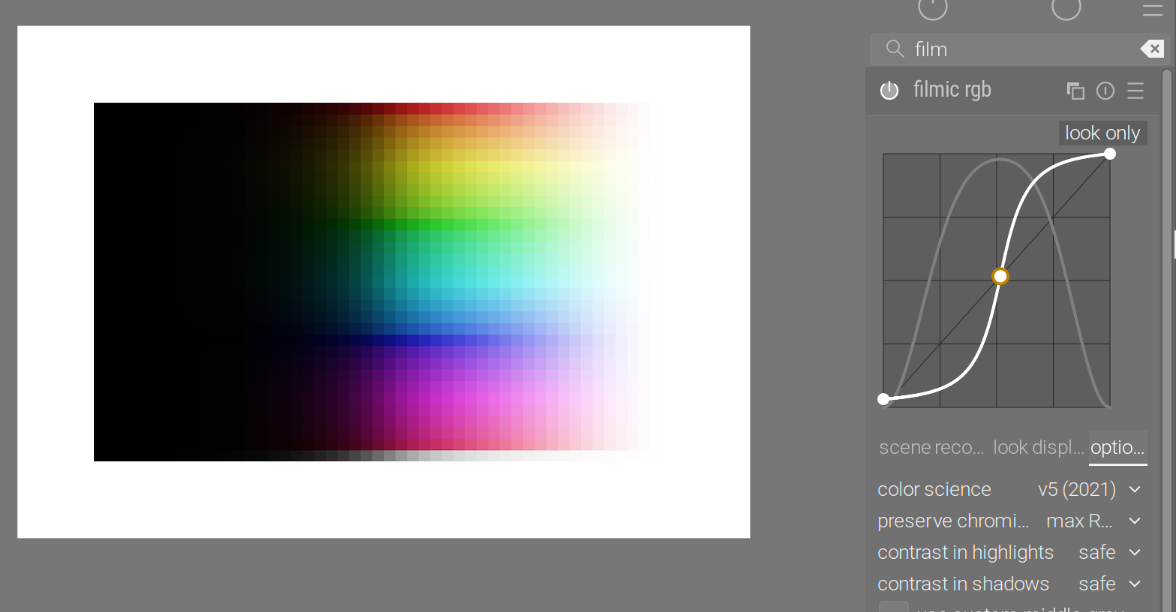
filmic rgb makes sure to avoid the N6:

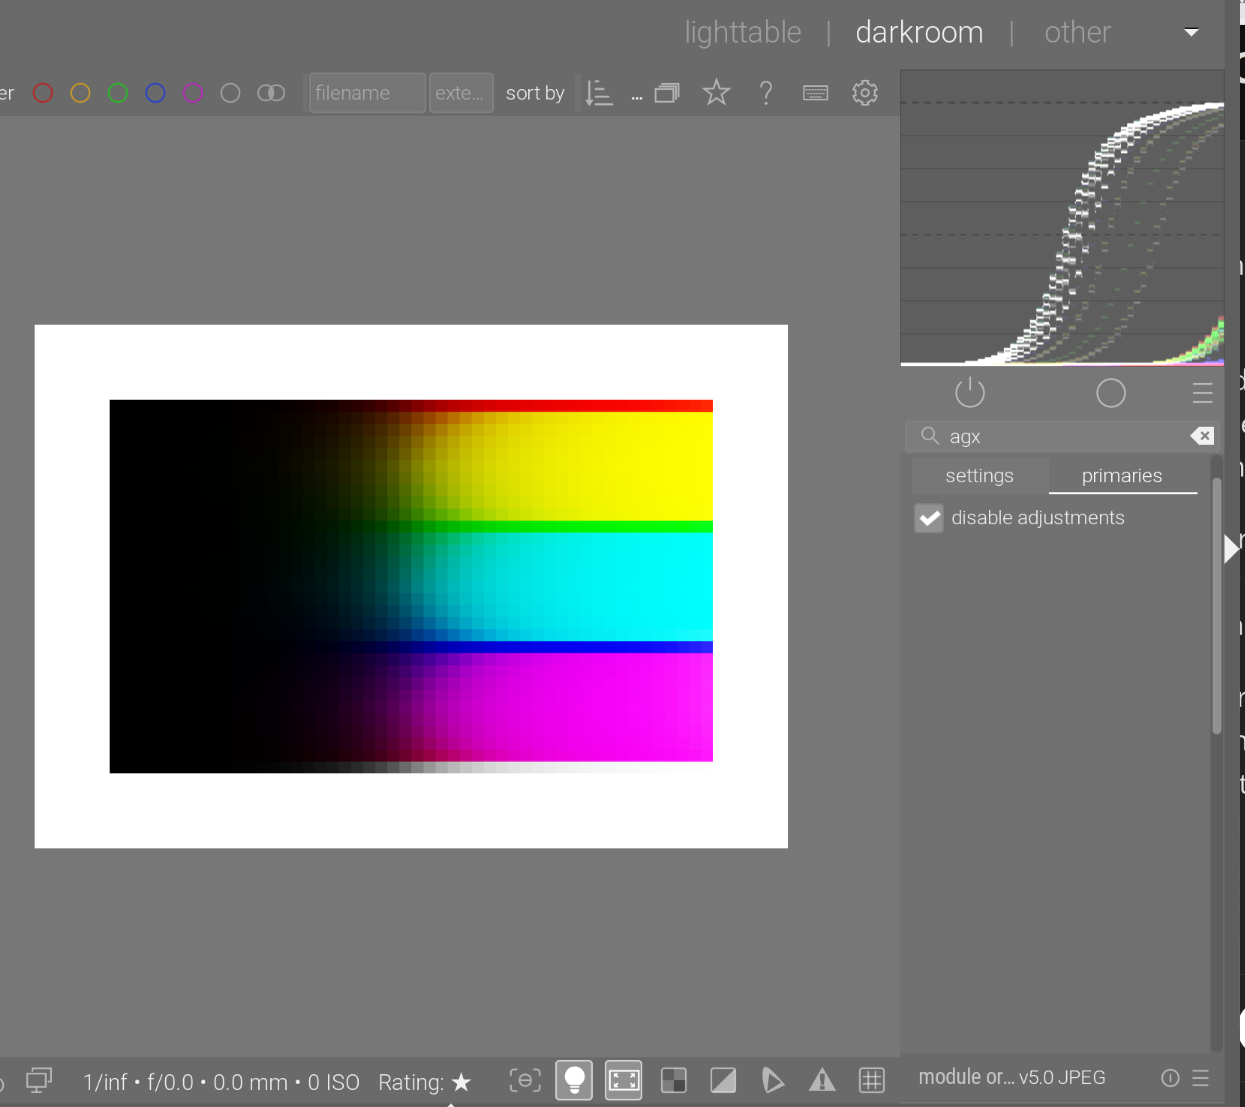
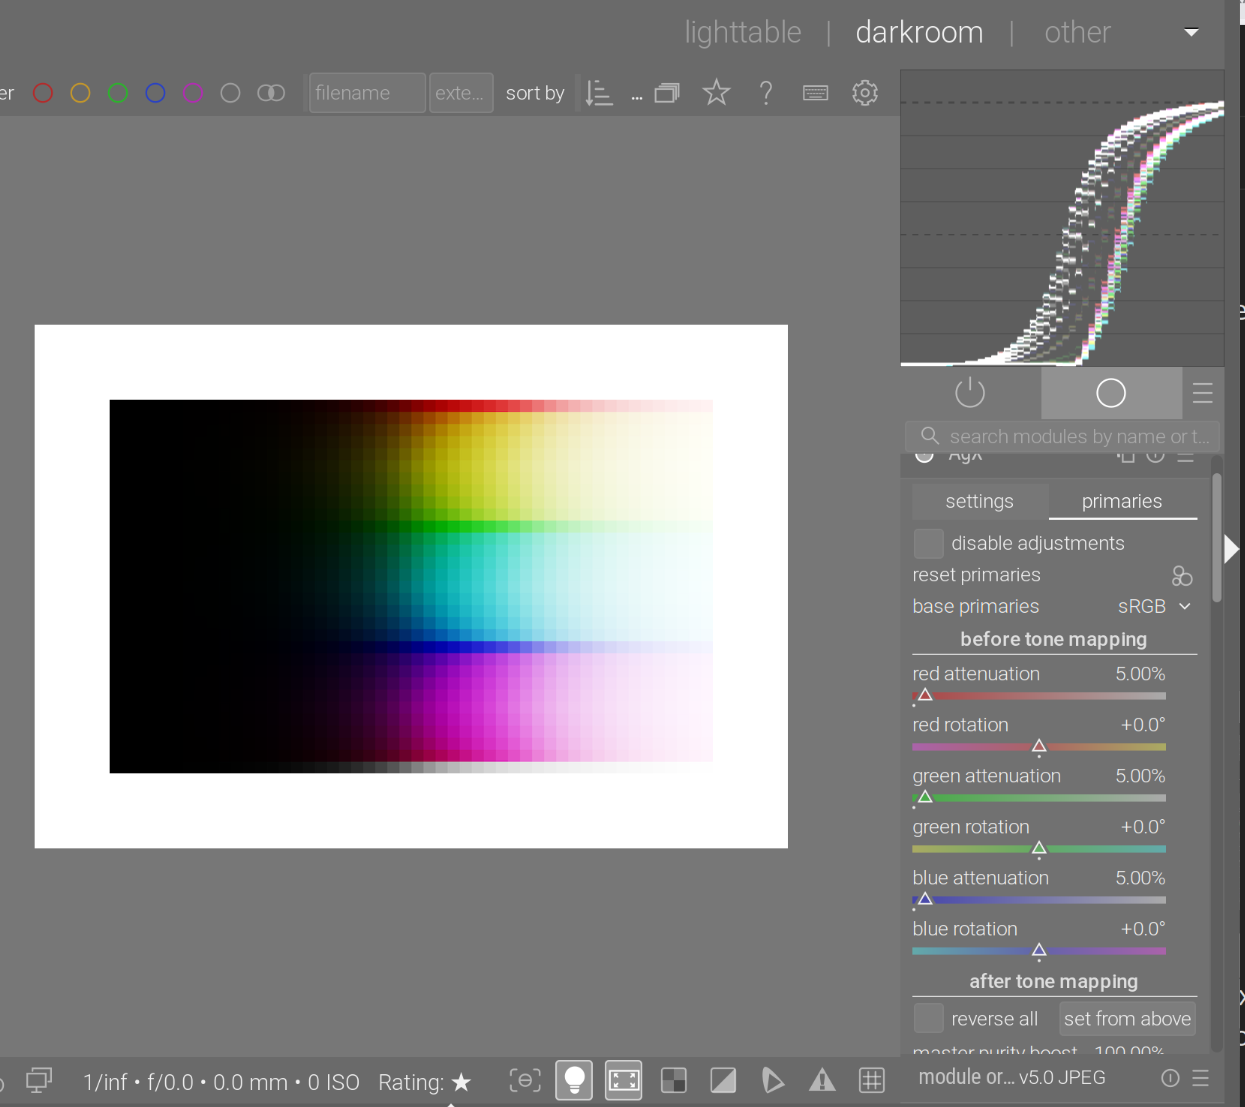
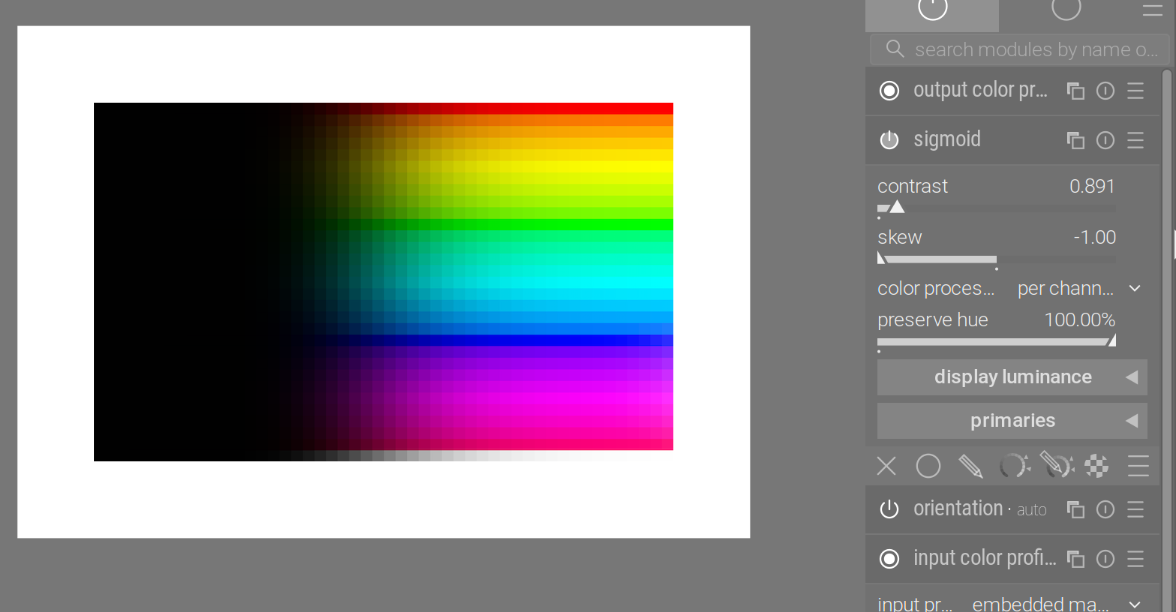
This is AgX without primaries adjustment, and without preserve hue:

We no longer have the sudden clipping, but the N6 is there.

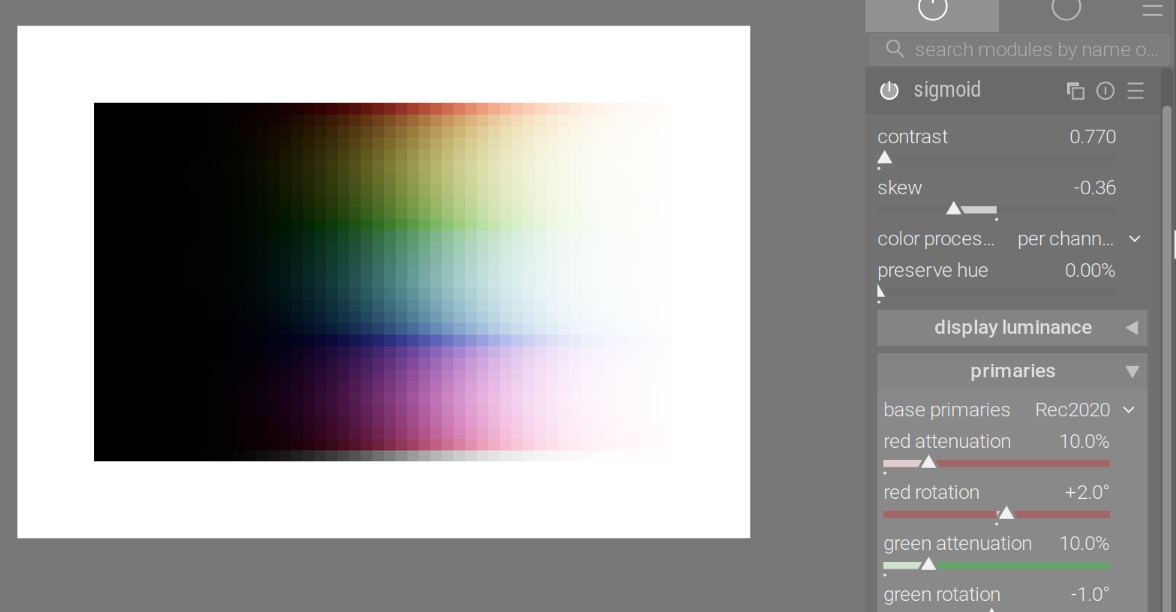
AgX without primaries adjustments, with preserve hue = 100%:

The problem is, brighter and brighter colours are not mapped to brighter and brighter pixels, as when the curves saturate, brightness tops out. Curve ratios are preserved, so growth of all curves is blocked.

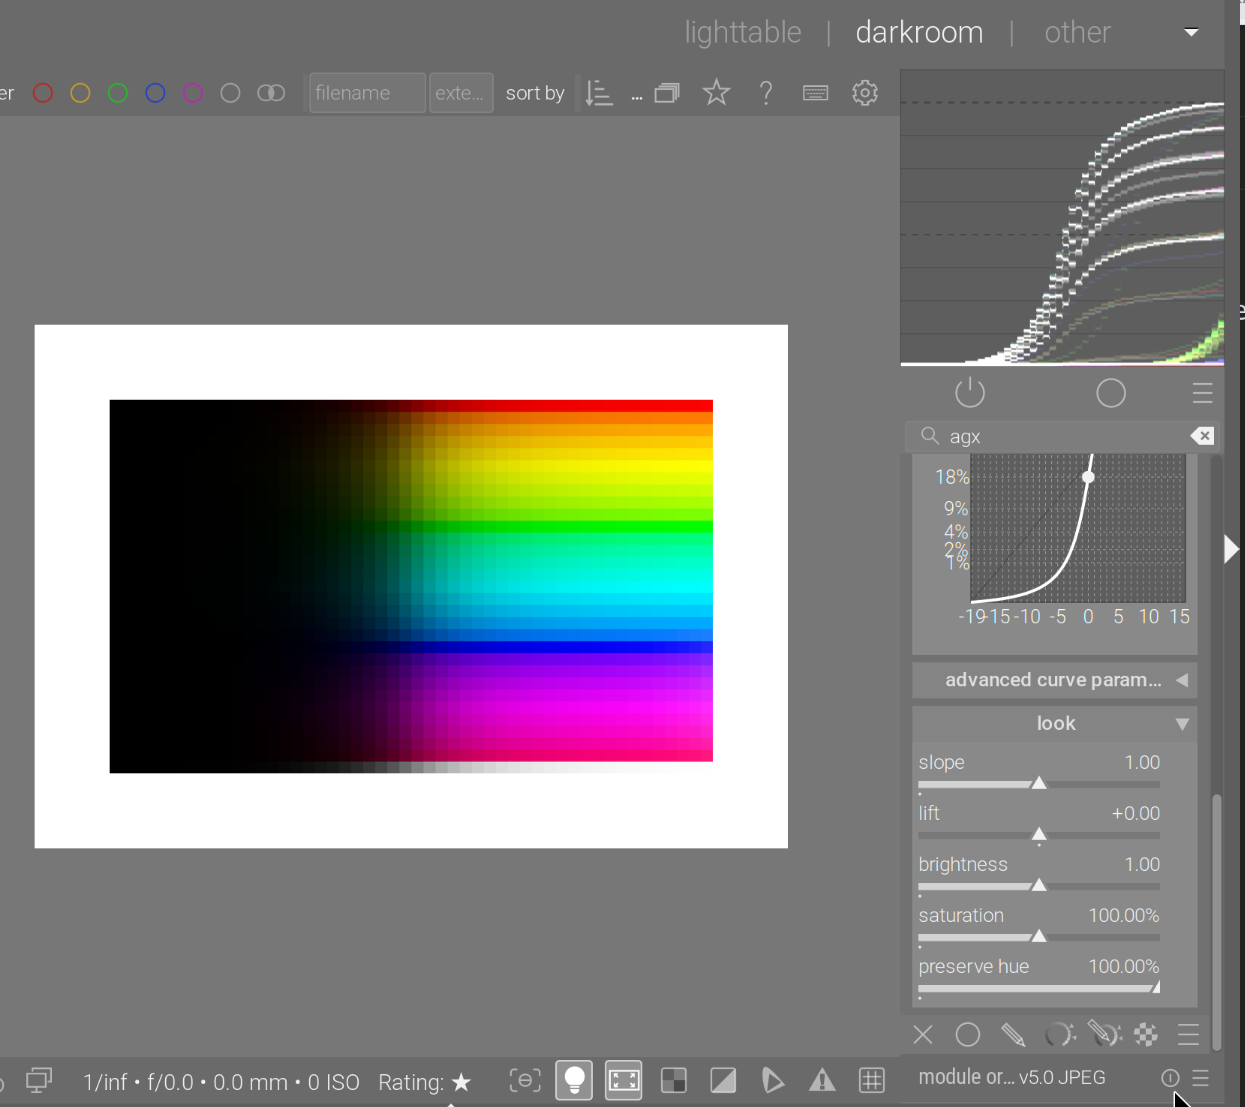
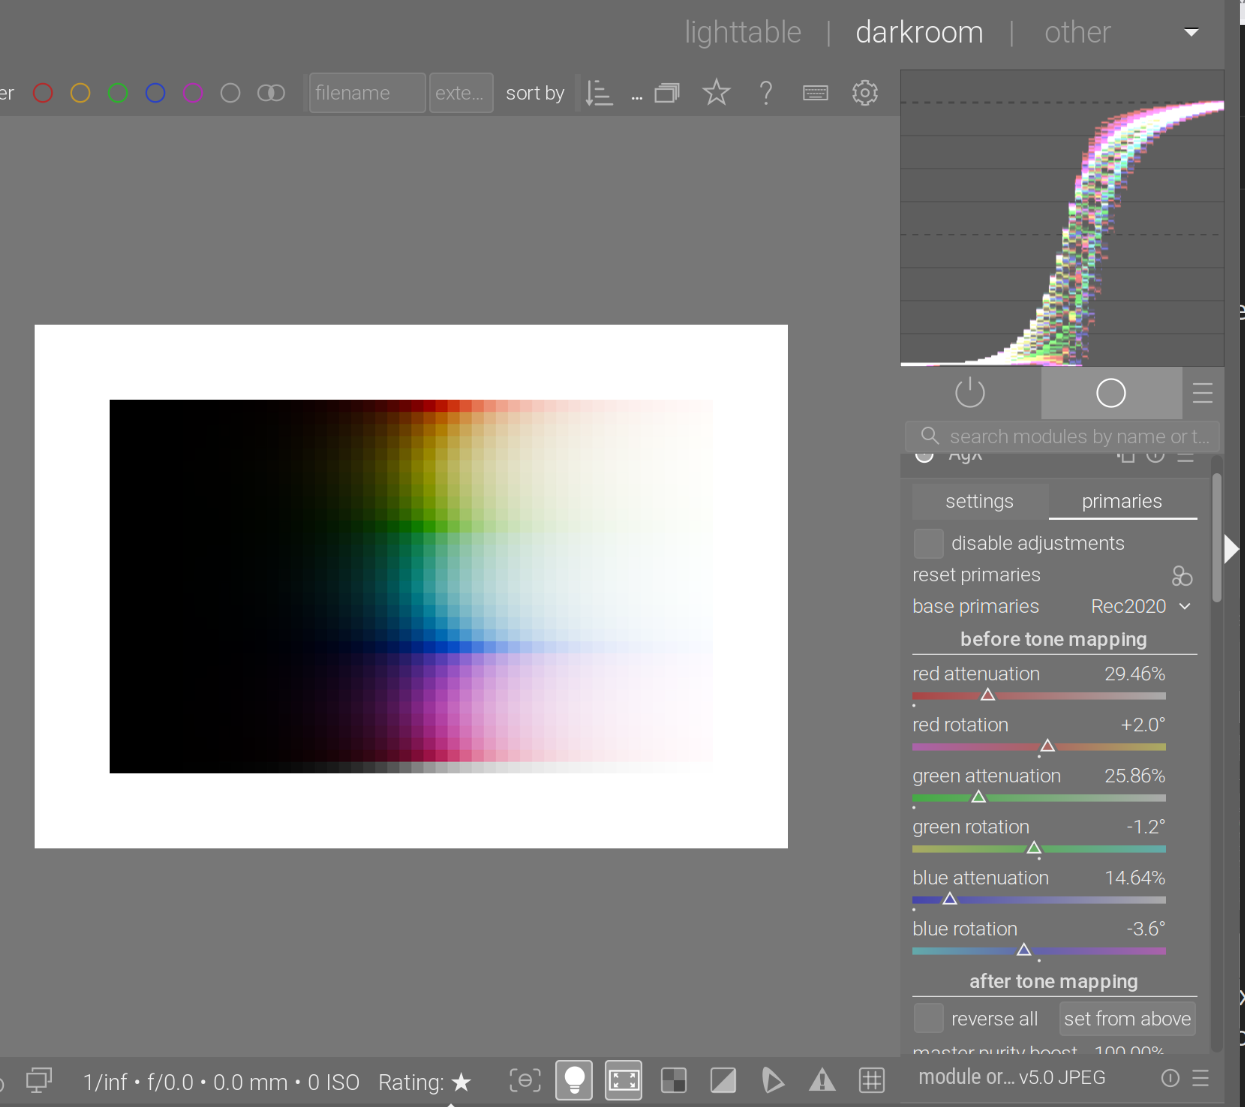
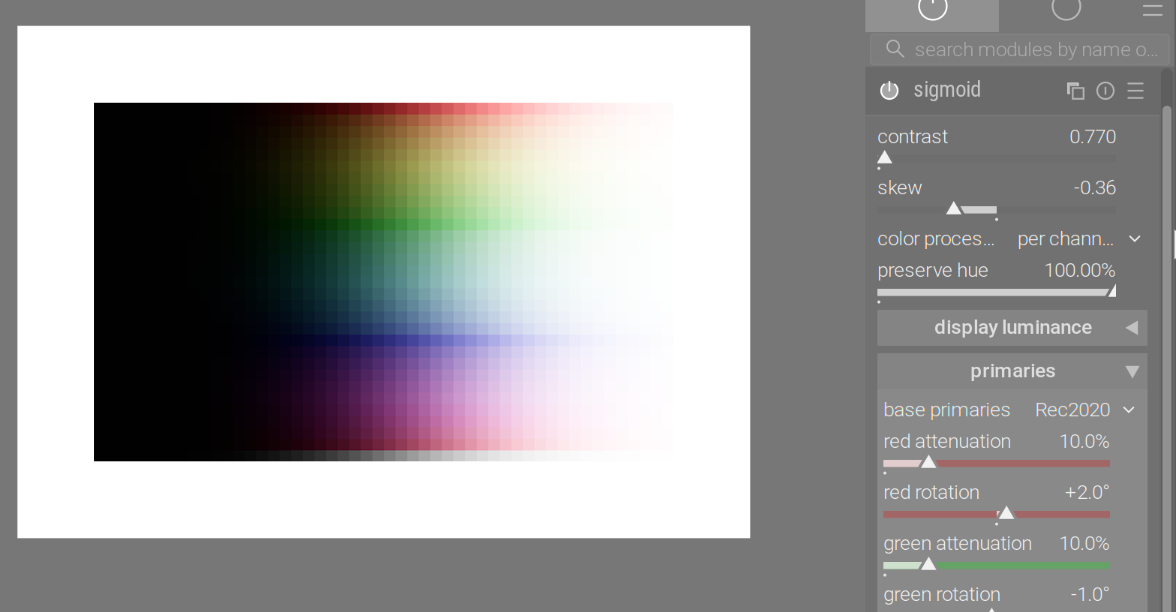
AgX, with a bit of attenuation:

See are beginning to see a bit of the ‘path to white’: since (e.g.) a pure red is desaturated, the value of the red channel will drop a bit, and (more importantly) the green and blue channels will no longer be 0. For high brightness (e.g. original input red 500%, green = blue = 0), we may get something like red = 450%, green = blue = 50%. That 450% will be log-mapped + curve-mapped to something like 95%, but the green and blue will be strongly boosted, to (for example) 80%. The end result is a red-tinted, light grey (or a bright, desaturated red).

However, we still see the N6 clearly.

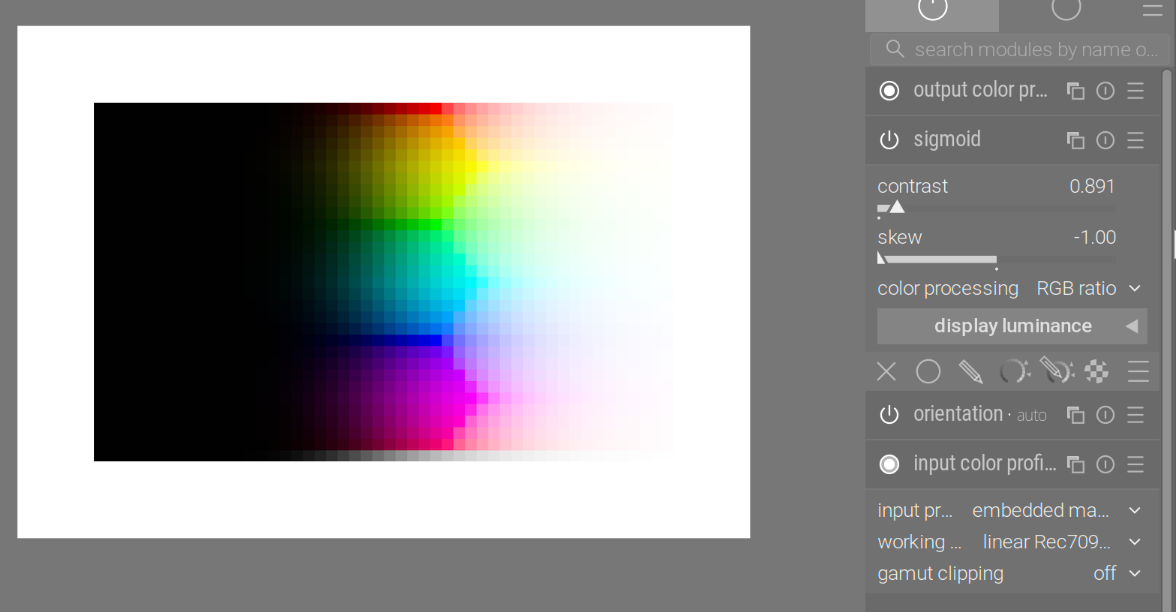
Then, twisting the primaries does not eliminate the N6. This is with the Blender-like primaries, this is still a per-channel curve application. We desaturated and rotated the primaries, so the colours change, but the phenomenon does not. Twisting the primaries is important to e.g. shift reds slightly towards red-orange (more yellowish), because such shifts are also present in human vision.

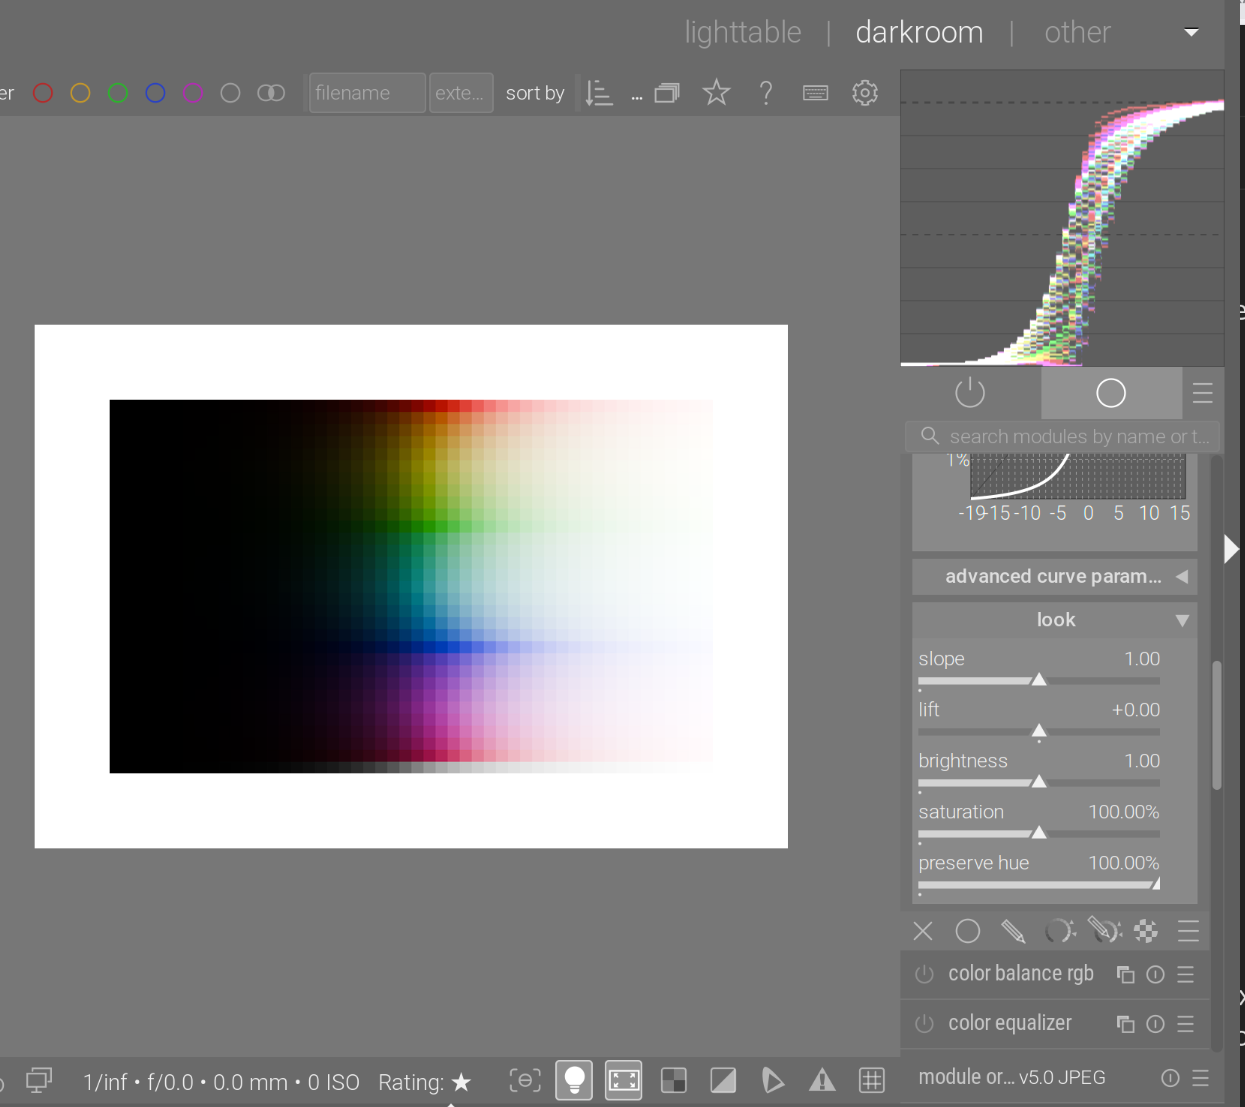
Turning on hue preservation fully:

A close-up shows the difference. Top: hue preservation = 100%, the yellowish green is kept; below, the yellow of the N6 is visible (hue preservation = 0%).

Test image: https://github.com/sobotka/Testing_Imagery/raw/refs/heads/main/RGB_sweep_smooth_31x50.exr

4 Likes

This is sigmoid in rgb-ratio mode. It also avoids the N6:

per-channel sigmoid with hue preservation:

… and without (N6):

sigmoid can also tweak the primaries, and produce the ‘AgX effect’ (the addition of the primaries was inspired by AgX). Without hue preservation:

And with hue preservation fully turned on:

3 Likes

Hi @kofa,

Wow, thank you so much for taking the time to explain this in such detail! Since you are the one who ported AgX to darktable, getting feedback directly from the source is incredibly valuable to me.

I realized that my simplification regarding the ‘Notorious 6’ and Filmic was technically imprecise. I want to fix this on the website to be both accurate and understandable for beginners.

Could you take a quick look at my proposed revision?

Current (flawed) text:
‘The problem with the Notorious 6 is that they often clip ugly into neon colors. Filmic RGB often struggles with this.’

New Draft:
‘A common challenge in digital processing is handling highly saturated, bright colors (the so-called ‘Notorious 6’).
While Filmic RGB tries to preserve the hue and saturation mathematically correct for as long as possible (which can sometimes look ‘harsh’ or artificial in extreme highlights), AgX takes a different approach inspired by analog film:
It introduces a ‘path to white’. As colors get extremely bright, AgX gently desaturates them. This prevents the unnatural ‘neon look’ and mimics how our eyes (and chemical film) perceive very bright light sources.’

Does this capture the essence correctly from your perspective?

Thanks again for your help!
Chris

filmic can also do desaturation (e.g. with color science = v5 and norm = max RGB):

It will preserve hue, which then leads to the often-mentioned ‘salmon sunset’ problem: our perception will shift those intense, bright reds towards orange/yellow. The recommended solution from Aurélien is to use color balance rgb to shift the highlights.

I would suggest simply mentioning hue preservation for filmic (and sigmoid), and the ‘salmon’ effect, saying the shift has to be introduced in color balance rgb or some other module in case of filmic, while it can be done via the primaries directly in sigmoid and AgX.

While AgX also has the hue preservation, that is only about the N6 introduced by the per-channel application of the curve. The shifts introduced using the primaries controls are not undone (you have the after tone mapping controls on the primaries tab to do that, if you wish).

1 Like

I’m on 5.3.0~git949.610a6048. I’m thinking this is a bug, but I would like for someone else to confirm in case the functionality has change. Per the dtdoc in kofa repo, the pivot target output picker should evaluate the region. When I press the picker, nothing changes for me (stays at 18%). Even if I set it to 0 or 100 (to test) and then press the picker, nothing changes (stays at 0 or 100).

There are two pickers now. The top one only picks the x position, the one below picks the output as well. It works for me.

1 Like

I clearly see two pickers. The second clicker does not seem to cause any change (in the image or slider values). Manually moving the slider does cause a change.

Fedora 42 KDE Wayland

I don’t think I’ll have time to look into this today. Could you please share a video?