Blender AgX in darktable (proof of concept)

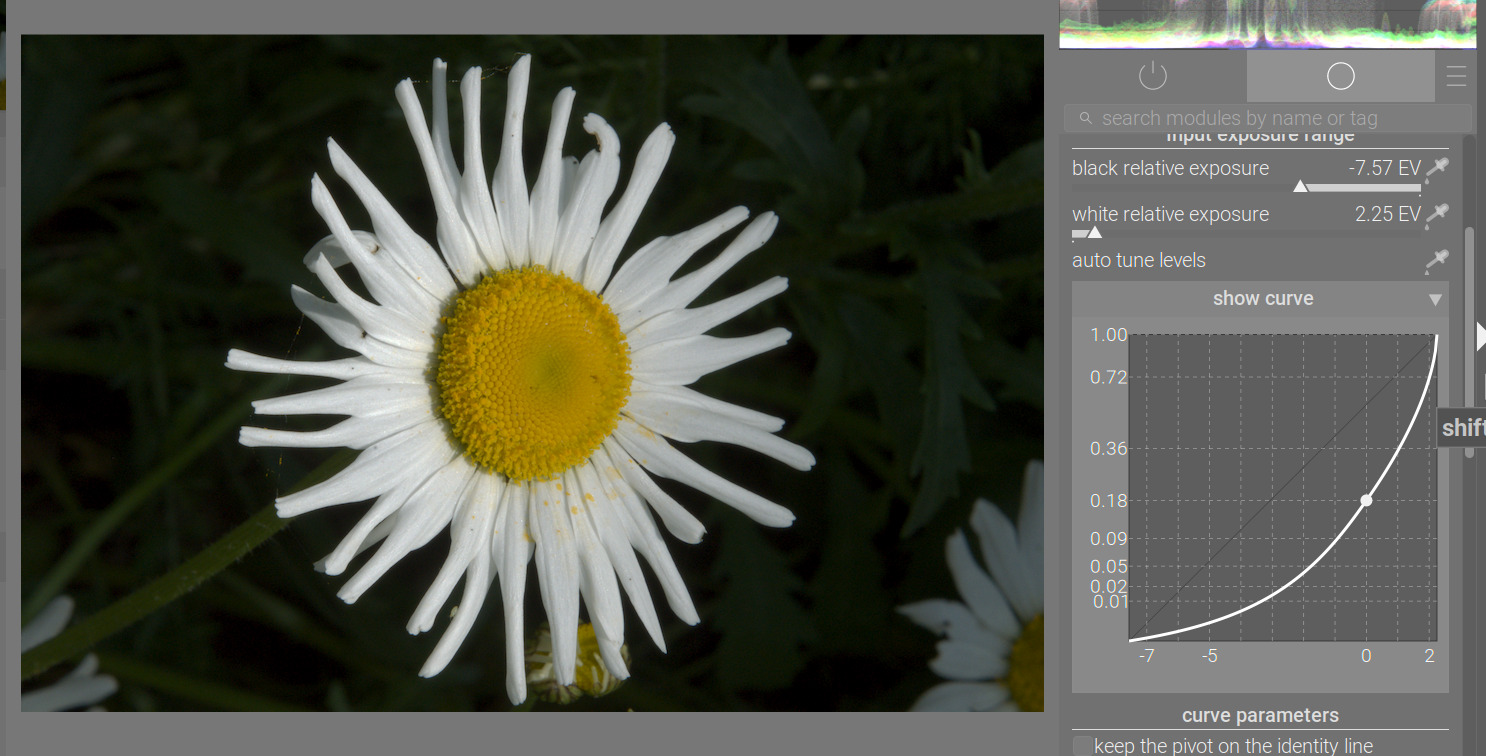
Output contrast is a ‘scarce resource’. The job of the tone mappers is to map a large input dynamic range to a much more limited output range. That means an overall reduction in contrast.

However, usually we don’t want the same contrast (or the same reduction of contrast) everywhere: our main subject should probably retain more contrast than the background etc.

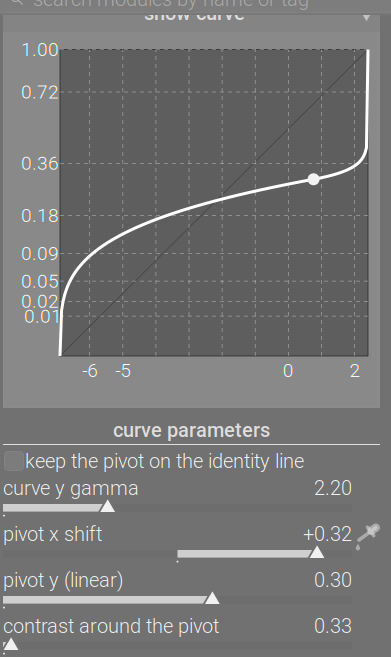
Do not think of moving the pivot as manipulating mid-grey. You move the point around which contrast is highest (well, see * below). This is what Boris demonstrated in these posts:
Blender AgX in darktable (proof of concept) - #669 by s7habo and Blender AgX in darktable (proof of concept) - #674 by s7habo

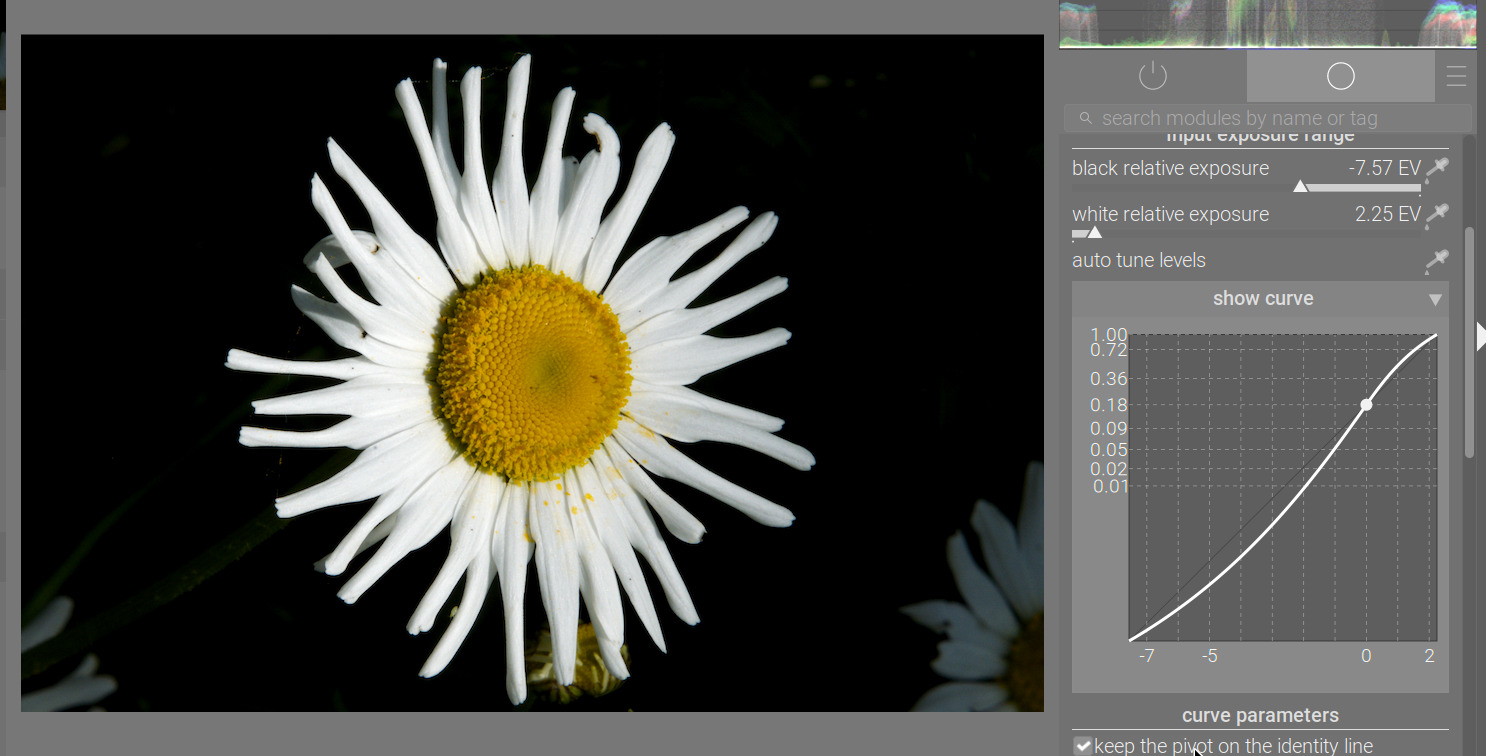
If you use the picker, the tool will try to make sure the average brightness of the selected region remains the same as it was with the pivot in its original, mid-grey-to-mid-grey position, by adjusting both pivot x shift (input selection) and pivot y (what output to map to).

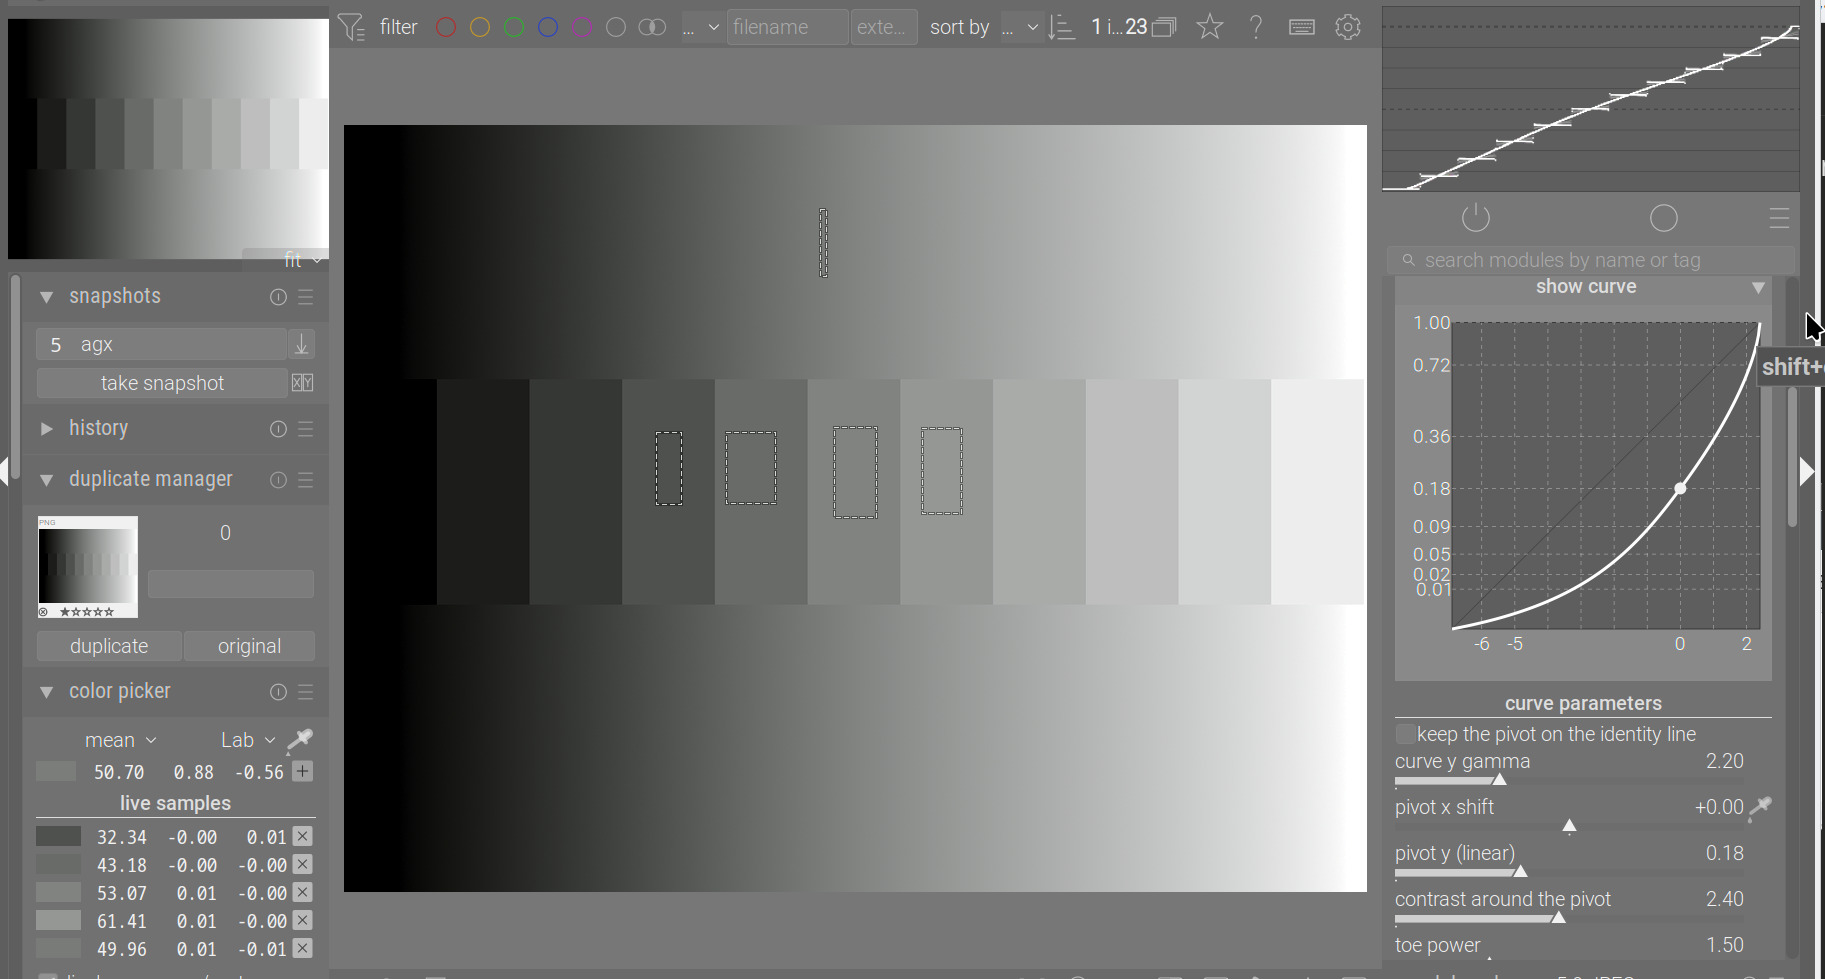
We could start with this (mid-grey is indicated by the arrow):

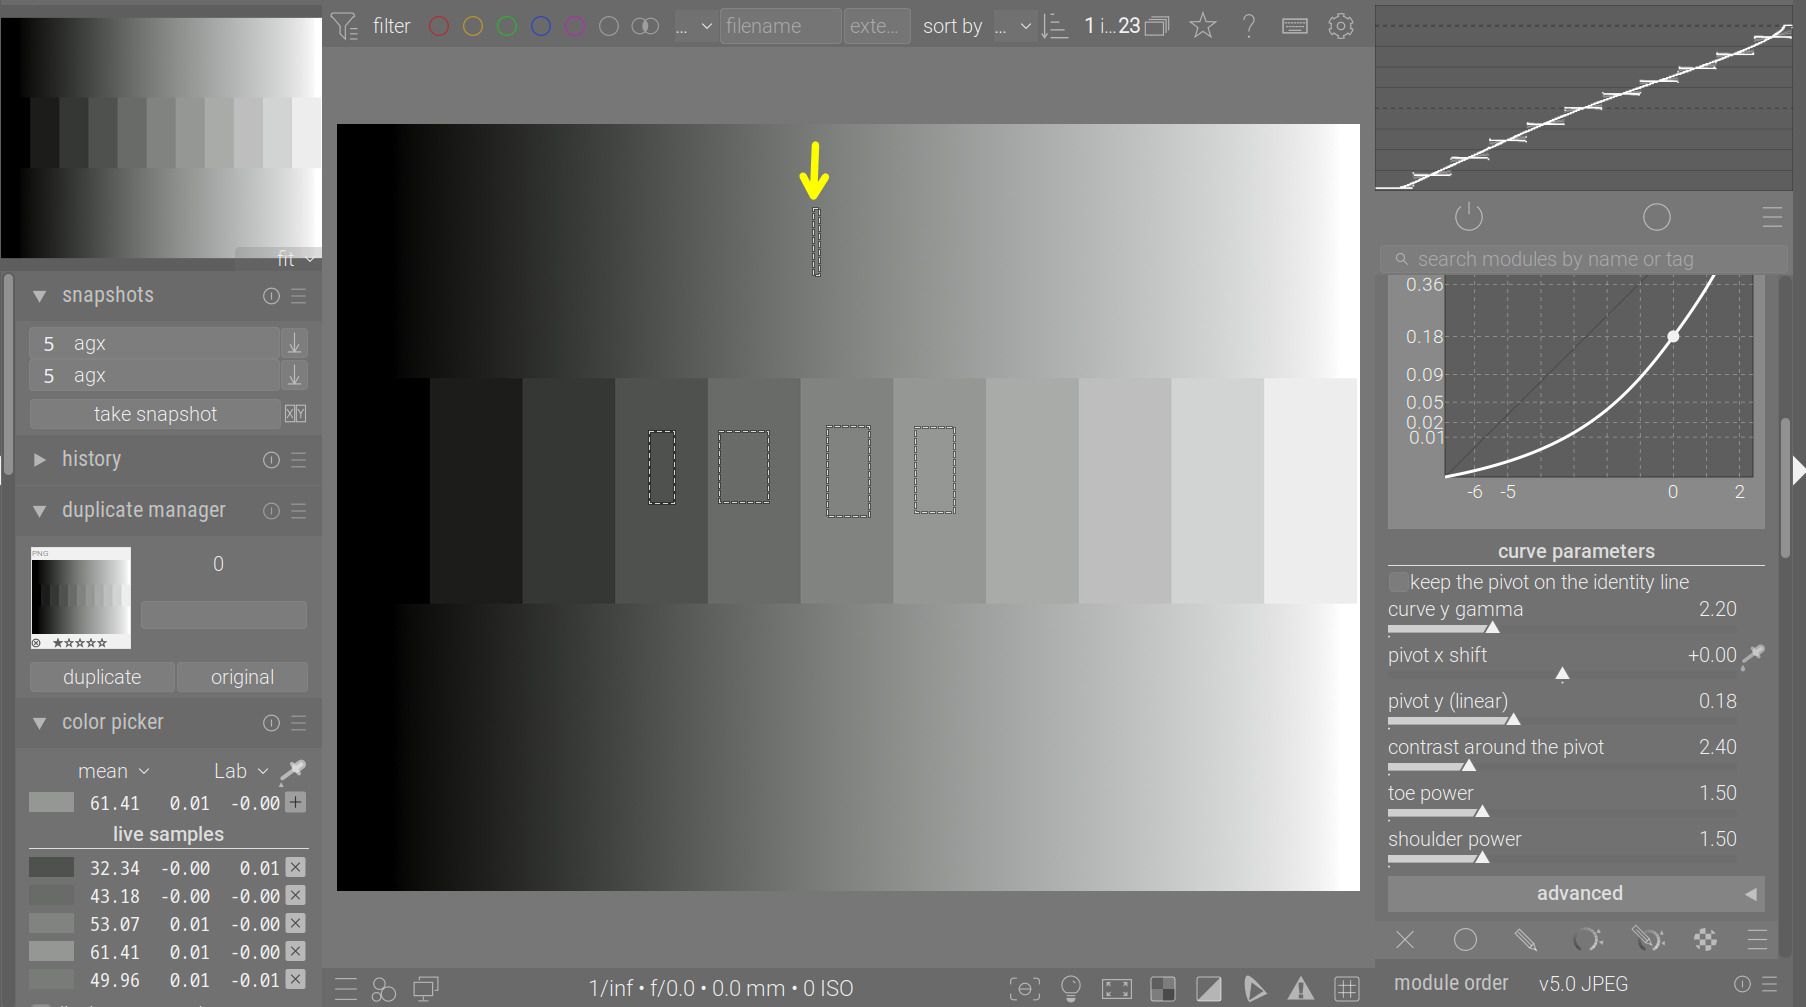
If I pick another pivot, the brightness of the selected patch remains unchanged. Picking from the darker patch of the left with L = 32.34 gives this result (top: with new pivot; bottom: original):

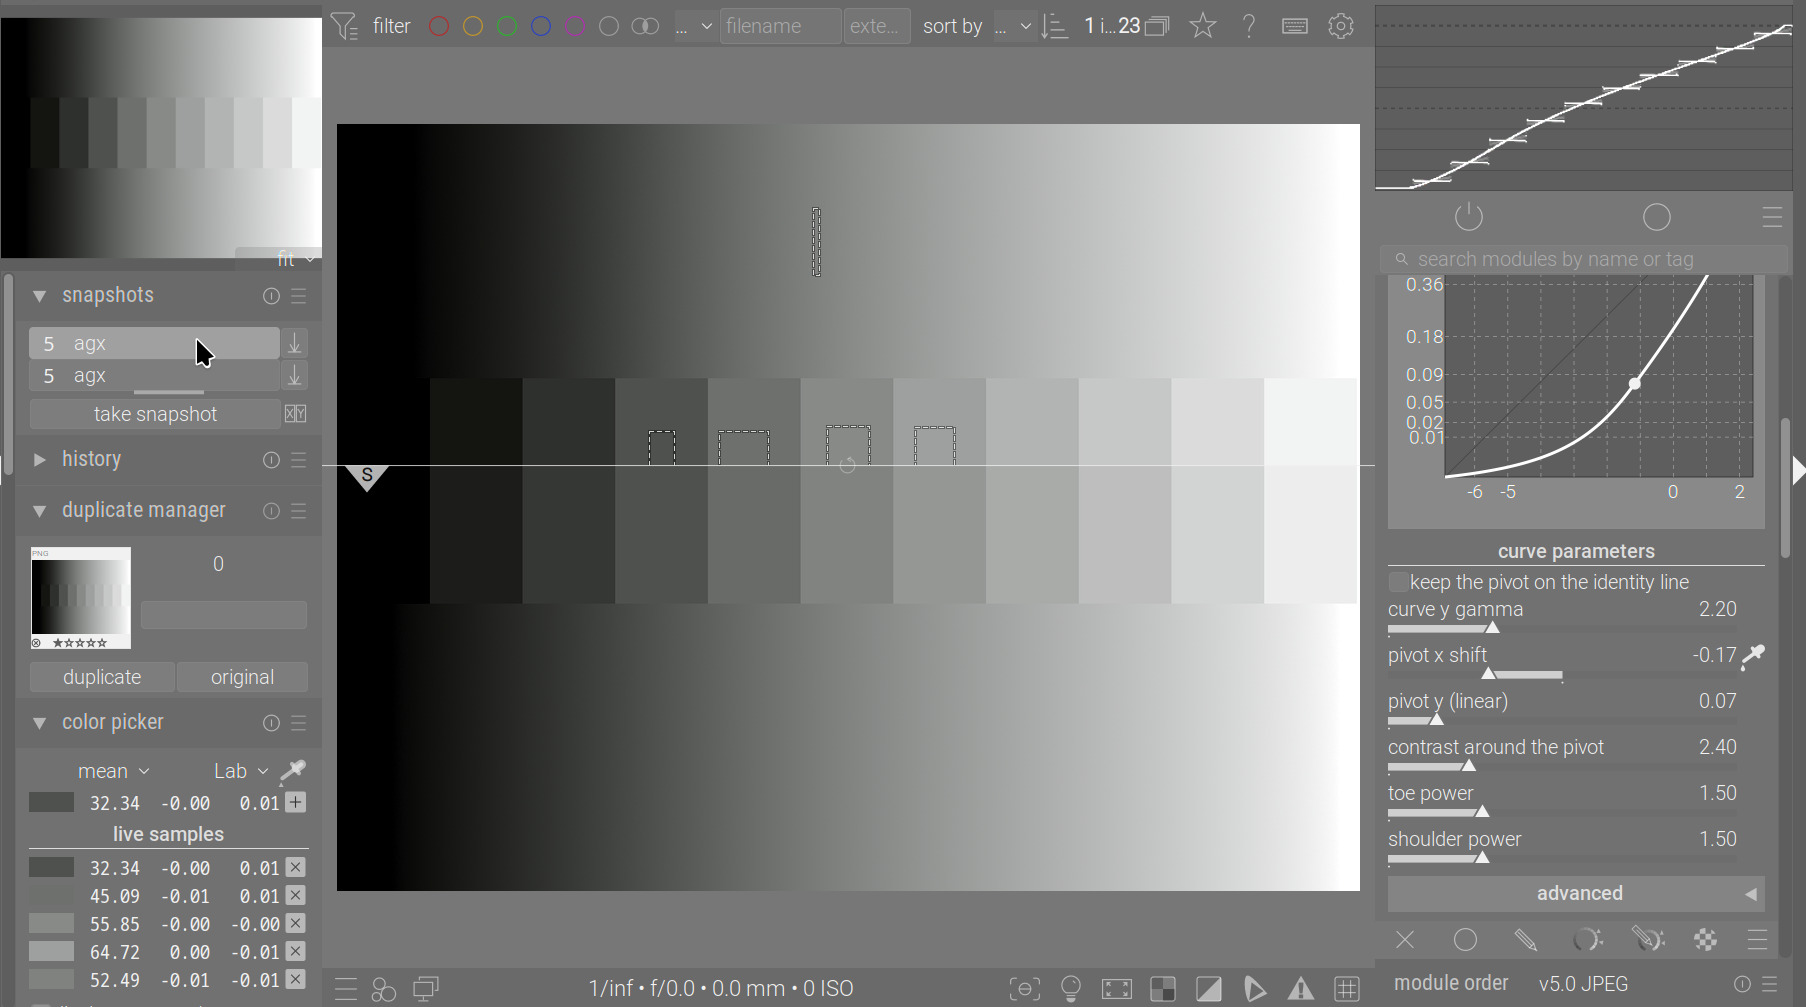
All the brighter patches (including mid-grey) have been brightened further (they are now all above the pivot). The brightness of the dark patch remained the same: 32.34

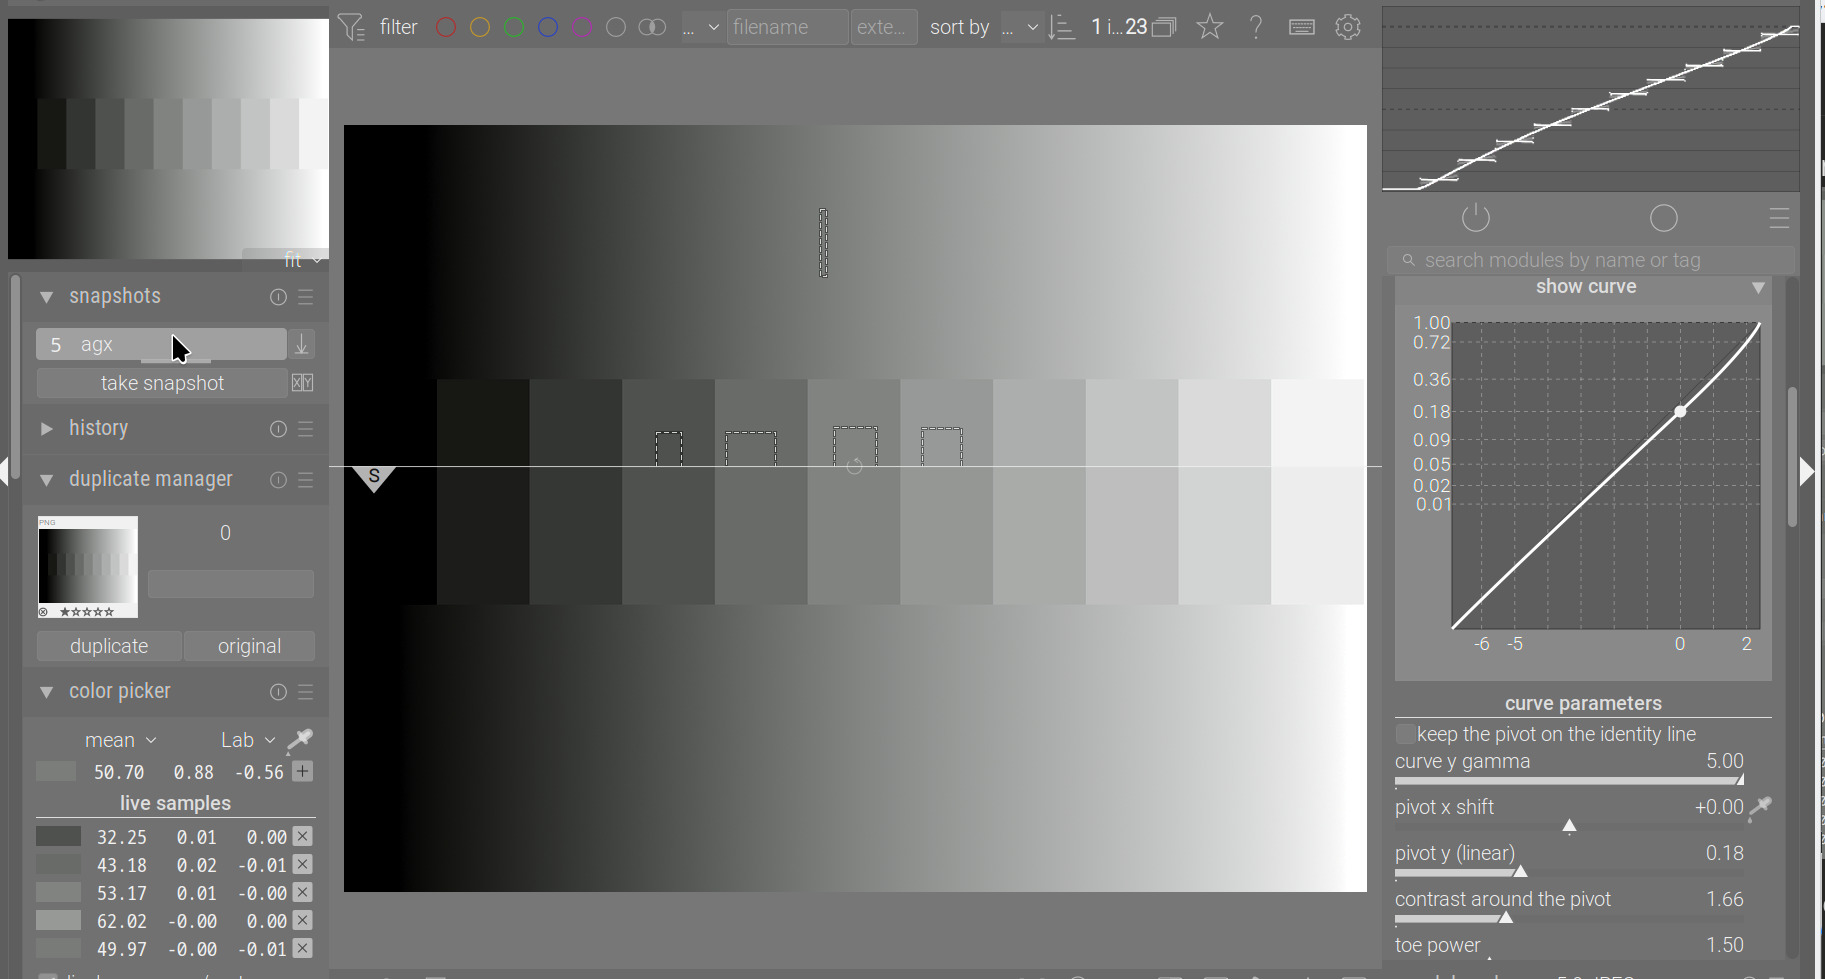
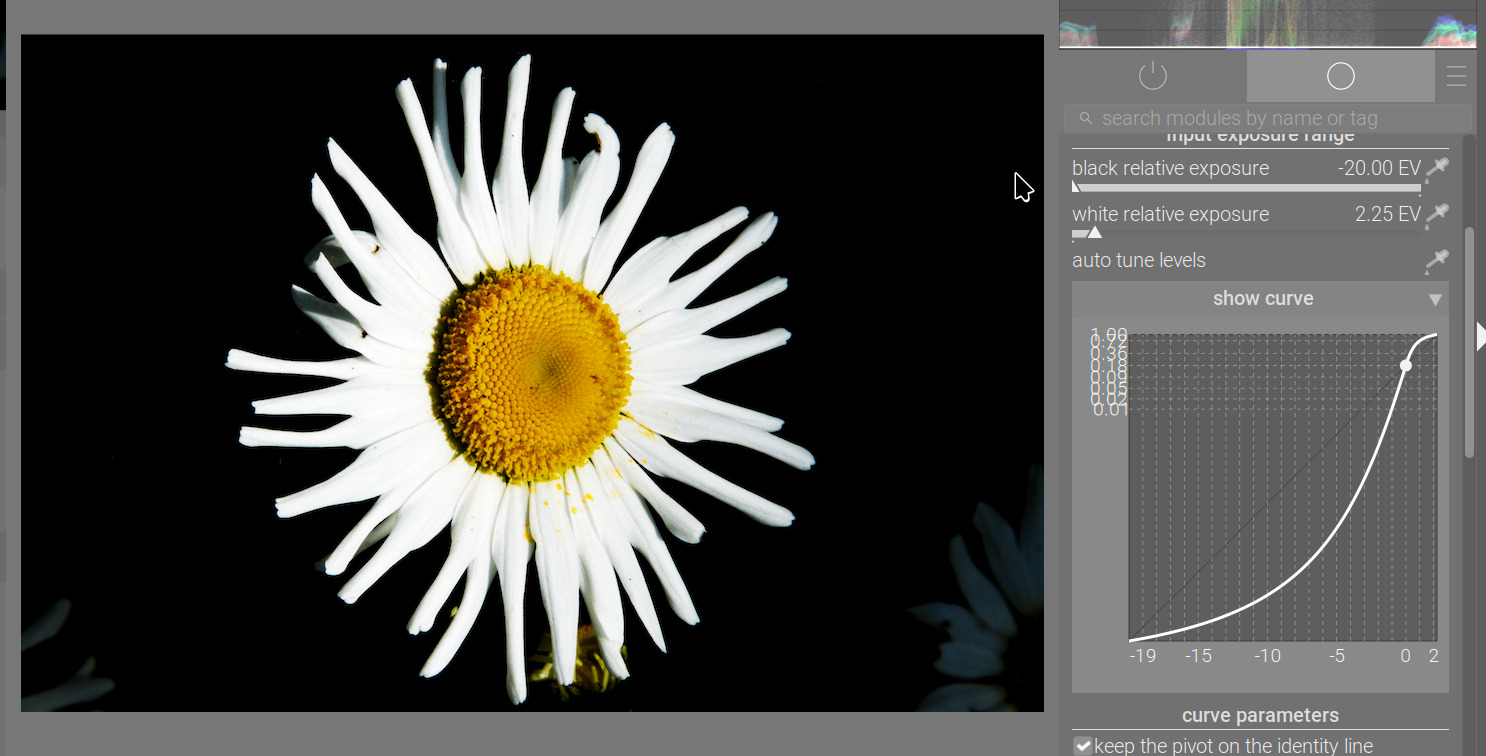
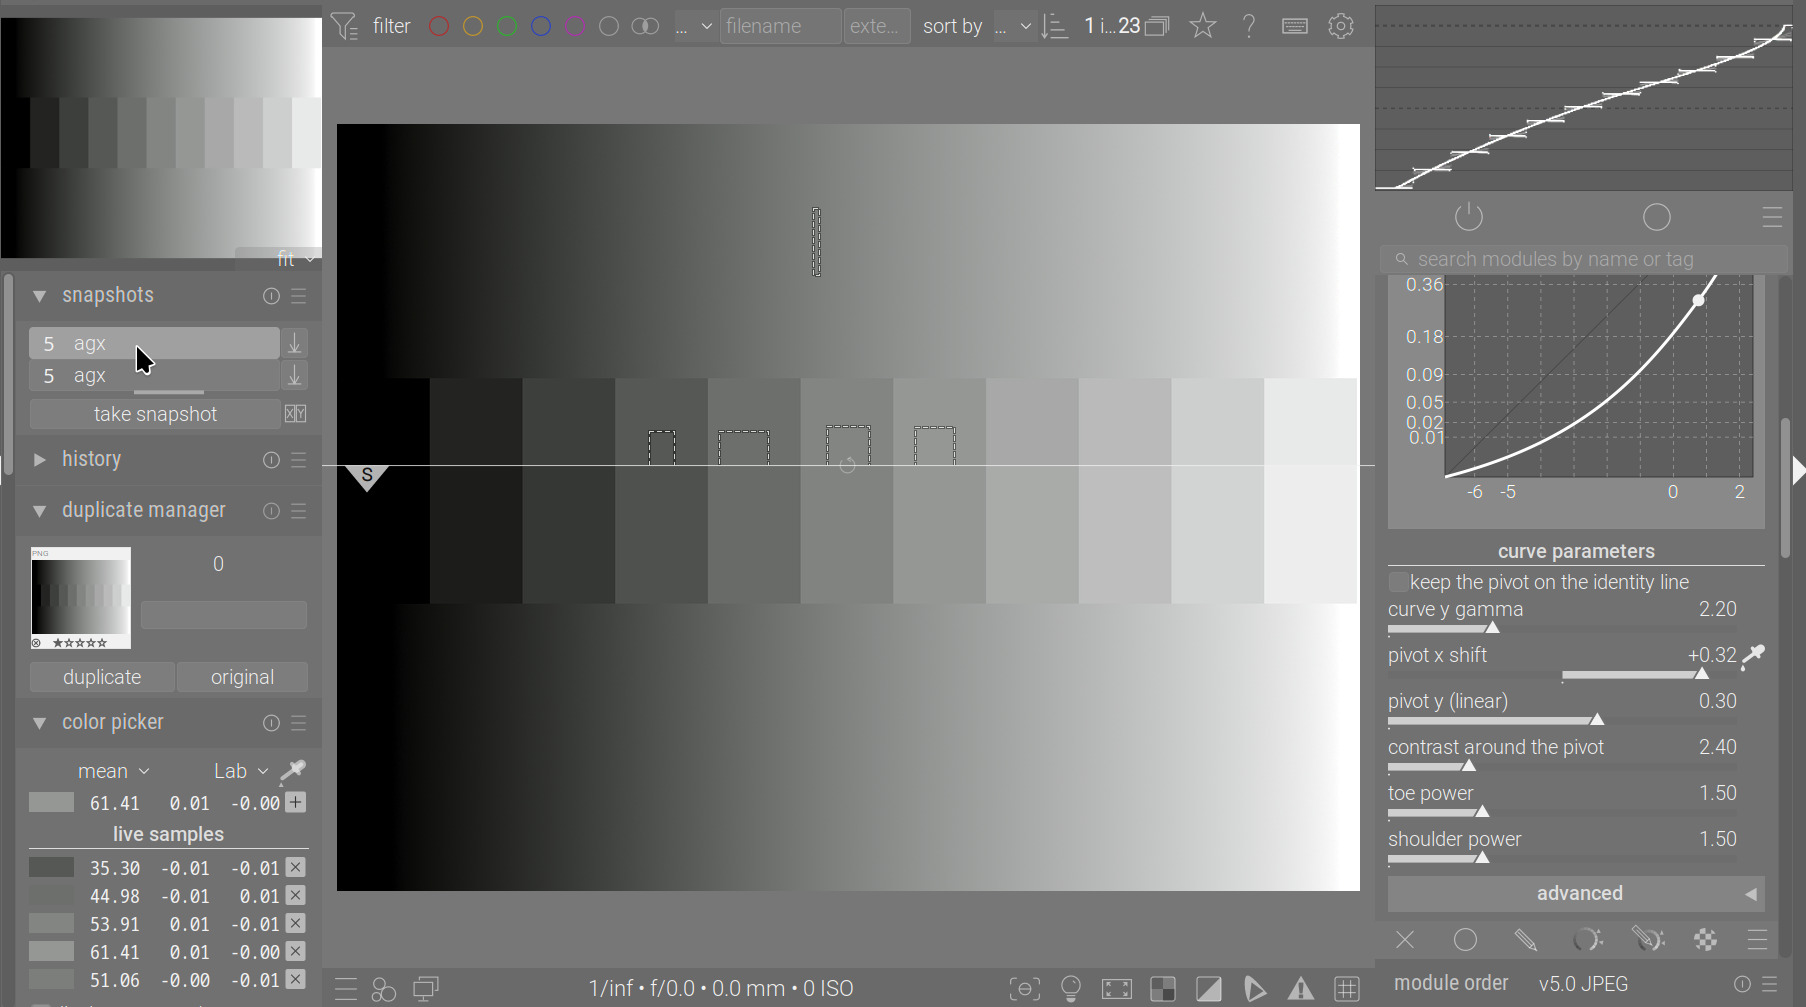
The opposite happens if I use a brighter patch (L = 61.41):

I’m not a purist. I think if you already have module settings (whether it’s tone equalizer or color balance rgb, or parametric masks) that would be all broken by moving exposure, then moving pivot y (changing the brightness of some midtone – normally, the pivot would not be in the deep shadows or in the highlights) is fine. Think of the tone mapper not as an editing tool, but something that prepares your image for display. That is what you are tuning here.

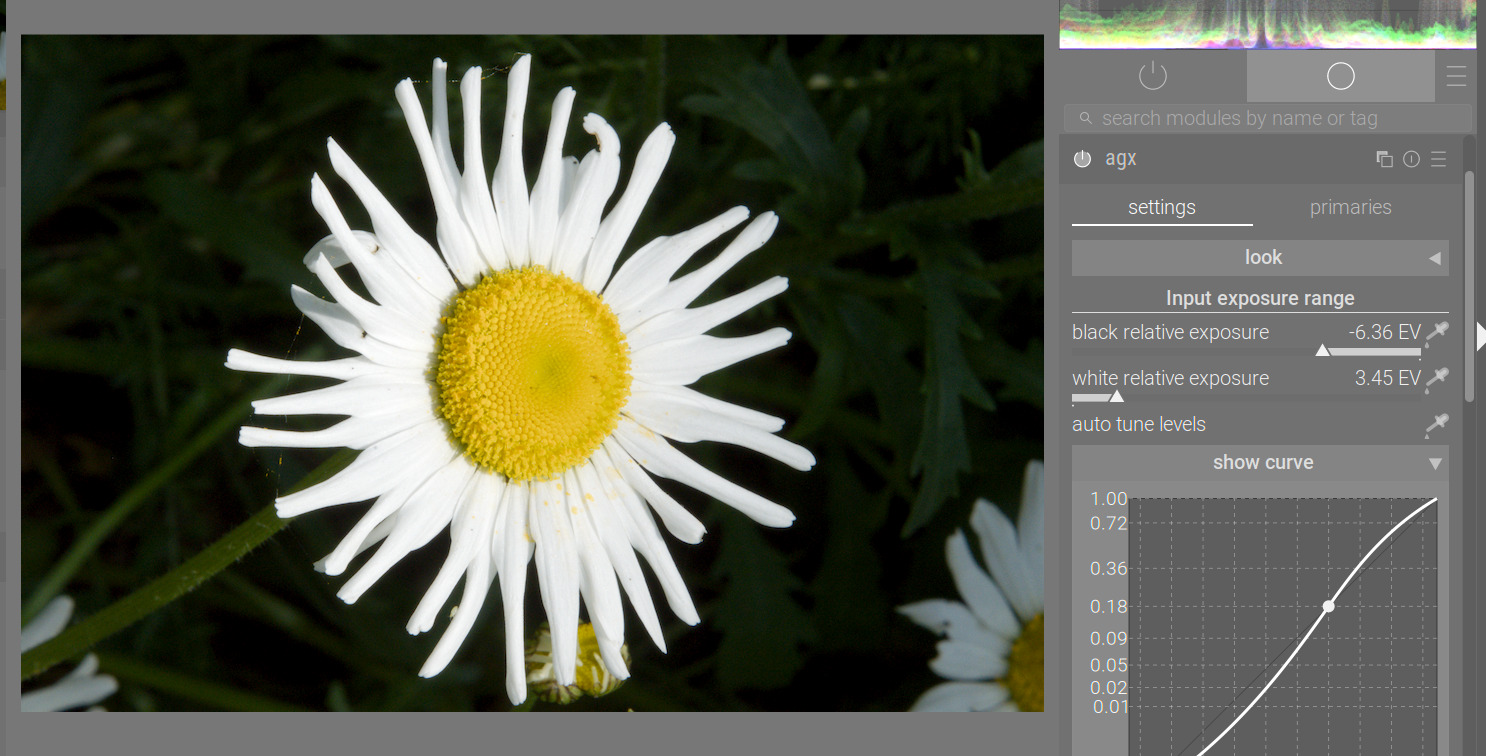
Moving pivot x (without changing the y) does alter the brightness of the image, but it’s kind of a side effect: you move which input (x) gets mapped to the given output (y). You are essentially changing the ‘y’ for the selected ‘x’ (and also move the point of of highest(*) contrast).
When you move ‘y’, you actually, directly adjust brightness.

(*) It may not actually be the point of highest contrast if you create an inverse S curve, which is not what we usually do:

6 Likes

A word on contrast and gamma (power): the two have a very similar effect in the midtones, but not for at the extremes:


4 Likes

That’s wise I guess. I’m just looking for some needed enhancements to the LUT module, but it doesn’t seem like it will happen…

that‘s like getting an AGX tonemapper - that also didn’t happen until Kofa just started prototyping it.
Features doesn’t ‚happen‘, they must be implemented by someone who thinks they are worth the effort to spend …

4 Likes

Thanks a lot @kofa for the great work you are doing with this module! It will certainly become a frequently used component in future versions.

I have briefly tested the current version. The autotune options work well imho.

I noticed the following minor issues, hope this isn’t a double post:

  • look: The “power” function is supposed to influence the brightness. I would expect the image to become brighter at higher values, as is the case with colorbalance rgb, for example, and not darker.
  • If the curve display is unintentionally minimized too far with the mouse, darktable (under Win11) crashes with the error “unspecified fatal error encountered”.

Anyway, a perfect job ! It’s great that you involve us all in the development.

2 Likes

Thank you. I’ll try to check the crash. I’ll probably need to set some minimal size. That portion of the code was actually lifted over from other modules by Google Gemini (not an excuse, I know), as I know nothing about the UI.

2 Likes

@kofa , FYI, I changed the size of the curve to different sizes (including a flat line), but nothing like a crash happened. I also reloaded DT several times to see if it happened. Fortunately not for me. I am, like @pass712, using a Win 11 system. It could be a trace case for him

I once had a crash on Linux while resizing the graph. I’ll try to exercise it a bit.

in dtgtk_drawing_area_set_height(GtkWidget *widget, int height) the height value can be negative causing a crash.
avoid crashes by negative height in drawingarea.c by MStraeten · Pull Request #18827 · darktable-org/darktable · GitHub fixes that in a last line of defense if not handled properly earlier …

3 Likes

I had the same crash as @pass712 under W11.

Thank you. The fix from @MStraeten provides a workaround, but also, even more importantly, Martin identified the issue. As I said, I know next to nothing about the GUI part, but I will check this; I’m sure I can find other modules with plots that set a size limit.

I’m currently working on:

  • switching between 2 or 3 tabs based on a config variable
  • I think I’ll keep the ‘auto-tune gamma’ / ‘keep the pivot on the identity line’ option, but will move it to the advanced curve settings. I’ll provide a default based on Blender where it is enabled (I will also keep the original Blender-like setup, where it is disabled, as Blender’s config uses a fixed gamma).
  • clean-ups

What remains for the next months is really cleaning up, fixing things, opening the PR, and fixing everything the real darktable developers tell me to do. I no longer spend 20 hours per week on this, but I have not stopped, either.

10 Likes

There is another six months until the next release :heart_eyes: as we are in feature freeze now for the summer release.

1 Like

Yes, I never intended this for the 5.2 release.

Here is a case where auto-gamma (keep the pivot on the identity line) harms the image:

Extending the black relative exposure does not help with the overly dark background:

It looks much better if exposure is increased, though:

3 Likes

Thanks very much for your detailed explanation @kofa. All makes sense. I think what I’m still wondering is why you might want to adjust the pivot if you have already adjusted exposure to set middle grey for your subject. As Boris demonstrated in his first mini-tutorial (Blender AgX in darktable (proof of concept) - #669 by s7habo), if you adjust exposure for your subject, then it should already be at middle grey, and then your pivot will be there by default.

However, there are probably images where you want your pivot to be in a different place to where you set your exposure’s middle gray. I just haven’t encountered that scenario yet.

1 Like

I haven’t tested the new option yet (keeping to the identity line) but I found being able to use those x and y sliders and then tweak the contrast around the pivot was very powerful once you introduced them…I used only visual cues to guide where I would land…I started with the auto picker and then adjusted… for some time my exposure approach in general of course has been to use the autopicker in the exposure module, first using entire image as selected by default…if that didn’t suit I would select my region if interest for a middle exposure…From there I find that I never need to think about exposure again…with all the control in AGX I seem to be able to get to where I need… I am undecided if I will use the identity line setting as I have become quite comfortatble without it but I guess it provides a technically “accurate” anchor for the tonemapping process??

If you think back to Ansell Adams, the average Caucasian skin is not at mid-grey, but about 1 EV above that (in the image with the lady that Boris used for demonstration, the dark hair was also included in the selection, that is why he got a reading close to mid-grey). Many flowers, brightly lit clouds, white or dark fur will also not be at mid-grey.

Those are independent. I know it’s confusing, that’s why I added the grid lines:

  • the pivot y (linear) moves the pivot up and down, because that changes the output brightness the x (input) value is mapped to; the pivot will move across grid lines, which remain static.
  • the gamma (in filmic parlance: hardness) adjusts the display only (at least for the pivot, as the gamma changes the contrast, too), the output brightness value that belongs to the pivot x does not change, the grid lines move along with the pivot.

The new auto option (keep the pivot on the identity line) sets the gamma/hardness only, you’ll still be able to adjust the pivot x and y.

I am undecided if I will use the identity line setting as I have become quite comfortatble without it but I guess it provides a technically “accurate” anchor for the tonemapping process??

For me I’ll probably leave the checkbox on and try to get something out of the image. If not possible I can always switch it off and start over again. You save a few clicks.

I left it on for this rather high dynamic range image. I tweaked saturation, preserve hue and decreased shoulder power. There was also an exposure correction and a CB rgb instance to increase chroma of blue in the highlights (4 ways tab). That’s all. I wasn’t able to get something similar with filmic (probably due to my skills).

8 Likes

@DanielLikesDT, regarding Film Emulation Play Raw - Cape Fold Mountains - #30 by DanielLikesDT

There are many sliders. Don’t be afraid; check out the posts from e.g. @s7habo, and maybe:

  • start with exposure, as usual with the scene-referred workflow
  • disable filmic and sigmoid
  • start with the ‘Blender-like’ preset
  • enable ‘keep pivot on identity line’
  • pick white and black relative exposure (like in filmic)
  • adjust contrast

The look controls provide (display-referred) saturation etc. adjustments. If you start with the Blender-like preset, which alters the primaries (the same controls, as mostly the same code, as in sigmoid), don’t enable hue preservation in look, as the hues will be controlled via the primaries, anyway.

You’ll find builds for Linux, Win, Mac (contributed by @priort, @Dave22152 and @MStraeten), just scroll back a bit.

6 Likes