Chrominance noise reduction causes size dependent desaturation

I am using a Sony DSC-RX100 as my travel camera because it’s small enough to fit into a pants pocket, has a useful zoom range and a lens and sensor which allow for indoor shots without a flash. However, these indoor shots are typically at high ISO (ISO400 and more) and therefore require good denoising. For many years I have been using Neat Image 6.1 (NI) for denoising. It’s an old version but does an excellent job with the proper settings and noise profiles.

For about 3 years I have been processing my RAW files with RT 5.7 and by now I get pretty much the results I want to achieve – with the one exception of denoising. Whenever I use the noise reduction of RT, I get a significant size dependent desaturation. i.e. color patches get more desaturated the smaller they get.

The screenshots below show this effect for an indoor shot taken at ISO800 that was minimally processed with only demosaicing by the LMMSE algorithm at default settings and manually setting the white balance. Denoising with RT was only for chrominance with the “automatic global” setting in conservative mode and Lab color space. Denoising with NI was with reduced strength for luminance noise and for medium and large scale noise to preserve as much detail as possible.

No noise reduction:

Reduction of chrominance noise with RT 5.9:

Noise reduction with Neat Image:

https://filebin.net/dq8o4on39m5pn5dc/Test1.ARW

Test1.ARW.pp3 (14.1 KB)

I can reduce the desaturation to some extent by manually setting a lower strength of chrominance noise reduction, but even when I chose a value which leaves much more residual noise than I can achieve with NI, the desaturation with RT chrominance denoising remains way to strong.

I get this desaturation with RT 5.7 and RT 5.9 and a post in May 2022 has reported a similar effect with RT 5.8, so the issue seems not to be due to a recently introduced bug and appears not to be limited to the environment in which I use RT (Windows 10).

So my first question is: Does anybody know a simple way to achieve denoising with RT without effecting this desaturation?

I have also noted that reducing luminance noise in RT with the “Luminance" slider“ leads to a reduction of contrast which can be counteracted with the “Detail recovery” slider (In my experience, the “Detail recovery” slider only recovers contrast but not lost detail).

Now my second question is: Does the chrominance noise reduction of RT use the same algorithm on the a and b channels of the Lab color space as the luminance noise reduction uses for the L channel?

If the chrominance and the luminance noise reduction of RT do use the same algorithm, then adding a function similar to the detail recovery for luminance noise reduction to the chrominance noise reduction tool could provide a means for counteracting the desaturation with good manual control on the effect. Unfortunately, I cannot check this myself with the RT source code or experiment with the code, because my experience in programming dates back more than 30 years and was in Turbo Pascal, so I have no experience with a programming language of the C family. Maybe one of the developers can comment on this idea.

For the time being, I will continue to use RT, because it does such a good job in giving full control on the parameters of RAW processing and has superb options for highlights reconstruction, flat field correction and RT deconvolution (which does not introduce any detectable extra noise with the proper settings for damping and iterations). My work around for denoising is then to perform all functions in RT which can only be done on a RAW file (demosaicing, flat field correction, white point and reconstructing highlights), export as a 16 bit TIFF, denoise the exported file with NI and continue processing in RT on the denoised TIFF file. However, this is inconvenient and I would really appreciate if I could get the same retention of color details with RT denoising as I can currently get with my old version of Neat image.

Have you tried the Blur/Grain & Denoise tool in Local Adjustments? There is a description here of some of the changes compared to the main-menu noise reduction tools along with some worked examples. Local Adjustments - RawPedia
You can use the local adjustments on the global image if you wish by choosing a full image spot and increasing the Scope setting.

Thanks for the suggestion of using the denoise tool in Local Adjustments.
I did read the RawPedia entries on the different noise reduction tools of RT and on the Local Adjustments tab, but had not tried out this rather complex tool because I had problems to imagine on how the many parameters will influence the result.
Now, following your suggestions; I had a try on the RAW file I added to this post. To be honest, it took me more than an hour to arrive at a better result than I got with the noise reduction tool of the Detials tab with manually setting a lower strength of chrominance noise reduction. The settings I arrived at were:

  • Full image spot, spot size 100
  • Scope (color tools) 90
  • Fine chroma 12.7
  • Coarse chroma 12.6
  • Chroma detail recovery 75

There is much less loss of saturation at these settings, with a noise reduction similar to the result I get with Neat Image (NI), but the retention of color details is still not as good as with NI. Maybe some other parameter settings could get me there, but I have no idea from the RawPedis entry on which direction to go.

Anyway, the outcome of this try suggests that adding a similar option for chroma detail recovery to the noise reduction tool of the Detail tab could improve the retention of color details when using this tool.

First, excuse my bad english…

Noise reduction is one of the most complex problems to deal with in photography because the sources of noise are multiple. See Emil Martinec’s excellent article on this subject - admittedly old - but the nature of noise has not changed. The modern Camera (Digital SLR) treat better at the sensor level, but the problem remains

https://homes.psd.uchicago.edu/~ejmartin/pix/20d/tests/noise/

and:
http://rawtherapee.com/mirror/noise/noise-p3a.html

To treat this noise, if I exclude what can be done upstream (Darkframe and at the time of the shooting) there are to my knowledge several generic methods:

  • median - which are usually very destructive
  • Fourier transform - alone or in addition to Wavelet (DCT)
  • Wavelets in RGB or Lab mode : in Lab mode – the 3 channels L, a, b uses the same principle.
  • Non local means - to deal with luminance noise
  • Guides Filter - which can complement denoising
  • Impulse noise
  • Line filter

The demosiacing has a strong importance…

Rawtherapee is equipped with these 7 methods.

The issue of desaturation and/or loss of contrast (which is essentially the same problem) is general whatever the tool. In principle these tools “remove” the noise that is mixed with the signal. So unless there is a miracle, removing the noise will inevitably have consequences. It is a choice, whatever the software. Keeping a noise level in certain areas is often a good choice. I don’t have NI, nor any other software…but having it won’t change anything, if I don’t have access to the code

One of the major problems is to know where to put the denoising in the process : at the beginning or at the end. Each has its advantages.
I was one of the actors with Emil Martinec and Ingo who developed Denoise (main). Initially it was at the end of the process. Now it is just after demoisaicing. You also find denoising in Wavelets levels which is at the end of the process.

When I designed the local adjustments (LA), I set myself several objectives, as it is located in the middle of the process.

  • to be able to use the possibilities of LA : transition, deltaE, full-image or local spot, excluding spot (to cancel the denoising in some areas), allow to adapt the level of denoising according to the areas (face, sky…)
  • use as a basis the same basic algorithms as denoise (main) - wavelet - DCT - median
  • take advantage of new features seen elsewhere - NLmeans for example
  • give the possibility to separate chrominance levels and add DCT
  • add (wavelet) the possibility of higher levels of decomposition (choice for the user)
  • possibility to use masks in 3 ways: traditional with the classic use of masks, Denoise based on luminance mask, Recovery based on luminance mask.
  • allow a progressive access to the complexity according to the learning (Basic, Standard, Advanced).

I am not going to give miracle recipes and I do not claim that Denoise (main) or Denoise (LA) or Denoise (wavelet levels) are perfect…There is always progress to be made. But as it is, it seems to me to be sufficient and already quite complex.

One solution is to do a first processing with Denoise (main) to reduce the noise (luminance and/or chrominance) to a minimum. Then use LA or Wavelet levels

Then if you choose LA :

  • Prefer NL-means then for the Luminance noise.
  • Use either Full-image and excluding spot, or local Spot, to better target treatment.
  • Do not hesitate to use several Spots (including full-image) by choosing different positions of the center of the RT-spot. This is a general advice when using LA with full-image

I will not rewrite here the Rawpedia documentation, which can always be enriched (thanks to @Wayne_Sutton ).

Porting the additions made in LA (NL-means, DCT …) is certainly possible, but complex because it is necessary to review many things … the algorithms are complex and the nesting levels difficult to handle (see for example Wavelets levels and denoise).

Jacques

2 Likes

I forgot to mention that in addition to the Rawpedia info, there are also some excellent videos by Andy Astbury @Andy_Astbury1 which may help e.g Raw Therapee Noise Reduction Control Refinements + Workflow Thoughts & A Bit of Photoshop 😀 - YouTube

Jacques’ comment on the importance of the choice of demosaicing algorithm is also covered in one of Andy’s videos - this one I think: RawTherapee: Noise Reduction, Capture Sharpening & Demosaic Balance + But First a Time Saver Preset. - YouTube

I have played around quite a bit with NI comparing it to RawTherapee and have found it to be a quick solution in a lot of cases. However it has its own tradeoffs (desaturation being one of them) and often I find I can get a better result with RawTherapee. It really depends on the image and how much time you are prepared to spend on it.
I’m traveling at the moment so unfortunately I can’t try the settings you came to on your image.

Wayne

1 Like

Dear Jaques,

Thank you for your reply giving an overview on noise reduction in RT which is both concise and comprehensive. Don’t worry about your English being bad, your style is actually better than the postings of a lot of native English speakers on the forum.

I know from this and other posts that you are an expert on algorithms for processing pictures, in particular noise reduction, and contributed a lot to RT. So I took my time to draft a reply that can stand up to your comments and contribute to an enlightening discussion. Since my reply will be quite lengthy, I have split it up in 3 parts.

1. What to aim for in noise reduction?

I concur with your statement that reducing noise will inevitably have consequences. One of the basics of information theory is that an algorithm transforming or filtering a signal cannot increase the amount of information in the signal (unless extra information is added). All it can do is redistribute the information. Therefore, a noise reduction algorithm providing an increase in the S/N ratio on the pixel level will inevitably lead to an information loss in another dimension, typically in a spatial dimension, leading to blur.

I also agree with your advice not to try a complete removal of noise, but to aim for an acceptable compromise between noise reduction and retention of picture details. The term „denoising“ is therefore a bit misleading, but I will continue to use it, because it is shorter than „noise reduction“ and used in the RT menus. My personal preference is on keeping detail and accepting more residual noise.

One thing I take away from Emil Martinec’s article on noise is that the major sources of noise in photography are photon shot noise and receptor response variability. Both these noise sources will also be present for human vision. Photon shot noise is the result of statistical fluctuations of the light source, and the photoreceptors in our eye will inevitably have some variability in size and response. If we want to compare our eyes with a camera regarding these noise sources, we have to consider the following facts. Camera sensors typically have pixel sizes of from 2 to 5 µm and a quantum efficiency of about 15 to 30 %. A photoreceptor cone in the fovea (the central region of maximum acuity) of the eye’s retina has a diameter of about 2 µm and cannot have more than 100 % quantum efficiency (This web page gives a comprehensive review on the eye’s physics and physiology). The eye’s pupil has a maximum diameter of 5 to 8 mm which for the eye’s focal length of about 25 mm translates to a maximum aperture of about 3 to 5, less than the apertures used with a DSLR at low light. Therefore, the amount of photons a photoreceptor cone of the eye receives per time unit is pretty much the same as for a typical camera sensor. The human photoreceptor response rate is about 15 per second and therefore the photon shot noise should be comparable to a camera at 1/15 second exposure time. Considering all this, there must be about as much photon shot noise in human vision as in digital photography at comparable exposure times. Nevertheless, we do not perceive noise in our color vision, even at low light, where any DSLR will record strong photon shot noise at 1/15 second exposure. From this I conclude that the human visual system has very efficient signal processing for noise reduction, which we are usually not aware of. However, no matter how effective this processing is, it must inevitable lead to a loss of information for the reason given above. But since we are used to this and unaware of it, we are not sensitive to this particular type of information loss.
If someone finds an error in these considerations which would lead to a different conclusion, then please reply and explain.

When I process a RAW file, I try to get a natural look, i.e. a rendering that is as close to what I perceived at the scene. I think most other users of RT have the same aim. Therefore, when I judge the performance of a noise reduction tool, I will look at how much perceivable degradation it causes. If the tool’s algorithm leads to a loss of information which the human visual system retains in its noise suppression, I will notice an objectionable loss of quality. If the tool’s algorithm sacrifices the same type of information as the human visual system, I will be more satisfied with the result because I cannot notice the information loss.

Therefore, we should aim to design noise reduction tools to mimic the characteristics of the noise suppression of the human visual system. Unfortunately, little seems to be known on how noise suppression is achieved by the human visual system (I have never seen it even mentioned in an article I have read) and as a consequence, we have no mathematical criterion to test whether we achieve such mimicking. All we can do is take a close look at the result and make a visual judgment.

2. Why do I prefer noise reduction with Neat Image (NI) over the current tools of RT?

Before I explain my reasons, I will give a short description on how I use the program. NI is commercial software, but you can download a demo version for trial. I use an old version (6.1 Pro), so you will get a different look with the current demo, but the workflow seems to be unchanged. The makers of NI consider their algorithms proprietary, so we have no algorithm or code for their noise reduction method. However, even from the information NI provides to the user, we we can draw some conclusions on which information is used by the noise reduction algorithm .

Denoising with NI involves the basic steps of loading a picture file, creating or loading a device noise profile, setting parameters for the denoising with control of the effect in a preview window, applying the settings to the entire picture and saving the processed picture. The program can create a noise profile from a sufficiently large featureless area of the picture. However, since many of my photos do not contain large featureless areas, I use the program option of creating noise profiles from a target photographed from a computer screen at different ISO settings. Noise profiles from the target usually have better quality than profiles made from a typical photo and they will give a good match for the noise properties, as long as the picture and the target shot have been processed the same way (NI displays values for the quality of the profile and the matching of noise properties with the loaded picture). I use different sets of device noise profiles processed with the demosaicing methods I use (AMAZE for low ISO and LMMSE for high ISO). NI has an option for loading the best matching profile of this set based on EXIF data and actual match.

The following screenshots show the properties NI displays for a device noise profile and the parameters for the denoising step. The first screenshot shows the data displayed in NI’s profile viewer window. The squares of the frequency components add up to the square of the overall noise level, which indicates that NI may be using a wavelet decomposition for denoising.

The second screenshot shows results of a noise analysis displayed in the window for creating or loading a device noise profile. When you hover the mouse over one of the sliders, NI displays a message saying that the slider adjusts the estimation of noise level in an eighth of the brightness range relative to the rough noise profile. This indicates that NI estimates noise levels for at least 8 brightness ranges and uses their differing values in the denoising algorithm. I do not fiddle with these sliders or apply the Auto fine-tune or Auto complete options, because this usually leads to a decrease in profile quality.

NI_noise profile

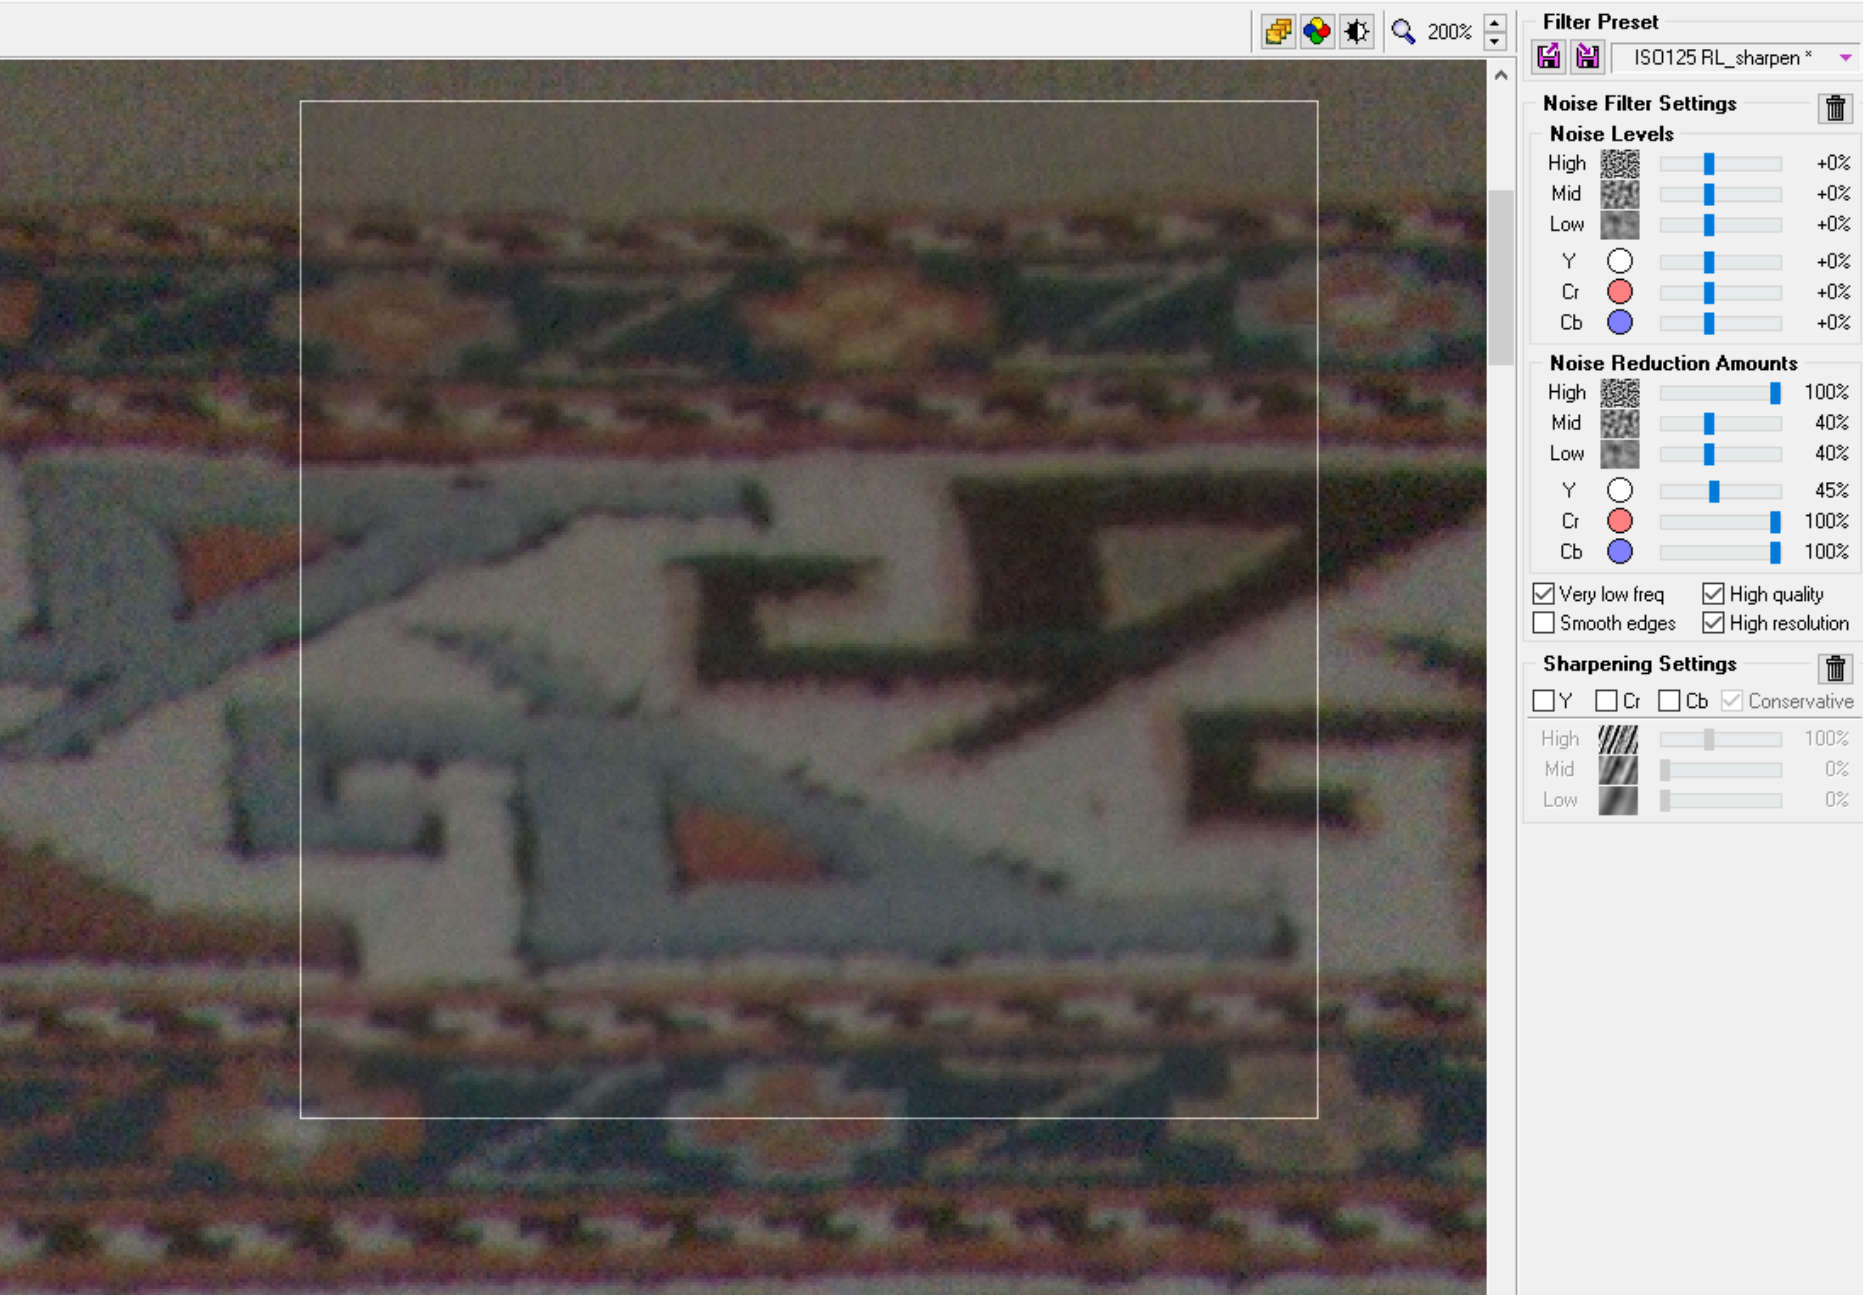
The third screenshot shows part of the window for the noise filter settings with the preview window showing the effect of the current settings. I usually load a preset for these settings which I made and which gives a good result at ISO125. This preset differs from the shown parameters only in a noise reduction amount for Y of 30%. I then check the denoising for different parts of the picture and if I find there is too much residual noise, I increase the noise reduction amount for Y until a further increase causes to much loss of detail. This usually does not take more than 5 minutes. As you can see in the screenshot, all I have to adjust for the photo of the carpet taken at ISO800 is an increase for Y from 30 to 45% and I am done. For more noisy pictures, I may have to increase the noise reduction amount for mid and low by 5 to 10%, but that is all I need to adjust to get good noise reduction with minimal loss of detail.

The last two screenshots show the denoising result for my carpet example with NI and a noise reduction amount for Y of 0%, i.e. reducing only chrominance. For both pictures, exposure has been increased by 0.5 EV to get the colors closer to the perceived colors and make the effects of denoising more visible. A direct comparison of the two screenshots shows that for this photo NI can substantially reduce color noise with changes to saturation so small that they are barely visible.

Prior to denoising:

After denoising only for chrominance:

The weak side of NI is processing very noisy pictures. Settings, which do not lead to losing a lot of details, will leave unsightly yellow and blue blotches, in particular in dark regions. I note from the working example in RawPedia for denoising with the local adjustments module that similar, although less prominent blotches remain with the local adjustments denoising tool of RT. There will also be a significant desaturation in NI with very noisy pictures, but it is much less size dependent than I observe with RT, so it can be countered by slightly increasing saturation.

My conclusion therefore is that I can get good denoising results with NI which can hardly be surpassed with the denoising tools of RT. With NI, I get there in a few minutes with few adjustments to one or at most three parameters for almost any picture, wheres in RT I still need to adjust many more parameters, which takes me much longer and often leads to inferior results because I could not get to the best parameter settings. The denoising tool in the details tab is easier to use, but I always get to much desaturation of small color details, no matter of how I set the parameters. My impression is that for the denoising result I get with NI the unavoidable picture degradation is less obvious than for the results I have obtained with the RT tools up to now, so NI gets me closer to my aim for noise reduction.

I think my better results with NI are not due to some magic algorithm of NI, but mainly to the ability of the NI algorithms to use information from a noise profile for adjusting the strength of noise reduction based on signal strength and ISO. Once I have found settings for the noise reduction parameters which give my preferred balance between reducing noise and preserving detail, NI will give me pretty much the same denoising for almost any photo shot with the same camera. All I have to do then are small adjustments to one or two parameters, for which I have a better feel of what I can achieve by changing them than for the parameters I have in RT.

3. My opinions on possible improvements of noise reduction with RT

The following two sections are not meant to be feature requests for RT, but as a basis and starting point for further discussion.

Consider the use of noise profiles

I think that device noise profiles for a camera, obtained from a suitable test picture at different ISO settings, can provide a more even level of residual noise (i.e. less variation in S/N ratio) for a noise reduction tool applied early in the processing pipeline. Darktable is FOSS which uses such noise profiles, so there are people willing to share their knowledge and experience in this area and code to build on. The noise profiles are used in Darktable to derive parameters for a variance stabilization transform (VST) that is used to equalize noise strength prior to applying the denoising algorithm, as described on this web page and in this post. The post mentions that RT uses the gamma parameter of the noise module for a similar transform.

I think that deriving the gamma parameter and a setting for noise strength from a noise profile is not only more convenient than finding out suitable settings for all ISO values by trial and error, but will in general give better results. The reason is that judging a setting for quality of noise removal and quality of detail retention is a task which requires a high level of concentration, which cannot be maintained for more than about 10 to 15 minutes. The more parameters you have to adjust by trial and error, the longer it takes, and as your concentration weakens over time, it gets harder to recognize an improvement and so you get lost and cannot proceed to better settings.

Using a VST with a fitted function may work well for many cameras, but will not be universal, as some cameras appear to change amplification with brightness, which leads to noise profiles that cannot be fitted well. This post shows an example for a Fujifilm X-T3, where for the red and blue channel the upper half of the brightness range cannot be closely fit with the gamma parameter. The use of the gamma parameter will then lead to a stronger denoising for the red and blue channel in this brightness range and an unnecessary loss of detail.

I think a more universal approach could be achieved, if you have a denoising algorithm that can apply a spatially varying strength for noise reduction. You could then create estimated noise strength maps for the three channels from a locally averaged signal strength and the corresponding noise strength of the noise profile and use values from these noise maps to set the noise reduction strength of the algorithm. However, I don’t know whether such a denoising algorithm is available.

Consider denoising RAW data prior to demosaicing

In your reply, you mentioned that the demosaicing algorithm has a strong influence on noise reduction. I have experienced the same for denoising with NI. I get different noise profiles for the same RAW file demosaiced with different algorithms and have to use a noise profiles made with the same demosaicing algorithm to get good denoising. I suspect that the reason for this is that the demosaicing algorithms introduce a local spatial and cross channel correlation which changes the noise characteristics.

As far as I know, most denoising algorithms assume noise to be random with no spatial and cross channel correlation and will give inferior results and artifacts, if such correlation is present. I have noted this for NI, where applying a chromatic abberation correction (which generates cross channel noise correlation) to a noisy picture prior to denoising will lead to much more residual noise towards the edges of the frame. Therefore, I expect that denoising the RAW data prior to demosaicing will give improved results, i.e. less detail loss, for the same amount of noise removal. In addition, this should reduce demosaicing artifacts. If noise profiles are used, only a single profile per ISO setting would be needed and could be used with any demosaicing algorithm.

For Bayer pattern RAW data, this could be done by partitioning the RAW picture by color into four monochromatic pictures, one containing the pixels from odd number rows and columns, one from odd number rows and even number columns, one from even number rows and odd number columns, and one from even number rows and columns. You could then denoise each of these pictures with appropriate settings for each color channel (preferably from noise profiles obtained from RAW data) and reassemble them to a denoised RAW picture with the original Bayer pattern.

Of course, one disadvantage of this approach would be that denoising is in RGB, so you cannot use different denoising strengths for luminance and chrominance. I doubt that is possible to achieve denoising with different strength for luminance and chrominance for RAW data, because physiologically meaningful values for luminance can only be derived after transforming from the device color space to the working color space and applying white balance. Since chrominance noise is more objectionable than luminance noise, it would there be preferable to combine RAW denoising with an additional denoising step to have a first step of denoising prior to demosaicing at a strength, which gives acceptable luminance noise, combined with a second denoising step after demosaicing and white balancing to further reduce chrominance noise.

Another possible disadvantage of denoising prior to demosaicing would arise, if blur introduced by the denoising algorithm would significantly increase with increasing signal strength. This would have the effect that capture sharpening with the RL algorithm would give less sharpening with increasing brightness, because the algorithm assumes a constant blur radius for the point spread function.

Kind regards,
Georg

@schorschbey
Thank you for this well argued and relevant response. I will try to be concise and give my point of view on the topics you have addressed.

Human perception of images and sensors.
You are right, this is an important subject. In Rawtherapee this aspect is included since 2012, approximately at the same time as the creation of the “Denoise” module (detail).
You can find these aspects in the Ciecam02 part which has been updated in 2020 with Ciecam16 and in 2021 with Cam16 in “LA”. Note that these concepts have not received, globally, from users all the attention they could have had.
You also find it to a lesser degree in the Retinex module, and in LA with “Original Retinex”.
Regarding the angle of vision (Observer), it was in RT set at 2°, it is now at 10° to take into account both cones and rods. There is an ongoing PR on this subject, partly related to the adjustment of the automatic white balance and color drifts.

The use of profiles - or in a way the automation of some settings
This idea is more than relevant and was partially realized in 2014 or so. The notion of MAD - Median absolute deviation - is used to evaluate the noise (luminance and chrominance). Certainly it must be possible to do better. But, it is very complex to implement in particular related to the design of RT which dates from 2006. The ‘preview’ does not ‘normally’ allow to work in full frame, this leads to a different code for the preview and the TIF/JPG output…

Realize ‘Denoise’ before demoisaicing
This idea seems attractive. For the reasons mentioned above, as well as the diversity of sensors, it is extremely complex to implement. I am not at all sure that it will bring a real improvement…only by doing it could we check.

Reminders of the history of noise treatment in RT
Before 2012 and thanks to the joint work on Dcraw and Perfectraw with Emil Martinec, Manuel Llorens, there were many debates about where to place the module - at the beginning or at the end of the process, and the tools to use: Wavelets, Fourier, median.

In the end, we built in 2012 the “denoise” (detail) module that we have today. I participated in the automation around 2015.

From that time, the demand was for a module based on wavelets located at the end of the process. This module (complex) allows to link the level of decomposition in ‘wavelet’, the level of denoising and contrast (in minus or in plus). It has been the subject of many comparative tests.

Around 2020, I wanted to get around the limitations of these 2 modules “Denoise” (detail) and “wavelet levels” by adding the “Denoise” module and the “Wavelet” module in LA. The number of accessible levels is more important and also gives the possibility to better combine the tools: Wavelets, DCT, Nlmeans, median, Guided Filter. It gives the possibility to use several spots and the deltaE to differentiate the action. It is located in the middle of the process.

What can be done?

Of course we can simplify and automate, it’s easier said than done, and I do not dispute the quality of the products on the market (Lightroom, Capture One, Ni, DxO…)

One idea that is often found on forums and in requests, is in the form of “but it’s in Lightroom, or Capture One, or…”. On the one hand, we don’t have the code, nor its principles. On the other hand, the development teams dedicated to the algorithms and their implementation is considerably smaller than in companies like Adobe. A few years ago there were 4 of us working on this type of work, today there are even fewer. We can look for reasons, but the fact is there.

Ten years ago, I was 65 years old and I was “in good health”. Today I am more than 75 years old, I am (very) sick. Programming is a way for me to escape the stress and worries created by the illness and its context. But today this occupation is limited to servicing and monitoring applications that are already in place. Implementing new projects is difficult for me.

This does not mean that your suggestions will remain unheeded, perhaps someone in the team can initiate and animate the new development, I would bring my participation if I can.

Jacques

1 Like

@schorschbey

Following your remarks that I tried my best to take into account, I created a Pull-Request
https://github.com/Beep6581/RawTherapee/pull/6705

The user interface has been re-organised and a panel has been added to provide an indication of the residual noise levels when carrying out denoise adjustments (LA).

Moreover, when you activate “Noise reduction” (detail) and Local Adjustments - denoise at the same time, the automatic values for “Noise reduction” - “chrominance / automatic global” are reduced by 50%.

Jacques

1 Like

Hello

Recall, you can easily access the PR executables

https://discuss.pixls.us/t/rawtherapee-pre-dev/35595

Jacques

Dear Jaques,

Please excuse my late reply, but wanted to take a closer look on the two videos by Andy Astbury that Wayne has mentioned, so I know better what I am actually doing when I use the denosing tools of RT.

The first video got me to experiment with the scope range and the Preview ΔE button in full image mode. I noted that in the ΔE preview, a reduction of the scope not only excludes parts of the image from denoising, but also leads to less intensity of the indicating color in the ΔE preview. I conclude from this that the displayed ΔE is not only showing a threshold for applying denoising or not, but actually a display of a locally varying strength for denoising. If that is the case, then your algorithm should in principle also be capable of adjusting denoising strength based on local luminosity and a noise profile and someone interested in profiled denoising could use it for that purpose. Correct me if I am wrong on this point.

When I tried out the denoise module in the local tab, I noted that it’s behavior differs from the noise reduction in the details tab in that the desaturation it causes is much less dependent on the size of a color patch. Therefore, I tried to recover lost saturation by increasing saturation with the slider of the exposure tab (the RawPedia entry states that this function changes saturation in the LSV color space). However, this not only recovered saturation, but lead to noticable hue changes compared with the noisy picture. Is there another function in RT which could give me better color recovery?

I understand well that, considering your health, you do not want to start up an entirely new venue in developing RT. So I am all the more impressed by the amount of effort you have already put in to modify the denoising module of the Local Adjustments tab. I think it is now my turn to try out the pre-dev version you made and give you a feedback, but please be patient with me, because I think this will take me more than a week before I can come up with a useful response.

As a final remark for this reply, I also tried out the denoise module of the wavelet levels tool, following the procedure described in the second suggested video of Andy Astbury. This got me to a result that comes pretty close to the result I get with Neat Image: Noise reduction with little loss of detail and much less desaturation than I got with the two other RT denoising modules. So you are right, there is no magic going on in NI, it just seems to apply denoising with wavelets and settings for denoising strength taken from the noise profile.

Georg

1 Like

@schorschbey

I will give you a more complete answer tomorrow…
But briefly the 3 “denoise” tools complement each other.

“Noise reduction” can be useful (depending on the noise level of the images) with “denoise chroma” and “Low median”. All this with low values and completed by one of the following modules

“local adjustments” allows (when images are not too noisy) to take into account the deltaE… It also allows to “marry” tools like NLmeans.
You can use the masks and accentuate/reduce the action with for example “Denoise based on luminance mask”.
It is possible to add chroma with “Color & light” - use with moderation.

The Wavelet levels module allows you to combine noise level and contrast level.

Jacques

1 Like

Hello all

I will only make the point on how noise is treated in RT. This in 2 parts, to avoid too long texts.

  • The difficulties linked to the design of RT
  • The noise problem and the solutions brought in RT

The difficulties linked to the design of RT
Rawtherapee has, since its first version, a particularity that makes some actions very difficult both in the ‘preview’ and in the TIF/JPG output.

The ‘preview’ does not easily allow to see / simulate / calculate what will be done on the whole image in output. Especially when using either wavelets with high decomposition level values, or functions that need the Fourier transform to create blurs or solve Laplacians. This has a very strong impact on the code and the results.

This preview does not allow to display the result of high levels of decomposition, for example level 9 of decomposition (the startup starts at 0), requires a window of 1024*1024, which is not always the case…

Another point concerns the adaptability of the code whose origin dates back to 2008 and 2012, work coordinated at the time by Emil Martinec. Of course this code has been adapted several times by Ingo and me in particular, but some aspects are difficult to circumvent, for example the evaluation of noise (wavelet) which is done by MAD (median absolute devaition), for each level of luminance, each direction, and the components R,G,B or L,a, b.
For 7 levels of decomposition it represents 63 average values (the display I made in LA denoise shows only 4). To be more efficient and to take into account MAD more precisely, it would be necessary on the one hand to modify the whole code (very important work) and on the other hand to solve the problem of the ‘preview’ above.

1 Like

The noise problem and the solutions in RT – first part
There is a difference between measured noise and perceived noise…
We see more luminance noise on neutral backgrounds with few structures than in the structures.
We often see more chrominance noise in colored areas.

Of course it is possible to put weights, this is what the “Automatic global” calculation in “noise reduction” does, using empirical formulas (of which I am the author) to find a compromise concerning the whole image - it will be too much for some areas and not enough for others. But it remains global.
On the other hand, there is the notion of “acceptable noise” which varies from image to image and from individual to individual.

The other major problem posed by noise is the noise itself, which will disturb the tools responsible for taking it into account. For example:

  • the high chrominance noise disturbs the measurement of luminance noise .
  • the necessary edge detection necessary for tools such as DCT - discrete cosinus transform - Fourier is disturbed by noise.
  • the deltaE, even if a “smoothing” is made, is strongly disturbed by the chrominance noise and limits its use, if the image is strongly noisy.
  • masks (to a lesser degree) are also impacted by noise (luminance and chrominance).

Another parameter of denoising is “where to place it” and of which type: RGB, Lab, CMYN… In principle no a priori, because experience shows that there is no “good” choice.

It is proposed to put a denoising before demoisaicing. Apart from the difficulty of elaboration, which is not the least of the problems, I don’t think that this is a miracle solution, quite the contrary. If you do “before”, the colors are poorly defined, and therefore their recognition is random. The experience of the cameras in my possession since 2006 (Nikon D200, Sony Nex 6, Nikon Z6 II) leads me to note that generating Raw with a small “denoise” by the camera, gives less good results in most cases, than “nothing” and a later processing of the Raw. Nevertheless why not, but ultra complex…

As a reminder, in RT there are 3 modules to deal with noise - I’ll come back to this later. But briefly

  • Noise reduction : just after demosaicing, can work in RGB or Lab mode. Works on the whole image and uses 3 types of tools - Wavelets (luminance: 5 levels, chrominance: 6 levels), DCT (Fourier) luminance, Medians. The “automatic” mode allows to take into account the overall level of chromatic noise. It is this module which was used to develop the algorithms, and it is this module which contains the basic “wavelet denoise” routines. If we count the functions to call this module, it is about 4500 lines of complex code…
  • Local adjustments denoise : it is located in the middle of the process and works in Lab mode. It uses 4 to 5 types of tools - Wavelets (luminance and chrominance 7 levels), DCT (Fourier) luminance and chrominance, Nlmeans (luminance), Medians, Guided Filter. It allows to localize the denoising, to use deltaE to isolate/strengthen certain areas, to use masks to attenuate/strengthen the denoising. Note that it results (because of the 7 wavelets denoise levels) in a very high resource requirement, if full-image. About 2500 lines of code only for “denoise”
  • Wavelets levels : is located at the end of the process and uses only Wavelets. Its use is centered around the Wavelet concept in the broadest sense, which allows for global processing of the image. It uses 4 to 6 levels and allows the combination of “noise” and “Refine” in a single tool. About 1000 lines of code for denoise.

The noise problem and the solutions provided in RT – part 2
Which module to use, in which cases? There is no single precise answer to this question. It depends on :

  • noise levels of the image
  • obviously on the understanding and mastery of each module.

For images with a low noise level, the 3 modules can deal with the problem and the solution will be the one where the user masters the tools best.

For images with a high or even very high noise level - beware, there are no miracles - I recommend (not obligatory, of course) that the modules be combined.

In the case of the combination of “Noise reduction” and “LA denoise” the “automatic global” chrominance calculation is reduced by 50%. You can also lower the level of the " Chrominance curve". You can also use a small median to reduce luminance and chrominance noise (depending on the image), for example “3x3 soft Lab”.
“LA denoise” will give you information about the luminance and chrominance noise after denoise. This can guide the action. If you want to see the noise before “LA denoise”, you have to set everything to zero (Nlmeans, Wavelets : Luminance, and Wavelets : Chrominance), then slightly activate a module, for example set “Fine chroma to 0.01”.

Here again, there are no miracle recipes - depending on the case, you can use full-image (be careful with resources) with one or more RT-spot - or several “local” RT-spot using deltaE or masks

  • Denoise based on luminance mask’ will allow to increase the denoising according to the information (dark, light mask) - ‘advanced’ mode
  • Recovery based on luminance mask’ will allow for example to process the background of the image without touching the subject and its structure (see example ‘Harvest mouse image’ in Rawpedia)

You can use Nlmeans for Luminance noise which does not use wavelets.
The chrominance noise allows a DCT control to recover some details… Again no miracles.

You can associate with the current Spot, or another one,

  • the " Local contrast & wavelets " module / Wavelets to act on the contrast…
  • the " Color & light " module to act on the chrominance (saturation)
  • etc;

In the case of the association " Noise reduction " and "Wavelet levels
Nothing is automated, I recommend to put “Noise reduction” in ‘manual’ and to reduce the default settings.
The " Wavelet levels " module is a global “Wavelets” image processing module which is globally quite complex and requires an effort of understanding from the user. Of course, there is no reason not to use only the “Denoise and Refine” module which allows simultaneous control of contrast and noise, and control of chrominance noise in " Advanced " mode.

Jacques

I tried to download the windows release build you created, but unfortunately without success.

The following warning has been annotated for this build:
Node.js 12 actions are deprecated. Please update the following actions to use Node.js 16: actions/checkout@v2, actions/upload-artifact@v2.

Could you please have a look whether you can fix that.

Georg

The file(s) are all the way at the bottom of the page. This Windows version won’t work right now due to a missing DLL (other Windows pre-dev builds work fine though). It will be fixed soon.

I think (I hope) the problem is fixed now

Jacques

1 Like

Hello
Thanks to the excellent improvement made by @Lawrence37 , you can now directly access (Windows & Linux) the “pre-dev builds”
https://github.com/Beep6581/RawTherapee/releases/tag/pre-dev-github-actions

Jacques

I have now downloaded the pre-dev build for the denoise improvements, but the executable doesn’t start up, because it cannot find the library libfftww3f_omp-3.dll. The DLL version contained in the unzipped package is libfftww3f-3.dll. Therefore, I cannot provide yet any feedback on the changes to denoising.

Georg

@schorschbey

I don’t know why this dll was missing. I added it.

This should now work (at least I hope so)

jacques

Thank you Jaques for the quick fix.
The pre-dev build is now runing under Win10 and I will be back with a response in a few days after trying out the changes you made.

Georg