Digitising Kodachrome ... colour adjustment with Darktable

Warning… long and somewhat rambling post… sorry!

I’ve been experimenting more with a few test slides and my Canon EOS 70D and bellows setup. Getting the colours ‘right’ is something that I’m going to need to figure out how to do. Darktable will be the tool.

This seems a non trivial topic even for newly shot raws on a modern DSLR but digitising slides introduces a whole bunch more variables… the white balance of the light source, the light when the photo was taken vs the balance of K64 slide film, the inherent colour response of the film and finally any colour shifts that have occurred due to ageing.

In terms of illumination source I started out using a slide projector (3300K ish) and have now bought a 4700K Solux halogen lamp which seems to be recommended in other people’s writings on this subject.

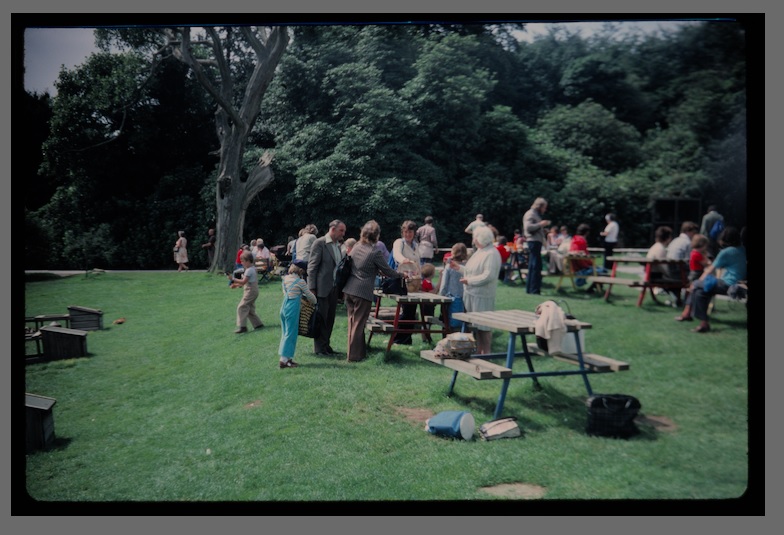
Yesterday I found what I think is a suitable test slide for colour adjustment. The photo (from my late uncle) definitely won’t be in the ‘final cut’ - it has a serious focus issue which I think is a camera fault. I’ve no idea who the people are, where it was taken nor why but it does have plenty of primary colours to play with. Kodak in Hemel Hempstead also seem to have slightly ‘missed’ with the mounting. The mount is dated 1980 so I think this one has fewer concerns over age related colour shift than some of the others… although it’s still 41 years old.

My initial reaction is that the digitised greens look very dull. This can be an issue with Kodachrome sometimes but not in this case - the grass is quite ‘in your face’ when looking at the slide on a light box. The reds on the other hand are coming through pretty strongly even in the unmodified raw file. The challenge then seems to be to get the grass to look like the slide without making the reds and blues looking ridiculous.

A screen grab showing the original in Darktable…

Screen grab of the image after applying scene referred worflow modules with default settings…

I’m not sure how best to share an experience of the original slide, but here is a pic from my little compact Lumix of the slide on the light box which seems to convey something of the look that I see on the real analog slide…

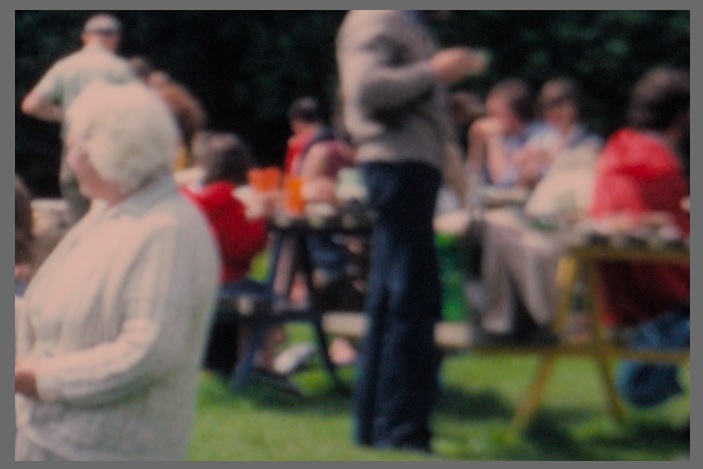
My effort to adjust the image to match.

So what did I do and what issues cropped up?

For white balance I think I have demolished my early theory that with a known illumination source I could simply set the WB based on a shot of the opal screen without a slide in place. That just doesn’t seem to work. The in camera white balance sometimes gets a decent answer, sometimes not. So far by trial and error I’ve been adjusting per slide and have had values varying from 4500 to 6500K, 5000-5500K is quite common but that range doesn’t work for every slide. This one is 4992K, sampled from the less sunlit areas of the white haired lady’s clothing.

The default Filmic RGB settings did strange things. They didn’t help the green much but they went pretty wild with the reds…

I switched ‘preserve chrominance’ to Luminance Y. This seems to make the reds less wild but I think there is still some tendency for patches of red to pop out of the picture.

Increasing the saturation to 15.65 in filmic rgb boosted the greeens a little but I could not push this any further without the other colours becoming a problem.

My next port of call was ‘colour zones’. Using this to push up the green saturation is something I’ve tried on several slides now. It has some effect but on its own it is pretty limited. Widening the peak more into the yellows has a much more noticeable effect… not a problem on this image but on images with strong yellows it can be problematic because Kodachrome has no issue with subdued yellows.
colour-zones-sat

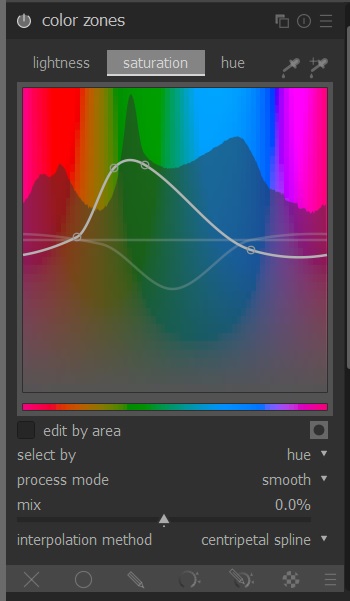
To me the grass still looked too blue, so I went to the hue tab and shifted some blue to green. This definitely helped.
colour-zones-hue

I’m pretty certain that I have not reproduced the way that the slide looks on the light box but it’s now less far away.

I also tried using the Velvia module which I’ve always liked and I think does help (I’ve used it on other slides) but I know it’s a bit of a ‘no no’ for the scene referred workflow so I undid that and made all of the colour adjustments in filmic and colour zones before making this post.

So… am I on the right track here?
Am I using the right modules for the job?
Are there better options?
Is filmic RGB perhaps a bad choice for something which is starting out as an image on film already?

3 Likes

Hi @Halina3000,
I may be on thin ice here, but
would one of the dtstyles help you?
Like the one entitled Kodachrome 64?

https://dtstyle.net/

Have fun!
Claes in Lund, Sweden

2 Likes

filmic is supposed to emulate the response curve of film, but your image already has that (since it is film), so you can turn that off.

4 Likes

Scanning with a DSLR is the worst idea ever… You are stacking the colorimetry error of the sensor over the one of the film and the scene illuminant (because film is balanced only for a particular illuminant), but also add demosaicing in there. I really don’t get why people inflict that upon themselves.

First you need to correct the sensor, that is white-balance and profile it for the current light bulb you are using to light your film.

Then, you need to correct for the film degradation and illuminant shift. Problem is you can’t white-balance it easily since it’s all non-linear, and chromatic adaptation in darktable is entirely built around the idea of linear RGB input. Personnaly, I would do that in color balance.

Filmic is, of course, unnecessary and redundant. You already have a filmic image, as Bill said.

Forget scene-referred, your film is heavily non-scene-referred from the beginning. Go for what looks best.

1 Like

Your best bet is going to be to purchase a color calibration target slide and use that to calibrate your camera + slide scanning light source. Ideally, the slide target would be printed on the same material that you will be scanning, but since your slides are Kodachrome a Kodak E100 or Fuji Provia target will have to do. If you can capture medium format slides with your setup a 6x7cm target will give better profiling results than a 35mm slide target. Targets vary in cost with something like the high end HutchColor Target running $500 or so, but you can find simpler IT8 targets for much less. The more patches and the broader the target’s gamut (more saturated) the better, since you’ll probably want to make a 3DLut based reproduction profile.

Basically, you would then shoot the target and use software like DCamProf, Argyll CMS (both command line based, free) or, my preference, Lumariver Profile Designer (DCamProf GUI, not free, but worth it for the immediate visual feedback as you create the profile) to make an ICC profile for your camera+lens+light source. Lumariver Profile Designer.

That process will give you an accurate digitization of the slide (well, as accurate as is possible with a camera sensor) to use as a base for any aesthetic adjustments you want to make. The tricky thing with scanning slide film is that it is designed to be viewed with a projector in a darkened room and is (a) tinted towards blue/cyan to account for the incomplete chromatic adaptation of the human eye to the warm projector light, and (b) gamma adjusted to account for flare and the dark surround. The best way to correct for this would probably be to make viewing condition adjustments using the CIECAM02 module. I’m pretty sure this is in Darktable, but I could be confusing DT and RawTherapee and I’m not at my computer to check.

Hope that’s helpful! Good luck!

1 Like

I agree that Filmic probably isn’t the best tool to use, but Kodachrome slides can approach 12.5 stops of density, so some kind of tone-mapping will probably need to happen.

1 Like

Though I doubt the Canon 70D will record all of these 12.5 EV…

1 Like

Yes, Good point. With an older Canon sensor like that there are probably only 8-9 (mostly) linear stops to work with. I suppose you would need to merge multiple exposures to digitize all the shadow and highlights detail.

1 Like

Thanks for all of the replies! I will have another try sans filmic.

Calibration targets… these slides are not ‘high end’ photos - many are less bad than the test shot but we are not talking about National Geographic material here. I have looked into calibration targets in the past and concluded that their cost is beyond what these photos justify.

Is digitising with a DSLR a good idea? I’m sure that all of the reasons why not are valid but in my own experience… I’ve tried three different scanners over the past 10 or so years with my slides and all have produced poor results even after a lot of effort on figuring out settings and post processing. The most recent was an OpticFilm 8200 something or other. Fine in terms of resolution but it never coped with the shadow areas on my Kodachromes and for that reason it could not reproduce what I could see just by looking at the slide. The DSLR digs more detail out of the shadows and with less noise than the scanner so that’s why I’m putting my effort in that direction now. For some slides I have already had results that I am very happy with… but green grass and red pullovers don’t feature heavily in those.

I’ve seen differing reports about the dynamic range of Kodachrome. I don’t know the definite answer. I do know that I have the option of bracketing my exposures and doing an HDR stack. I’ve tried HDR on some more tricky slides with good results. I’ve also found that some slides that I thought would need HDR have actually worked fine with just a single exposure. In fact I struggle to get the optimum exposure in a single attempt so bracketed exposures tend to happen whether needed for HDR or not.

I’ll have a look at that preset but quite often my search results for Kodachrome turn up styles/presets etc which aim to apply a Kodachrome ‘look’ to the output of modern digital cameras. I already have the ‘look’. I want to get it digitised, hopefully without making it worse.

My overall impression from reading this thread is that it doesn’t need to be so complicated. I do DSLR scanning regularly and professionally, with excellent results. I use RawTherapee, not darktable, but the same principles will apply. This procedure below is for continuous light such as an LED light panel.

  1. You need some slides that are “perfect” in that the color balance is dead on and they don’t need any adjustment to improve them. They should have good skin tones, some neutral grays, and a mix of other colors. They should also be sharp so you can recognize any issues with your focus, alignment or lens. They must be exposed perfectly.

  2. Shoot a custom white balance on just the light source, with the slide removed. Read the camera manual to figure out how to do this. For example, my Nikons are only able to do a white balance shooting through the viewfinder, not on live view. Use this WB for shooting the slides or negatives.

This should be done at the lense’s sharpest aperture, say around f8 for most macro lenses. Set the ISO to base, often 100.

  1. Put the slide in the holder and get the focus and size.

  2. Remove the slide and shoot a blank, stopping down about 2 - 3 stops so the histogram is roughly centred on the camera’s LCD. The histogram should narrow column, indicating that the exposure across the frame is about the same. If the histogram spreads out at the bottom it means the exposure is uneven across the frame. You can see this clearly by shooting one with the the lens wide open, say f2.8, which will often show darkening toward the corners. A shot at f8 will show a much more even exposure.

  3. Some of your slides will probably be a bit over or underexposed. Leave the aperture around f8, but adjust the shutter speed to make exposure corrections.

This shot is digitized from a Fujichrome 35mm slide, using two different LED panels as the light source. One panel has a good CRI and is about 5500 K. The other is a cheap Huion which is about 9300 K. In each case I set a camera custom WB to the panel and made no further color adjustments. Personally, I can’t tell the difference. This is a good test slide as it has skin tones, grays, whites and a variety of other colors.

3 Likes

Another attempt…

  • Duplicated the image, compressed the history back to the default modules.
  • Played with colour balance to push green into the mid tones. Looked promising but a green tint was appearing in places where it wasn’t wanted
  • Turned on a parametric mask. I haven’t used these before so not sure what all of the sliders do but by trial and error with the preview mask I ended up with… Input L 0-49, Input C 13-100, Input H 37-123
  • added local contrast with default settings.

Other than boosting the greens I have not touched the saturation of the other colours.

Plenty of scope for more fine tuning (e.g. I’m not looking at the slide today) but I think this way shows promise…

Thanks again for the help and suggestions.

1 Like

Thanks for your thoughts. Your results with the two different light sources are very interesting. My two sources are not so far from each other temperature-wise but so far (other than the required white balance temp) I have not seen a difference in the results. The Solux lamp is preferable for a couple of more practical reasons - it is less bulky than the projector and it doesn’t have the same annoying tendency to produce a focussed image of dust onto the opal screen.

I only have the one (home made) light box so that’s busy previewing slides.

I’d like to be able to keep a constant white balance because it would be one fewer step in the workflow but so far that has not worked for me. I’ll have another try.

I’ll keep looking for a perfect slide. It may take some time :slight_smile:

The colours in your images are not what Kodachrome looks like!

In my opinion, there is only one way to achieve good and authentic colours for Kodachrome slides, that is a calibration with an IT8-target: Shoot an IT8-target on Kodachrome material with the same illumination used for digitizing the slides, create the ICC-profile e.g. with Argyll and embed this profile into your images.

Caveat is, that these targets are rare and expensive!

All else will end up in frustration.

Hermann-Josef

Yes, you definitely need a better slide to establish your baseline color. I also notice that your image is soft on the right side, possibly out of focus due to an alignment issue. Are you using a mirror for alignment? A couple years ago I started a thread here about a DIY copy stand for digitizing film which you might find useful. Since then I’ve modified the system a bit, using a Benro GD3WH geared head and eliminating the Super Clamp. For a light source, a lot of people now are using a Raleno video light, which I’m considering getting myself. DIY copy stand for DSLR scanning

I think that is rather pessimistic. I’ve already had results on other slides that I am very happy with - a big improvement on results for the same slides from the OpticFilm scanner.

No, it’s the original slide that’s the problem. I think there was something wrong with my uncle’s camera because I see the same issue in other slides from the same camera. I’ve checked by messing with the focus while zooming in on the blurry areas in tethered live view. Ironically I’d always assumed that his kit was better and that he produced better photos. Most of my own shots are from my first 35mm camera which was hardly perfect (but not this bad). I have some later slides from my own Minolta XGM but I have not dug those out of their drawer yet.

I have an Ektachrome 35mm IT-8 target but rarely use it, as I get good results from setting my camera white balance to the light source. The scan needs to look good, and nobody is going to quibble about whether a piece of wood in the photo is R217 G167 B58 or R220 G166 B58. You can get excellent, professional quality scans without an IT-8 target.

no, it is my experience, and that of others. And, most importantly, it is just physics. You cannot ignore the spectral sensitivity of your detector in combination with the spectrum of the illumination not being standard.

Just a quote from the excellent book by Giorgianni & Madden (2008):

An RGB scanner will produce accurate CIE
colorimetric values, based on a particular light
source, only when used with a transform that is
specifically designed for the particular medium
being scanned.

In your case, replace “scanner” by “DSLR”. The principle is the same.

Hermann-Josef

You can get better results with a dedicated scanner but that is only practical if you need maximum quality and have the time to do the scans. DSLR scanning is a proven technique, just keep it simple:

Take an empty shot against the light source to read your white balance.

Then pick a slide with heavy overexposed parts - or if you still have it - frame an empty slide from the overexposed leader of the film. That will give you the correction to get white - if you want to neutralize the whites of your film.

Same can be done for the blacks if you want.

Mind: the look of almost any film depends on neither black nor white being neutral grey but having a strong tint.

But turn off pretty much every tool in your RAW editor and start from there.

Once you have a setting you like it should work with pretty much every slide you have.

Fair point.

Wavelengths of light are physics, colour science… may be physics but with a huge slice of human perception to muddy the waters. Whether I’m happy or frustrated with my results… not physics.

A good point. I had not thought about the inherent tint of the film itself. From memory my leaders are black though… such as they are after I’d tried by best to get 37 or 38 exposures onto the film :slight_smile: I’ll keep an eye out for major overexposure to check the whites. I need to check the ‘reject’ boxes. Dark areas are not in short supply.

Back in the day when most scanning was done by service bureaus charging hundreds of dollars per drum scan, the goal was to match the original transparency as closely as possible. Then, when the client complained about a scan having a slight color cast, the service bureau would point out that the original film also had that color cast, and they did their job by making a good match to the flawed original.

These days, with DSLR or mirrorless scanning, my goal is not to exactly match a flawed original, but to make the necessary corrections to improve it. Was the slide underexposed? Then I’ll increase the exposure time when digitizing. Was the slide taken in open shade resulting in an ugly blue cast? Then I’ll adjust the color temperature in RawTherapee. I don’t need an IT-8 target so I can get an exact match for a flawed slide. Instead I’ll use my own judgement, and a well-calibrated monitor, to get the image looking good to my eye.

Keep it simple. Set your camera’s white balance to the light source for a baseline, and make adjustments based on the individual slide.

2 Likes