The jpgs are less exposed.
But even on 100% the images look less exposed in darktable compared to any other program I tried. This is not the embedded jpg.
I asked around in the Adobe forums and they told me darktable is not correctly displaying the dngs. So I wanted to verify this, because the darktable images look closer, though somewhat underexposed, to the actual shots.
What does “displaying the dng correctly” even mean? The data is being demoasoced correctly and the white balance looks OK. Darktable does less processing of your image by default than lightroom does.
There‘s more information in the darktable default. The lightroom-default seems to have a lot of clipping already in the sky due to more initial processing
Thanks a lot for checking that for me. I am honestly very new to raw stuff. My goal is saving the pictures I take in the highest quality possible (complete with location info, etc). I also would like them to look very close to the actual shot and that is what darktable does it seems. I don’t plan to edit the dngs. My question is: why Windows Photos, Google Photos, and even the built in LG gallery in my phone display a very similar Lightroom version? Do they apply a tone curve as well? Is that tone curve built in the DNGs that cause them to show that overexposed image? I am just trying to understand how this works.
Also do you know of any android app that shows the dngs without applying any of that tone curve? Lightroom does a horrible job … I don’t how it is the most popular raw editor.
I think you have a misunderstanding about RAW files. You’re not looking at a processed image when you first open a RAW file.
Let me explain you the difference to a JPG from the camera:
When you shoot a picture as JPG, the camera postprocesses the taken image. This includes applying white balance, color corrections, contrast, shadow- and hightlicht correction and some more.
Finally it saves the result into a JPG file.
When shooting as RAW, the camera just takes the sensor data and writes it into a RAW file (and includes some metadata about white balance values and other info).
There is no postprocessing in the RAW file, so it looks dull when you first open it. You have to postprocess it by yourself.
And that’s where RAW-converters like Darktable or Lightroom come into play. With some knowledge and experience you can get much better photos than the camera processing a JPG file.
Here’s an example of what I mean:
Take a look at how the image looks at the begin of the video. It’s dark, low contrast, not much color. And then look at the image at the end of the video. This is what RAW-converters are for. https://www.youtube.com/watch?v=qNNm4g-mUKU
Understood, but I try to get the DNGs to look very close to what I want them to be when I take them, by adjusting the exposure, iso, ss and so on. My goal is to avoid lots of editing (I am not a professional- just want to store high quality photos). So I am looking for a Windows app and an android app that will show the DNGs as close as to how the pictures were shot, almost as-is, without applying any filters.
I opened your JPEG screenshot, then in-turn cropped the darktable side, then the LR side, so I could compare the histograms. The difference I can discern would be attributable to a “tone curve” on top of the initial processing. Indeed, I tried a curve on the darktable crop, and I was able to make an equivalent image just by dragging the top-right point over to the left, just to scale the image data.
Ah! You’re starting to ask the same sort of questions I asked about three years ago when I started to re-explore photography. What I found is that raw processors, including what your camera does internally, do various levels of processing to present you with what you might call a “photograph”. LR and its ilk tend to do more, RT and dt a little less, depending on how configured. Even dcraw, the basic command line raw processor, scales your image for output by default, and you have to explicitly tell it not to.
What I found works for me was to come to understand Every Single Thing that has to be done to a raw image, and I mean ‘really raw’, in order to make it presentable. It’s not a lot:
white balance,
demosaic,
color conversion,
whatever other processing to make the image presentable.
#4 is where so-called ‘secret sauce’ of cameras and softwares resides, but I’ve found a simple linear scaling is all it takes to make my proof images, and a lot of times those are good enough for the family.
Why don’t you just store the dng’s?
Whenever you need, you can always pick one of those, do a quick edit and voilà, there you have a high quality photo.
Do you have in mind just storing high quality jpg’s?
If so, basically, your image is about 1.5 stops more exposed when you open it in LR and Windows image viewers than when in dt. This doesn’t mean that your DNG is any less good; i.e., the data is still there. What is different is one of two things or both:
The DNG has tags that indicate the 1.5 stop setting.
LR or the image viewer adds 1.5 of exposure by default.
How to solve this problem is simple. Open it in LR / viewer, lower the exposure and generate a new thumbnail or preview. AFAIK, you can do that in LR, PS, Adobe DNG Converter and likely your phone’s camera and image editor apps.
Alternatively, just edit the DNGs, export TIFs or JPGs and decide whether you want to keep the DNGs.
As I said I want to avoid editing any photos. Just quickly browse through DNGs the same way I would browse JPGs. I am looking for a Windows and Android apps to view DNGs quickly without them adding any exposure shifts. I saw IrfanView mentioned. Anything for Android?
Adobe Bridge is fast but it adds that nasty overexposure.
It doesn’t take that much more work to make the adjustment or generate new previews for LR or Bridge. You choose one item from one dialog, apply it to every file and voila. Same goes for dt and all other apps.
Other than that, underexpose your images by 1.5 EV but that would hurt your dynamic range.
PS If you really don’t want to touch anything, then JPG is still an option. There is no shame in using JPGs. We share and print them all of the time, not the raw files. If you have an app like OpenCamera, you probably have enough settings to satisfy your photography needs without needing to go into raw.
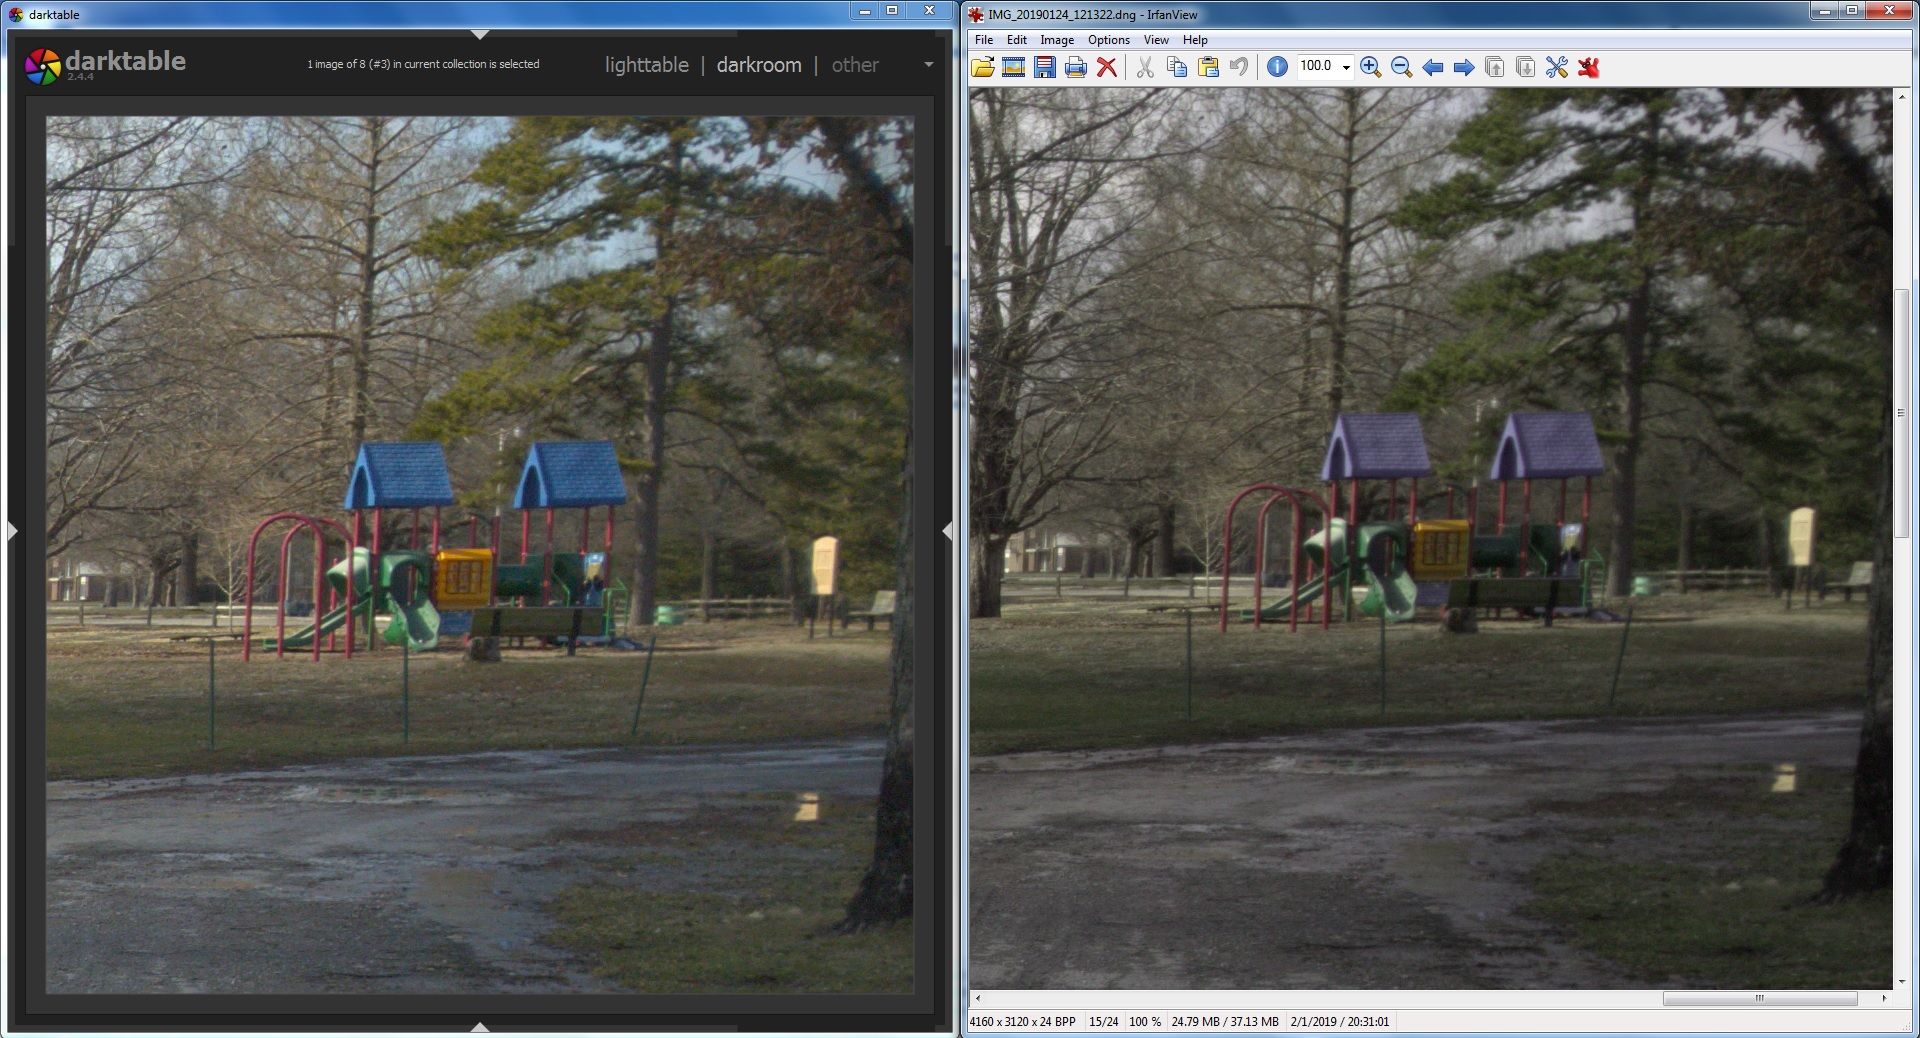
I tested IrfanView and there is a major color difference. Blue shows an obvious purple hue (see pic). I tried playing with the settings in the Plugins section (camera white balance,…etc), but it doesn’t fix it. If I uncheck the camera white balance, I get a red hue over whole image.
As I understand it, the dng contains a camera profile which has a colour matrix and a tone curve. dt seems to be using the colour matrix but not the tone curve. The other apps you mention are probably using both.
If you really don’t want to edit your photo’s then you’re best getting them right in the camera and saving as jpegs. Take the photo and look at it. If the exposure isn’t how you wanted it then change it and take the photo again until you get something you like.
Does opencamera have the option to save as raw+jpeg? That would probably be your best bet.
Yes, use darktable.
As pointed out several posts ago, you never see the raw information in an imageviewer. At least some basic processing is done - in most cases with an ‚one size fit‘s all‘ approach.
Endless discussion about different colourscience of different manufacturers and which ist better is an indicator, that there are a lot of decisions to make between capturing light on a sensor, store it and process it to achieve the intended look. Most manufactures uses different picture styles to cope with different users expectations.
So to enable IrfanView to display the raw files like your cameras manufacturers jpg they have to implement all theses decisions your camera manufacturers jpg engine made …
The jpgs look unnatural to me (esp the ones out of my phone) with all the denoising. The dngs have a higher bit depth too, isn’t it? They look more life-like, esp at 100%.
This is a common experience when people first encounter Darktable (DT) and free software RAW development. Here’s my own post about it, from almost exactly a year ago:
In my case, the RAW development was very far from the JPG one. It turned out there were all sorts of issues with the shots, partly due to LED lights giving out of gamut colors which confused even the in-body JPEG rendering…
One of the problems we’re facing, if I understand this correctly, is that camera manufacturers (Nikon, Canon, etc) collaborate with Adobe to have their JPG development process reproduced in Lightroom (LR) more faithfully. This means the RAW development LR users first see is often close to the out of the camera (OOC) JPEG, because proprietary development algorithms from the camera are reproduced in LR. I found this particularly striking when working on pictures from my Fujifilm X-T2 camera.
An entire play RAW thread discussed the finer details of how that bridge (and its environment) could be rendered:
In the end, I think the experience of free software RAW processing is that you are not trying to reproduce the JPG or LR development. I understand you are not aiming to do that, but the reality is that development is a personal, maybe even artistic process that will yield vastly different results depending on your objectives and (in my case, lack of) skill.
The way I browse RAWs is through Darktable, and I made it explicitely use the JPG thumbnails. This makes sense to me because it’s how I saw the shots when I was taking them, it’s often the shot I want. It does mean that I sometimes have to go uphill to go back to that JPG, but it’s a small price to pay to not have Adobe and/or Microsoft crap on my computers.