I’d like to talk a bit about a new filter that has appeared in the G’MIC-Qt plugin recently, namely Colors / Tune HSV Colors. After a few days of using it, I must say I find it extremely useful to quickly tune the colors of an image, with quite fine control over the outcome (and the algorithm behind is also quite smart, which is mentally satisfying  ).
).
Here is how the filter looks like in the plug-in:
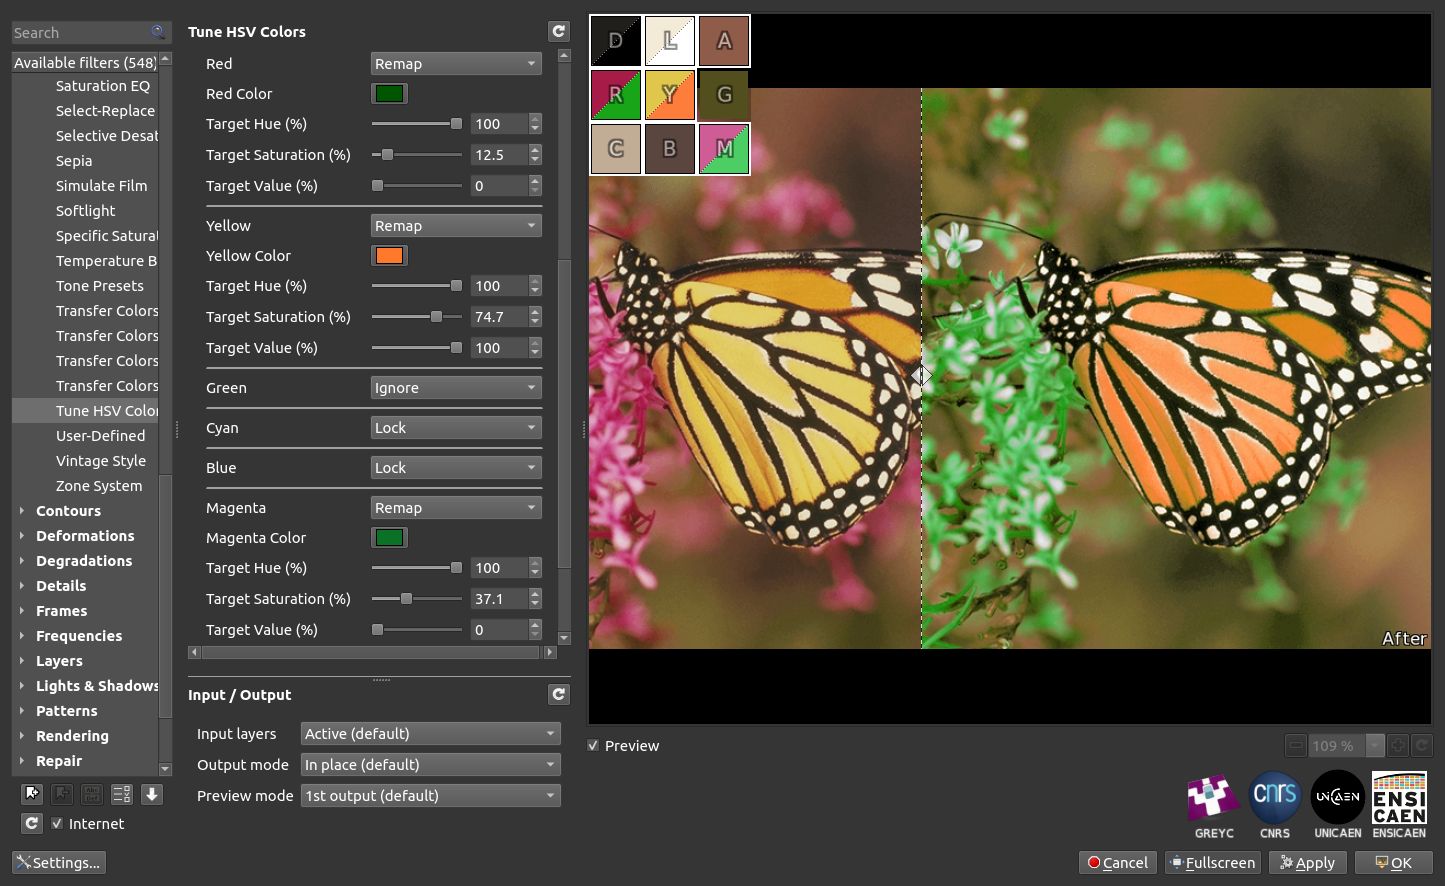
This screenshot already make you feel what the filter does : modify specific colors in an image in a quite ‘smooth’ way, without creating halos or discontinuous colors.
What was the primary goal?
Initially, I wanted to create a filter able to normalize the image colors in some way. What I mean by “normalize” is modifying the image colors to make them more “pure”.
Basically, the idea was to detect first the “primary” colors in an image, i.e. the existing colors that were the most :
- Light (L)
- Dark (D)
- Red (R)
- Yellow (Y)
- Green (G)
- Cyan (C)
- Blue (B)
- Magenta (M)
-
 the average color (A)
Then, the filter would allow to modify these colors to make them converge to their corresponding “pure” colors (e.g. “pure” red would be RGB(255,0,0)). Doing that would make the colors “pop” a little bit if the input image is a bit pale or not enough color-contrasted.
Detects these closest colors in the image is indeed what the filter does in the first place, using different means (e.g. Light and Dark colors are just the pixels with min/max value of the La^*b^* lightness).
Of course, sometimes, some of the detected color are very far from their corresponding pure color (typically, if the input image does not contain pixels in green, magenta ,…).
Now that we have these closest colors detected, the filter allows the user to modify them.
From a technical point of view, each L/D/R/Y/G/C/B/M detected colors is considered as a colored keypoint that will be mapped into another color. The 3D interpolation of these colored keypoints in the whole RGB cube generates a complete 3D CLUT that will be applied to the input image to get the outcome.
Color modification
The nice thing about this filter is that the color mapping is not just as simple as “Let the user select a replacement color” for each of these primary colors (we already had the filter Colors / Customize CLUT in G’MIC-Qt, for this purpose).
In fact, while this would somehow make sense for Dark and Light colors to be remapped to respectively pure black RGB(0,0,0) and pure white RGB(255,255,255), such a direct mapping is not desirable for other colors. For instance, replacing the most “green” color in an image by a pure green RGB(0,255,0) would be a bit wild (as the pure green is a very very light color).
And forcing the user to select the “right” color is not that user-friendly (that is what I learnt with the filter Colors / Customize CLUT indeed), because it is actually hard to choose a color that matches the value or saturation of the initial color, and this often produces unnatural color transitions at the end.
Here, the color modification the filter allows is a bit more subtle than that :
- First, you can decide, for each closest color to a primary color, how it must be considered for the 3D CLUT interpolation. You can :
- Ignore it. This basically tells the filter that this color does not play an important role in the mapping you want to define, so you let the filter assigns its new value, according to the constraints you will set for the other colors. This won’t add this color as a keypoint for the CLUT interpolation, and there are high chances this color is remapped with a new color.
- Lock it. Doing that, you tell the filter this color is important in the final look, but you don’t want to change its aspect. So you ensure this color will stay the same in the outcome. This selects it as a keypoint for the CLUT interpolation.
- Remap it. You want to modify this color to something else. This also selects it as a keypoint for the CLUT interpolation.
If you decide to remap one of the colors, you have a fine control on how the initial color will be remapped.
- You can first define a “reference” color that, by default, corresponds to the “pure” version of the detected color (so, pure red, pure yellow, pure green, etc…). “pure” is defined in the HSV representation, so with S = V = 1 and H going from 0 (red) to 300 (magenta), with a 60^o step.
- Then you decide how much your current color (the one detected in the input image) must converge to the reference color. This is done also in the HSV representation, with three separate sliders Target Hue (TH), Target Saturation (TS) and Target Value (TV) expressed in %.
- For instance, choosing TH = TS = TV =100\% just replaces the initial color by the reference color.
- Choosing TH = 100\% and TS = TV = 0\% forces the initial color to be remapped to the hue of the reference color, but won’t modify its saturation and value.
- Choosing *TH = TV = 0%$ and TS = 100\% will only modify the saturation of the initial color, to make it match the saturation of the reference color.
As you see, the filter allows you to finely tune the color mapping.
What is cool is that the filter also displays a color chart that describes the mapping that will be applied on the image.
Examples of use :
Example 1:

Here, you can see clearly what the mapping does:
- It remaps the Dark color (which is actually a bit redish) to the pure black, with TH = TS = TV = 100\%.
- It remaps the Light color (off-white) to pure white, with TH = TS = TV = 100\%.
- It remaps the Blue color to magenta, by forcing it to have the same Hue as the reference color, and make the Saturation and Values converge towards those of the reference color (but not at 100\%).
As a result, the blue liquid is replaced by a magenta liquid, and the off-white background to a lighter color. The effect on the dark color is not much visible on this example, but it makes the dark color more “black”.
Example 2:

Here, I wanted to simulate an evening light, on an initial drawing by David Revoy.
To do that, I set the filter parameters to:
- remap the Average color into a dark blue (global color mood).
- remap the Light color into cyan (clouds, eyes).
- remap the Yellow color into magenta (cat and fox skins, balloon).
On the displayed color chart, you can actually see what colors are considered for the CLUT interpolation (those with a white outline, here Dark, Light, Average and Yellow). And for the colors in Remap mode, you also see the remapped color (bottom right) (e.g. here, detected Yellow to Magenta).
Conclusion
This color modification filter seems to be really useful and versatile because :
- It can be used to normalize the image colors, by allowing to use a wider range of colors and shades.
- It can be used to globally change the color mood (mainly by settings the Dark, Light and Average colors).
- It can be used to locally modify colors (e.g. changing the color of specific objects).
And it does that with a quite smart CLUT interpolation technique, which allows the computation of smooth transitions between the modified colors.
I must say, it’s already one of my favorite filter for color tuning !
Hope you enjoyed this little description.


 ). I’m sure it’s never asked before.
 Certainly, a way to control colourfulness without going too deep into colour theory.