This is a companion discussion topic for the original entry at G'MIC 3.0: A Third Dose to Process Your Images!
A new major version (numbered 3.0.0) of G’MIC (GREYC’s Magic for Image Computing), an open source framework for image processing, was released on December 9th 2021. This project, distributed under the CeCILL free software license, is mainly developed by the IMAGE team of GREYC, a French research laboratory in Information and Communication Sciences and Technologies (Mixed Research Lab CNRS / ENSICAEN / University of Caen).

The last report on this software was published over two years ago, in August 2019. Since then many new features have been released. In this article, we detail some of the most significant ones.
It’s time to make a hot drink, get comfortable on the couch and let us tell you about two years of development of a dynamic, free project!
Note: click on the images to get higher resolution versions.
1. G’MIC In Just Over 3.0.0 Words
G’MIC is an open-source framework for digital image manipulation and processing.
It offers various user interfaces for the algorithmic manipulation (automated or semi-automated) of images and generic signals, ranging from simple 1D signals to 3D volumetric image sequences with any number of channels (which includes classical color images). The core of this project is based on the definition of a specialized scripting language (the “G’MIC language” and on a free implementation of its associated interpreter. This language was specifically developed to ease the prototyping and implementation of new image processing algorithms and operators. The users of the framework can thus apply operations among the hundreds already predefined, but also have the possibility if writing their own complex processing pipelines and make them accessible in the various user interfaces of the project. G’MIC is therefore, in essence, an open, extensible and constantly evolving framework.
![]()
Fig. 1.1 : Logo of the G’MIC project, a free image processing software, and its mascot “Gmicky” (created by David Revoy).
The G’MIC project has been developed since 2008, mainly by two members of the IMAGE team of the GREYC laboratory: David Tschumperlé (CNRS research fellow, team leader) and Sébastien Fourey (ENSICAEN lecturer). The IMAGE team, one of the six teams of the GREYC, is composed of about fifty members (researchers, teacher-researchers, doctoral and post-doctoral students, engineers), all specialized in the fields of algorithmics and mathematics of image processing.
The most visible G’MIC user interfaces are: the gmic command, which can be used on the command line (an essential companion to ImageMagick or GraphicsMagick for those who process their images via the terminal), the G’MIC Online Web service, and above all, the G’MIC-Qt plugin, which is available for several popular digital image editing software (free or proprietary) such as GIMP, Krita, Paint.net, and more recently, Adobe Photoshop or Affinity Photo. This plugin allows you to enrich these programs with more than 570 different filters and effects to apply to images.
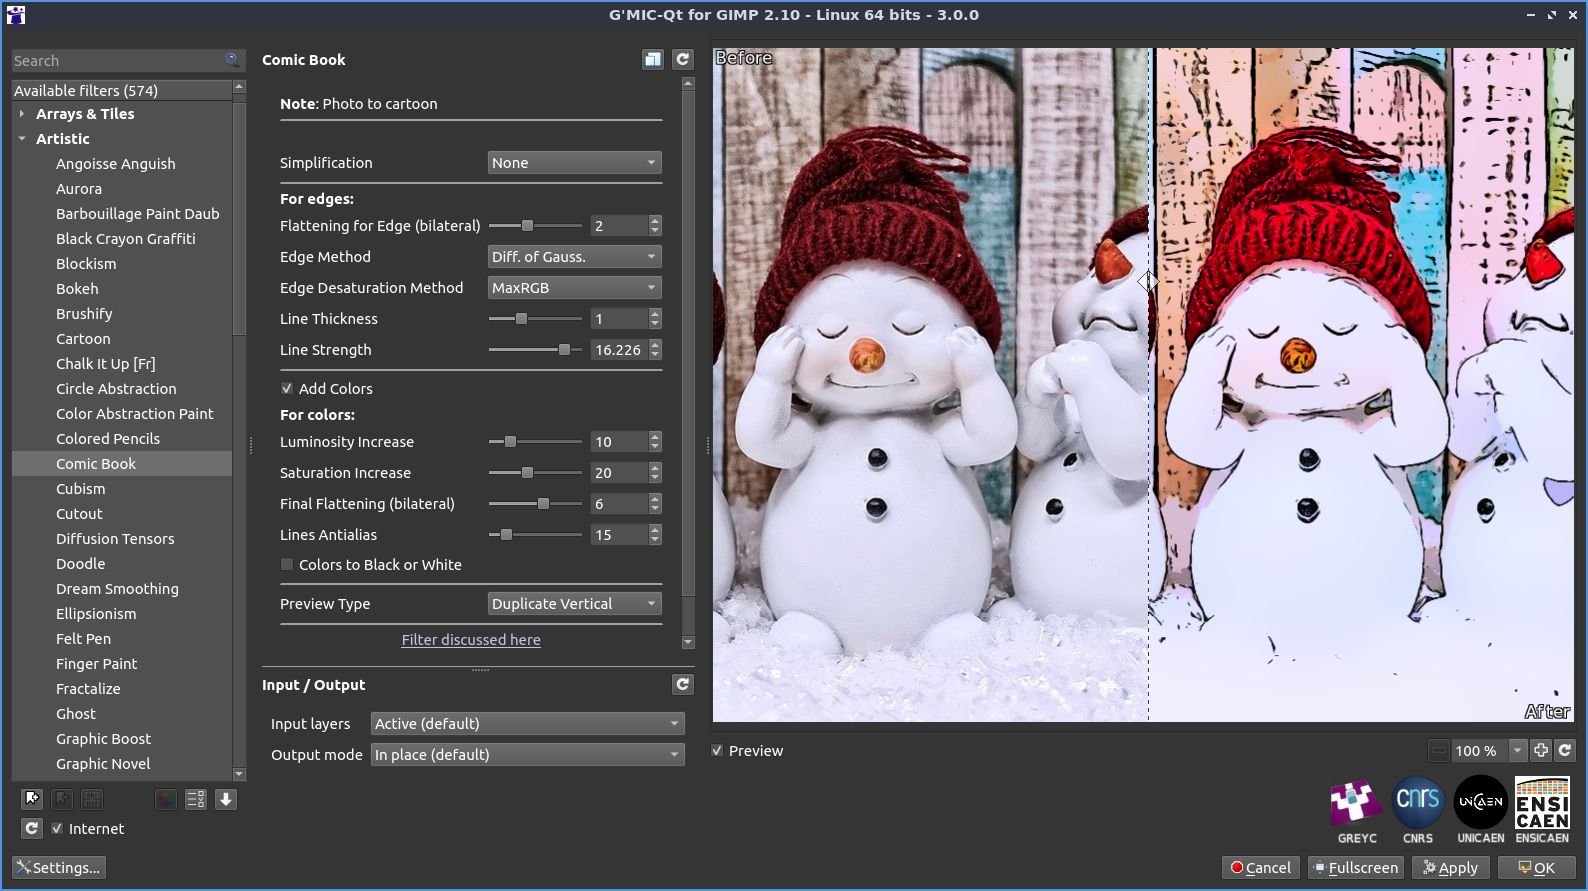
Fig. 1.2: Overview of the G’MIC-Qt plugin, version 3.0.0, here launched from GIMP 2.10.
Thanks to its integrated scripting language, facilitating the prototyping and implementation of image processing algorithms and operators, new filters are regularly created and added to G’MIC. A large part of this article will be dedicated to the description of the new filters and effects developed in the last two years.
2. New Features of the G’MIC-Qt Plug-In
G’MIC-Qt is the most popular and most used interface of the G’MIC project, so let’s start by describing the new features concerning it. An exhaustive list of the new filters would be impossible here, since in fact more than fifty new entries have been added in two years! We have tried to follow the adage “A picture is worth a thousand words”, by sprinkling this article with numerous figures illustrating the new features.
2.1. Artistic Effects
- The new Artistic / Paint With Brush filter is in the great tradition of effects that seek to transform a photograph into a drawing or painting. Its originality lies in the fact that it will repaint the entire image given as input on a virtual white canvas, applying successive brushstrokes at different scales: first with coarse brushes, then with increasingly fine brushes to recreate the smallest details of the image.
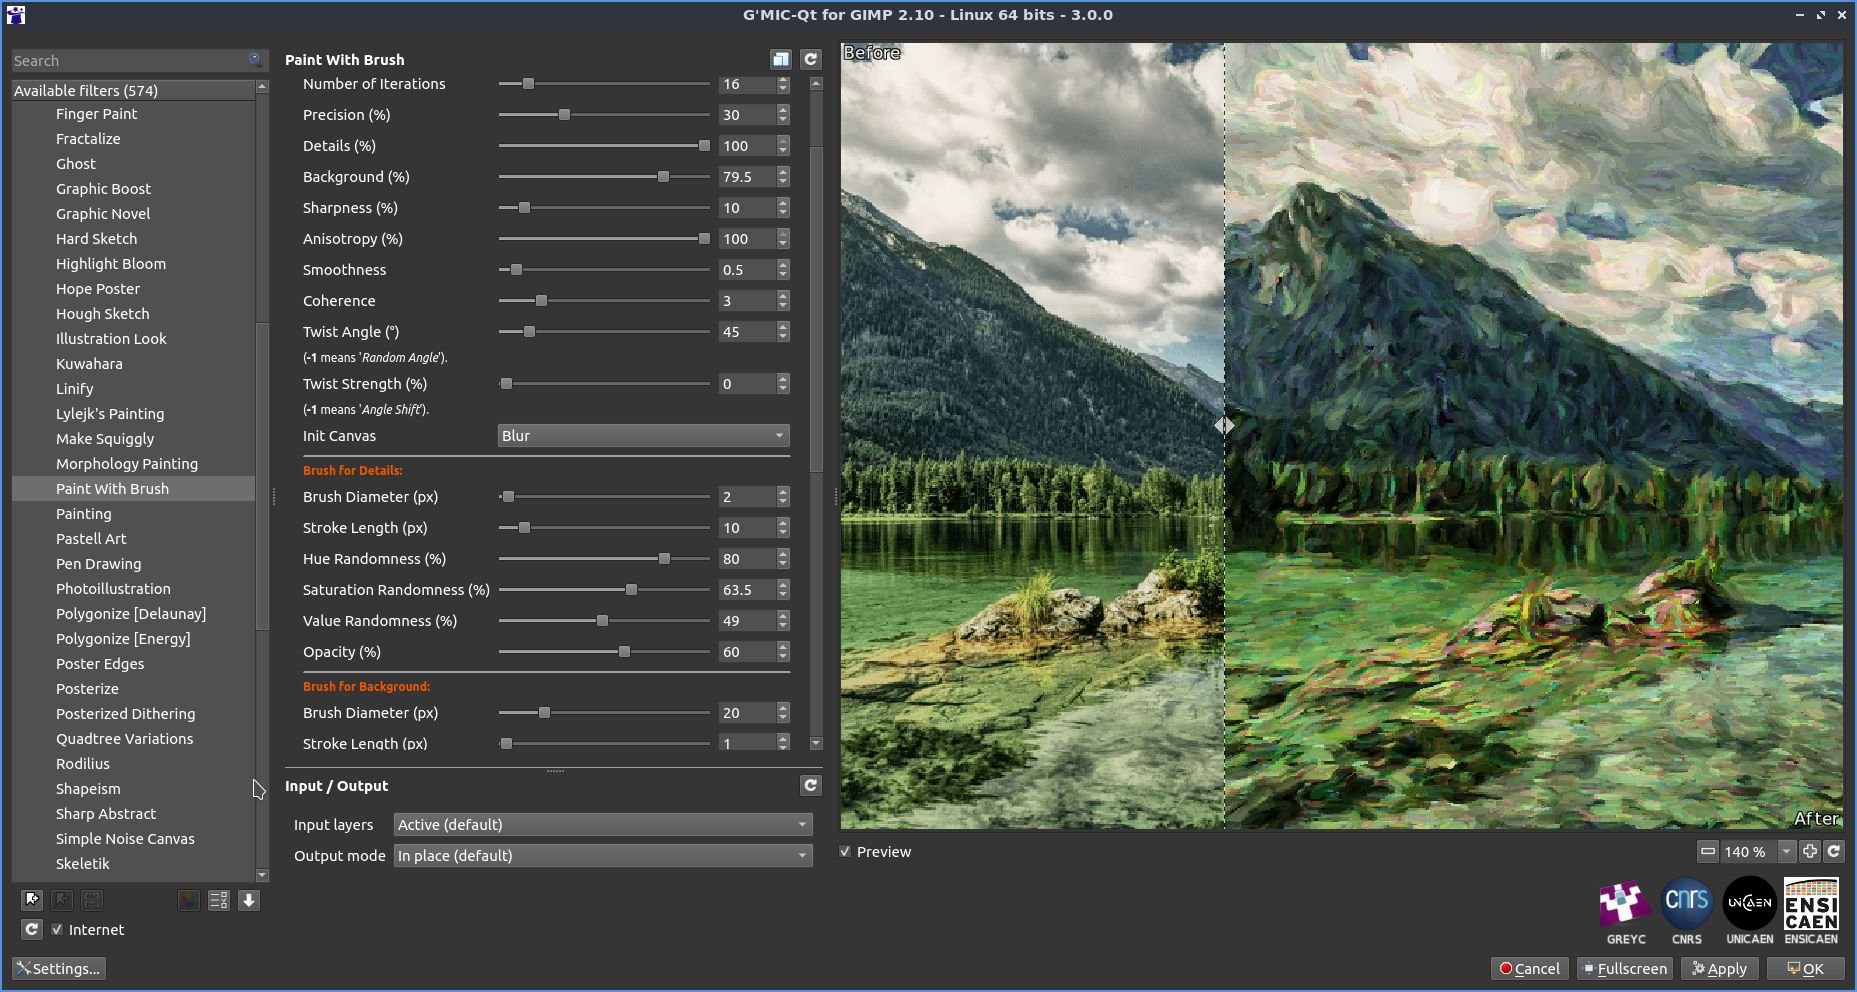
Fig.2.1.1. The " Artistic / Paint With Brush " filter in action.
Here, everything is adjustable: the number of brush strokes at each iteration, the brush dynamics (size, opacity, color, orientation…), the geometric precision of the strokes, etc. This makes it a very versatile filter, allowing it to simulate various painting styles. This can be seen in the animation below, which shows the results obtained with several provided presets.
Fig.2.1.2. The different presets proposed allow to simulate several painting styles.
- In the same vein, the Artistic / Doodle filter redraws an image in the form of “doodles”, i.e. a set of continuous black lines on a white background, located mainly on the outlines of objects present in the images, as illustrated by the result below.
Fig.2.1.3. Result of the “Artistic / Doodle” filter.
- Still in the spirit of converting an image into an illustration, the Artistic / Comic Book filter has been recently added to the plugin and allows you to give a cartoon look to your images. This is a “community” filter, since it was created by Claude Lion, a new contributor to the project, and then slightly modified by myself.

Fig.2.1.4. The “Artistic / Comic Book” filter in action.
- Want to scare your kids just before bedtime, to make sure they have a good night’s sleep? The new Artistic / Ghost filter is for you! This algorithm agglomerates semi-transparent white segments on the outlines of objects, which often results in quite nightmarish images (especially when applied on portraits).
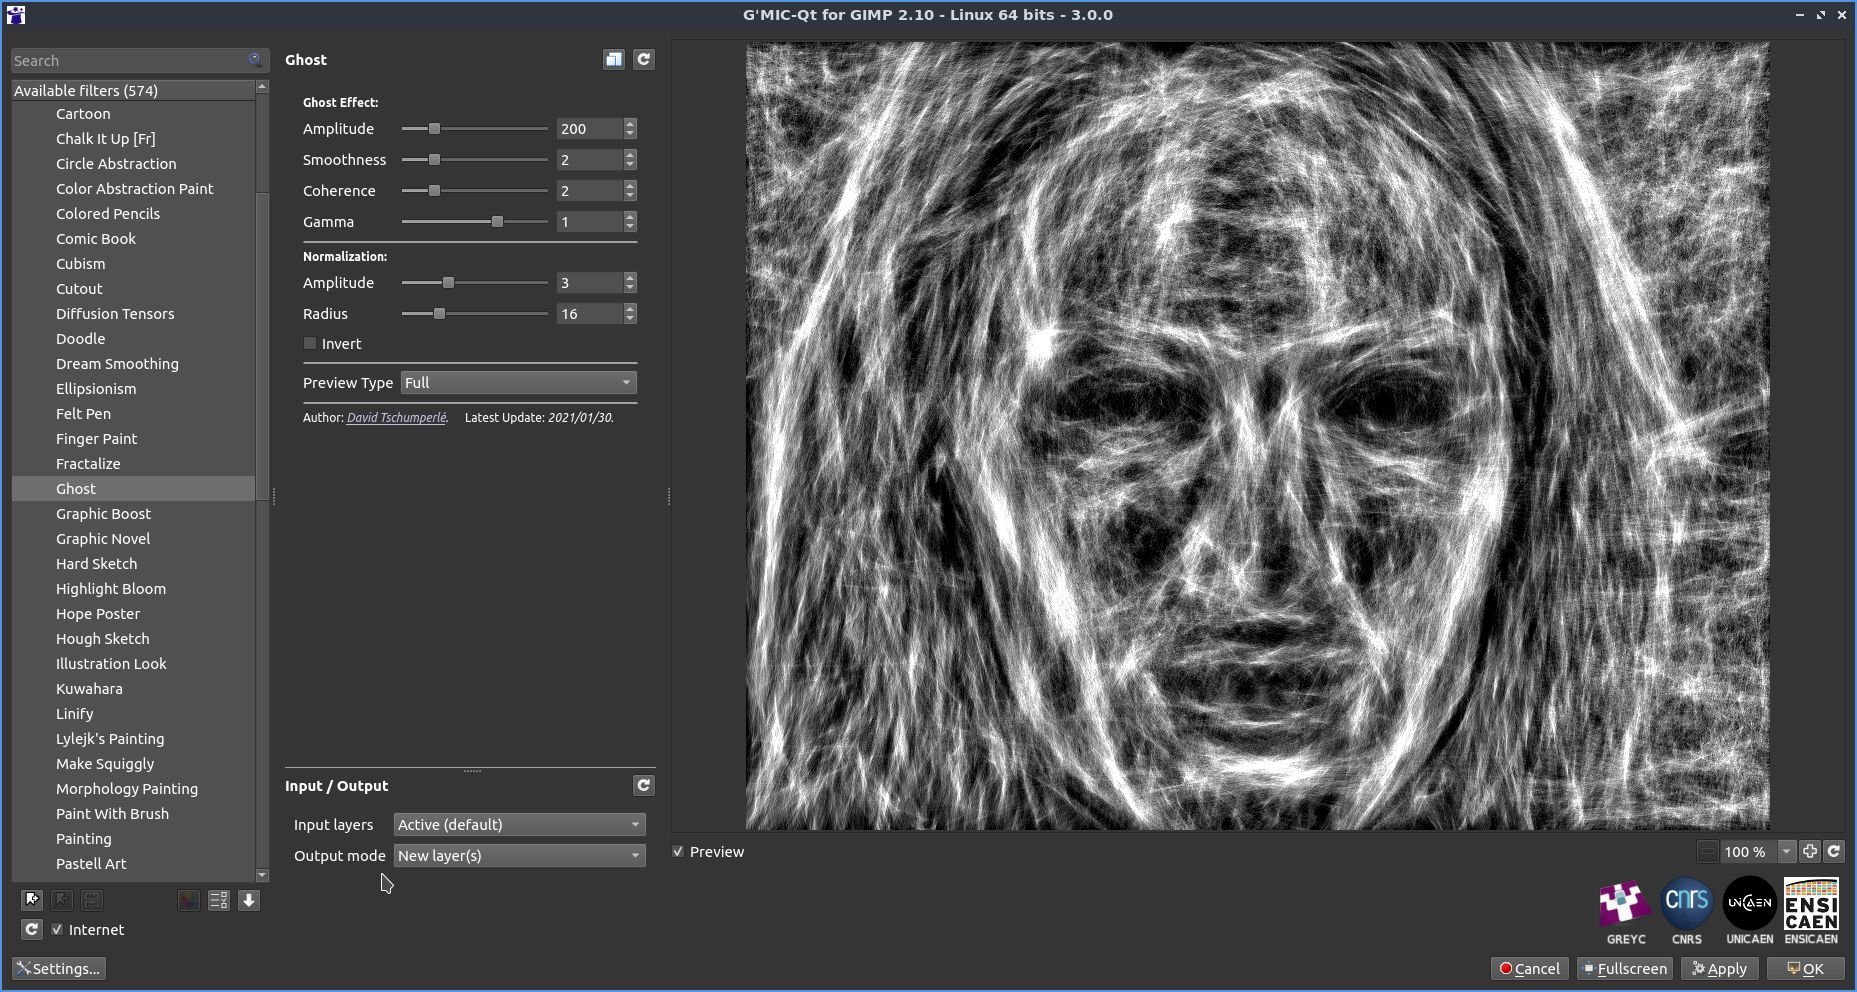
Fig.2.1.5. The “Artistic/Ghost” filter in action. Keep the children away!
It is then easy, by mixing the result of this effect with the original image (through well chosen layer merging modes) to generate animations, which will transform any of your images into a horror show! (here we used it in conjunction with the G’MIC morph command to render the animation below).

Fig.2.1.6. Animated variation around the " Artistic / Ghost " filter.
- Finally, let’s mention two small improvements to existing artistic filters. First of all, the Frames / Droste filter has been equipped with interactive points that can be manipulated in the preview window, making it easier to adjust the area where the input image is repeated. These are the colored points visible at the four corners of the mirror, on the example below.
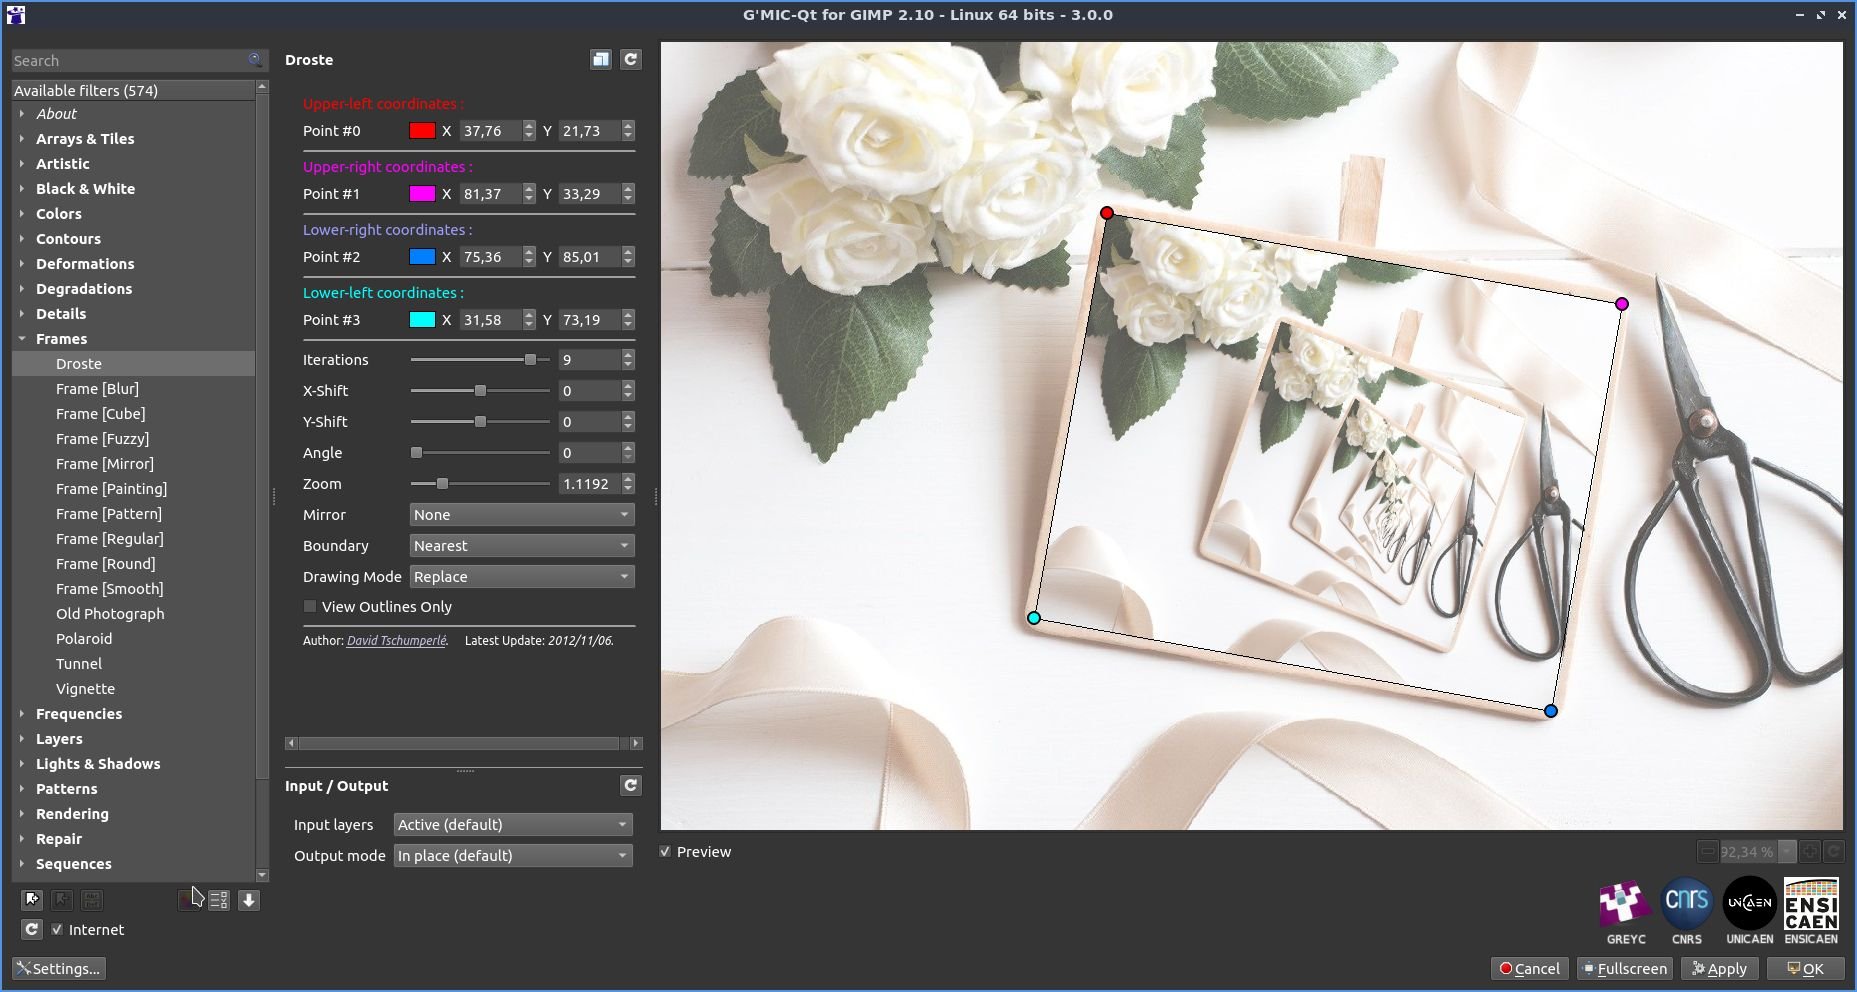
Fig.2.1.7. Addition of user-manipulable points for the “Frames / Droste” filter setting.
Next, the Artistic / Stylize filter gets six new preset styles, developed by Christine Garner, an artist who had used the filter extensively to give her images a textured look before offering her contribution. These new styles allow, for example, the production of images with pencil, chalk, pastel or charcoal textures.

Fig.2.1.8. One of the new predefined styles available in the “Artistic / Stylize” filter.
2.2. Image Enhancement
- The plugin has yet another new algorithm to help with image denoising, a classic yet very challenging problem that has occupied image processing researchers for several generations. The new Repair / Denoise filter tries to solve this task using an algorithm based on convolutional neural networks.
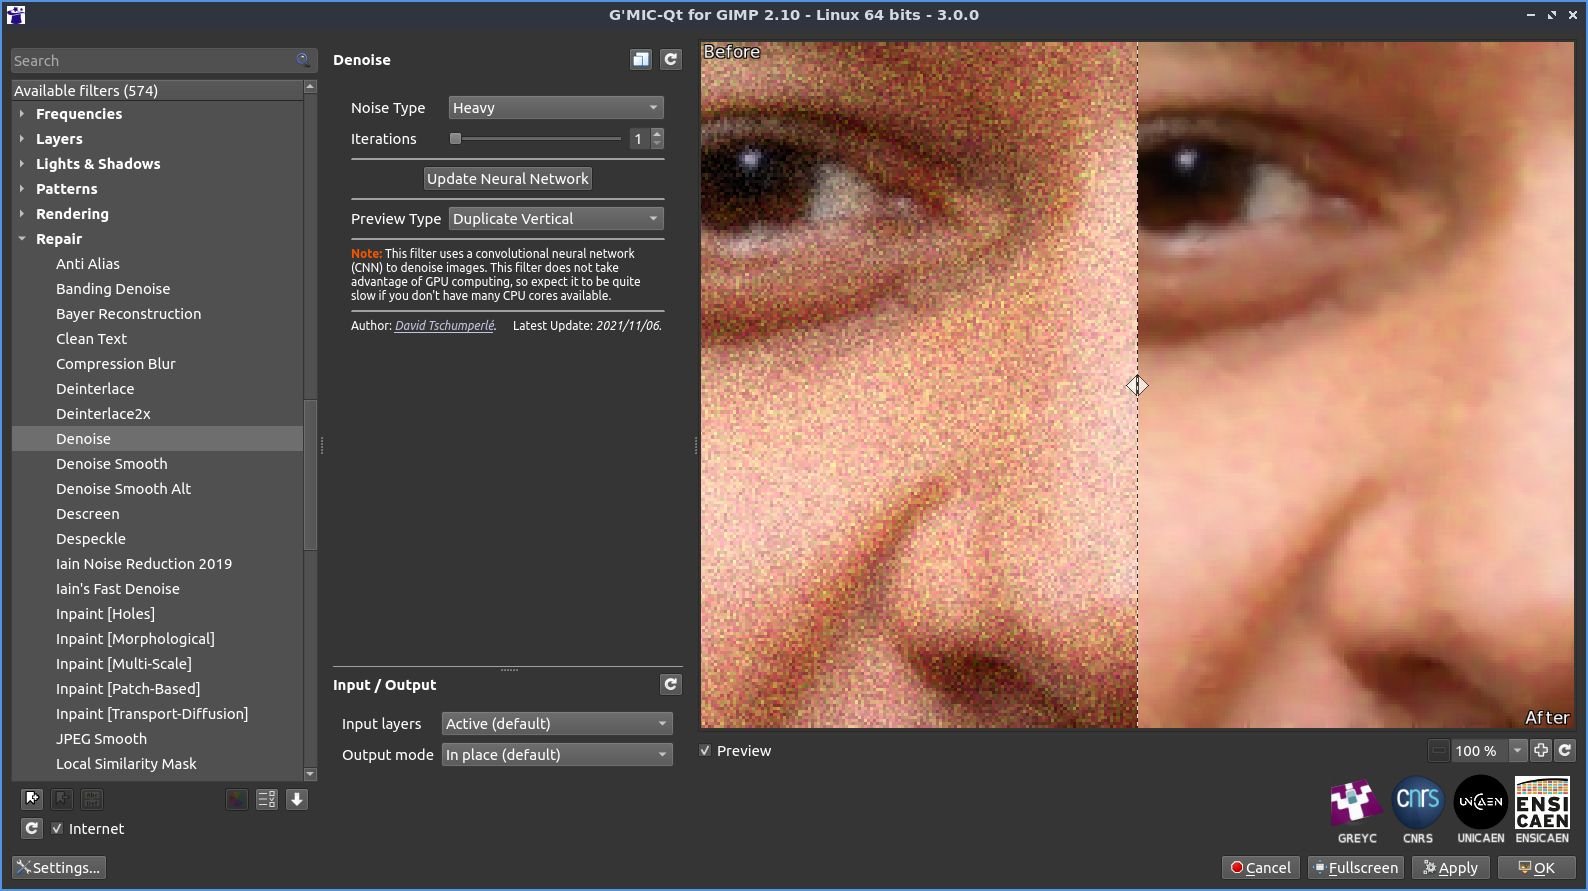
Fig.2.2.1. The “Repair / Denoise” filter in action.
At first sight, this information may seem trivial, but it actually represents a milestone in the history of G’MIC (as well as many weeks of development!). Indeed, to implement this filter, we had to write a complete machine learning library from scratch, named nn_lib (for “Neural Network Library”). This library now allows the construction, learning, and evaluation of artificial neural networks (this type of method being generally referred to as “Artificial Intelligence”). The Repair / Denoise denoising filter is actually the first G’MIC filter based on this new machine learning library!
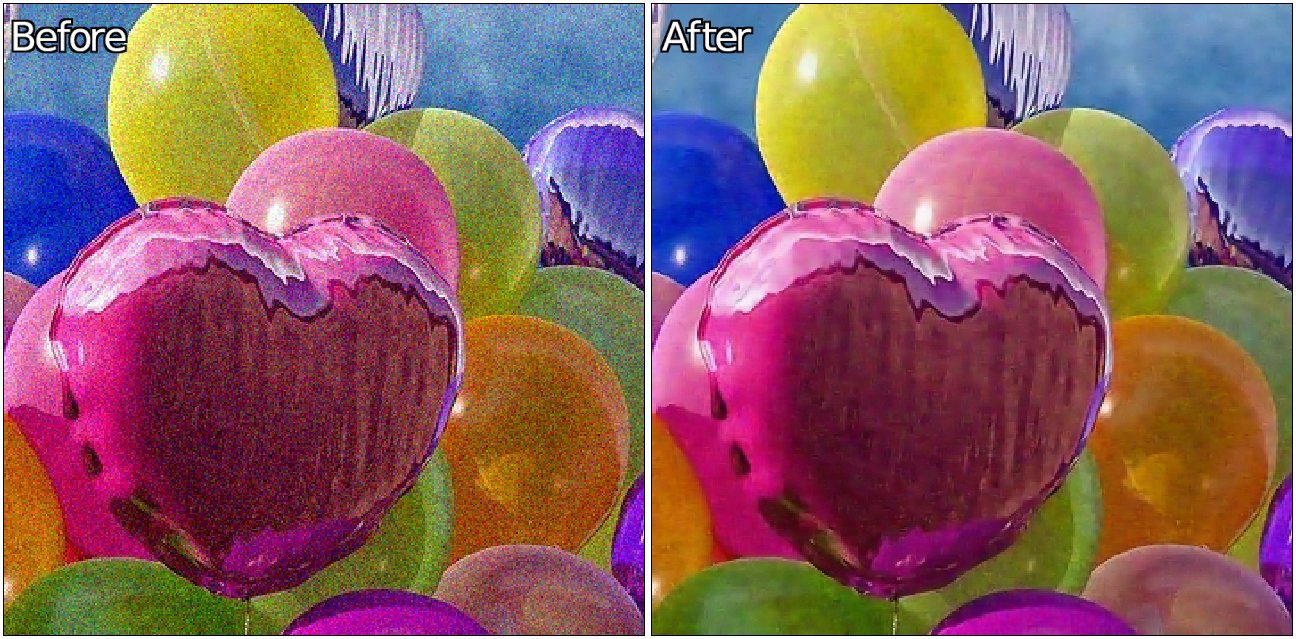

Fig.2.2.2. Two examples of image denoising, obtained with the “Repair / Denoise” filter.
With the development of nn_lib, we hope to offer more and more neural network based filters for image editing and generation in G’MIC in the future. Great things to come!
- Another more specialized image enhancement filter has been integrated into the G’MIC-Qt plugin. It is the Repair / Unpurple filter whose role is to remove the [purple fringing]((Purple fringing - Wikipedia) that can appear in photographs. The algorithm used here is a direct port in G’MIC language of the Unpurple algorithm by Martin Jambon, port made by Stanislav Paskalev. We can see the effect of this filter below, on a portion of an image with annoying purple fringes.
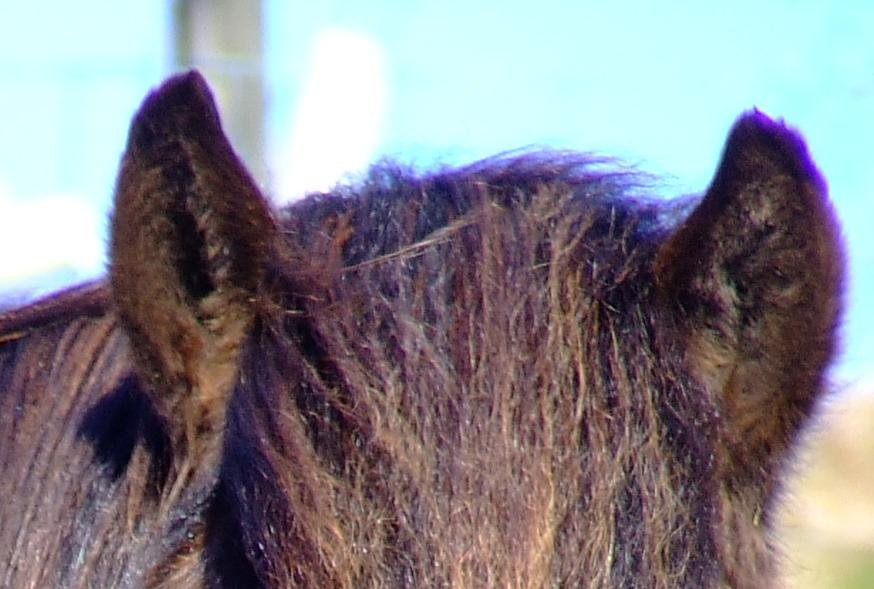
Fig.2.2.3. Portion of color photograph with purple fringing.

Fig.2.2.4. The “Repair / Unpurple” filter in action.
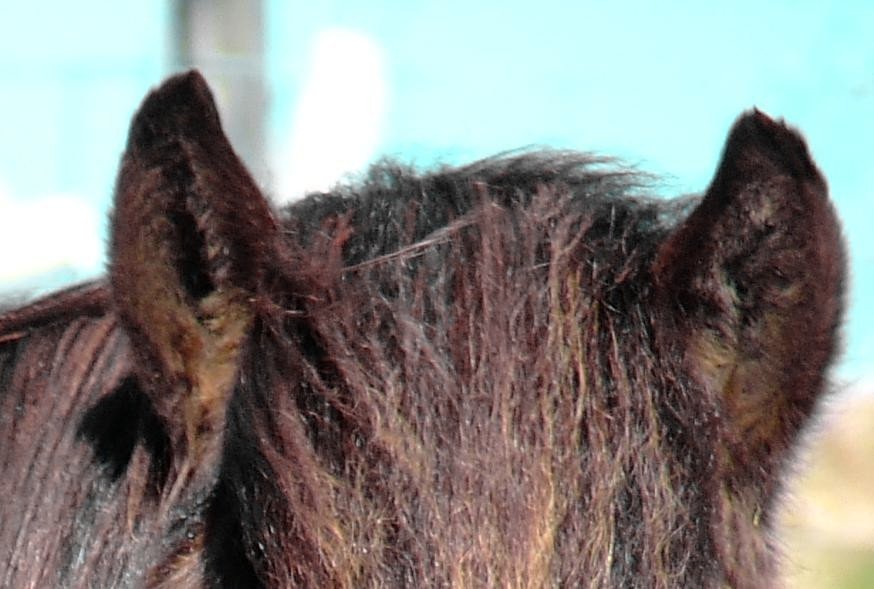
Fig.2.2.5. Result of the filter: the purple fringe has disappeared.
- Suddenly feel like enhancing the details in your images? The new Details / Sharpen [Multiscale] filter may be of interest to you. It enters the armada of existing sharpening algorithms in G’MIC. It is based on a multi-scale enhancement algorithm to bring out details of different sizes in images.

Fig.2.2.6. The " Details / Sharpen [Multiscale] " filter in action.

Fig.2.2.7. Result of the application of the filter on a color photograph.
2.3. Color Retouching
For the color retouching of images, two new particularly interesting filters appear in G’MIC-Qt:
First, the Colors / Tune HSV Colors filter, which allows the user to define - in a very finely tuned way - a transformation function operating in the HSV (Hue-Saturation-Value) color space. This filter works in the following way:
- First, the filter will determine the existing colors in the input image closest to the following pure colors: red (denoted R), yellow (Y), green (G), cyan (C), blue (B) and magenta (M). The darkest (D), lightest (L), and average colors (A) are added to this list. It’s possible that the input image does not contain any of these colors at all, and in this case the closest extracted color may be perceptually quite far from the ideal pure color. This is the case for example with the image of the butterfly shown below: this image contains no pixels in blue tones.

Fig.2.3.1. The " Colors / Tune HSV Colors " filter first extracts basic colors from the image.
- These nine colors extracted from the image will then be used as a basis for the definition of a custom color transformation. We can indeed modify each of these colors independently in the HSV space, by making the color more or less bright, more or less saturated, or by changing its hue. This is what we do in the example below where we modify the reddest and magenta colors to make them green and thus change the color of the flower on which the butterfly is placed (whose hue has also been slightly modified).
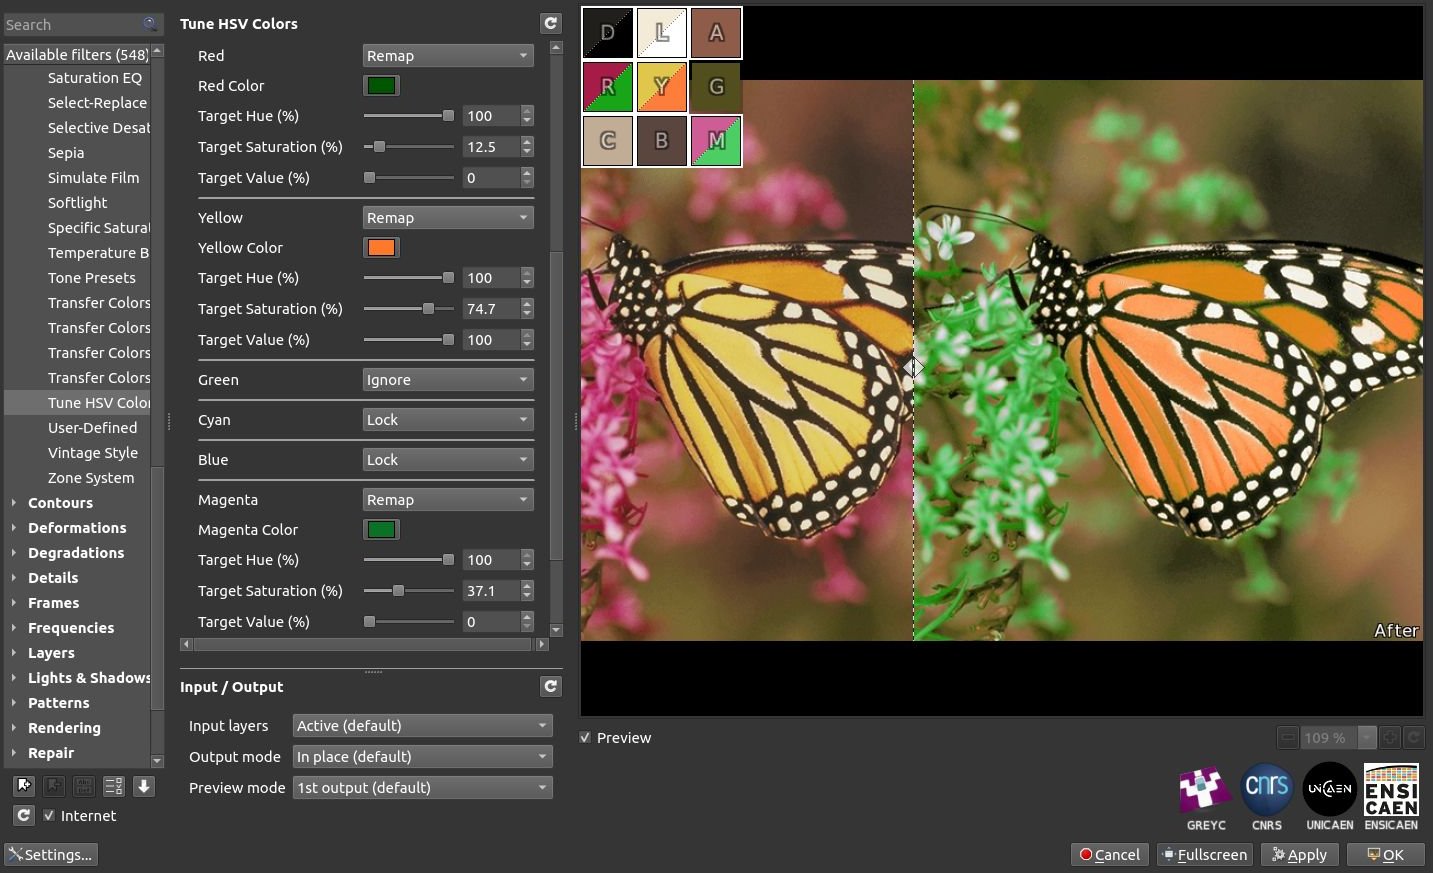
Fig.2.3.2. The user can act on each of the 9 “key colors” individually to define a customized color transformation.
From a technical point of view, this redefinition of the “key colors” leads initially to the construction of a dense interpolated CLUT (Color LUT) in 3D, which is then used to modify the input image according to the wishes of the user, as illustrated below in our example with the butterfly:

Fig.2.3.3. Internally, G’MIC generates a 3D CLUT modeling the desired colorimetric transformation.
The use cases of this filter are quite large. Whether it is for a local color retouch (transformation of one color into another), or a more global colorimetric retouch, this filter will easily find its place in the toolbox of the color tweaker. In the figure below, we used this filter to define a twilight color atmosphere.
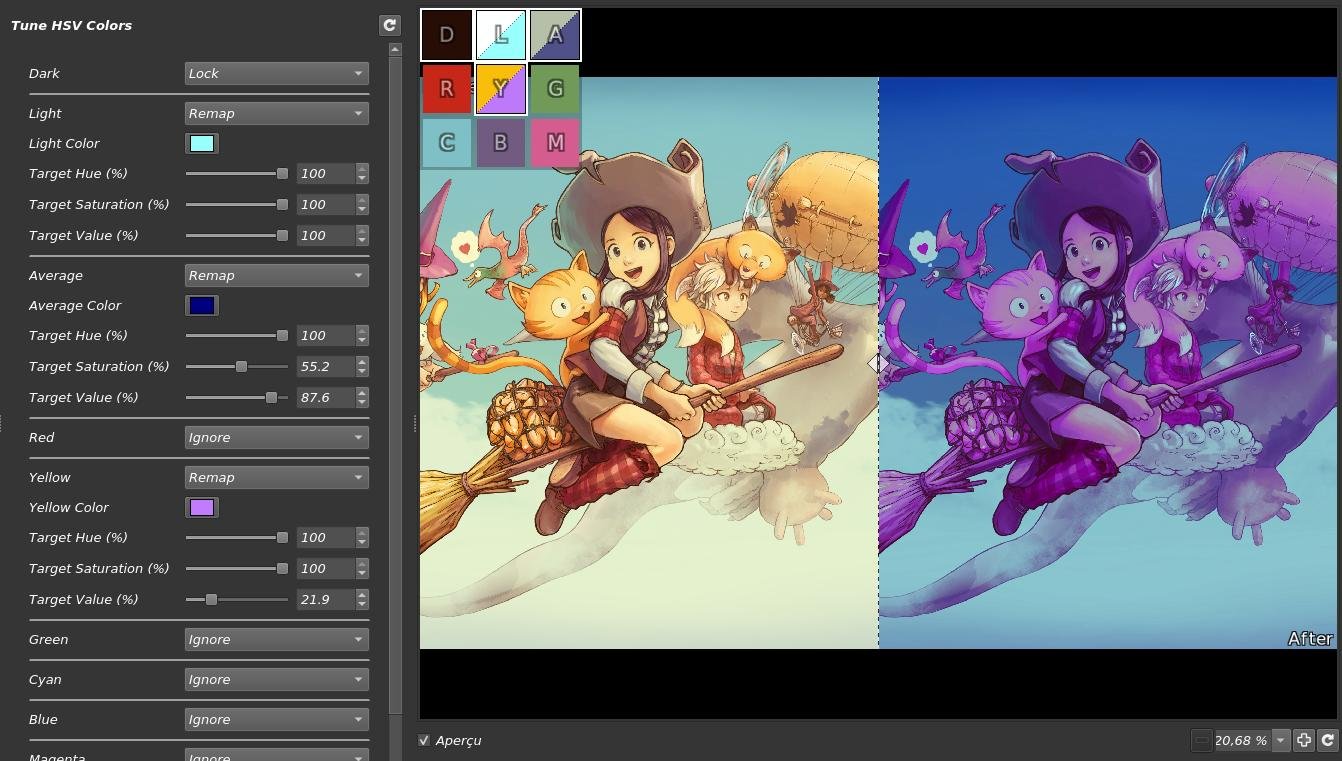
Fig.2.3.4. Global color transformation applied to an image of Pepper & Carrot by artist David Revoy.
A demonstration video of this filter can be seen on the Youtube channel of Pierre “El Lobo”, who regularly posts tutorials in French on how to use GIMP. Click on the image below to access it. More details on how to use this filter can also be found on the G’MIC forum.

The second notable colorimetric retouching filter is called Colors / Transfer Colors [PCA]. It makes it possible to transfer the colors of a reference image to a target image which one wishes to modify. Technically, this transfer is made by imposing the covariance matrix of the image to be modified to match that of the reference image.
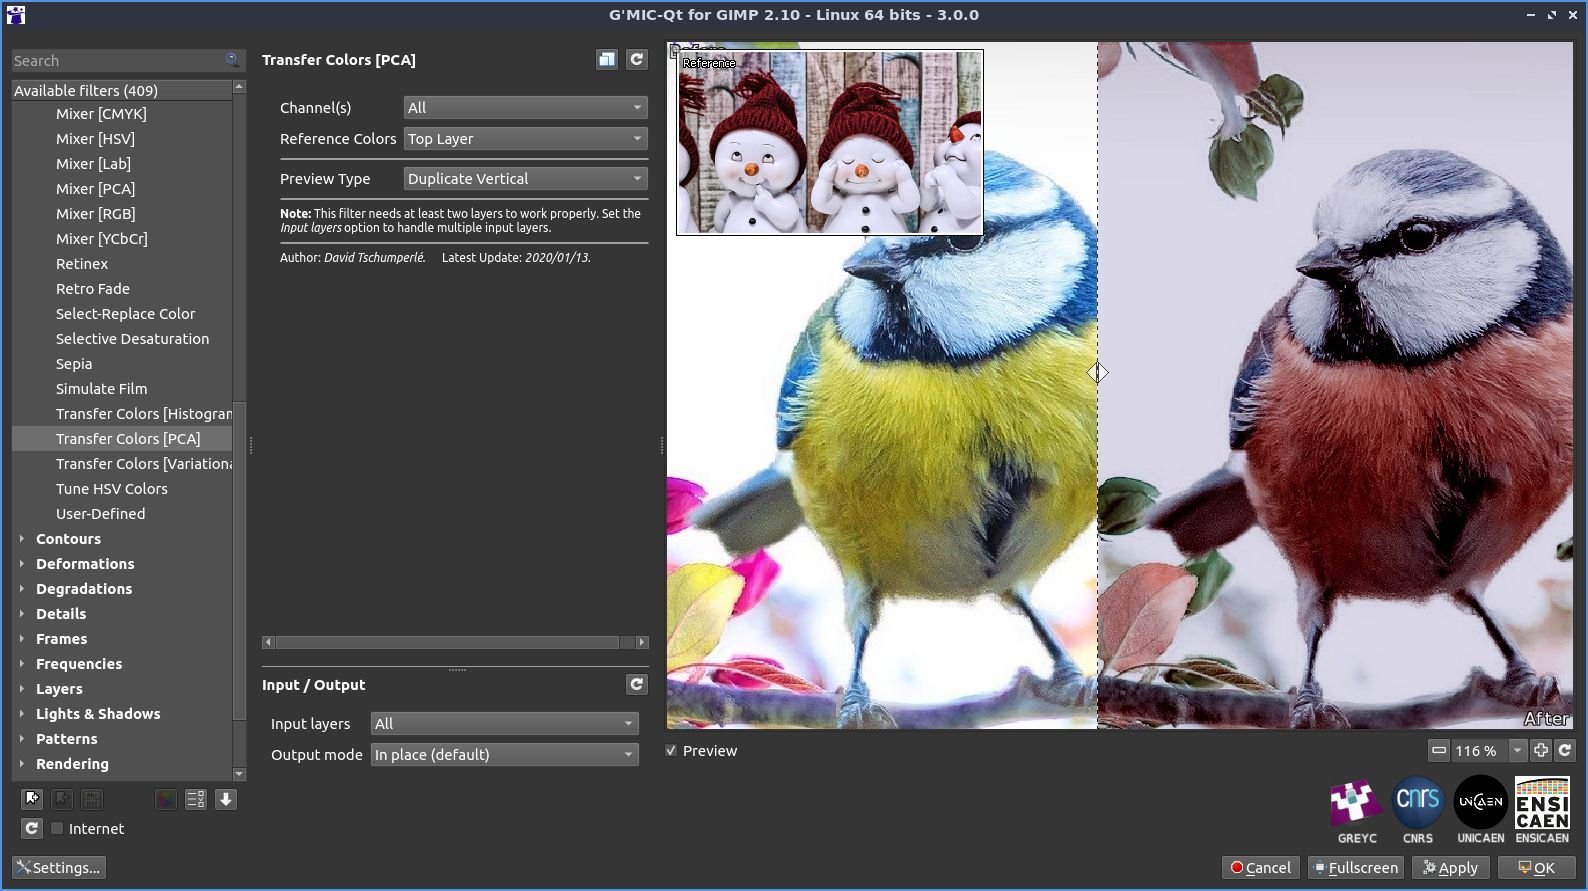
Fig.2.3.5. The “Colors / Transfer Colors [PCA]” filter in action.
Fig.2.3.6. Result of the color transfer. The colors of the reference image (snowmen) were transferred to the bird image.
Note that the underlying color transfer algorithm is not only used for this filter, but has also been integrated as a sub-part of more complex processes (e.g. the Artistic / Stylize filter mentioned earlier).
2.4. Deformations and Degradations
Lovers of image distortion and Glitch art may also be interested in this new version 3.0 of G’MIC.
- Firstly, with the new Deformations / Breaks filter, which randomly introduces triangular discontinuities into the images. This filter was originally requested by the artist David Revoy to generate a deformation similar to that of an older filter, Deformations / Crease, but with sharper cuts. Two new deformation modes were implemented for this effect (Flat and Relief modes) with the following result:

Fig.2.4.1. Application of the two different modes of the " Deformations / Breaks " filter on a color image.
Below, David Revoy demonstrates an application of this image break filter in the context of illustration, for a rendering of magical lightning with a most beautiful effect!
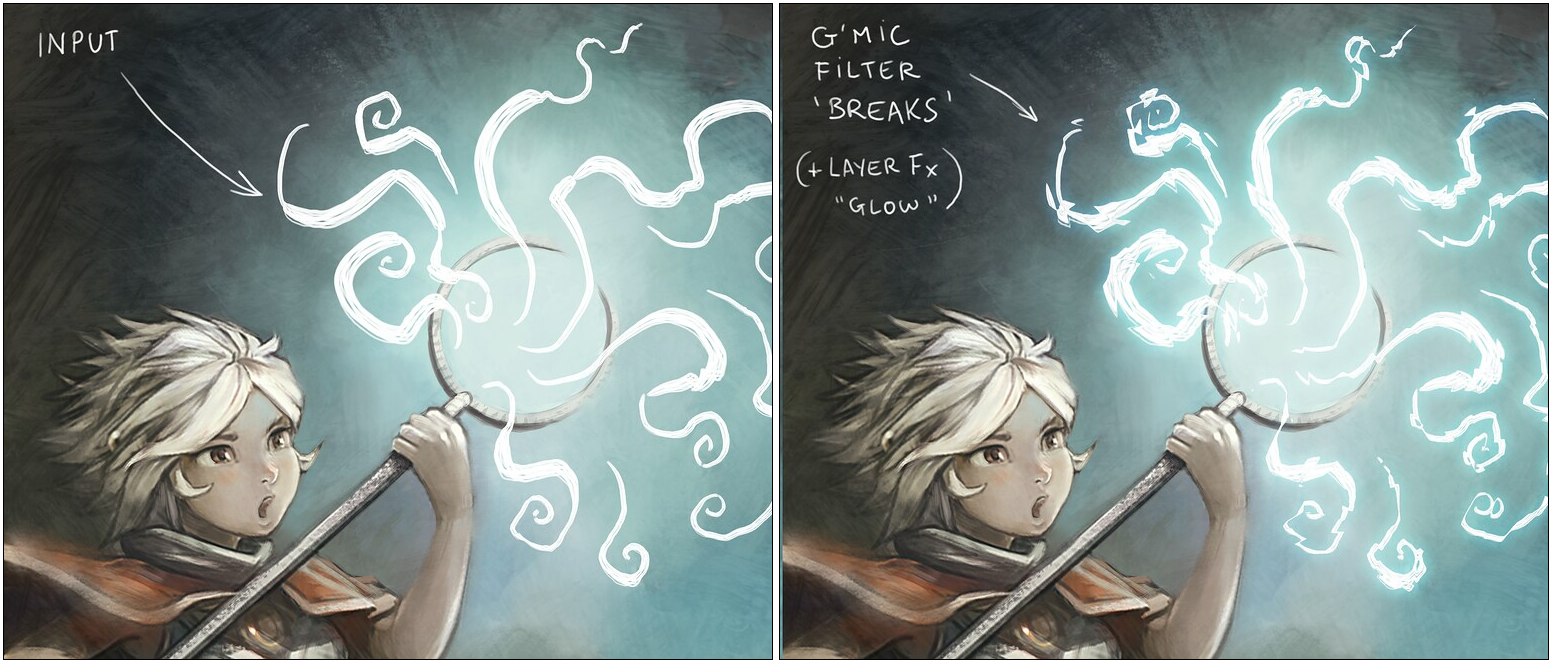
Fig.2.4.2. Use of the " Deformations / Breaks " filter to distort the shape of magic flashes.
A more detailed video of David Revoy using this type of filter can be seen at the following link:

- Another very glitchy effect: the Degradations / Rebuild From Blocks filter tries to rebuild an image from all its blocks. It does not position them all in their original place, but does allow itself to reuse the same block if necessary. As you can imagine, the result looks vaguely like the initial image but with a very pronounced block effect.

Fig.2.4.3. The filter " Degradations / Rebuild From Blocks " will change the positions of the blocks in the image.
It is funny to notice that in the example above, the blocks corresponding to the eyes have simply been reversed in the two images!
- Finally, the Degradations / Blur [Multidirectional] filter applies, as its name suggests, a multi-directional blur effect to the image. It is possible to adjust the number of simultaneous blur directions, as well as to enhance local contrast in the resulting image.
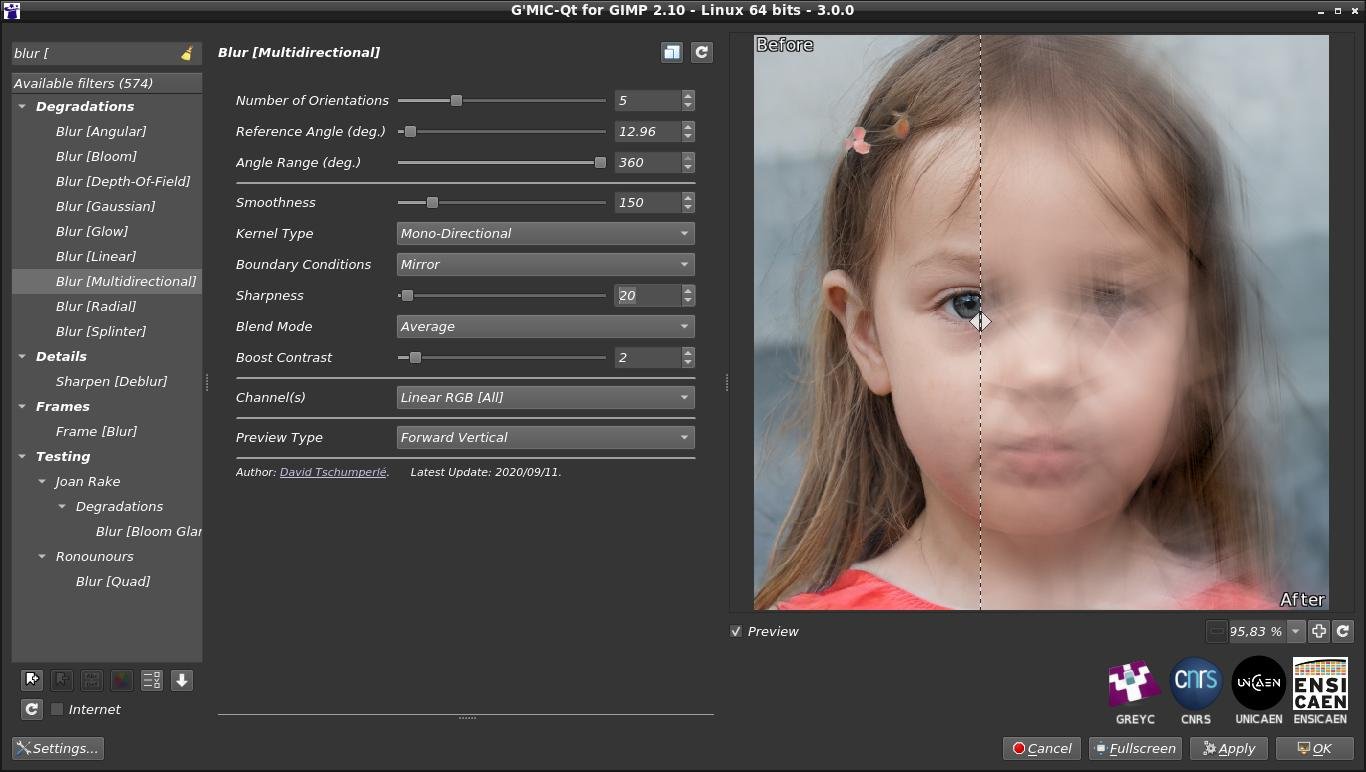
Fig.2.4.4. The " Degradations / Blur [Multidirectional] " filter in action.
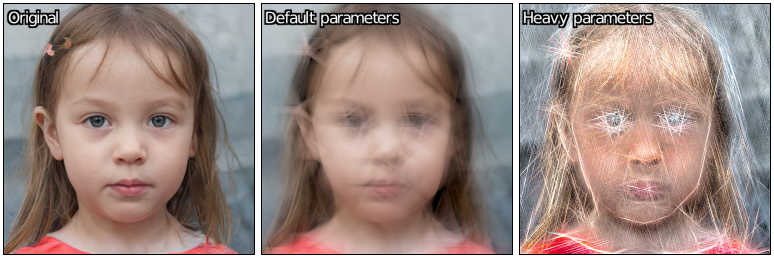
Fig.2.4.5. Results obtained with different filter settings.
2.5. Rendering of Shapes and Patterns
Now let’s enter the wonderful world of rendering filters. This is a unique category where you can find all sorts of oddities, filters that seem to have no use at all, until one day they become perfectly indispensable… or not! The following filters, which appeared in G’MIC 3.0, are no exception to this rule. They may be of little use to you, but they are still nice!
- Let’s start with the simplest of them, the Silhouettes / Others / Dragon Curve filter, whose purpose is to draw the Dragon Curve, a fractal curve composed of a single continuous line, built iteratively.

Fig.2.5.1. Different iterations of the construction of the dragon curve.
- Let’s quickly move on to the Rendering / Hypotrochoid filter which, again, aims to draw a particular sine curve, namely a Hypotrochoid.

Fig.2.5.2. The " Rendering / Hypochotroid " filter in action.
- Still in the world of curve drawing, let’s take a closer look at the new Rendering / Sine Curve filter, which defines a family of 2D or 3D parametric curves, with a large number of user-adjustable parameters (nearly 50!).
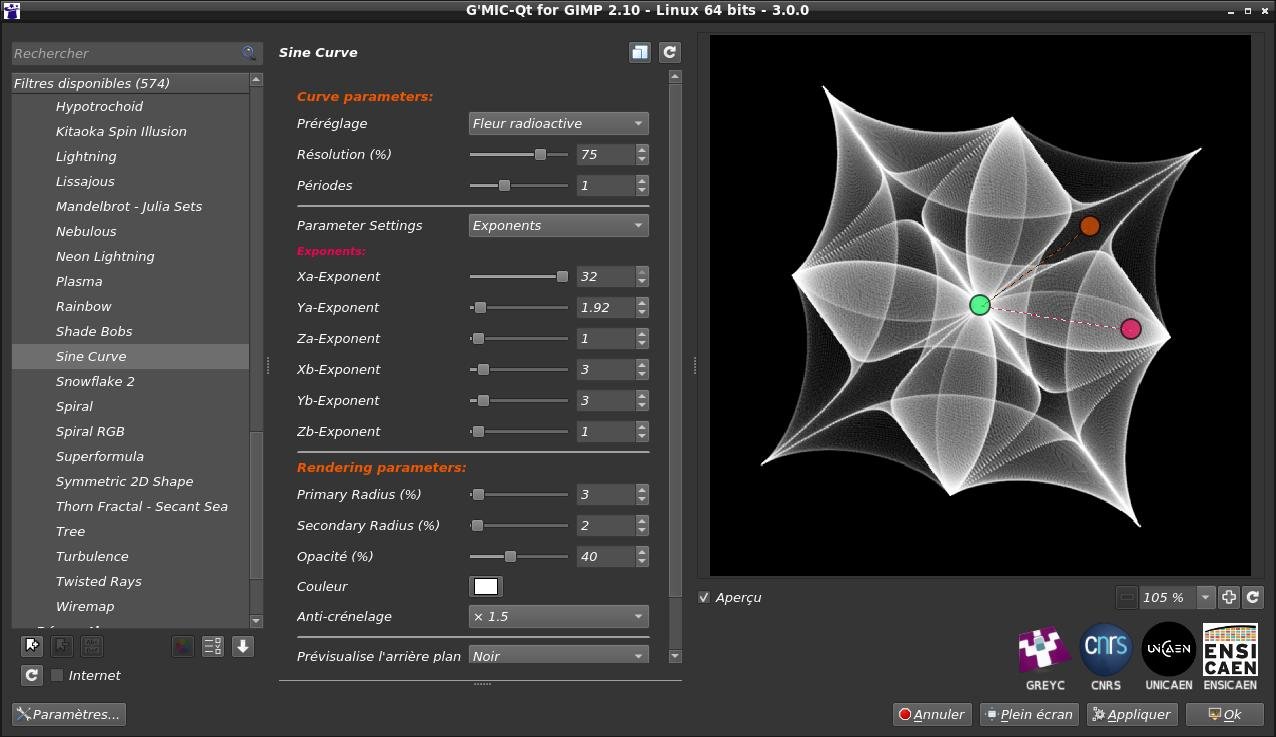
Fig.2.5.3. The " Rendering / Sine Curve " filter in action.
There are a lot of parameters, so this filter offers a set of presets to play with all possible curve variations. The figure below illustrates some of the predefined shapes offered by the algorithm.
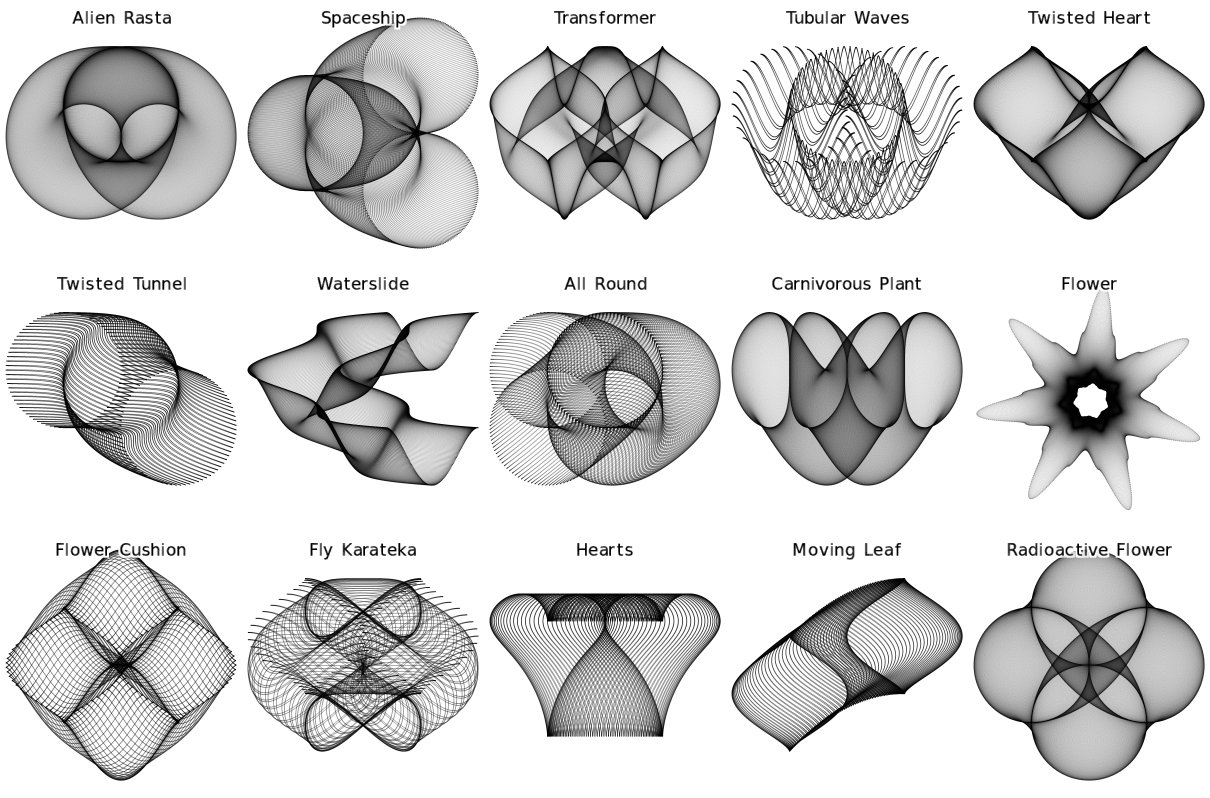
Fig.2.5.4. Some parameter presets provided by the " Rendering / Sine Curve " filter.
As you can see, this filter allows you to draw a wide variety of parameterized sine curves. It can be used to generate shimmering backgrounds. Pierre “El Lobo” has also made a short video tutorial on this filter (in French), which can be seen on his Youtube channel (follow the link below)

- What if, instead of just rendering 1D curves, we were now interested in the parametric generation of 2D images? This is what the Patterns / Random Pattern filter proposes, whose operation is quite original: it generates a random mathematical function
f(z)(zbeing a complex variable), composed of basic complex functions (cos(),sin(),pow(), …) and operators (+,-,*,/, …), by recursively constructing an expression tree.f(z)is then evaluated for all the pointszof the image, located in a rectangular domain, which is itself randomly chosen. The values off(z)are finally transformed into RGB values to determine the colors of all pixels in the image.

Fig.2.5.5. The " Patterns / Random Pattern " filter in action.
Note that the construction of the function f(z) depends only on the random seed used to generate the expression tree. The figure below illustrates some image renderings obtained with different values of random seeds.
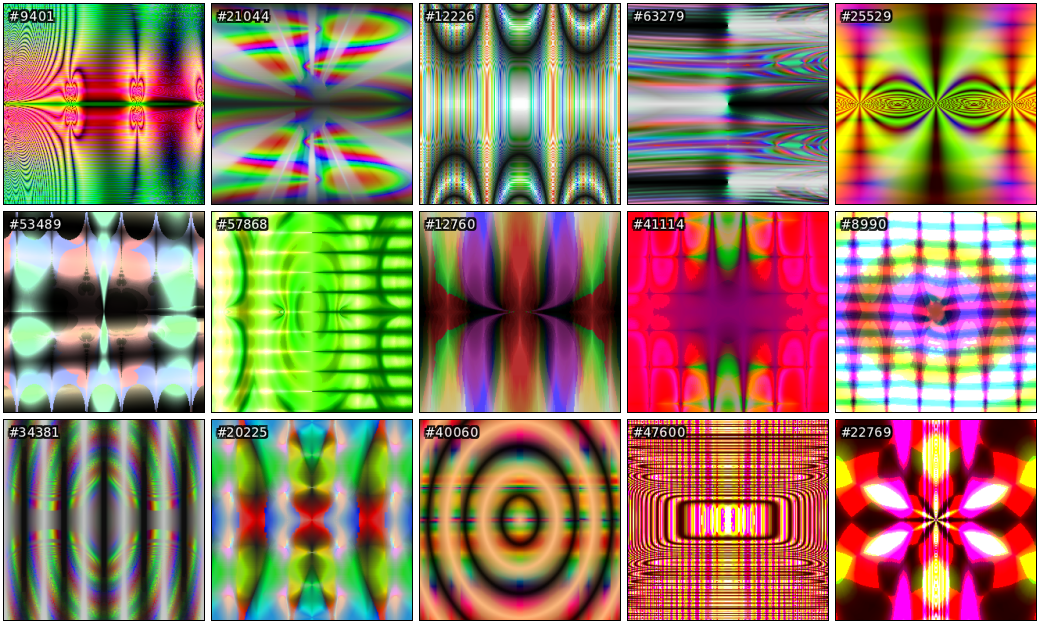
Fig.2.5.6. Some examples of random patterns generated by the " Patterns / Random Pattern " filter.
- Recursive image generation methods can produce original and interesting geometric patterns, and the Patterns / Triangular Pattern filter confirms this. It generates images consisting of triangles recursively subdivided in different ways, each with a probability of occurrence adjustable by the user.
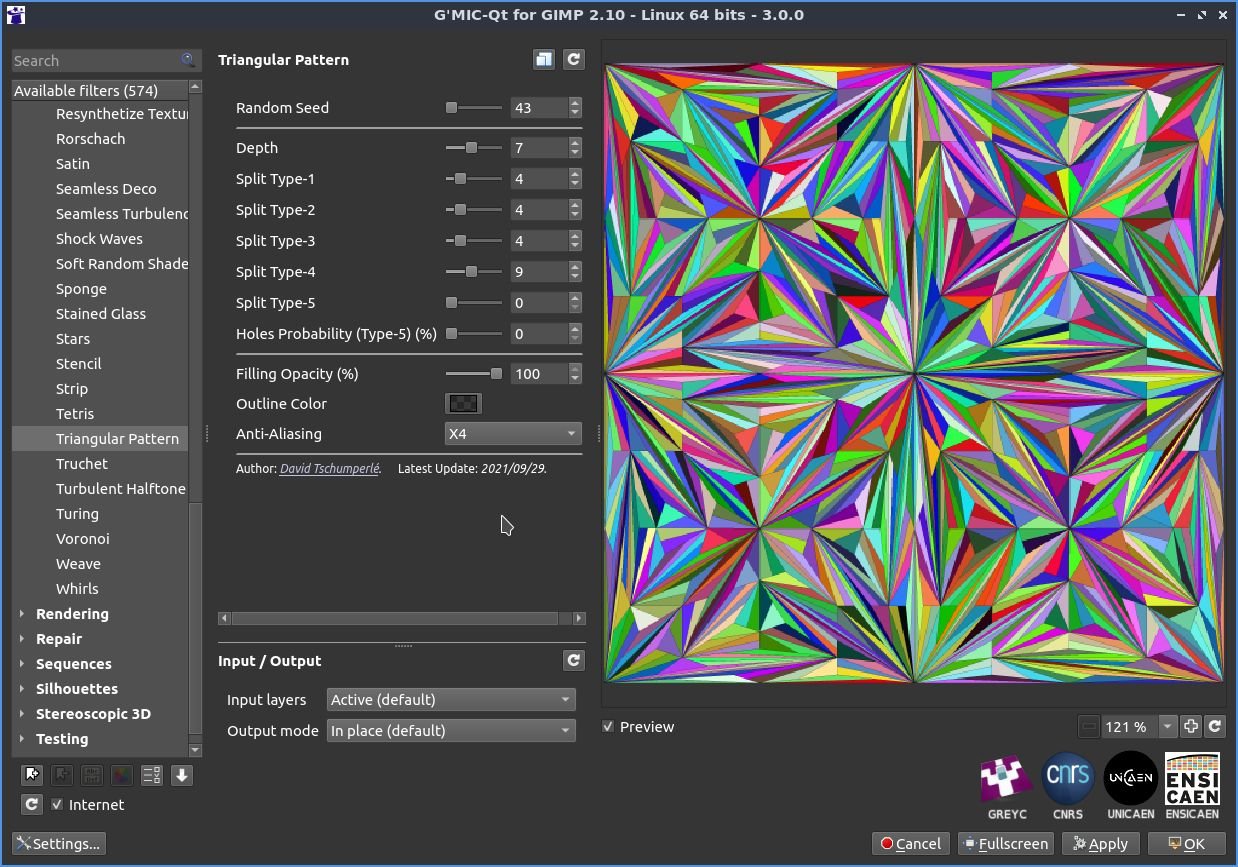
Fig.2.5.7. The " Patterns / Triangular Pattern " filter in action.
As the iterations proceed, more and more complex geometric patterns are formed in the image, as shown in the animation below.
Fig.2.5.8. Visualization of the triangular pattern construction iterations by the " Patterns / Triangular Pattern " filter.
By increasing the number of iterations and drawing only the contours of the subdivided triangles, we can generate truly remarkable fractal geometric patterns, given the apparent simplicity of the triangle subdivision algorithm, as illustrated in the following figure. This will give you ideas for tiling your kitchen or bathroom!
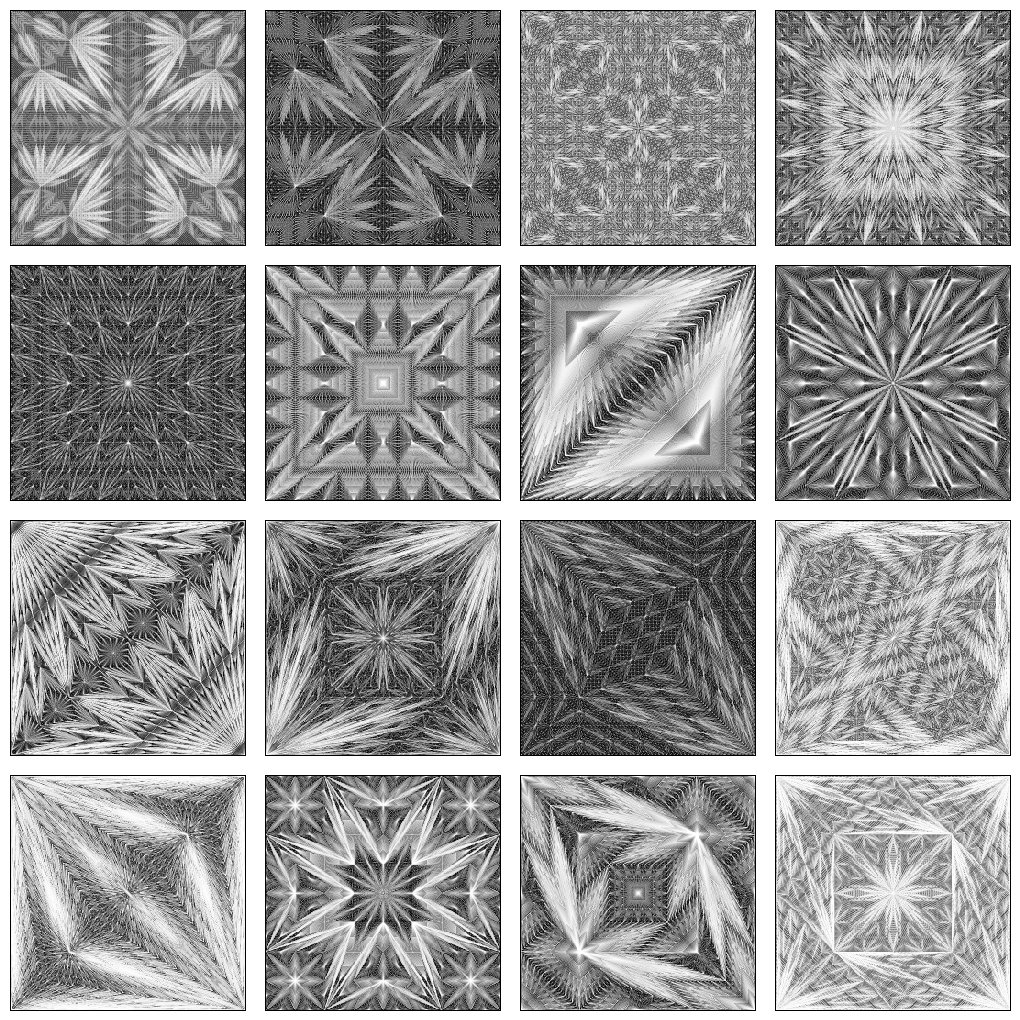
Fig.2.5.9. Some examples of random recursive triangular subdivisions obtained by the “Patterns / Triangular Pattern” filter.
- And speaking of fractals, let’s visit the Rendering / Newton Fractal filter which allows you to navigate in Newton Fractals, with a large number of adjustable parameters. These fractals are obtained by trying to find the zeros of a complex function
f(z)(often a polynomial) by the Newton method. This iterative technique builds a sequence that is supposed to converge to one of the zeros of the function. For each (complex) pointzof the image, we determine its displayed color according to the number of iterations necessary to reach convergence, which generates beautiful fractal geometrical patterns.
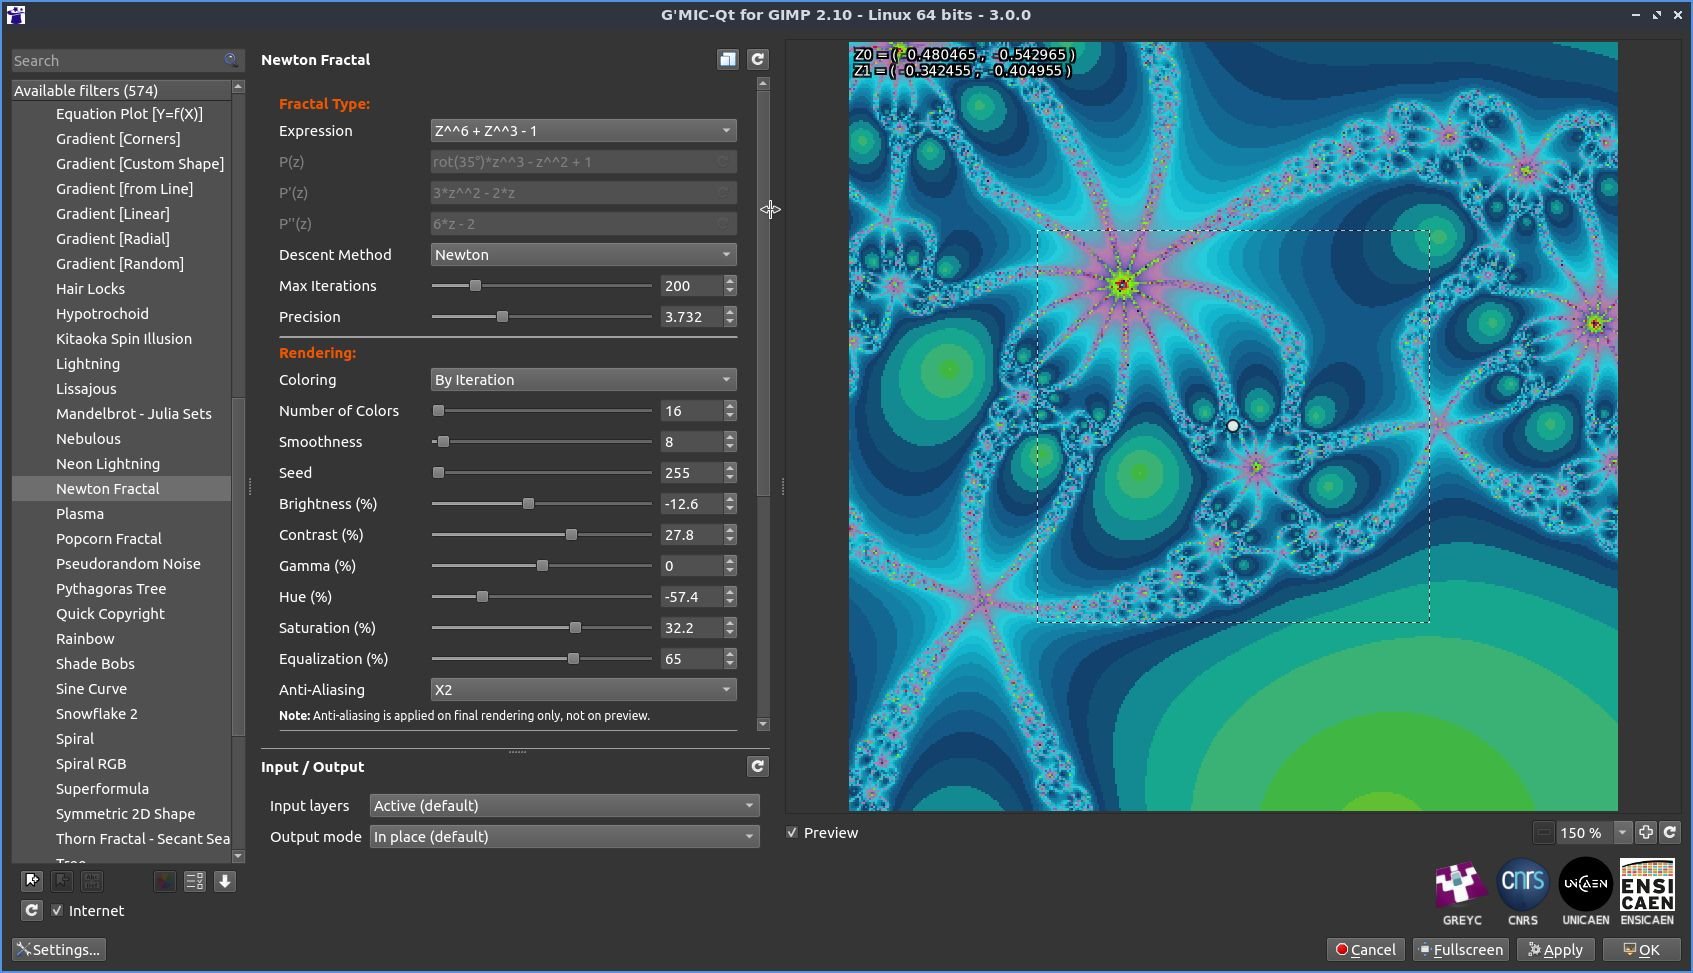
Fig.2.5.10. The " Rendering / Newton Fractal " filter in action.
In G’MIC-Qt, the filter allows the user to enter a custom mathematical formula to define the function f(z) and its derivatives. It also offers options to colorize the fractal in a personalized way and to easily navigate in the fractal space thanks to its simple but efficient integrated browser. Finally, it extends the principle of calculation to other methods of resolution (Secant method and Householder method). And as always with G’MIC, it is also possible to script this filter from the command line (with the gmic command), to generate for example this type of animations:
Fig.2.5.11. Generation of a zoom in a Newton fractal, scripted with gmic.
- Still in the “fractal” spirit, the new Rendering / Tree filter allows you to generate fractal trees, again with many adjustable parameters to tweak as you please.

Fig.2.5.12. The “Rendering / Tree” filter in action.
In addition to the colors of the trunk and the leaves, the size of the branches and the probability of the branches splitting into several pieces can be adjusted. This allows generation of trees with quite different geometry and looks, as you can see on the figure below.
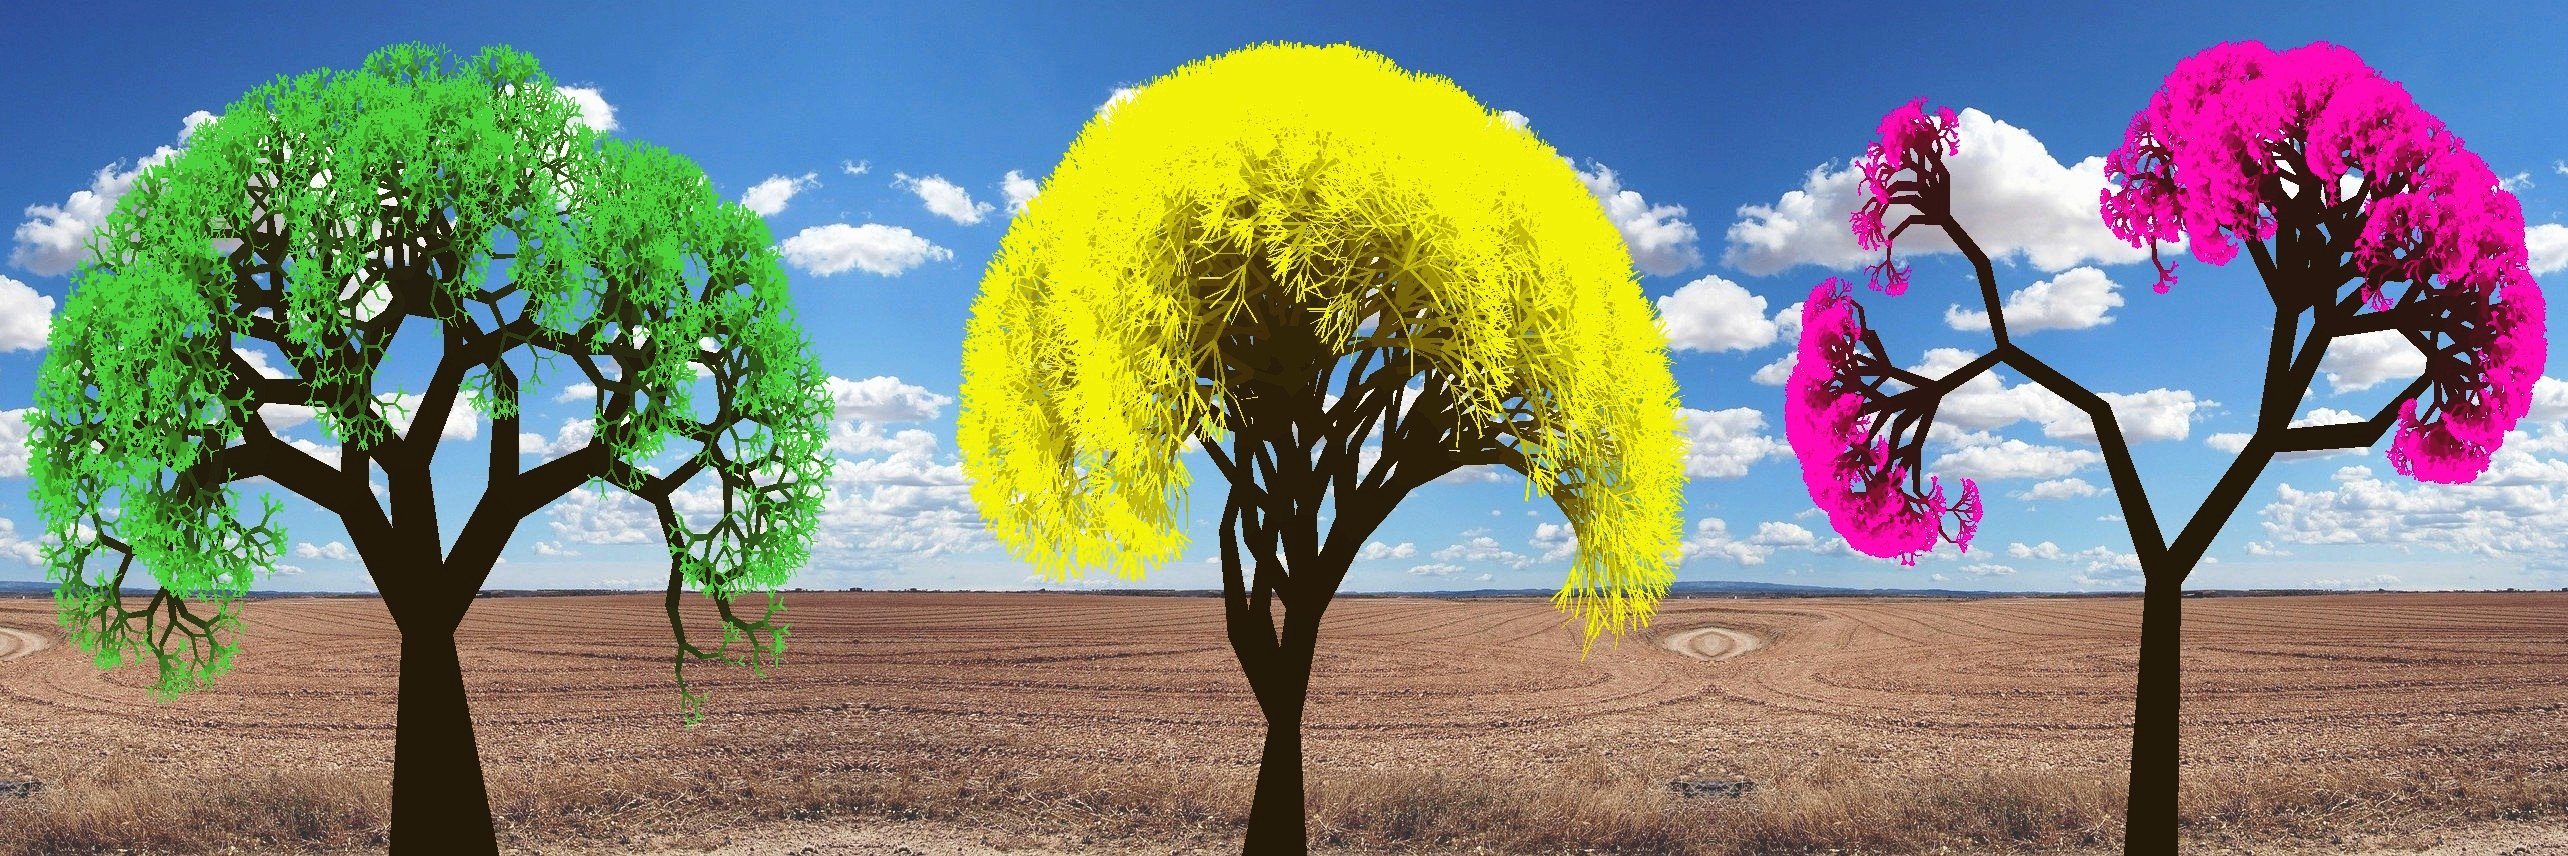
Fig.2.5.13. Examples of tree renderings with different settings, using the “Rendering / Tree” filter.
The following video illustrates the use of this filter in GIMP (click on the image below to access the video).

- Another rendering effect worth highlighting (no pun intended…) is the Light & Shadows / Guided Light Rays filter. This filter allows light rays to be emitted from a point source of light, towards or through any shape drawn by the user and defined as an opaque mask placed on a transparent layer above the input image.
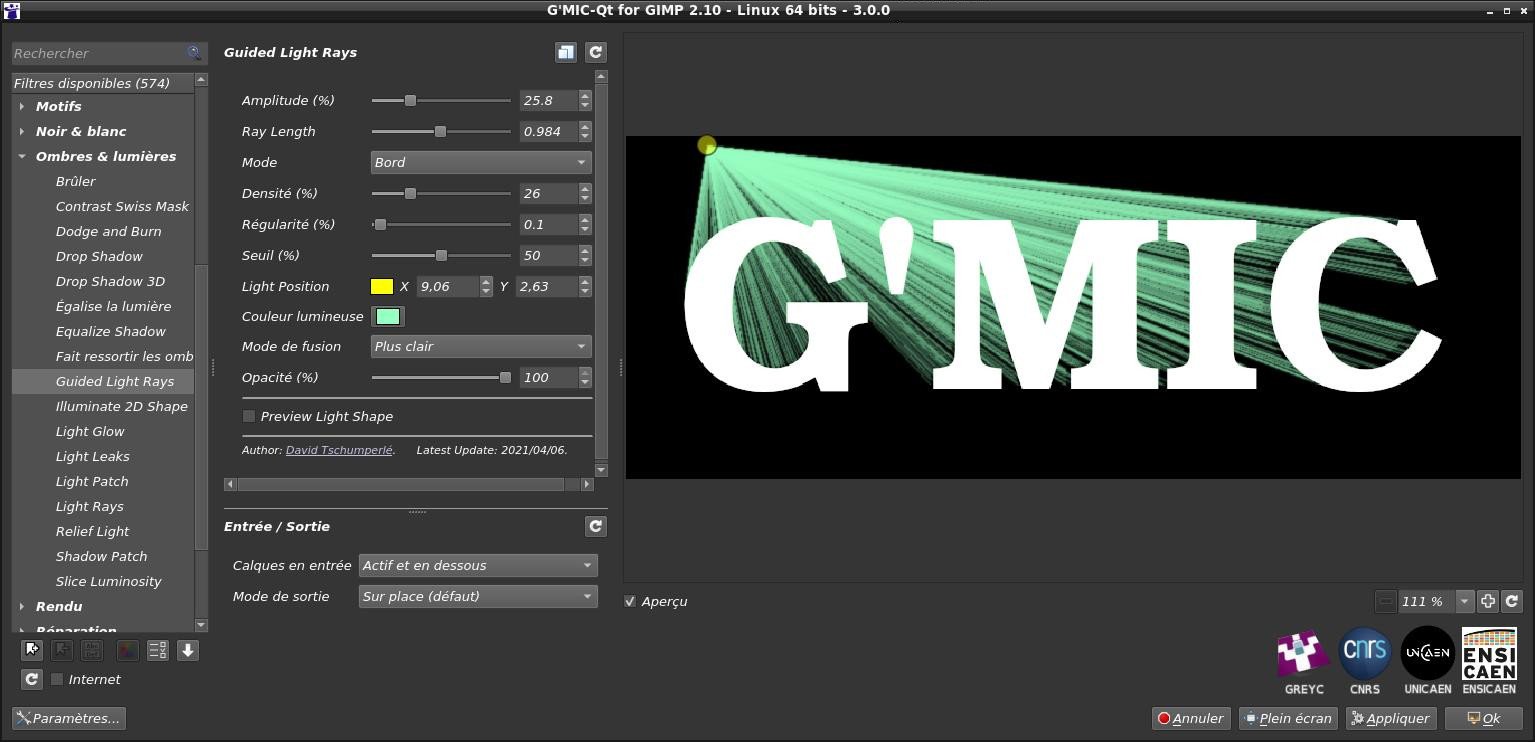
Fig.2.5.14. The " Light & Shadows / Guided Light Rays " filter in action.
In the example above, the light rays stop when they meet the pixels of the G’MIC logo. But it is also possible to adapt the filter parameters so that the rays pass through the shape. This is done in the example below, where the user-defined mask corresponds to the glass surface of a living room window.

Fig.2.5.15. Light rays synthesized to pass through a user-defined mask.
With this filter, it is easy to add custom lighting effects to photographs, as shown in the following example. All you have to do is define the mask of the shape guiding the light rays, and the filter does the rest!
Fig.2.5.16. Adding a side lighting effect with the " Light & Shadows / Guided Light Rays " filter.
The following video tutorial shows how to use this filter in GIMP:

- Finally, to conclude our tour of the new rendering effects, let’s end with the Sequences / Moiré Animation filter, which takes us into the wonderful world of animation based on the (robust) technologies of the last century, namely: paper sheet and transparent sheet! This filter will indeed allow creation of an animated optical illusion, at low cost, by generating images with a Moiré effect. From an animation given as input (containing few images), the filter will produce a still image as well as a binary mask containing vertical bars as below:
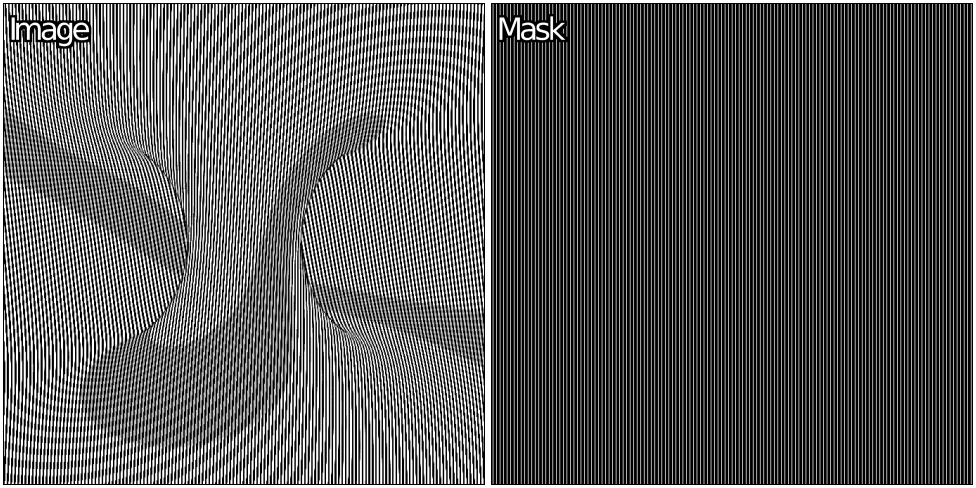
Fig.2.5.17. Images generated by the " Sequences / Moiré Animation " filter from an animation made of 5 images.
The trick is to print the first image on a blank page and the second on a transparent sheet of the same size. By positioning the transparent sheet on the page in an appropriate way, and by moving it laterally, the animation becomes visible. Indeed, the vertical bars printed on the transparent layer allow only one image of the animation to pass through at a time, and these images follow one another as the transparent sheet moves:

Fig.2.5.18. Rendering of the animation when the transparency moves on the printed page.
Note that although the number of frames of the animation is indeed limited (in general, less than a dozen, there is obviously no possibility of converting a two-hour film!), there is no reason to limit oneself to grayscale images. The following two figures illustrate, for example, the rendering of a color animation with this filter.
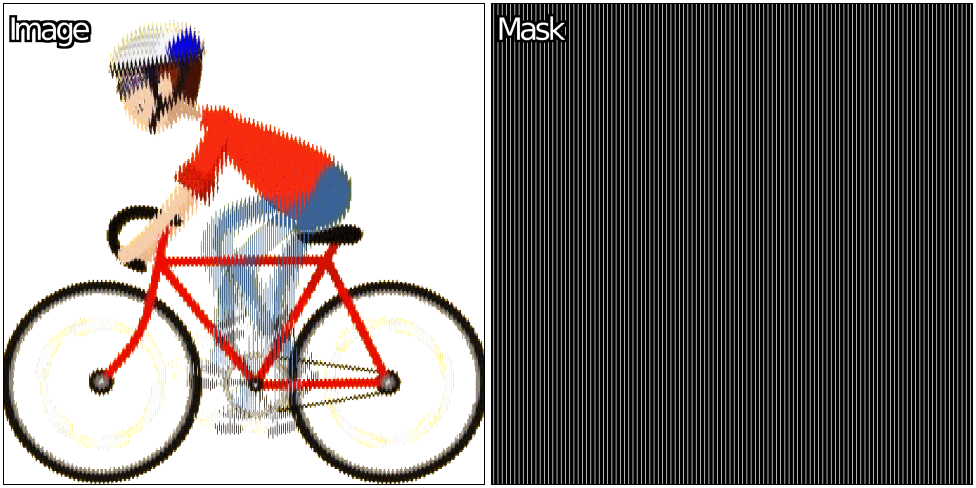
Fig.2.5.19. Images generated by the " Sequences / Moiré Animation " filter from a 6-frame color animation.
Fig.2.5.20. Rendering of the animation when the transparency moves on the printed page.
“Your examples are nice, but what does it look like in real life?”. Well, the feeling of animation is really present, as you can appreciate in the video below :

To sump up, it’s an inexpensive and fun way to create personalized animation materials. Kids, not yet jaded by the Youtube application on their smartphone, will love it!
2.6. Keeping up to Date
The set of filters we have just described is only a subset of all the new filters added in the last two years. In particular, there are many “community” filters that sometimes remain in the shadows for some time before being added to the main list of filters (e.g., filters in the Testing / category). To make it easier to keep track of these updates, G’MIC-Qt has added the About / What’s New? function, which lists the recent additions and deletions of filters in the plugin. This list is tailored to the user, as it is based on the user’s previous list.

Fig.2.6.1. The "About / What’s New? filter in action.
As a reminder, the Update Filters button below the filter drop-down list will allow the plugin to check for new filters and download them if available.
This overview of the new G’MIC-Qt filters is now complete. But more improvements to the plugin are waiting for us!
2.7 More and More Host Software
- One of the most important pieces of news in the life of G’MIC-Qt is its availability as a plugin compatible with the 8bf protocol. This API was designed by Adobe in the 90’s for the development of plugins for its flagship (and non-free) software Photoshop. It is a protocol still in use, despite its great age (and technical limitations). Over the years, this plugin API has even been adopted by many other illustration and photo editing programs. As a result, this 8bf version of the G’MIC-Qt plugin can in practice now be used inside many popular 8bf protocol-compatible programs, namely: Adobe Photoshop, Affinity Photo, Paint Shop Pro, Photoline, XnView, to name a few.

Fig.2.1.1. The G’MIC-Qt plugin running under Affinity Photo / Windows.
Thanks to Nicholas Hayes, the author of the Paint.NET plugin, this 8bf version of G’MIC-Qt has been released. This is good news for all users of these proprietary software, who will be able to benefit from a new plugin well supplied with many image processing filters, with the possibility of modifying and improving them, and all this without paying anything (what a change!  ).
).
-
Another piece of good news is the improved support of the G’MIC-Qt plugin for GIMP, especially on Windows, where several users reported compatibility problems with the provided
.dllfiles when the last version of GIMP was released (2.10.28). In addition, thanks to changes made by Jan Tojnar, the G’MIC-Qt plugin can now be compiled for GIMP version 2.99 (the name of the development version of GIMP that will become the long-awaited 3.0). We should also mention the arrival of the G’MIC-Qt plugin for the Flatpack version of GIMP, thanks to the work of Hubert Figuière who packaged it for Flathub. -
Finally, let’s note the expected integration of G’MIC-Qt 3.0 in the next major version 5.0 of Krita software, which is planned to be released this December. This integration is planned to be complete and systematic, i.e. G’MIC-Qt will be included by default in Krita, and not installed as an external plugin (as it is currently the case). This promises a better integration in Krita and should solve several recurring problems, especially for Mac users. This integration is done by amyspark, with whom we are in contact.
2.8. Interface Improvements
The plugin has also seen its graphical interface improved, with in particular:
- A new filter tagging system with colored tags that can be assigned to one or more filters. These colored tags (6 different colors) allow the user to mark certain filters to find them more easily later. Of course, each user decides on the meaning of each color and the use cases are therefore potentially numerous: these tags can be used temporarily for a given session, or alternatively, filters can be marked for a longer period. The plugin interface offers a simple but efficient way of managing these different tags as shown in the animation below:
Fig.2.8.1. Colored “tags” are available to mark filters in the G’MIC-Qt plugin.
- A “Copy G’MIC command to clipboard” button, located at the top right of the panel containing the filter controls:
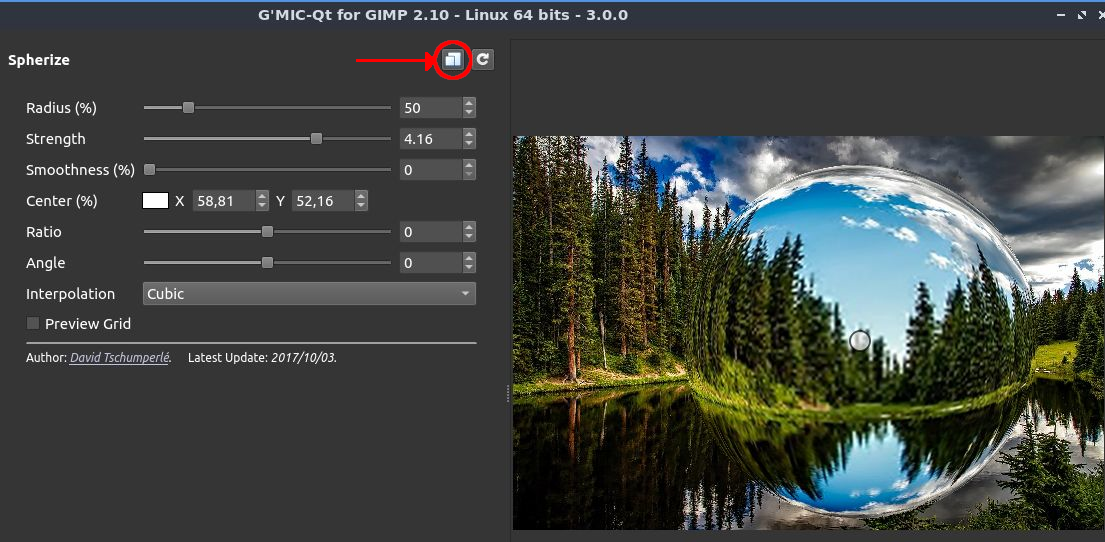
Fig.2.8.2. New button to copy the G’MIC command to the clipboard.
This button will delight all scripters: by pressing it, we get the equivalent G’MIC command to be invoked in the terminal for the gmic CLI tool, in order to apply the currently selected filter with its current parameter values. For example, here is what the clipboard contains after pressing this button in the example above:
fx_spherize 50,4.16,0,58.8136,52.1628,0,0,2,0
This string can then be pasted back into a command line call to gmic, to get exactly the same effect on other images, or to integrate it into a more complex processing pipeline:

Fig.2.8.3. Application via the terminal of the G’MIC command copied from the G’MIC-Qt plugin, on other images.
This is a really handy feature if you write your own processing scripts. You can take advantage of the convenience of the plugin’s graphical interface (especially its preview window) to adjust the parameters of a filter, but also the power of the command line to apply batch processing to several dozen or hundreds of image files.
- Among other improvements, G’MIC-Qt has an improved translation system (e.g. a complete French version is planned in the near future), and the API offered by the plugin has been enriched to allow more control by the host software. These improvements are for example used by G’MIC-Qt to offer new control options via a command line call.
3. Improvements to the G’MIC Core
This description of the new features visible in the G’MIC-Qt plugin being completed, let’s talk about the other improvements brought by this version 3.0. A lot of interesting things have been added to the core of the G’MIC project, namely its interpreter and its associated image processing library CImg (which is also updated to version 3.0). These new features are certainly less visible, but just as important since they have a potential impact on all the interfaces of the project!
3.1. Language and Interpreter Improvements
- Let’s start with the feature that required the most development effort, which we already mentioned earlier: the implementation of an internal machine learning library (
nn_lib). This library allows the manipulation of generic neural networks and supports both the network learning phase and the inference phase. This library has been re-implemented from scratch, which represents a really important effort of research, implementation and testing (but it has also been a very instructive work!).nn_liballows the construction in G’MIC of neural networks with convolutional or fully connected modules, pooling modules, residual modules, etc. Several optimizers have been implemented to manage learning (SGD,RMSprop,Adam,Adamax) and it is therefore already possible to train networks for some image processing tasks with this new library. The diagram below illustrates, for example, one of the network architectures that has been trained for the new Repair / Denoise denoising filter mentioned earlier.

Fig.3.1. One of the neural network architectures trained for the new “Repair / Denoise” denoising filter.
This is of course only the beginning, but we hope to generalize the use of nn_lib to develop new interesting filters in the near future. More technical details about the nn_lib library can be found in the [dedicated article]((https://discuss.pixls.us/t/machine-learning-library-in-gmic) on the G’MIC forum.
- Another notable improvement concerns the re-implementation in G’MIC of an extended Markdown language interpreter:
gmd(like G’MIC Markdown). This Markdown rendering engine is now the one used to produce the [reference documentation]((G'MIC - GREYC's Magic for Image Computing: A Full-Featured Open-Source Framework for Image Processing - Table of Contents) and the [tutorial pages]((Introduction), visible on the project web page. It is also used to display the help on the terminal when G’MIC is invoked from the command line (withgmic -hfor example). The appearance of this new Markdown parser goes hand in hand with an overall improvement of the documentation available for the project.
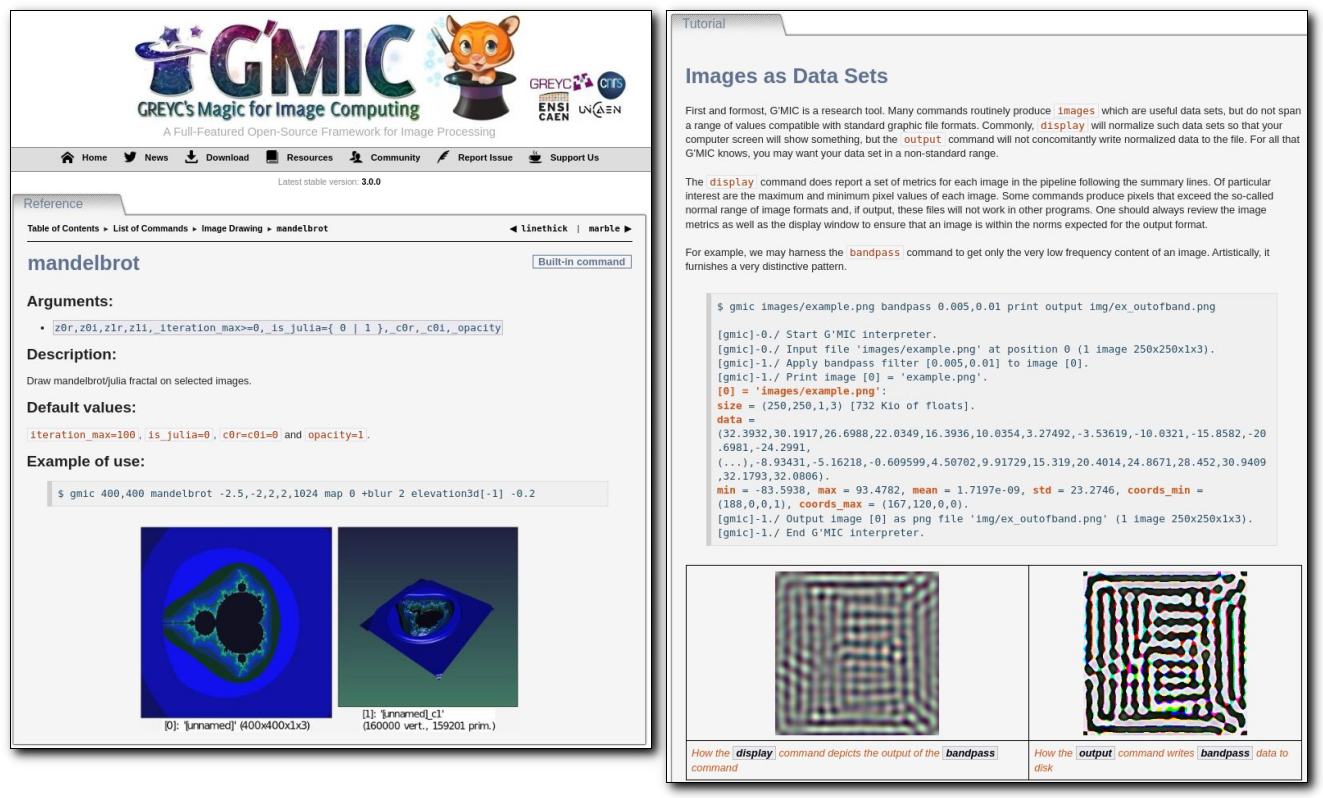
Fig.3.1. The new G’MIC Markdown parser is used to render the reference web documentation.
- The management of new custom color palettes has been improved, with the introduction of a new
palettecommand providing 34 predefined color palettes, each composed of 256 RGB colors (some of them recovered from CMOcean and LOSPEC):
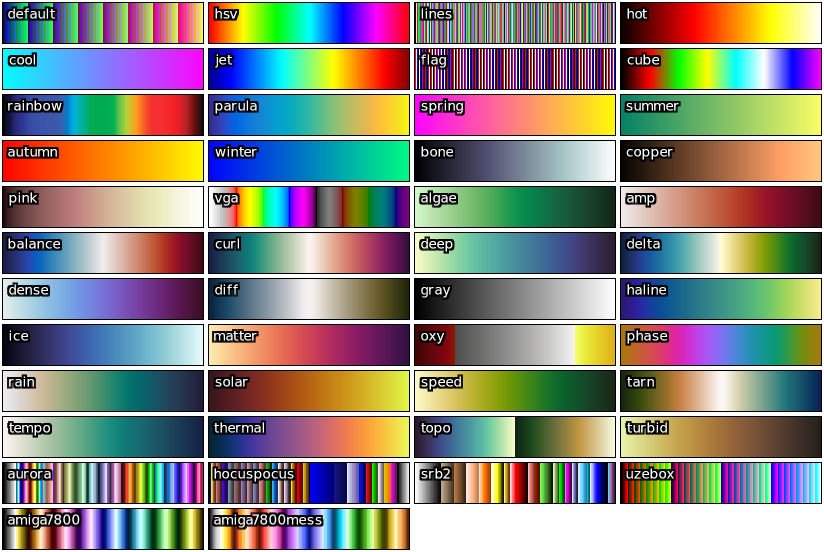
Fig.3.2. Set of color palettes proposed by default in G’MIC.
Moreover the G’MIC interpreter user has now the possibility to define and name their own color palettes which will be used in the map or index commands, used to apply these palettes on color images. These palettes are generally useful for color visualization of scalar image data. For example, the colorization of a Mandelbrot fractal can be done very simply in G’MIC with the following command line:
$ gmic 600,600 mandelbrot -1.0132,-0.316356,-1.00227,-0.305418,512 map amiga7800
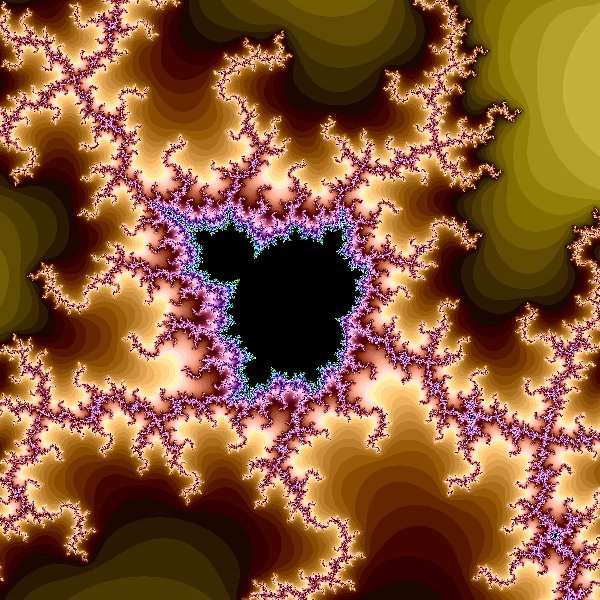
Fig.3.3. Result of the application of the amiga7800 color palette on a Mandelbrot fractal.
- Regarding the rendering of 3D mesh objects, there are two new features: first, the re-implementation of the 3D viewer (
display3dcommand) which has been rewritten directly in the G’MIC language and will therefore be easier to maintain and evolve.

Fig.3.4. Overview of the new G’MIC 3D mesh object viewer.
Secondly, it is now possible to export a 3D mesh object built in G’MIC (typically with a procedural generation) as an .obj file in Wavefront format, a simple ASCII format that most 3D modelers can also read. Here, illustrated below, is an example of importing a 3D object generated recursively in G’MIC and re-imported into Blender, using this Wavefront file format.
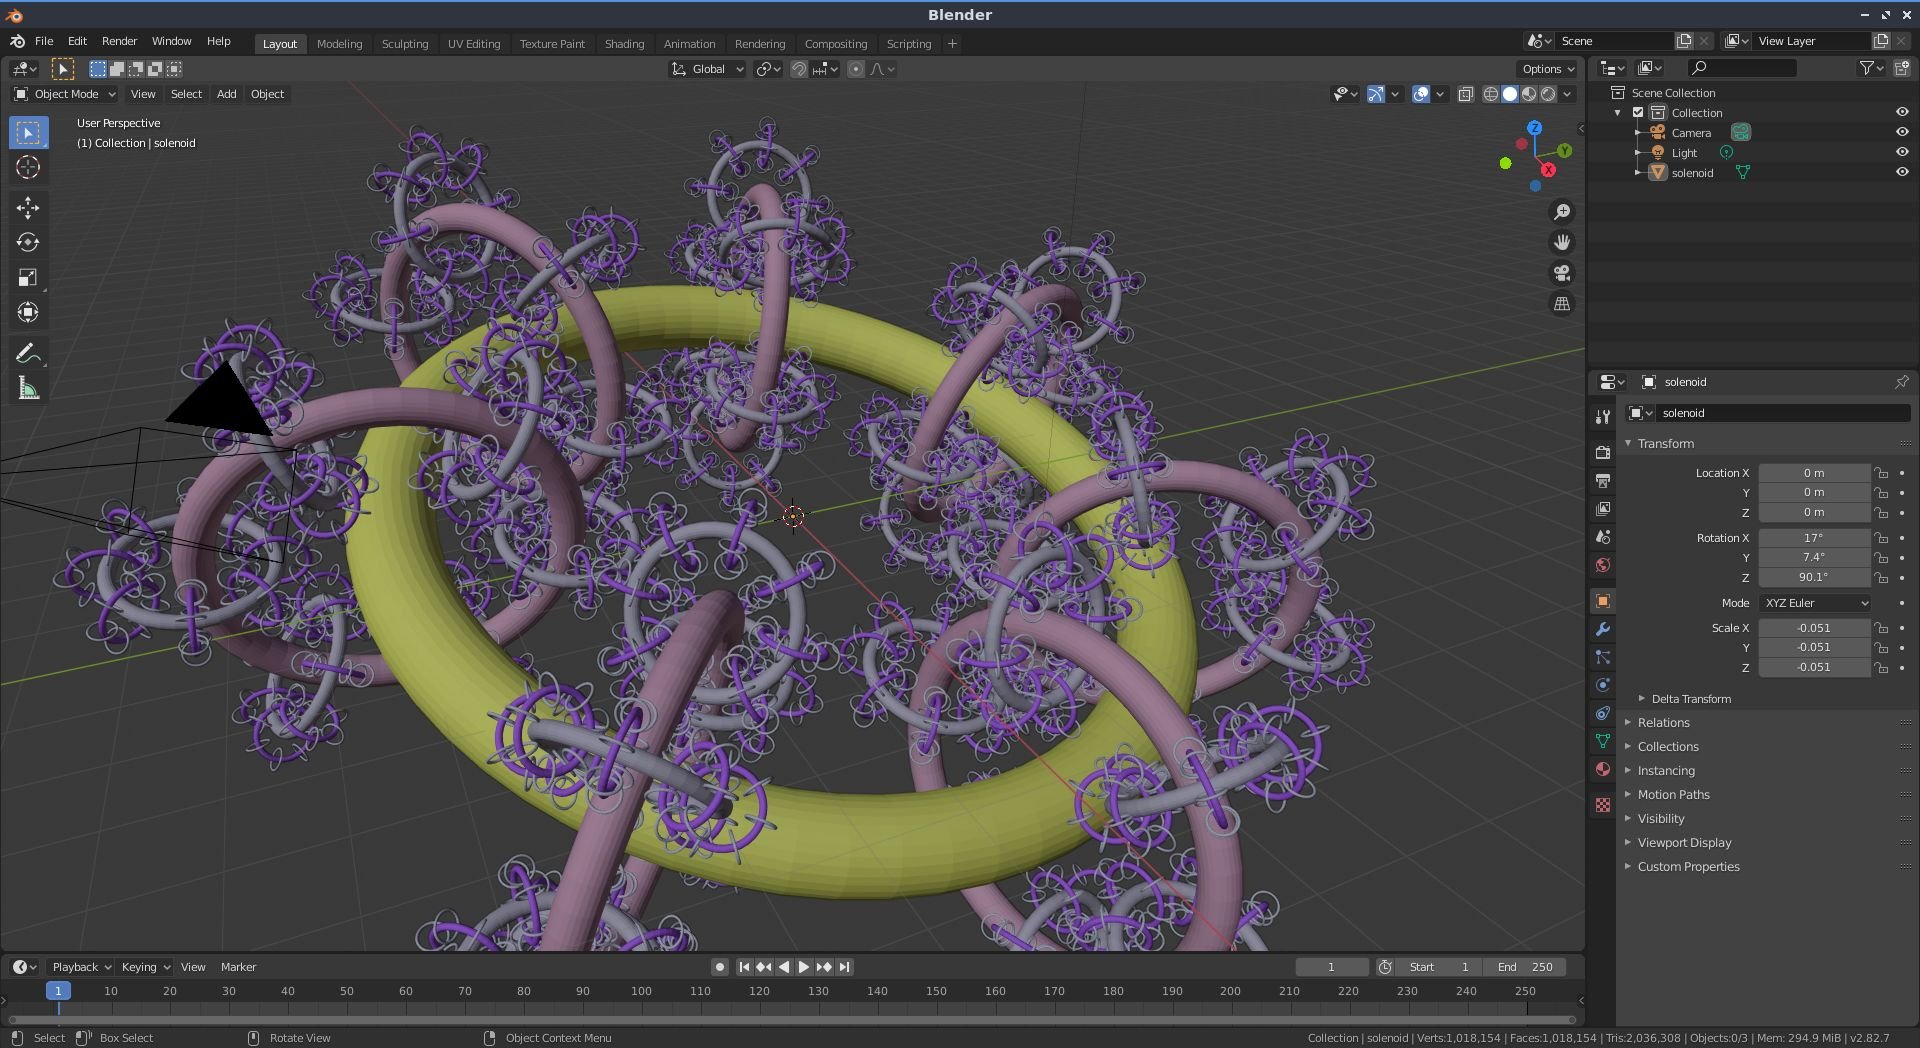
Fig.3.5. Import in Blender of a 3D object generated by G’MIC in a procedural way.
-
Still in the field of input-output, we note the appearance or improvement of support for certain file formats, such as those with the extensions
.png,.tiff,.csv,.webp,.arw,.cr2,.nef,.dng,.heic,.avif(the last two, however, are not activated by default). -
Two new commands
loremandportraitallow retrieval of random images from two different web services: Lorem Picsum and ThisPersonDoesNotExist. They are quite handy for testing filters quickly on arbitrary images, without having to keep them in local storage. For example, the command :
$ gmic +lorem 800 +portrait 800
will show you this:

Fig.3.6. Overview of the result of the new lorem and portrait commands.
- Finally, let’s note that
gmic, the command line interface of G’MIC, now accepts the definition of entry points in script files with.gmicextension, and that we can now make such files executable (with the Shebang). For example, under Unix, the followingtest.gmicfile can be made directly executable and launched from a terminal:
#!/usr/bin/env gmic
# File 'test.gmic'
echo[] "Hello G'MIC friends!"
(to be continued)