Some hints to get better results (at least using the TSP batch files) is to first extracted the subject and placed on white background, then added contrast to you target image. I usually use a blending of G’MIC Painting preset set to lighten and adjust opacity to taste. It’s what I did to your image. Below’s roughly the result I used (see some flaws on this one since I did this quickly; lol) to feed into my voronoi batch file. Gary. 

@lylejk
Thank you :o)
@grosgood
I had fun with the script.
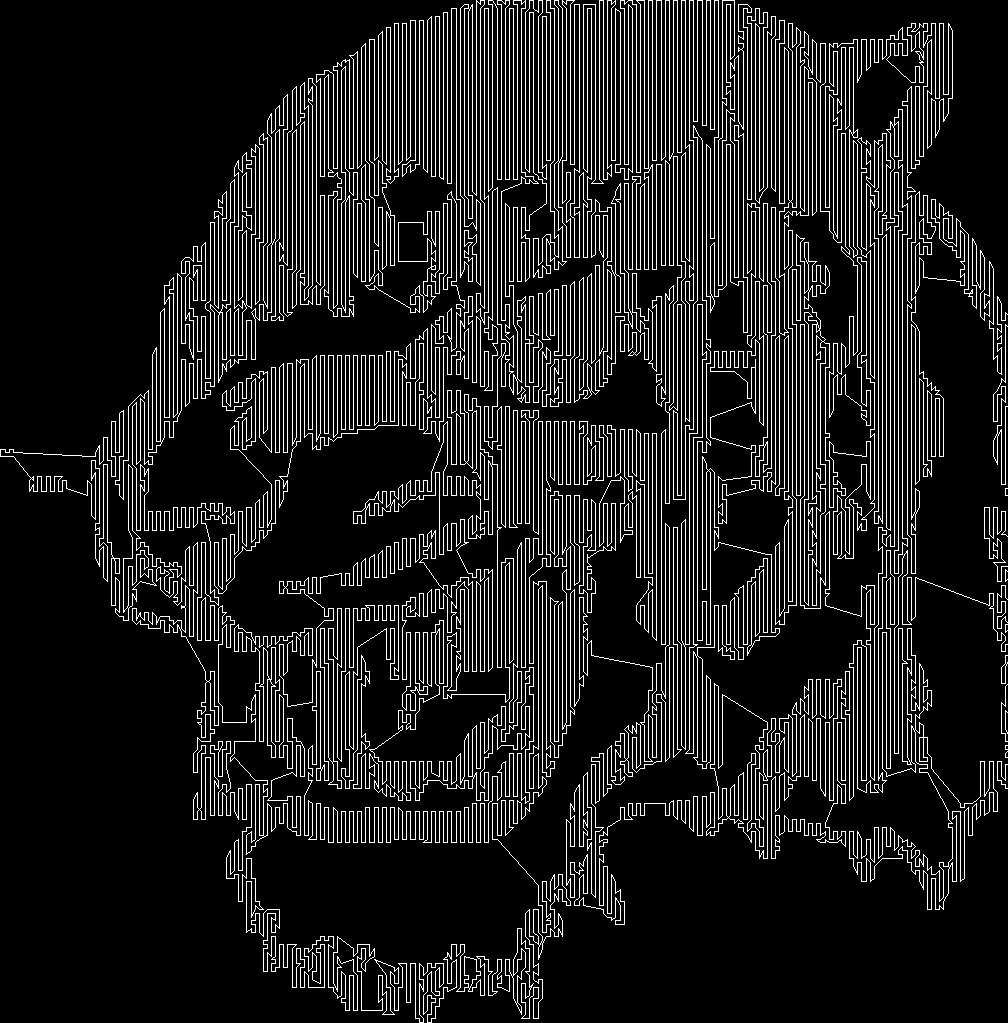
Starting from a black and white image and modifying the script I arrive by chance with an interesting and very ‘geometric’ result (View at full size to see the lines).

resize 1024,{{h}/{w}*1024}
samj_Masques_Noir_Et_Blanc_Preview 3,50
to_gray
negate
dilate 10
   +r2dx. 25%,5
   pointcloud. 3
   channels. 0,1
   *. 4
   tsp. ,
   permute. cyzx
   nm. points
   i 1024,1024,1,1
   nm. canvas
   eval {V=crop(#$points);polygon(#$canvas,-size(V)/2,V,1,0xffffffff,255)}
   keep[0,-1]
rm[0]
autocrop
You have to update G’MIC GIMP for this script to work properly.
1 Like
Really cool, samj; getting close to getting the Hilbert Curve random density fill that I would like to see.
It is indeed very interesting!
I surmise there are three contributing factors.
- Your preprocessing steps give rise to large solid white masses.
- There is a follow-on multiplication of the point set scaling all the coordinates up by a factor of 4. In effect, this expands the solid white masses into grids of cities, which you can directly see if you invoke
pointcloud.again after the multiplication `*. 4’ on the point set image. It would look like this:

- ever-so-slight rounding errors could shift North-South cities closer, perhaps, or vice-versa, and it is likely that such behavior would be the same for large regions. The traveling salesperson would tend in the same direction for long stretches of the path until local errors in plotting shift to favor other directions, such as the transition diagonals in the upper left hand patch of the tiger’s head.
You might — for its entertainment value, substitute for *. 4 a fill command f. c==0?i*4.1:i*3.9 to bring cities closer together slightly along the North-South axis; this would lead to a preponderance of vertical lines, like so:

as the traveling salesperson finds North-South cities slightly closer in the grid than East-West cities. Overall, there are a number of interesting tricks to be pulled here.
@lylejk
Thank you for the pointers! However, these also re-enforce my thinking (perhaps not clear) regarding what I think are good gmic-qt filters: few controls and large “sweet spots” that accommodate many kinds of images, and such that one does not have to do much preprocessing either in preparation or internally, through a number of pre-tsp image conditioners, in order to get splendid results. If a lot of preparation needs to be done in order for an image to be in the filter’s ‘sweet spot’, then the likelihood of the filter user being disappointed is that much greater, and that is especially an important matter of concern for compute-intensive, long-running filters. After prep and long minutes of waiting, the results really need to be good or people will be broken-hearted.
I really like the TSP tool you are using; it responds to tonal changes quite well. It would be interesting to take it apart and see how it ticks. Alas! I am over-booked and see no time for such an exercise on my watch. Perhaps, in a week or two, if some interesting mods show up here, I could wrap it up as a gmic-qt filter, but I make no promises. I also have an inventory of tutorial material nearing release (there has been none from me since last September), and that sits higher on the TODO stack.
And — there’s the rest of life, too…
1 Like
Tiger : https://www.ghostscript.com/doc/examples/tiger.eps
Thanks to @grosgood for his answer, here is the result of his advice :
resize 1024,{{h}/{w}*1024}
samj_Masques_Noir_Et_Blanc_Preview 3,50
to_gray
negate
dilate 10
   +r2dx. 25%,5
   pointcloud. 3
   channels. 0,1
   f. c==0?i*4.1:i*3.9
   tsp. ,
   permute. cyzx
   nm. points
   i 1024,1024,1,1
   nm. canvas
   eval {V=crop(#$points);polygon(#$canvas,-size(V)/2,V,1,0xffffffff,255)}
   keep[0,-1]
rm[0]
autocrop
Stairs/Escaliers

resize 1024,{{h}/{w}*1024}
samj_Masques_Noir_Et_Blanc_Preview 3,50
to_gray
negate
dilate 10
jeje_strip 45,50,0,2,0
   +r2dx. 25%,5
   pointcloud. 3
   channels. 0,1
   *. 4
   tsp. ,
   permute. cyzx
   nm. points
   i 1024,1024,1,1
   nm. canvas
   eval {V=crop(#$points);polygon(#$canvas,-size(V)/2,V,1,0xffffffff,255)}
   keep[0,-1]
rm[0]
You don’t need to wrap around w, and h. It works.
C:\Windows\System32>gmic 5,10 echo {w/h} rm
[gmic]-0./ Start G'MIC interpreter.
[gmic]-0./ Input black image at position 0 (1 image 5x10x1x1).
[gmic]-1./ 0.5
[gmic]-1./ Remove image [0] (0 images left).
[gmic]-0./ End G'MIC interpreter.
That’s right. I simply use the beginning of another project to activate the ‘tsp’ script :o)
That’s cool, Gary. Just sharing some insights I discovered with voronoi stippler over the years. Another one is to invert the target, then after running, invert that result to get white on black (similar results to what you got with yours).
@lylejk
Thank you : The Traveling Salesman problem. • GIMP Chat
I always have fun with the scripts of @David_Tschumperle and @grosgood
A black line on a white background :

if {w}>{h}
resize 1000,{{h}/{w}*1000}
else
resize {{w}/{h}*1000},1000
fi
samj_Masques_Noir_Et_Blanc_Preview 3,50
to_gray
negate
dilate 10
pointcloud. 3
channels. 0,1
resize. 2%,1
add. 12
tsp. 200
1024,1024,1,1
repeat {0,w}
 line. {0,boundary=2;[I[$>],I[$>+1]]},1,255
done
rm[-2]
dilate 2
negate
1 Like
I like this last one. Black line on white canvas. It still has a laser beam coming out of the eye of the tiger. 

Going back to Rep’s original, I sort of like the meandering single line (i.e, no picking up the pin) result. Again, I would want this ability in the plugin, since, well, I’m a GIMPer. Not opposed to CLI or scripts (hence TSP), but like to be able to keep withing an editing environment. Maybe David or someone can figure out how to do this within the G’MIC plugin. While I’m asking, would like the Hilbert (and other type) of variable density single line fill render abilities as well (doesn’t hurt to ask). lol
Well, the main difference of @Reptorian’s sample and the rest of yours is that the line can cross itself! Although it is different, I recall this:
Somehow, instead of having the edges of the image or shape as direction change points, we could have the edges and textures of the image… and instead of straight lines, we have splines, etc.
Some remarks follows to my tests :
I did some testing with splines but it’s very, very slow.
@lylejk
Make a GMIC-Gimp plug-in is difficult because the rendering is very, very slow.
It could be sequential, for example :
- At first visualize the completed areas.
- Then validate the final overview.
The stability of the plug-in during the time of treatment must be taken into consideration.
Just brainstorming. We don’t have to implement all the ideas. I think it would still work with straight lines, we just have to decide when to change directions and how many times.
The thing is G’MIC is probably the wrong program to do this because of the slowness but who knows: you are all geniuses. ![]()
Appreciate the followup, samj. I guess I’m still wanting G’MIC to be the do all of do alls. lololololool
Still, my Dad always told me there’s always more than one way to skin a cat. lol
That’s why I attempted to recreate/convert many Paint.NET plugin to G’MIC.
Appreciate your efforts, Rep since coder I’m not. So many great coders that have made me happy over the years, you included, Rep.
1 Like
I had fun exporting to SVG in the directory where is ‘update310.gmic’
I join the code I activate in GIMP and the file ‘list_points_tsp.svg’ created by the script.
I will realize a plug-in by separating the rendering and the SVG backup.

CRLF="\\r\\n"
Liste="<?xml version=\\"1.0\\" encoding=\\"utf-8\\"?>"$CRLF
Liste=$Liste"<svg xmlns=\\"http://www.w3.org/2000/svg\\" version=\\"1.1\\" width=\\"1024\\" height=\\"1024\\">"$CRLF
Liste=$Liste"<title>Test GMIC SVG</title>"$CRLF
Liste=$Liste"<desc>Points et Segments</desc>"$CRLF
if {w}>{h}
resize 1000,{{h}/{w}*1000}
else
resize {{w}/{h}*1000},1000
fi
samj_Masques_Noir_Et_Blanc_Preview 3,50
to_gray
negate
dilate 10
pointcloud. 3
channels. 0,1
resize. 2%,1
add. 12
tsp. 200
+crop 0,0,1,0
Xend={i0}
Yend={i1}
rm[-1]
repeat {{w}-1}
Index=$>
 +crop $Index,0,{$Index+1},0
 Xa={i0}
 Ya={i1}
 rm[-1]
 +crop {$Index+1},0,{$Index+2},0
 Xb={i0}
 Yb={i1}
 rm[-1]
 Liste=$Liste"<line x1=\\""$Xa
 Liste=$Liste"\\" y1=\\""$Ya
 Liste=$Liste"\\" x2=\\""$Xb
 Liste=$Liste"\\" y2=\\""$Yb
 Liste=$Liste"\\" stroke=\\"black\\" />"$CRLF
done
Liste=$Liste"<line x1=\\""$Xb
Liste=$Liste"\\" y1=\\""$Yb
Liste=$Liste"\\" x2=\\""$Xend
Liste=$Liste"\\" y2=\\""$Yend
Liste=$Liste"\\" stroke=\\"black\\" />"$CRLF
Liste=$Liste"</svg>"$CRLF
('$Liste')
output_text.  $_path_rc/Liste_Points_TSP.svg
# SVG validé sur https://validator.w3.org/
rm.
1024,1024,1,1
repeat {0,w}
 line. {0,boundary=2;[I[$>],I[$>+1]]},1,255
done
rm[-2]

1 Like
@samj: For Liste, you could do:
str=initial_string
str.=" appended string"

echo $str
You can do ..= which appends the other way.
Having fun with Gmicky in GIMP/GMIC 3.1.0_pre for getting an SVG image (1 line) :

## Supprimer les 2 lignes pour obtenir un SVG sur une autre image ##
rm
fx_gmicky 0
####################################################################
Param1Masque1=1.25
Param2Masque1=42
Param1Masque2=0
Param2Masque2=32.5
CRLF="\\r\\n"
Liste="<?xml version=\\"1.0\\" encoding=\\"utf-8\\"?>"$CRLF
Liste.="<svg xmlns=\\"http://www.w3.org/2000/svg\\" version=\\"1.1\\" width=\\"1024\\" height=\\"1024\\">"$CRLF
Liste.="<title>Test GMIC SVG</title>"$CRLF
Liste.="<desc>Points et Segments</desc>"$CRLF
Liste.="<polyline points=\\""
if w>h
resize 1000,{h/w*1000}
else
resize {w/h*1000},1000
fi
+samj_Masques_Noir_Et_Blanc_Preview $Param1Masque1,$Param2Masque1
to_gray.
negate.
dilate. 10
pointcloud. 3
channels. 0,1
resize. 1%,1
add. 12
tsp. 200
+crop. 0,0,1,0
Xend={i0}
Yend={i1}
rm.
repeat w
 Index=$>
 +crop. $Index,0,{$Index+1},0
 Xa={i0}
 Ya={i1}
 rm.
 Liste.=$Xa" "
 Liste.=$Ya" "
done
rm.
# ligne 2
samj_Masques_Noir_Et_Blanc_Preview $Param1Masque2,$Param2Masque2
to_gray.
negate.
dilate. 10
pointcloud. 3
channels. 0,1
resize. 1%,1
add. 12
tsp. 200
repeat w
 Index=$>
 +crop. $Index,0,{$Index+1},0
 Xa={i0}
 Ya={i1}
 rm.
 Liste.=$Xa" "
 Liste.=$Ya" "
done
Liste.=$Xend" "
Liste.=$Yend" "
# Liste.="\\" stroke=\\"blue\\" fill=\\"transparent\\" stroke-width=\\"2\\"/>"$CRLF
Liste.="\\" stroke=\\"blue\\" fill=\\"transparent\\" stroke-width=\\"2\\" mask=\\"none\\" style=\\"fill:#000000;fill-opacity:0\\"/>"$CRLF
Liste.="</svg>"$CRLF
('$Liste')
output_text.  $_path_rc/Liste_Points_TSP.svg
# SVG validé sur https://validator.w3.org/
rm
1500,100,1,3
fill_color. 255,255,255
text. "SVG disponible sur :",20,20,20,1,255,0,0
if '$_os'=='windows'
 text. $_path_rc"\\Liste_Points_TSP.svg",20,50,20,1,255,0,0
else
 text. $_path_rc"/Liste_Points_TSP.svg",20,50,20,1,255,0,0
fi
autocrop
3 Likes