Handling shade + direct sunlight with skin-tones, filmic / sigmoid preference?

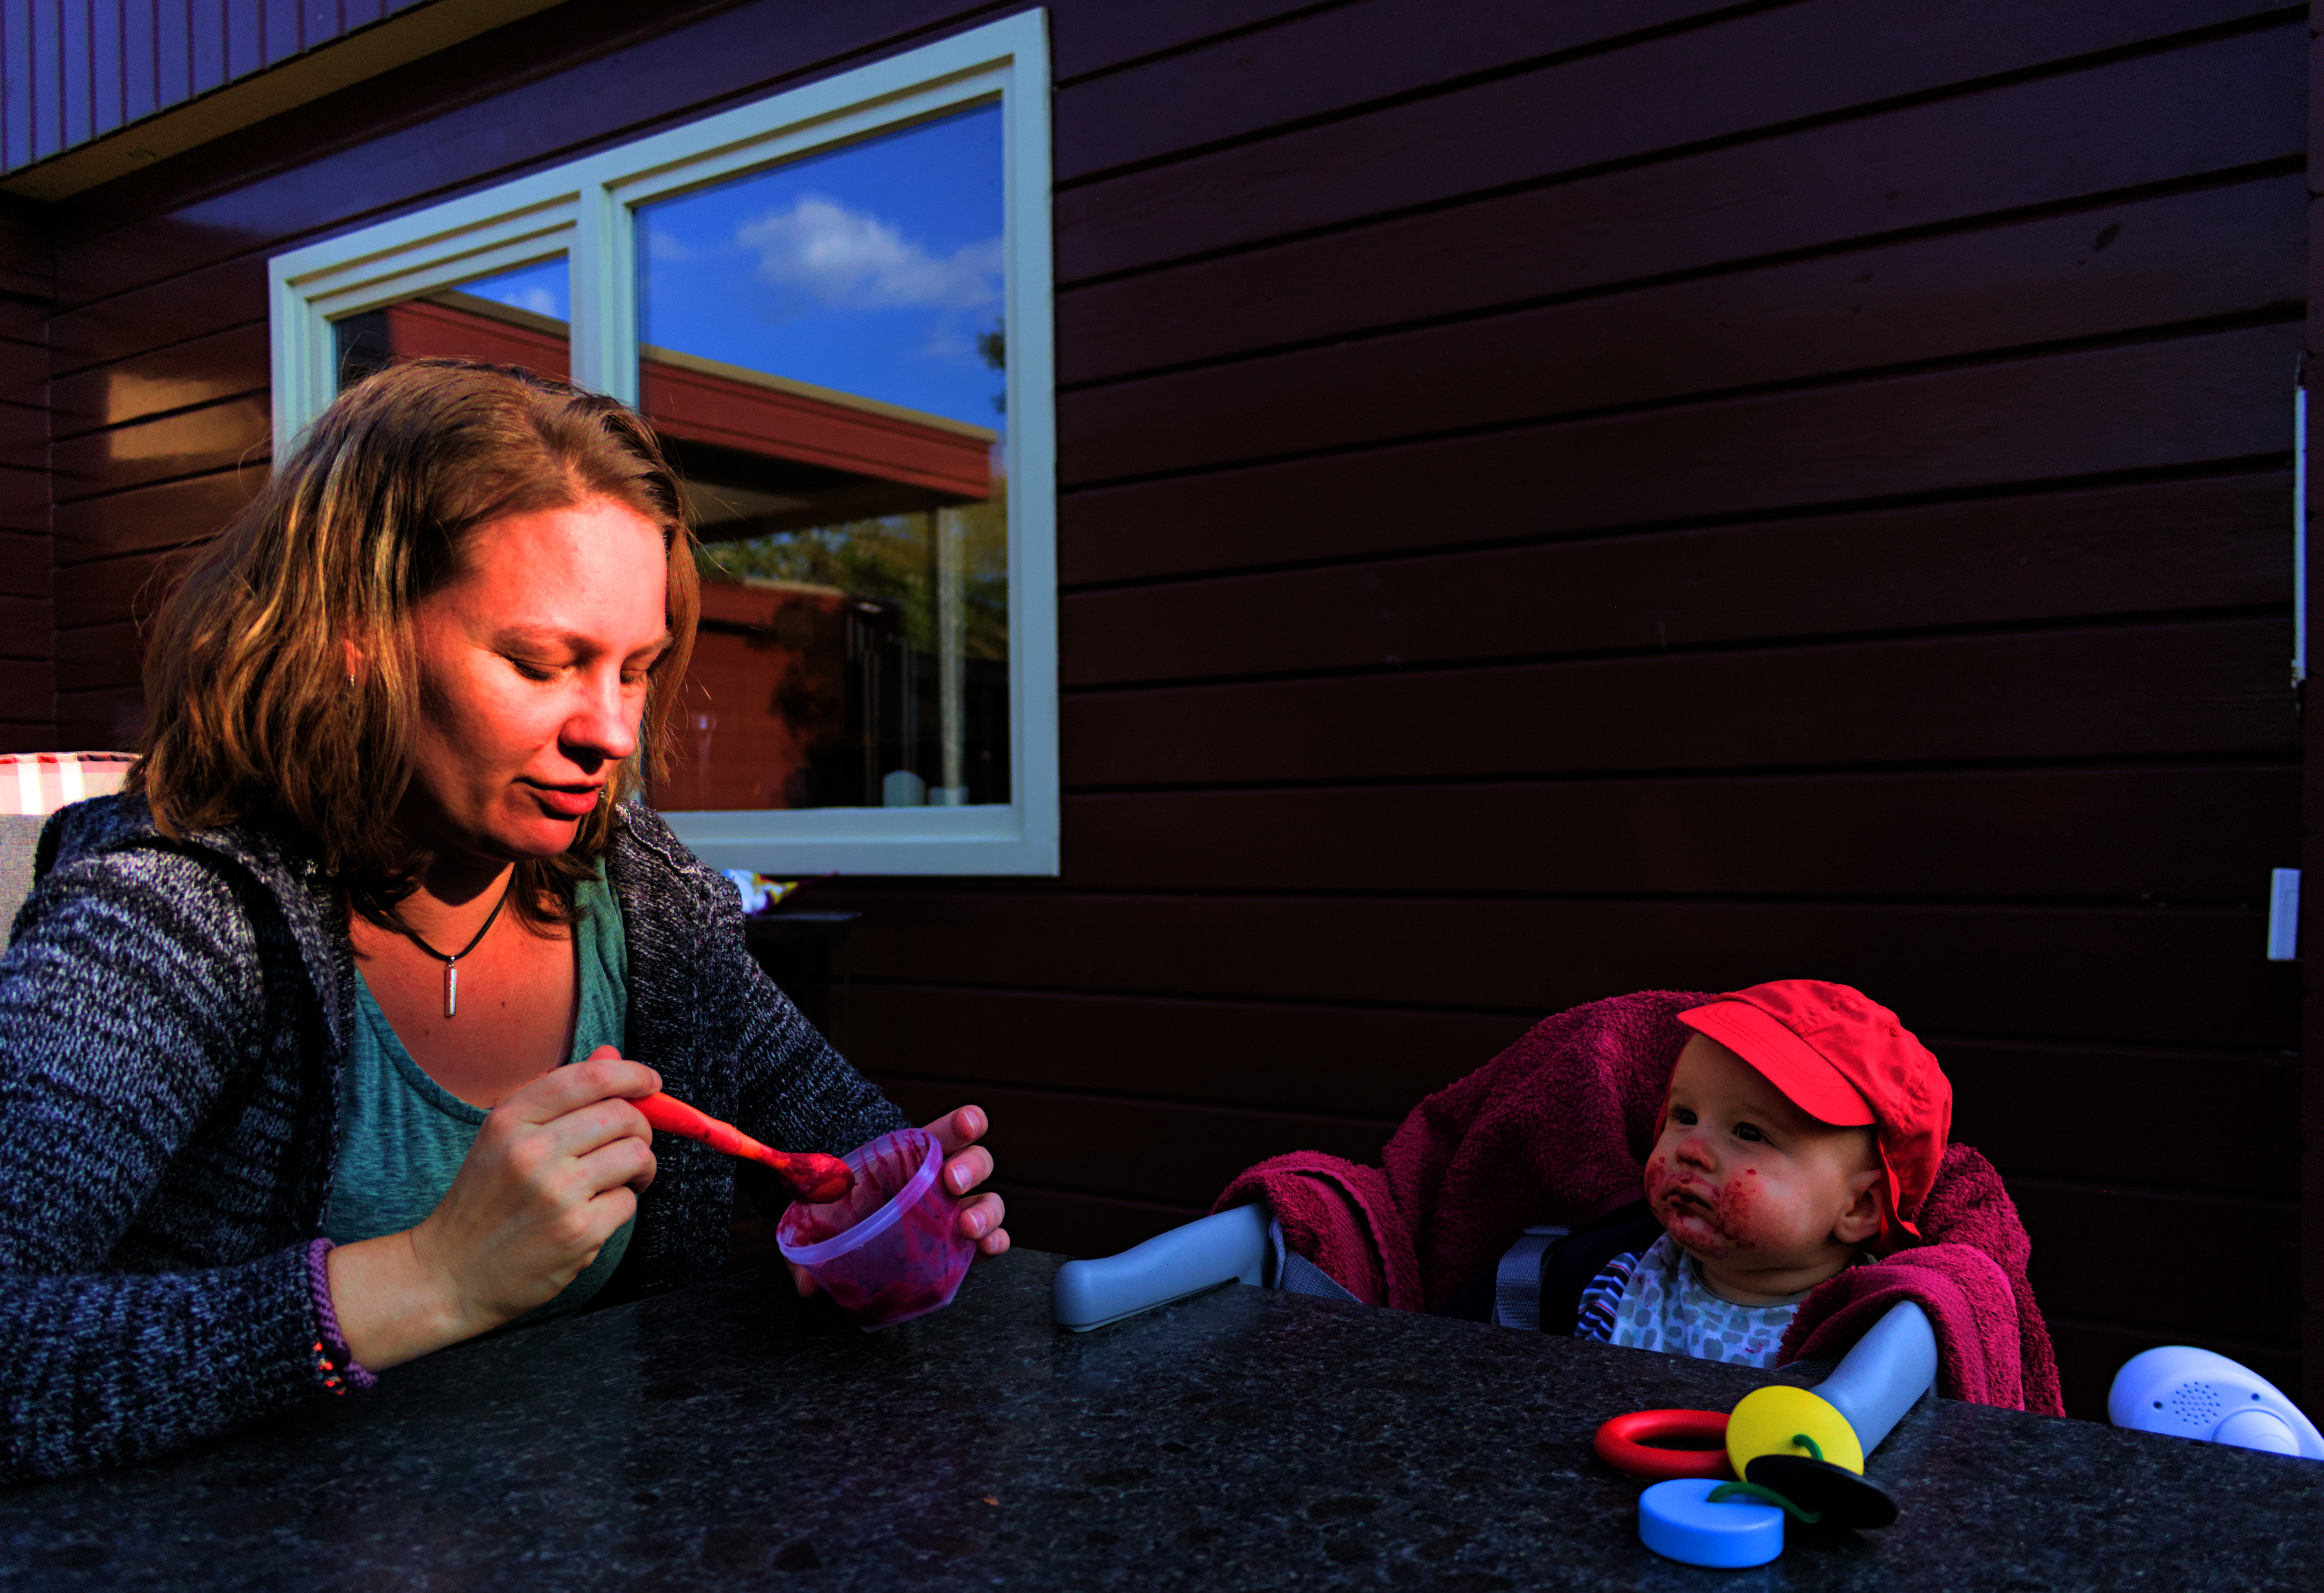
I started this post in the ‘evaluate sigmoid’ thread, but figured it would be too much of a hijack, so I cut & pasted the rest in here.

This file is too contrasty, as in there is too much different between shade and direct sunlight on the skin of the girl.

In discussing sigmoid, it was made clear to be that they can be quite different in how they handle skintones if the skin is in the highlights (as in, direct sunlight as in this file).

Also, the extreme difference in light between the two subjects makes this a shot I normally do not use / post / share. But I’m interested if people have techniques to get something likeable out if it.

There are two angles to go here - and many others of course :wink:. The skin of the girl can be ‘skewed’ towards something more likeable. But for evaluating tone mappers, I would think I would like the hue to be similar to before tone-mapping.

What I mean is that, when I look at the LCh color-picker, I see a skin-hue of about 43/44.
Now, I think that’s too red to be pleasant. But in this case, I see it as ‘the truth of the shot’.
So yes, I get more pleasing results by skewing the hue towards the 50-ish… but for a tone-mapper I see that as a hue-shift / an error. Or in this case, a lucky accident :).

Anyway, I’m interested in techniques to handle the dynamic range. But also to see what other people find ‘a pleasing skin tone’. And if what filmic does is an annoyance, an error, or just how it should be… or everything is wrong and you just have to make something of it :wink: .

(The only likeable edits I got from this is with heavy masking and changing the white-balance locally of the kid to give some warmth, etc… Spend some real time with it, which I normally do not want to do with simple family snapshots, I just flag the image as a reject and move on).

P5020458.ORF (13.0 MB)
Creative Commons License
This work is licensed under a Creative Commons Attribution-NonCommercial-ShareAlike 4.0 International License .

I have tried to adjust the tone of the boy’s face and the woman’s hand with the rgb color balance module and adjusted the exposure of the lady with a mask

Darktable 4.0.1

P5020458.ORF.xmp (22,4 KB)

Not that easy indeed, but here’s an attempt:


P5020458.ORF.xmp (8.7 KB)

… aaand another attempt.

Handled the light conditions with tone equalizer - not too bright, because it seems a shadowy place. Then the colors didn’t fit my taste and I tried to improve with the channel mixer.
I think the result is fairly “natural”?

P5020458.ORF.xmp (79.0 KB)

1 Like

My version…

P5020458.ORF.xmp (17.7 KB)

1 Like


P5020458.ORF.xmp (11.4 KB)

P5020458_01.ORF.xmp (12.5 KB)

Hello,

Thanks for sharing, here is my version with Sigmoid.


P5020458.ORF.xmp (11.0 KB)
Greetings from Brussels,
Christian

A couple of quick edits… I haven’t really captured the light…hard not to try to include the baby but the real star of the photo is the light captured on the mom… I may see if I can do that element justice… For these I tried to keep all settings the same and the just work filmic and sigmoid to see how they differed Sigmoid first Filmic second


P5020458.ORF.xmp (11.8 KB)


P5020458_01.ORF.xmp (13.3 KB)

1 Like


Handling shade + direct sunlight with skin-tones, filmic _ sigmoid preference_.ORF.xmp (99.2 KB)

Thanks @jorismak for the nice photo!
I wasn’t sure what I’d find here - I don’t take many people photos so I wasn’t entirely sure what to expect.
I first used sigmoid, and got a result I was happy with pretty quickly. I should mention at this point that whenever I use sigmoid it’s almost always in the ‘per channel’ mode. The other (rgb ratio) seems very similar to filmic, but with less control, so I haven’t done much with it.
I more or less just increased the contrast in sigmoid, and fiddled with exposure and tone eq until I liked the result. Using sigmoid (in the way I do) I often don’t need to add any saturation in color bal rgb, in fact sometimes I back it off a little.


Then I went back to original file and started again with filmic, and was a little surprised to find it more difficult to get a result I was happy with… v6 max rgb left the lady’s face very flat, although I could have got away with no tone eq at all… I ended up using tone eq with the gf medium preset (same as in the sigmoid image), filmic v6 max rgb with a bit of fiddling in the look tab, color bal rgb for saturation, and a bit of local contrast only on the highlights to restore… um… depth? texture? to the highlights.
And I’m happy with this result too! But I found it harder to get there.

P5020458-filmic.ORF.xmp (11.4 KB)
P5020458-sigmoid.ORF.xmp (11.0 KB)

In my opinion, in this case, how the colors look in highlights is very dependent on the correct white balance.

The second aspect that plays a big role is the treatment of highlights before they are taken over by tone-mapper.

Regardless of whether they are treated by filmic or sigmoid, in both cases they should be brought back - as far as possible - from the area of high compression to preserve the details and colors. This can be done with tone equalizer.

After that, the only question is which specific settings are important for each tone-mapper.

Filmic offers different modes for preserving chrominance, which can be advantageous depending on the scene.
In my experience, if you do it without these modes and adjust colors and contrasts with the color balance module, you will get good results very quickly.

Sigmoid has good contrasts from the start, especially in the mid-gray area, which need only minor adjustments. The color preservation is also good. Nevertheless, there is no way around making fine adjustments in the color balance module. In this case, I had to reduce the color saturation in highlights.

filmic:

P5020458_filmic.ORF.xmp (11,9 KB)

sigmiod:

P5020458_sigmoid.ORF.xmp (15,2 KB)

One more important note regarding this scene: be careful not to distort the brightness ratio in the scene. If the woman is illuminated by direct sunlight and the child is in the shade, they cannot be similarly bright. If you brighten the child too much, the scene will look unnatural.

13 Likes

Hi @s7habo ,
how did you managed the white balance in your edit? did you use both white balance and color calibration for it? I am having a hard time getting good skin tones.

If you load the sidecars and look…you can see very std editing…looks like a custom WB in CC module use the hue and chroma sliders…

Often its an auto WB with the picker and then tweak those as needed to bring back things as you like if playing with lighting…

Edit…

The selected WB is this…

image

As shot is this…

image

So As shot is here…

image

Shifted to more yellow…

image

I have used only color calibration module.

With color picker in the CAT Tab of color calibration module I took window frames as reference:

grafik

Since the window frames are in shadows, they can’t be neutral gray/white because they were influenced by blue sky.
So I adjusted chroma a little bit (moved slider to the right) until the window frames and shadow area were slightly bluish.

I also paid attention to the change in the skin color of the woman, which is illuminated by the sun.

5 Likes

All the talk about skin tones, it was the back wall that gave me grief. I liked the contrast of light and wanted to keep the mood shade brought. Whenever I tried to darken or add contrast it turned into a pixelated blotchy mess with false gradients, especially noticeable on export. Managed to control it in the end.

handling-shade-P5020458_03.ORF.xmp (17.2 KB)
dt 4.0.1 stable, so this is a filmic version.

@s7habo thanks, now it makes sense to me.

I loaded indeed the sidecar file and was somewhat confused because darktable showed that both the white balance and the color calibration modules were used for white balance.

The original white balance module was split into white balance (for general purposes i.e. demosaicing) and color calibration (enables you to use multiple instances and masking for wb). See here: darktable 3.8 user manual - white balance

Thanks for the info @sushey ! Yes, I know that stuff. I was just confused because darktable showed following warnings saying that the white balance was applied twice:

image

as far as I know from the stable build, the warning only appears when you tweak the white balance module and the color calibration module for the same edit.

Maybe it is just a problem because I’m not using the exact same master build as Boris. But anyway my original question was answered. Thanks!

1 Like

I think at some point in time there was a bug that D65 was showing as modified in WB and hence triggering the error…but it could also be something else…

How is your white balance set? If using color calibration, white balance should be set to camera reference.