Highlight recovery in DT and RT

Hi! I’m trying to work with this image. I would like to achieve the result of the jpg you see here, but with Darktable I cannot understand how to use Filmic RGB or other modules to make it.

img-70db00752b83805d75f0b0021c12ba47.CR2 (13.8 MB)

In particular, when I use Filmic colors change so much from the version without it (which I like the most). How can I edit this image? How would you edit it?

Thank you.

This files are licensed Creative Commons, By-Attribution, Share-Alike.

1 Like

The closest I could get in a few minutes.

Setting gamut clipping in input color profile gave me your jpg-like color in the sky. Couldn’t get there without gamut clipping.

DT 3.7

img-70db00752b83805d75f0b0021c12ba47.CR2.xmp (8.4 KB)

What version of dt are you using?
I’m now in 3.7 (though for this there is no difference over 3.6, I think), and just after opening you photo (nice one, BTW!) is very close to the jpeg you posted:

But obviously it’s not the same, and it’s a bit darker and softer in colours (but in the proper family, I think, not distorted as you seem to obtain).
So, just with a little adjustment on filmic (just white and black relative exposure, a bit, and some adjusments on reconstruct to improve the sun, threshold to -1.58 EV and balance 100% to texture), and an adjustment to improve contrast and saturation on Color Balance RGB (you can start with the preset add basic colorfulness and tweak a bit to your taste, I have prepared my own usual adjustment to start with), you get something nicer:


img-70db00752b83805d75f0b0021c12ba47_01.CR2.xmp (6.3 KB)

and very close to your JPEG, I think.
Just a little couple of things then: I applied the lens correction (so vignetting out, like on your JPEG again), and a bit more of colour correction, just for me, to give a little more of stength to the green field in the center, so that is the only element out of the rest of the orange-ish gama. A second instance of Color Balance RGB, tuned with a drawn and parametric mask to get this greens (that seem to be yellows actually), , enhancing saturation and brilliance (to compensate the darkening of the saturation) in mids and darks, and a bit of added color in the 4 ways tab (a bit of blue in the sahdows, just 238º 1.5%, and a bit of paler blue in the mids, power 194º 0.25%). And doesn’t need that this need anything more, for me (it’s a beautiful dreamy image yet!).


img-70db00752b83805d75f0b0021c12ba47_02.CR2.xmp (10.0 KB)

Hope that helps!!!

Well, to be honest, I felt that I needed a bit of contrast, and in your JPEG it was also so. For that, just went a bit down in the black relative exposure in filmic (-5.86 EV), and added some Diffuse or Sharpen (that’s only in 3.7, and the reason I upgraded; but if you are in 3.6, you can do it in other ways, like local contrast or constrast equalizer)


img-70db00752b83805d75f0b0021c12ba47_03.CR2.xmp (11.0 KB)

1 Like

Filmic went from ‘v4 color science’ to ‘v5 color science’ as far as I know, and it now defaults to no mid-tone saturation. Instead, ‘you are supposed’ (there is no right and wrong, of course) to use the ‘color balance rgb’ that is in 3.7 to get the saturation/vibrancy to where you want it.

Filmic desaturates the highlights. So you can lower the white point to leave more room before it starts desaturating (that means that things like the sun disc can have more color) or you can up it a bit to turn it more to white.

You can also play with the ‘latitude’ slider in the 3rd tab (from my head), this controls what is considered ‘highlights’ and ‘mid-tones’. If you up the latitude, more is considered mid-tones, so more color is kept.

Color balance RGB is simple controls to modify the saturation and/or vibrancy (and other stuff) in shadows / mids / highlights. It has a simple ‘add basic colorfulness’ preset that adds saturation but less of it in the highlights. It’s then a simple slider to control how much saturation you actually want in the highlights.

1 Like

In my hack software, straight-up linear rendered a very magenta sun; so few pixels in it, it didn’t even show up in the histogram. Sometimes, a regular filmic curve will desaturate such, but not this one. I don’t have the fancy dt filmic, but i do have RT’s in-paint based highlight recovery, which handled it nicely.

I messed with a number of tone curves, but the only one that gave good tonality in the shadows while preserving some of the sky detail was the doublelogistic curve we’ve discussed here. Here’s my render based on that curve:

Edit: After I posted the image, for kicks I went back and turned off the highlight recovery, kept the doublelogistic curve, and found it worked to desaturate it all by itself…

GIMP-LAB

I’m a bit confused here. Darktable 3.7 (if you start over, discard the history of the file or save it somewhere, and make sure in the preferences your workflow-defaults are set to scene-referred and modern-color) you are not even that far off from the default look?

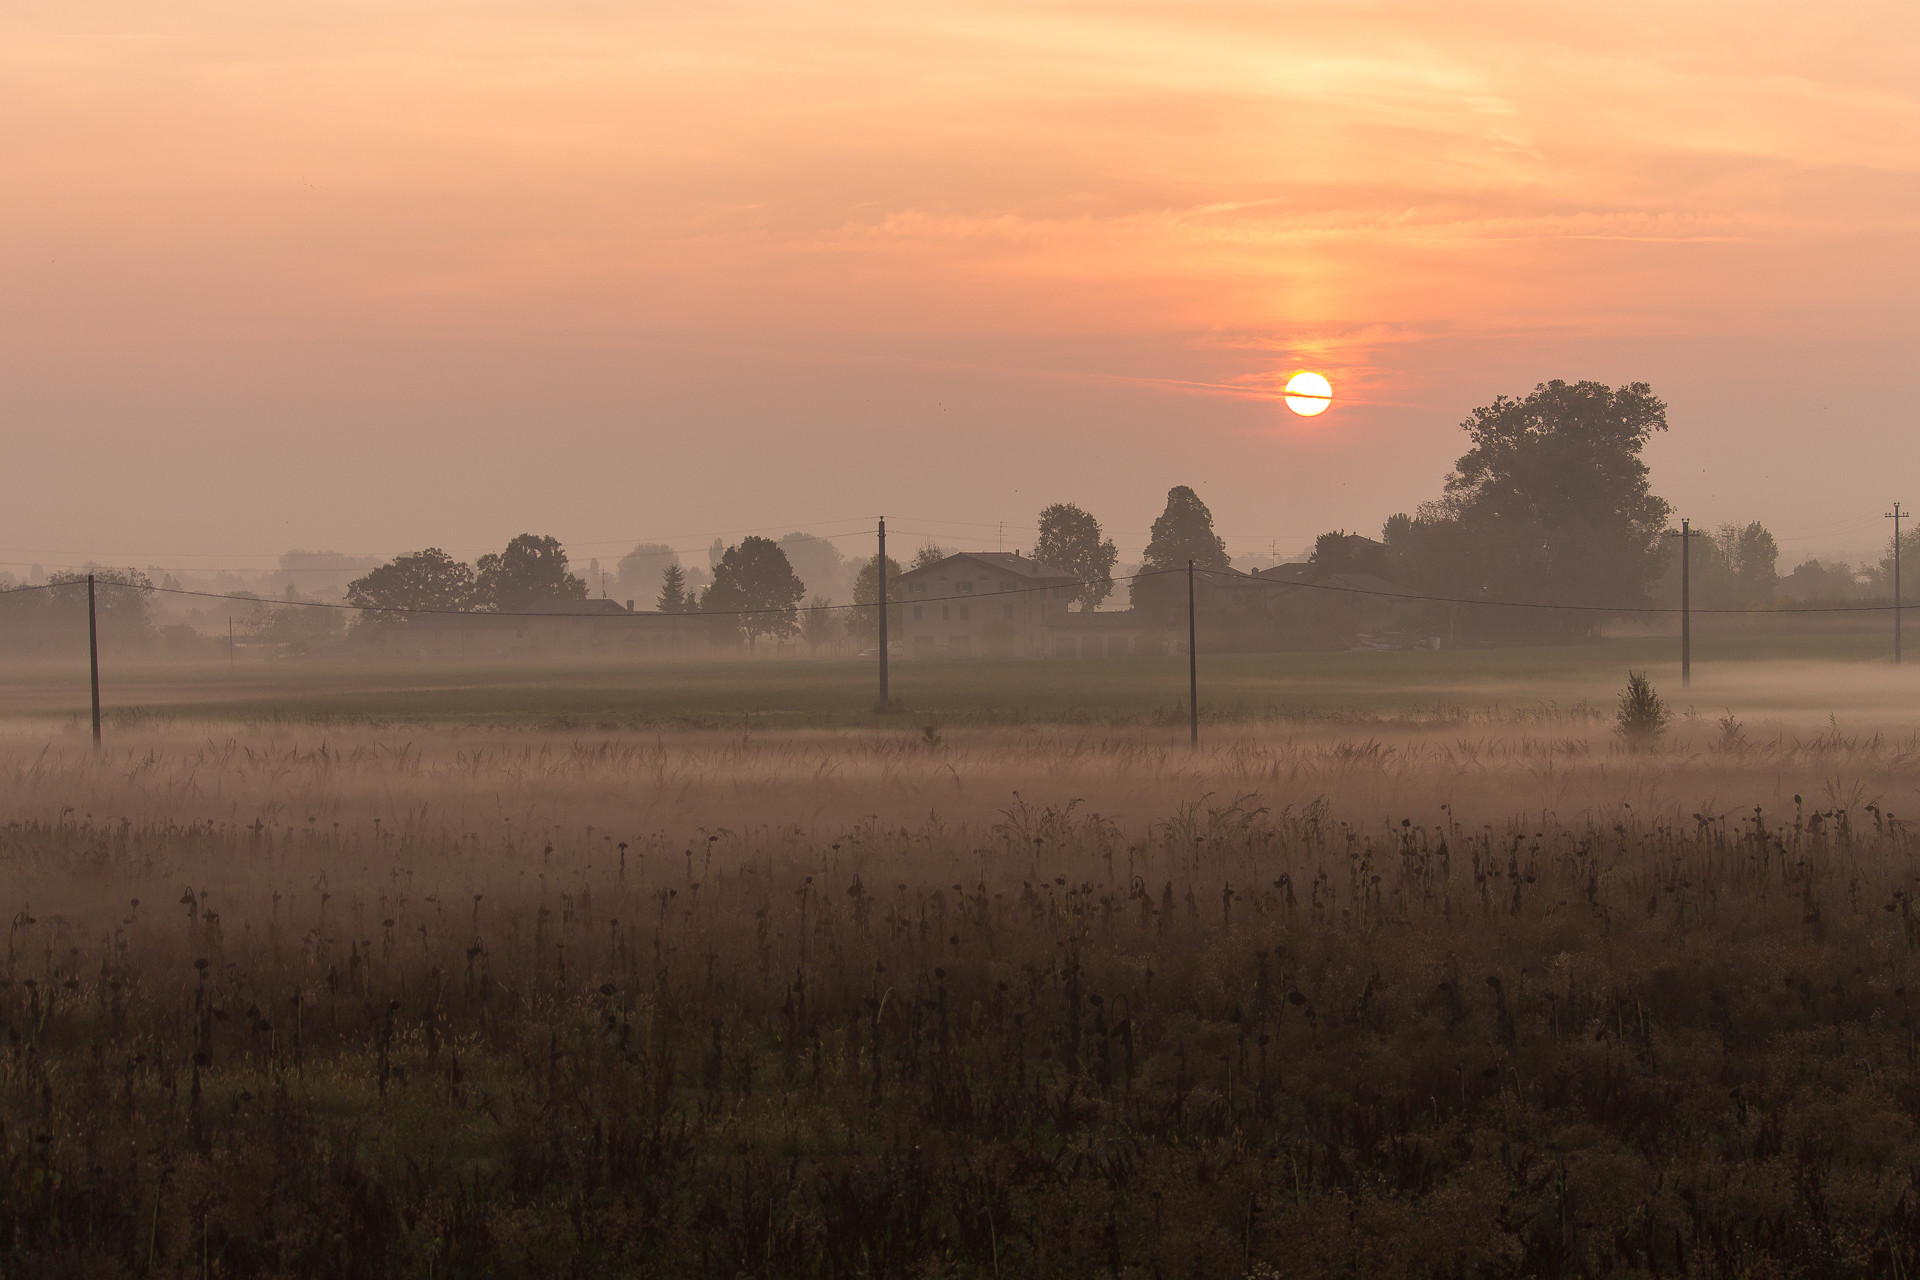
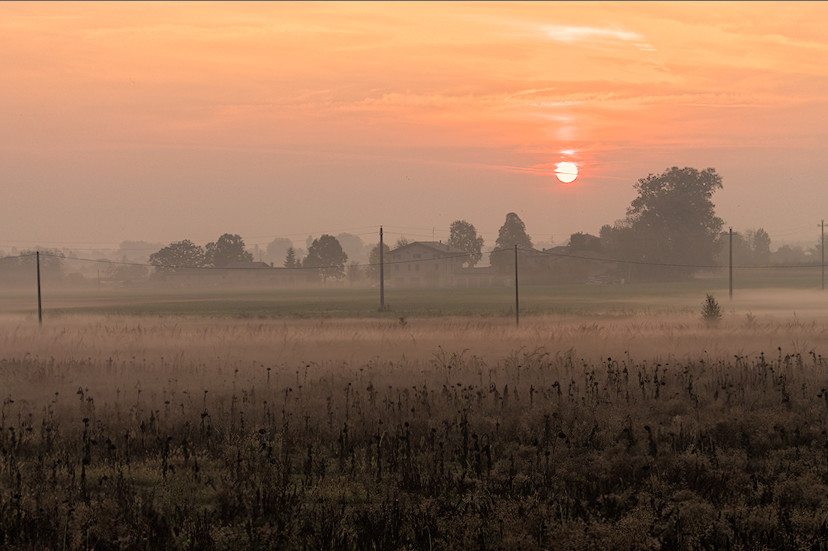
This is really the complete default I get when loading your file?

Your jpg example is brighter, yes. And it seems to contain even a bit less saturation. But the contrast isn’t that far off, to be honest.

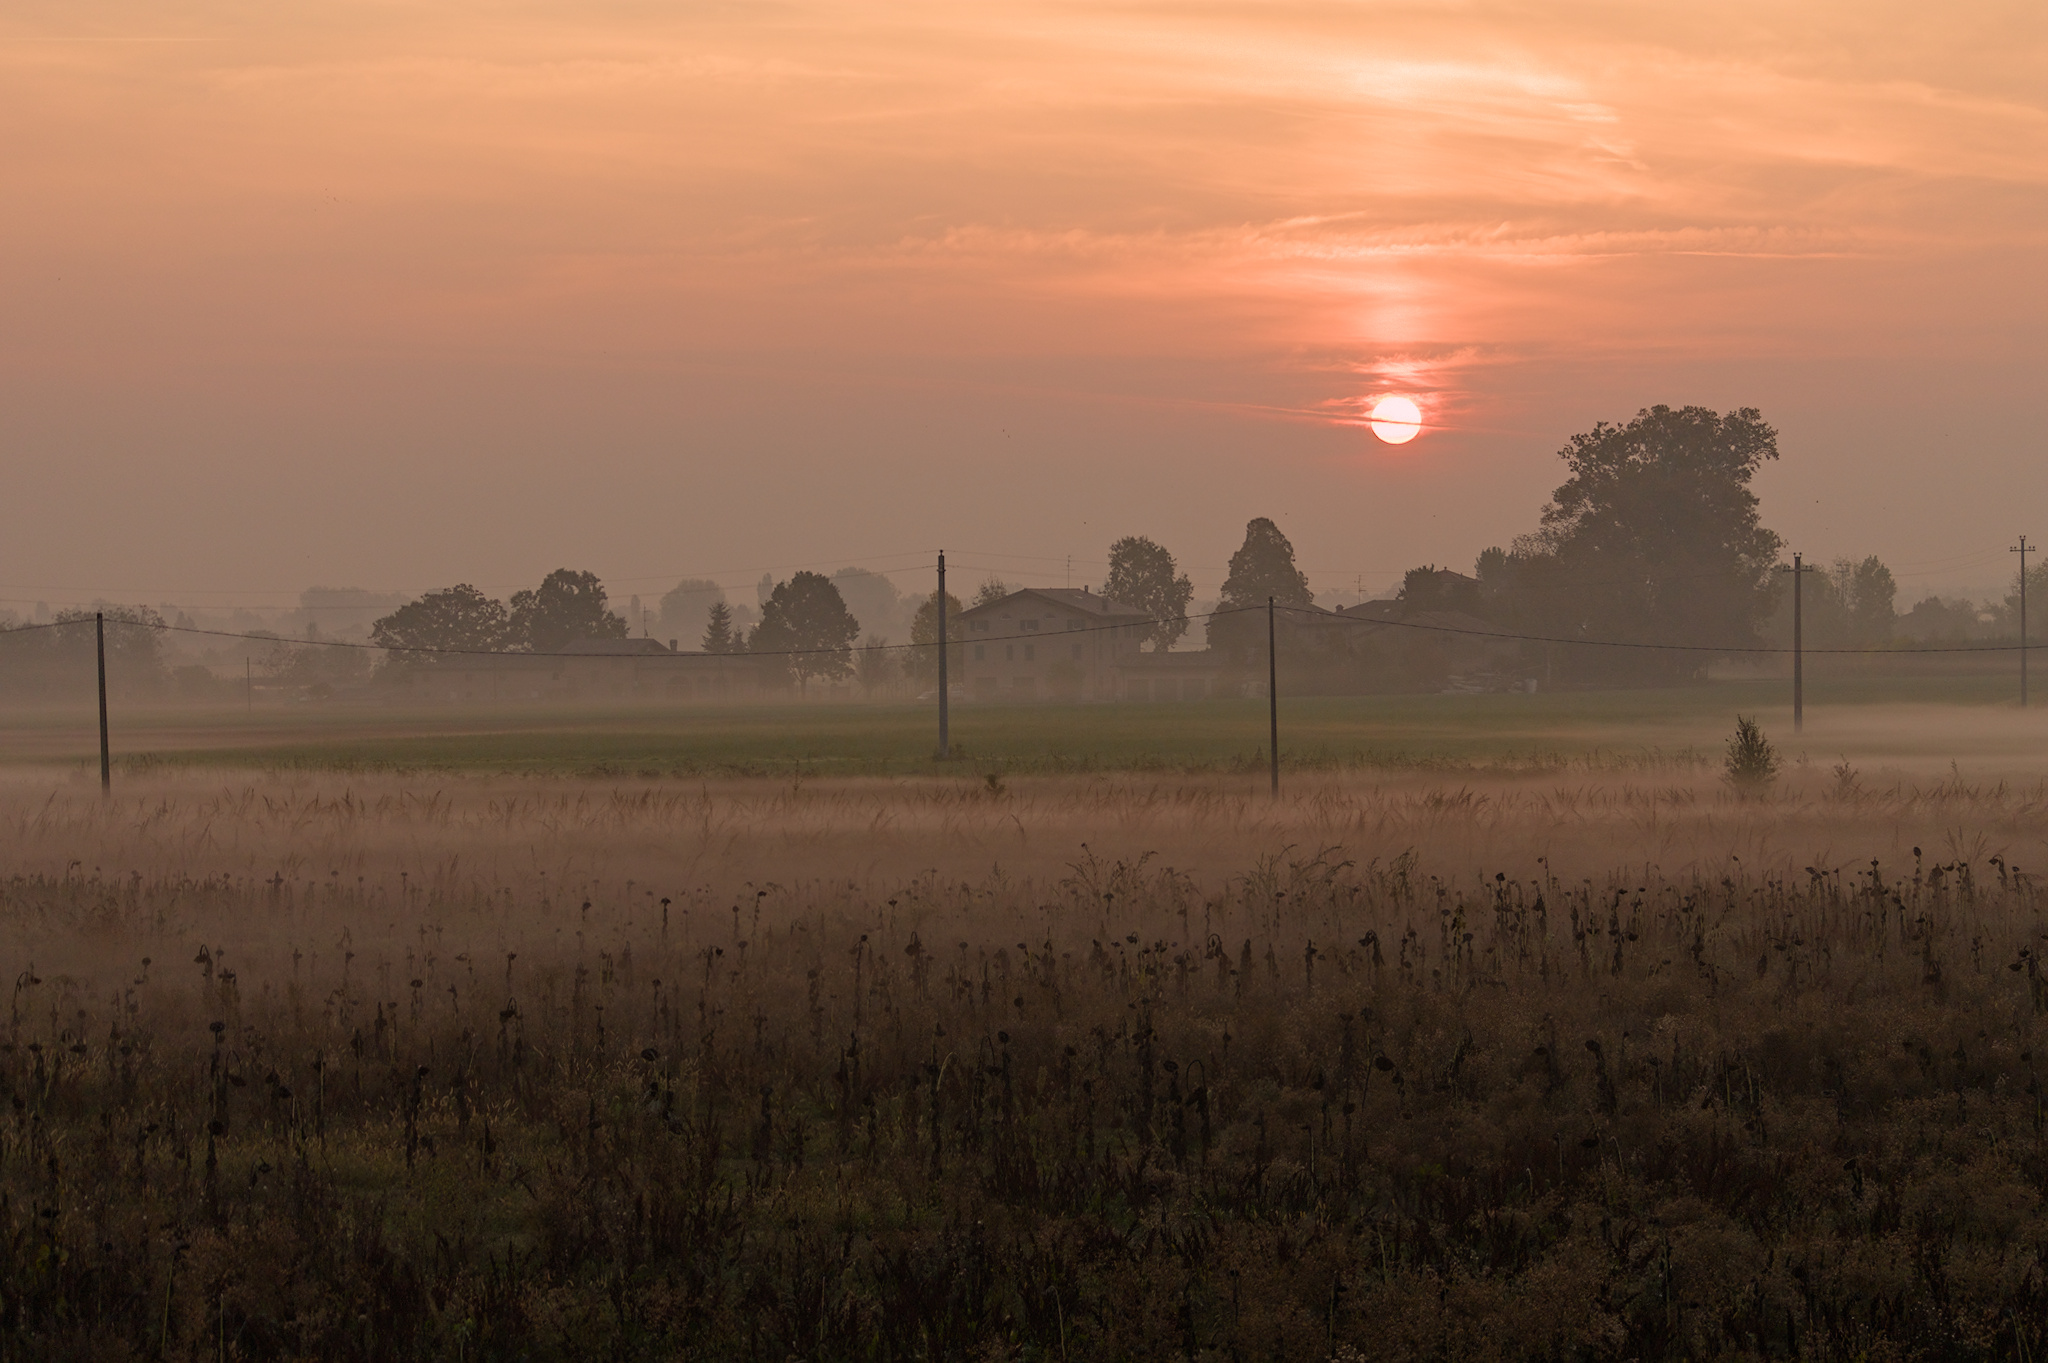
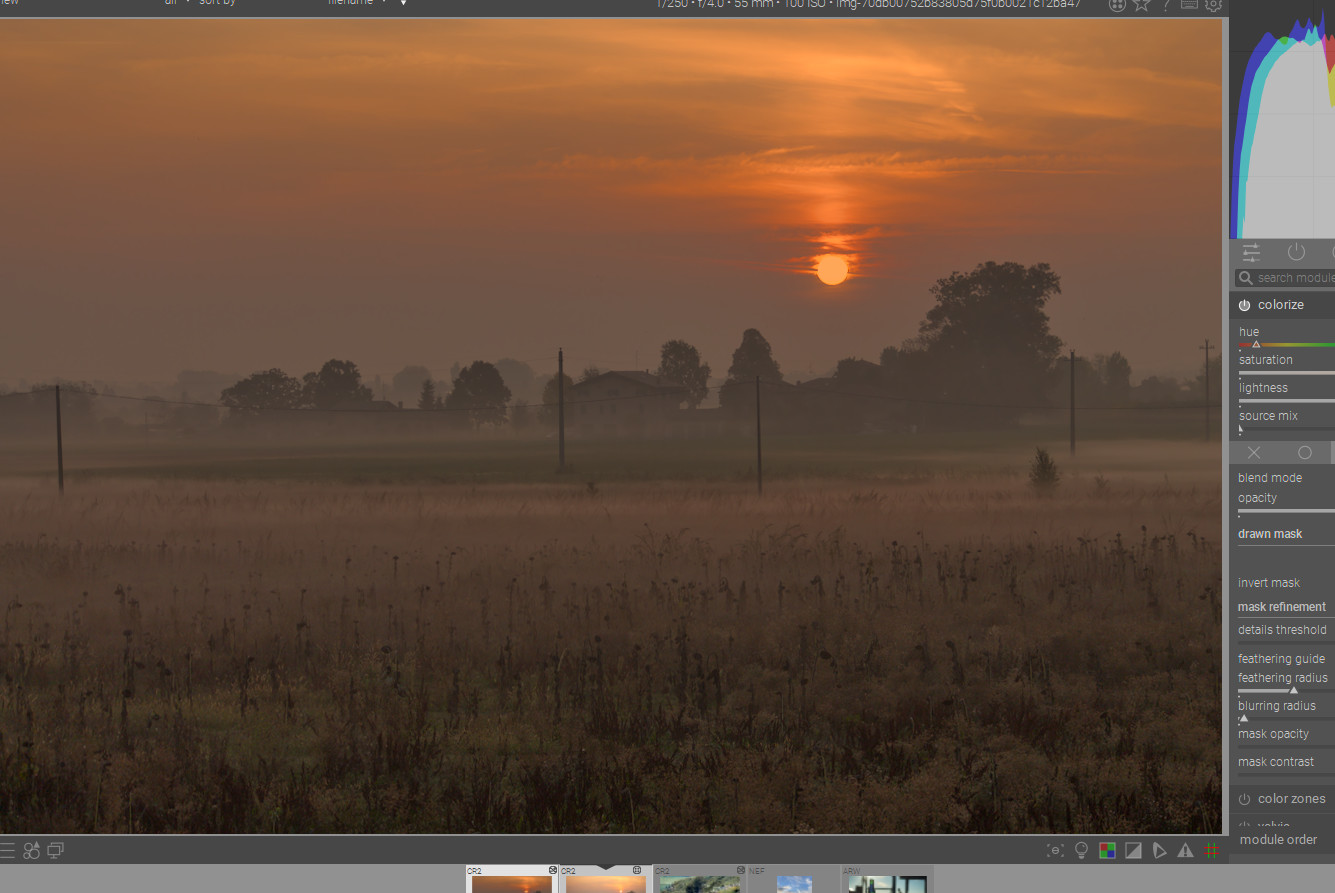
Raise exposure to 1.5:

activate lens correction:

in filmic, turn latitude all the way to the right (or almost all the way, +/- 48%)
then in the 1st tab (scene), hit the auto button.

Increase contrast in film a bit to +/- 1.45 / 1.5:

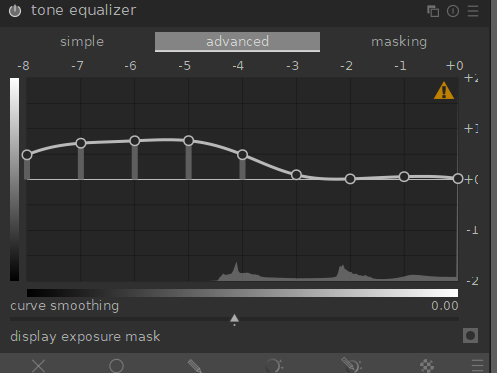
The field in the bottom of the picture is a bit too dark in mine. Enable ‘tone equalizer’, go to the advanced tab, move your mouse cursor now to your image over the bottom of the picture and give a few nudges of the mousewheel up or down to tweak the tones.

After that I smooth the curve a bit manually to extend all the way to the very darks, I end up with this:
image

Enable ‘color balance rgb’, hit the ‘add basic colorfulness’ preset.

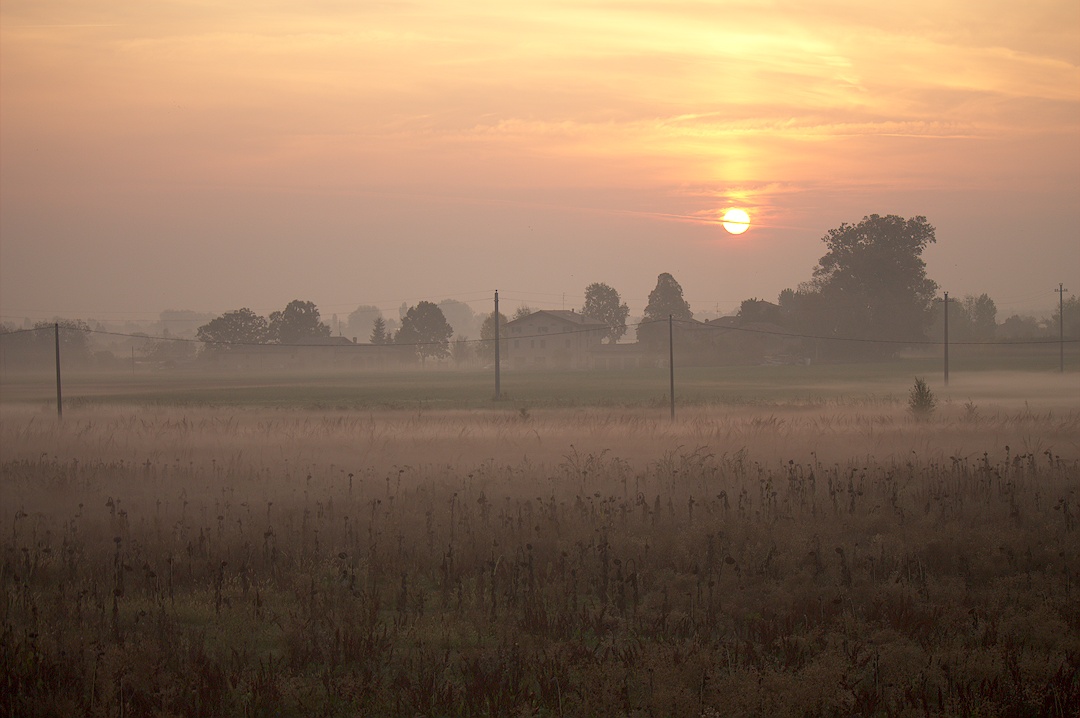
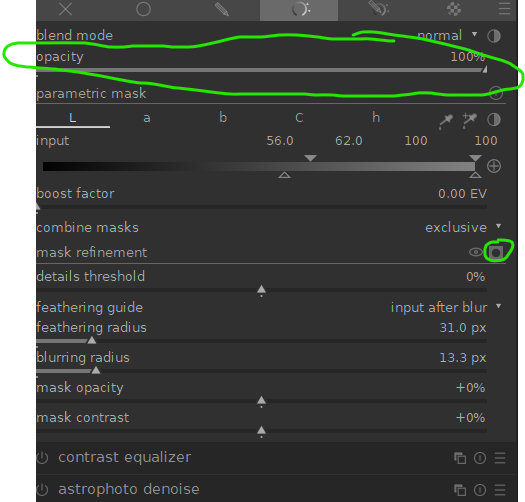
The image could add a bit of clarity / local contrast, specially in the clouds in the sky.

I use my trick for this, ‘local contrast’ module in bilateral mode, very low contrast (3), very high details (>300%). Then enable a ‘parametric mask’ to select just the highlights, tweak blend opacity to taste to control effect strength:

image

image

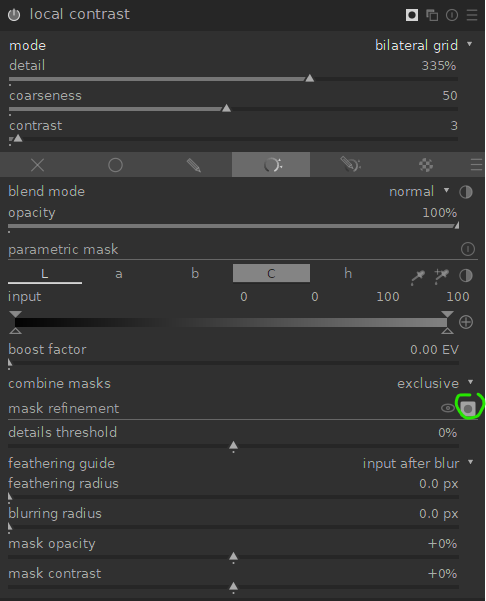
turn mask-preview back off, then tweak opacity slider to finely control the effect:
image

play with highlight-reconstruction modes to see which you like best (also try the ‘off’ mode :P)., I ended up using ‘reconstruct color’ and lowering the clipping threshold a bit, to turn the sun disc more yellow instead of plain white:

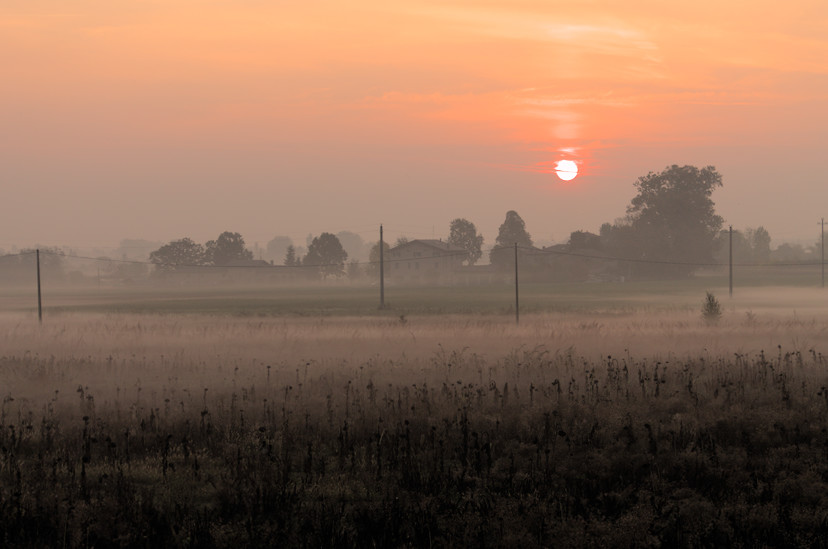
For sharpening I enable ‘diffuse’ module with the ‘AA filter’ preset, and move the module before ‘input profile’ (so below it). Then I add another isntance of ‘difufse’ and use the ‘lens blur medium’ preset, and move it above ‘input profile’.

image

Viewed at 50%, the sharpening is a nice blend between subtle but noticeable, but this if of course a different taste for everybody. Pick your own. Might also be fun to add a 3rd instance of ‘diffuse’ with the dehaze preset (it’s not that strong out of the box), but I think you are going for the hazy look, so you might not. Three instances of diffuse can bring big systems to their knees, specially if OpenCL is not working :).
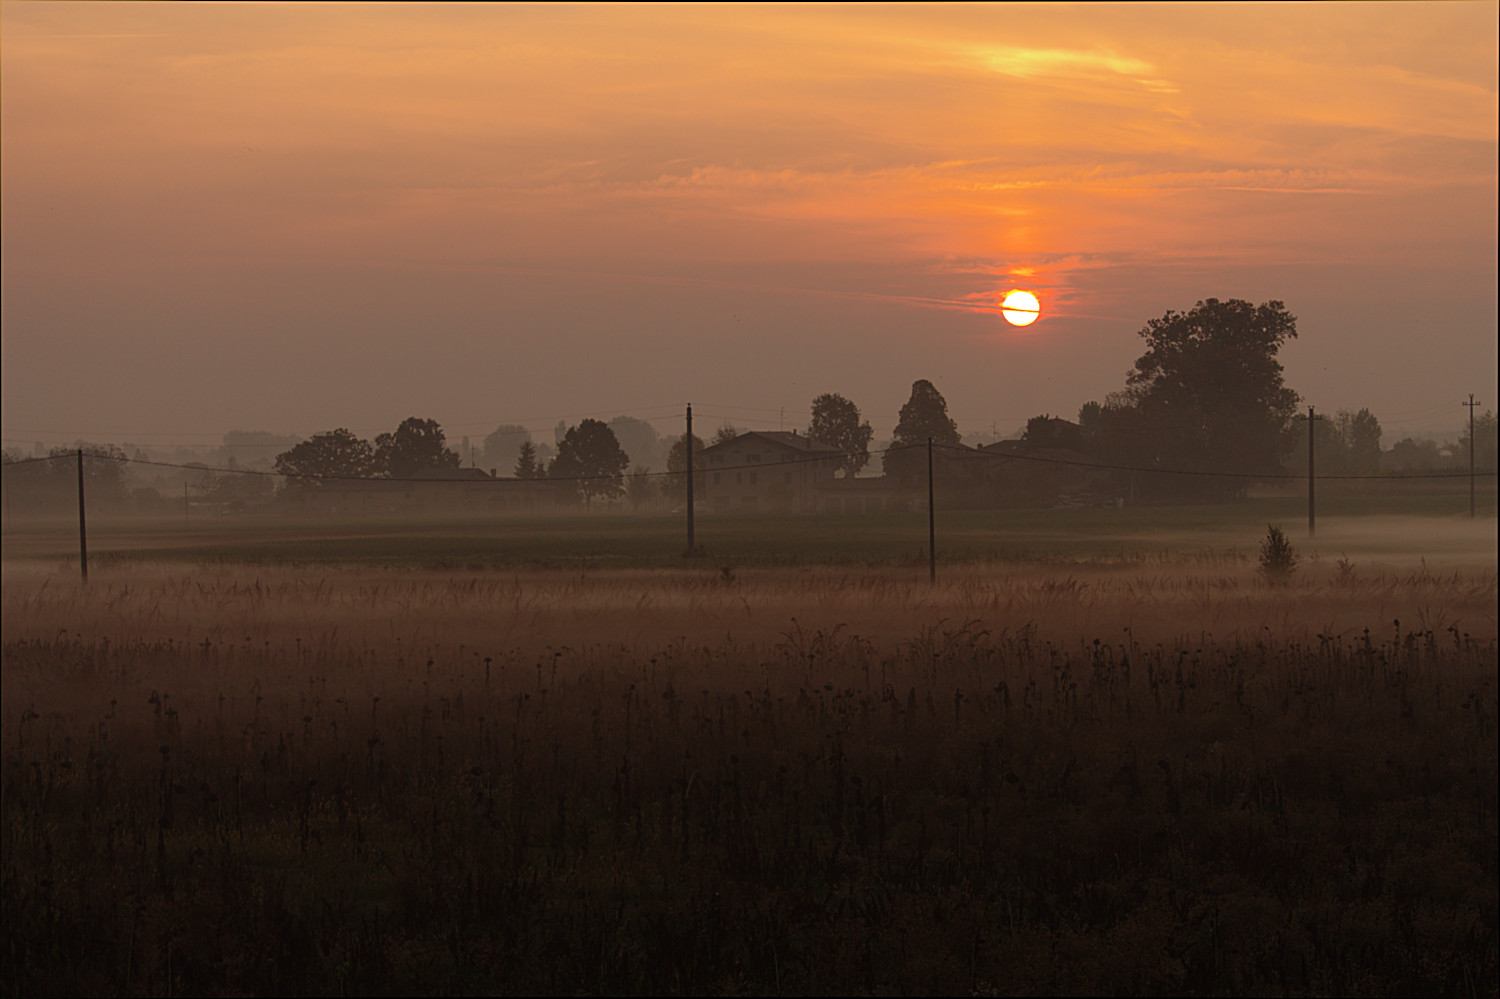
Final jpg export:

Well, normally I would do some kind of output sharpening, but my Lua is broken apparently, and I have no energy to start up Photoshop now :).

This is of course not 100% one to one, but in my eyes it does a very similar thing as your preview jpg.

If not, I would love to hear what differences you think are show-stoppers for you!

(PS: Filmulator also seems to do a nice no-hassle way with this!)

3 Likes

Nice explanation. AP has just moved the default position for diffuse to come after ie above color calibration…apparently having the color channels balanced allows better edge performance I think was the explanation?? Could be wrong…

1 Like

Try using lightness blend mode with filmic…it really cuts down the desaturation and sometimes that is okay. To me your image is a nice use case at least for my taste to do it… Also play with the color preservation modes…for some images its not too big a difference and for others you get quite a different result…

1 Like

It’s not easy to get right colors in Sunsets/rises with DT.
Often it is purple/magenta instead of orange. Tipp: turn off “preserve chrominance” and resaturate e.g. with “color balance”.
Happy editing!

1 Like

What I cannot manage is the light halo around the sun. It is always too much hard in the passage to the darker zone near to it. Also some super white ray through clouds makes feel like the daen was reflected in the water.

Thank you all! I will take a look at all you edit version. I’m on windows 10 so I think I cannot install 3.7 version of Darktable. In general, by seeing jpg, it seems to me that color gamut is the way I was looking for. Also RT seems more balanced straight away. I will try everything. Thank you!

For sure you can have 3.7…here is a build from just a few days ago…darktable windows insider program 10/10

there is an update each Sunday…

You can do other things too…so here I just used a drawn mask and colorize…sampled the sky around the sun…then just blended it in…also used retouch to clear away that band across it…using opacity and the colorize settings you can tweak the sun hue and saturation …this is quite zoomed in and I just threw it in there…so when you zoom out its pretty good…so fix the sun that way and then use the tone eq to setup the sky…I took a quick run at it with ART and RT …neither really handled the sun that fantastically IMO …but I am not as familiar with them…

Zoomed out…

I like the way you recovered highlight details, I think that the overall result is also better than my jpg.

Thank you!

I think this comes quite close to the original JPG (done in dt 3.6).


img-70db00752b83805d75f0b0021c12ba47.CR2.xmp (15.4 KB)

1 Like

Thanks for posting
darktable 3.6.1


img-70db00752b83805d75f0b0021c12ba47_03.CR2.xmp (12.8 KB)

2 Likes

My own, moody and foggy interpretation. I like the tones in the colored parts of the sky above the sun.


img-70db00752b83805d75f0b0021c12ba47.CR2.xmp (10.3 KB)

2 Likes

Only a blend of three exposure settings with Enfuse.