Why not use the embedded JPG as the preview on the lighttable?
On there other hand, sometimes, especially when I don’t have time to set the exposure and shooting with a compact camera prone to both clipping and noise, I take an exposure-bracketed series. There, having darktable undo that offset comes really handy: I’ll see the previews as the camera would have taken them, and can quickly delete any obviously badly clipped version, and I only have to fine-tune the exposure.
Since there are different workflows and working methods, there’s no one way that will work all the time, not even for the same person. That’s where darktable’s flexibility helps.
On more thought: unlike with SLRs, with mirrorless and compact cameras, the viewfinder image already reflects exposure, which makes manual mode a lot easier. Instead of turning an exposure-compensation knob, one could turn aperture and/or shutter speed. No compensation is registered, so darktable won’t undo anything.
Another point:
using the workflow setting of ‘none’ works fine for experienced users, who can be expected to know what that implies. But for new users, the resulting initial images could be rather deconcerting (dark, dull, flat, … etc.). And for them, I think the current defaults are well suited.
If, after learning the basics of darktable and raw processing, they decide they want to modify certain defaults, they can change the global settings and/or create presets suited to their needs/liking. Creating a preset or a style for the first time may take 5 min(? including looking up how to do it in the manual), but needs to be done once. I know it takes me less time than typing this post…
Defaults don’t have to be perfect, but just “good enough”. They cannot be perfect in most cases. Just look at the default added exposure: initially it was 0.5 EV, then changed to 0.7 EV. While this seems to work for most cameras, some require different settings…
@terry: One could argue that the garage door to the left is the “proper” exposure (that is, the one with the default auto correction). Perhaps not the intended result, but…
And there is a technical reason why the two images can be expected to look different: dt doesn’t read intent (aka the user’s mind).
There are two approaches to exposure correction in camera at work here:
one group uses it to ensure the scene dynamic range fits within the camera’s range as much as possible, so this correction should be undone in dt;
another uses it to set the overall appearance of the image, so dt should not undo the correction.
As dt can’t judge which is the user’s intent, the devs picked the first option.
When you use manual settings in camera, there’s nothing in the image file to tell dt why you picked a particular exposure, so dt cannot (and should not) correct beyond adding the baseline 0.7 EV…
As for things going “wrong”: for me the left image of the garage door is the properly exposed one, looking at the door and the bricks…
Yeah so I think the difference here is that you’ve deliberately told the camera “you’ve got your estimation of grey wrong - assume grey is this instead”, in which case the compensate button won’t do what you want (you’ve actually said “treat dark grey as if it were mid grey”). The process outlined assumes that the camera is using evaluative metering and has correctly identified the exposure of the image as a whole (and set the exposure so that the average image is mid-grey), but has failed to protect highlights, so you use compensation to do this (so yeah, not true ETTR, just highlights protection). Since mid-grey was correct, exposure compensation correctly restores it.
I never use the appearance of the processed photo to determine this, but use the raw overexposure indicator (though as I’m pretty confident about my in-camera ETTR this is rarely an issue).
I used to have a similar problem in that my ETTR process was to meter off the brightest part of the image and then apply a +2.75 compensation to it, since I knew the dynamic range of my sensor. I just used my own preset for exposure and filmic. Nowadays, since I have a mirrorless camera and can use the histogram, I shoot in manual and use slightly different presets.
MIght be worth a clarification in the user manual.
I shared the link for this discussion with the student and his response was " Think I have opened a can of worms with many opinions ! I need to read through a few times to understand each person’s reasoning."
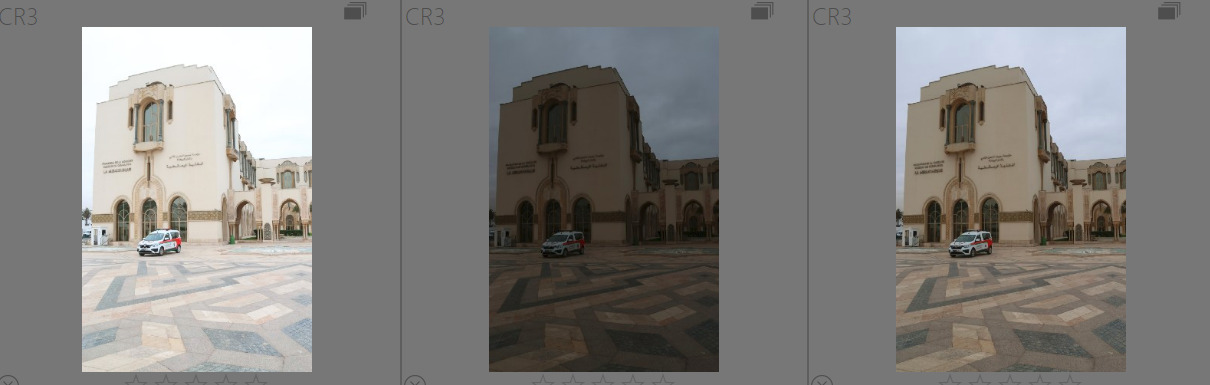
My response to him was this" I often open a can of worms. I have thought more about culling images based upon exposure/look in lighttable. I am not keen on it because it can be misleading and it is probably no quicker anyway. In the three shots shown below you would be tempted to cull the brightest exposure, but the reality is it is possibly the best exposure because the sensor has received as much light as it can handle before clipping and this produces the highest signal to noise ratio which minimises noise and maximises shadow detail. But the only way I know this is to look at the image in the darkroom with the raw exposure clipping indicator showing what is happening. BTW, when these three images are open in the darkroom they look nearly identical because the exposure compensation setting is adjusted for. This suits my needs when I do exposure bracketing to ensure the image is captured correctly by at least one of the exposures. I may then pick a suboptimal exposure because the subject looks better than in the technically best exposure. But for some users it can seem a strange default because they have applied exposure comp in the camera to get the look they desire."
Along those lines, why not package a global preset that incorporates the +0.7 exposure level default and turns off compensate camera exposure (CCE) and then add a note to the manual to explain that as an option? That might reduce the number of comments on the subject and help new users as they encounter the setting as they’re adjusting from whatever software they were using before. The preset provided by @kofaabove works fine.
@kofa: yes, the option to use the embedded JPG as the preview on the lighttable might work, but you still have the inconsistency between the preview and the image as opened. As best as I can tell the CCE isn’t a requirement for the scene referred workflow and no modules expect that compensation, so I would prefer consistency from viewfinder => camera display => culling => edit. That’s just my take, FWIW.
Actually, I think the reverse is true, that a new user who isn’t accustomed to an automatic exposure compensation is likely to pause and question what’s happening, which in turn generates more of the same questions and debates. That’s what @Terry is trying to address. I’m not saying DT needs to do things as the other programs, but some consistency helps with learning.
But that’s an unintended trick question because they are both the same scene and exposure. One is not more proper than the other, they are identical except for the way that DT presents them.
I don’t know if I agree with that. In both cases I deliberately told the camera to assume a different middle grey, I just used different controls on the camera body to do that. Both shots reflect the same decision to compensate exposure in the same way, but DT interprets them differently because the manually set exposure doesn’t reflect a compensation in the EXIF data
I agree. As I said above, that and a preset built into the module might go some way promoting better understanding of the settings and its options in the future. I can submit a feature request, if desired.
Again, the process assumes you’re using exposure compensation only to protect the highlights and that without the compensation the image would be middle-grey on average. If you’re either (a) using something other than exposure compensation to achieve that; or (b) using exposure compensation to achieve something different, then these defaults won’t work for you. So don’t use them.
Better to just disable and bake your own. As I say, I’d still prefer not to have any defaults than a proliferation of alternative defaults for various workflows. I think AP’s idea around this was to suggest an entire recommended end-to-end workflow for users (including shooting).