How to run 2 sessions of darktable (how to show 2 live edits side-by-side)

I’m new to “advanced” photo editing and darktable. Graduating from a base of GIMP / PaintShop Pro and LightZone.

I’ve watched dozens of videos from Bruce Williams, Boris Hajdukovic, Rico Richardson, Stefano Ferro, etc. They make editing look easy. When I sit down to edit one of my own photos, I blank out. My edits end up being very basic and un-inspiring.

The play raw site is great. I’ve downloaded others’ edits but having a hard time understanding them. Why did this person use this module? What settings did they change?

What would help me is being able to have 2 sessions of DT running at the same time. I could look at someone’s tool stack and do a real time comparison how their modules’ settings are different than the defaults. In the 2nd session, adjust the settings to match. The learning is seeing what’s different and being able to see the effects changing in real time.

I was taking screen shots of the module settings, opening a different duplicate, then comparing the saved screen shot. This is slow and not very productive. For example, filmic RGB that has 5 tabs inside the module … this becomes tedious to document someone else’s work this way. Parametric masks, too.

Launching a second session of DT (Windows) says that the database is locked.

What would it take to have 2 sessions of DT running against 2 different duplicate XMP edits of the same source image?

You’d be better just creating a virtual copy of the image, load the xmp to it and and flick back and forth between the two. Space forward and back space back if you’ve not got the film strip on.

I can do what you’re wanting easy on Linux but wouldn’t mess aroud like that, not sure about on Windows.

Maybe start in the active modules tab… click your way up and you will see what each module does to the image… you can pause at each step to see the settings but really don’t over think or you will induce paralysis… Look at your image. Decide what it needs in terms of tone color and contrast and then try some tools… I could edit most images if pressed with tone eq color calibration and colorbalance rgb only and then when necessary filmic or sigmoid and the accessory modules for lens correction and denoising maybe use diffuse and sharpen for sharpening and I have a bunch of local contrast presets that i use… Keep it simple out of the gate and then when you master a basic workflow…you can experiment more…

1 Like

I could explain how to set up a second version of dt, but I don’t have time today. It’s not difficult.

It’s not too hard… you need to start the second session with (I think) these parameters:

--configdir "C:\dtvintage" --cachedir "C:\dtvintage" --tmpdir "C:\dtvintage"

configdir is the main one, I think the others are good too…
Replace the C:\dtvintage (I was trying out an early version of dt) with whatever folder you want to use (create it beforehand) to hold the database and other bits of your ‘second dt’.

In Windows a convenient way of doing this is to make a suitably named desktop shortcut and add the string into the target box:
image
PS ignore the fact that the screenshot shows that I called 4.2 vintage… it was actually 2.4 :face_with_raised_eyebrow:

Thanks @123sg.

I am curious whether RTFM is wrong or confusing. This is what I had attempted.

"%ProgramFiles%\darktable\bin\darktable" --library :memory:

based on this:

Does this not work for Windows? Or is it a misunderstanding of the meaning?

I did also find this in GitHub

So cachedir and tmpdir might not be required.

I probably won’t get to play with this until the weekend.

1 Like

I’ve never tried the memory option… I’m far from an expert anyway​:wink: but the set of configdir, cachdir and tmpdir was recommended when I was having issues running a dev build alongside 3.8 I think it was. Really don’t know much about it! Good luck :+1:

Not to de-rail this but really if you have 2 edits I think you just make duplicates. What you are trying to do seems overly complicated… When you click on the icon of a duplicate in the duplicate manager it toggles the display to that duplicate so it can be like having before and after. Or you can just change the lighttable mode to cull and side by side and just hitting ctrl L will toggle you there for a side by side… This just seems like a better way to use your screen space and real estate and couple this to the dynamic snapshots I think you should be able to get most any comparison… This quick video shows 3 versions being edited… easy to switch to on off comparison or side by side and using snapshots you could now do dynamic panning and zooming…

1 Like

This is a really cool trick, nice!

I think he wants to compare the used modules side by side, which is AFAIK not possible using only one instance.

The different options all have a specific use:
–configdir specifies where to store the program configuration (e.g. whether to use sidecar files)
–library specifies which library to use; the library is used to store edits, and can only be used by at most one dt instance at any time
–cachedir specifies where thumbnails are cached
–tmpdir is used for temporary files

So there is a problem right of the bat when you want two dt instances accessing the same image and edit: both instances need access to the same database, and that’s forbidden (as it’s a very good way to destroy a database).
A similar issue exists for sidecar files: two instances of dt trying to manipulate the same sidecar at the same time can do “funny” things (look up “race conditions” or “data race”).

(Note that this is not the same as having two instances of dt running on separate databases and/or configurations. Those two instances won’t try to modify the same database.)

What might be possible is to use two separate instances, and use physical copies of the images files you want to study:
the original should ideally be read-only, and in its own copy of dt (and with --library :memory:). Then use a copy of the image file to work on (I would probably use two directories, one for the originals, and one for my edits). One other thing to keep in mind: with --library :memory you may not have access to your styles and presets (as “data.db” is also locked by the first instance of dt). But that’ s not a problem if you use it for the originals.

Two instances is still really awkward to try to do something like that… you can use a series of duplicates or just make changes and toggle back and forth with undo and redo.

In the beginning I was focused on trying to catch all the slider settings and modules that people were using thinking this would teach me the tool… I didn’t find it helped… It was a bit like trying to just memorize information for a test with no understanding. Once I just started to just experiment and more importantly to understand tone and color better the tools and the settings made far more sense.

I also found it easier to analyse tools using a test image and not a photo… so something like this has a wide range of color and elements to use for looking at color contrast sharpness… etc…

But everyone has their process…

2 Likes

Yes. The fastest way of learning a tool is using it. Wouldn’t necessarily do this with a chainsaw, but here the side effects are not so nasty! :slight_smile:

2 Likes

I suppose some sort of image report could be cool…not sure I would use it but we have the hover tool tip that shows the things that are change in a module. If you could generate a sort of report for active modules I guess it could help to break down an edit… I guess you could also have two instances of the same module… Blend one in difference mode to show you were in the image things are changed so that you could target your examination and then disable that and active that second instance with those settings…then you could toggle that one an off for a visual or zoom and pan to examine… bit tedious but I suppose to assess something like diffuse and sharpen maybe…

Great Ideas, especially the difference mode - I made a mental note! :+1:

Configure this for your own system:

Create a directory on another drive or partition, if you have one, or put it somewhere on your C: drive. Name however you want to make it unique. Create a matching file for use as a bat file.

image

This is my bat: dt3.5C.bat:

start /d J:\dt3.5C\darktable\bin darktable3.5C.exe --configdir J:\dt3.5C\darktableconfig\config\ --cachedir J:\dt3.5C\darktablecache\Cache1 --library :memory:

image

I think, don’t have a good memory, that when you first start this version, the darktablecache and darktableconfig directories will be created, so all you have to create is the darktable directory.

image

Copy those directories from your installed version to the new darktable directory.

image

Rename darktable.exe to the name you want to use for your second version.

Create a shortcut to the bat file wherever is convenient.

image

I think this is what you’ll get when you first start the new version.

image

image
This is not showing all the files.

By using memory for the library, you will not create a database. By setting storage to Never, you will not overwrite the xmps you open to examine.

For each playraw I create a directory and download the xmps that each person submits. I have an additional programmable keyboard. I copy the name of the person who submitted the xmp and when I go to download the xmp, I just hit a key and the person’s name is inserted into the xmp name.

image

In your installed dt version, you import the raw and create duplicates for all the example xmps. For each duplicate, use load sidecar file to load one of the example xmps into that duplicate. I have a shortcut for that: shift+ctrl+4. I create a text file in the directory to keep track of which duplicate has which example xmp.

image

Once you have loaded all the examples, you can import that directory into your second dt version. Then you can open each example duplicate and work through each step of the edit.

If you create your own edits, to load them into the second dt version, close that version, open it up again, and import the directory again. It should bring everything up-to-date.

Everybody is welcome to help out on making these directions correct or adding additional needed info.

1 Like

Thanks @Underexposed, this works.

There are 2 ways I found to do this inside DT. I was using tagging and add the person’s name. I’ve since changed to putting the name in the duplicate manager. This shows up in lighttable in the metadata under version name.

1 Like

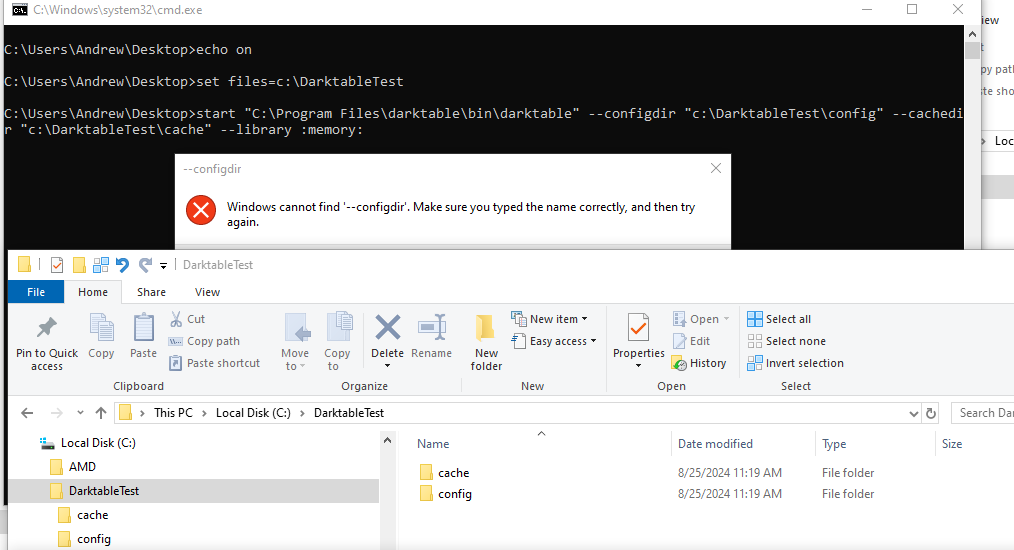
Windows 10. I got this to work on an older version. I’ve updated to 4.8.1 and when I run the .bat file for doing this, I get an error "Windows cannot find ‘–configdir’. I’ve tried various combinations - spaces vs. no spaced, training forward slash vs. none. The folders do exist.

echo on
set files=c:\DarktableTest
start "%ProgramFiles%\darktable\bin\darktable" --configdir "%files%\config" --cachedir "%files%\cache" --library :memory:
pause

Windows is trying to access a file or directory called --configdir. This is not a darktable problem, but one with the Windows command line you use.

It only happens when I try to execute darktable from the above batch file.

I noticed if I remove the start command, it works fine, but then I have a command prompt that launched darktable with an open window.

I rarely do batch programming anymore, but I’ve used “start” to launch windows executables like this to prevent command windows from staying open after the “real” executable launches.

I found an old post somewhere elese that said to pass a null command to start first. The batch file with this change works (darktable launches with the correct startup parameters AND the command window stays open only long enough to launch the darktable executable), but I don’t understand why.

@echo on
set files=c:\DarktableTest
start "" "%ProgramFiles%\darktable\bin\darktable" --configdir "%files%\config" --cachedir "%files%\cache" --library :memory:

I agree completely b/c this is where I am currently in my learning. Making too many changes and losing the image to over processing. Doing so much only serves to show causality and is useful to a point; but then reset and use the fewest tools necessary.

1 Like