Hugin pano/HDR + darktable in scene-referred

How to use Hugin to perform image alignment and stacking for HDR and/or stiched panorama and still preserve (sort-of) signal linearity for later edits ?

1. How to shoot ?

When shooting the pictures, ensure you lock AE (auto-exposure) and AF (auto-focus) so the whole series of images to stack have the same exposure reference and same focal distance.

If you are not bracketing for exposure (meaning if you don’t intend to use HDR blending), expose to protect highlights in the brightest region of your panorama.

1. Prepare the raws

  1. Open your series of raw images in darktable.
  2. Disable all modules except demosaic, lens correction, dithering and orientation. Disable even white balance, color calibration, highlights reconstruction, exposure and especially filmic/base curve.
  3. Export your raws in TIFF 16 bits with Rec2020 linear color space.

You could export in EXR or TIFF 32 bits but Hugin expects images encoded between 0 and 1, so display-referred (linear or non-linear), therefore integer file formats are enough. Since raw images are usually 12 or 14 bits linear, if using 16 bits, you don’t need non-linear transforms either.

You guessed it… we will force Hugin to blend the signal as raw as possible. The images will look green, that’s normal.

Alternatively, if you have an identity ICC profile you may use it at input and output (overwrite the standard matrix at input profile) so the camera RGB is completely untouched before merging.

2. Operate Hugin

  1. Import the TIFFs sequence in Hugin,
  2. Create control points in “feature matching”,
  3. Optimise geometry for “everything”, click “calculate”
  4. Optimise photometry for “high dynamic range, fixed exposure”, click “calculate”

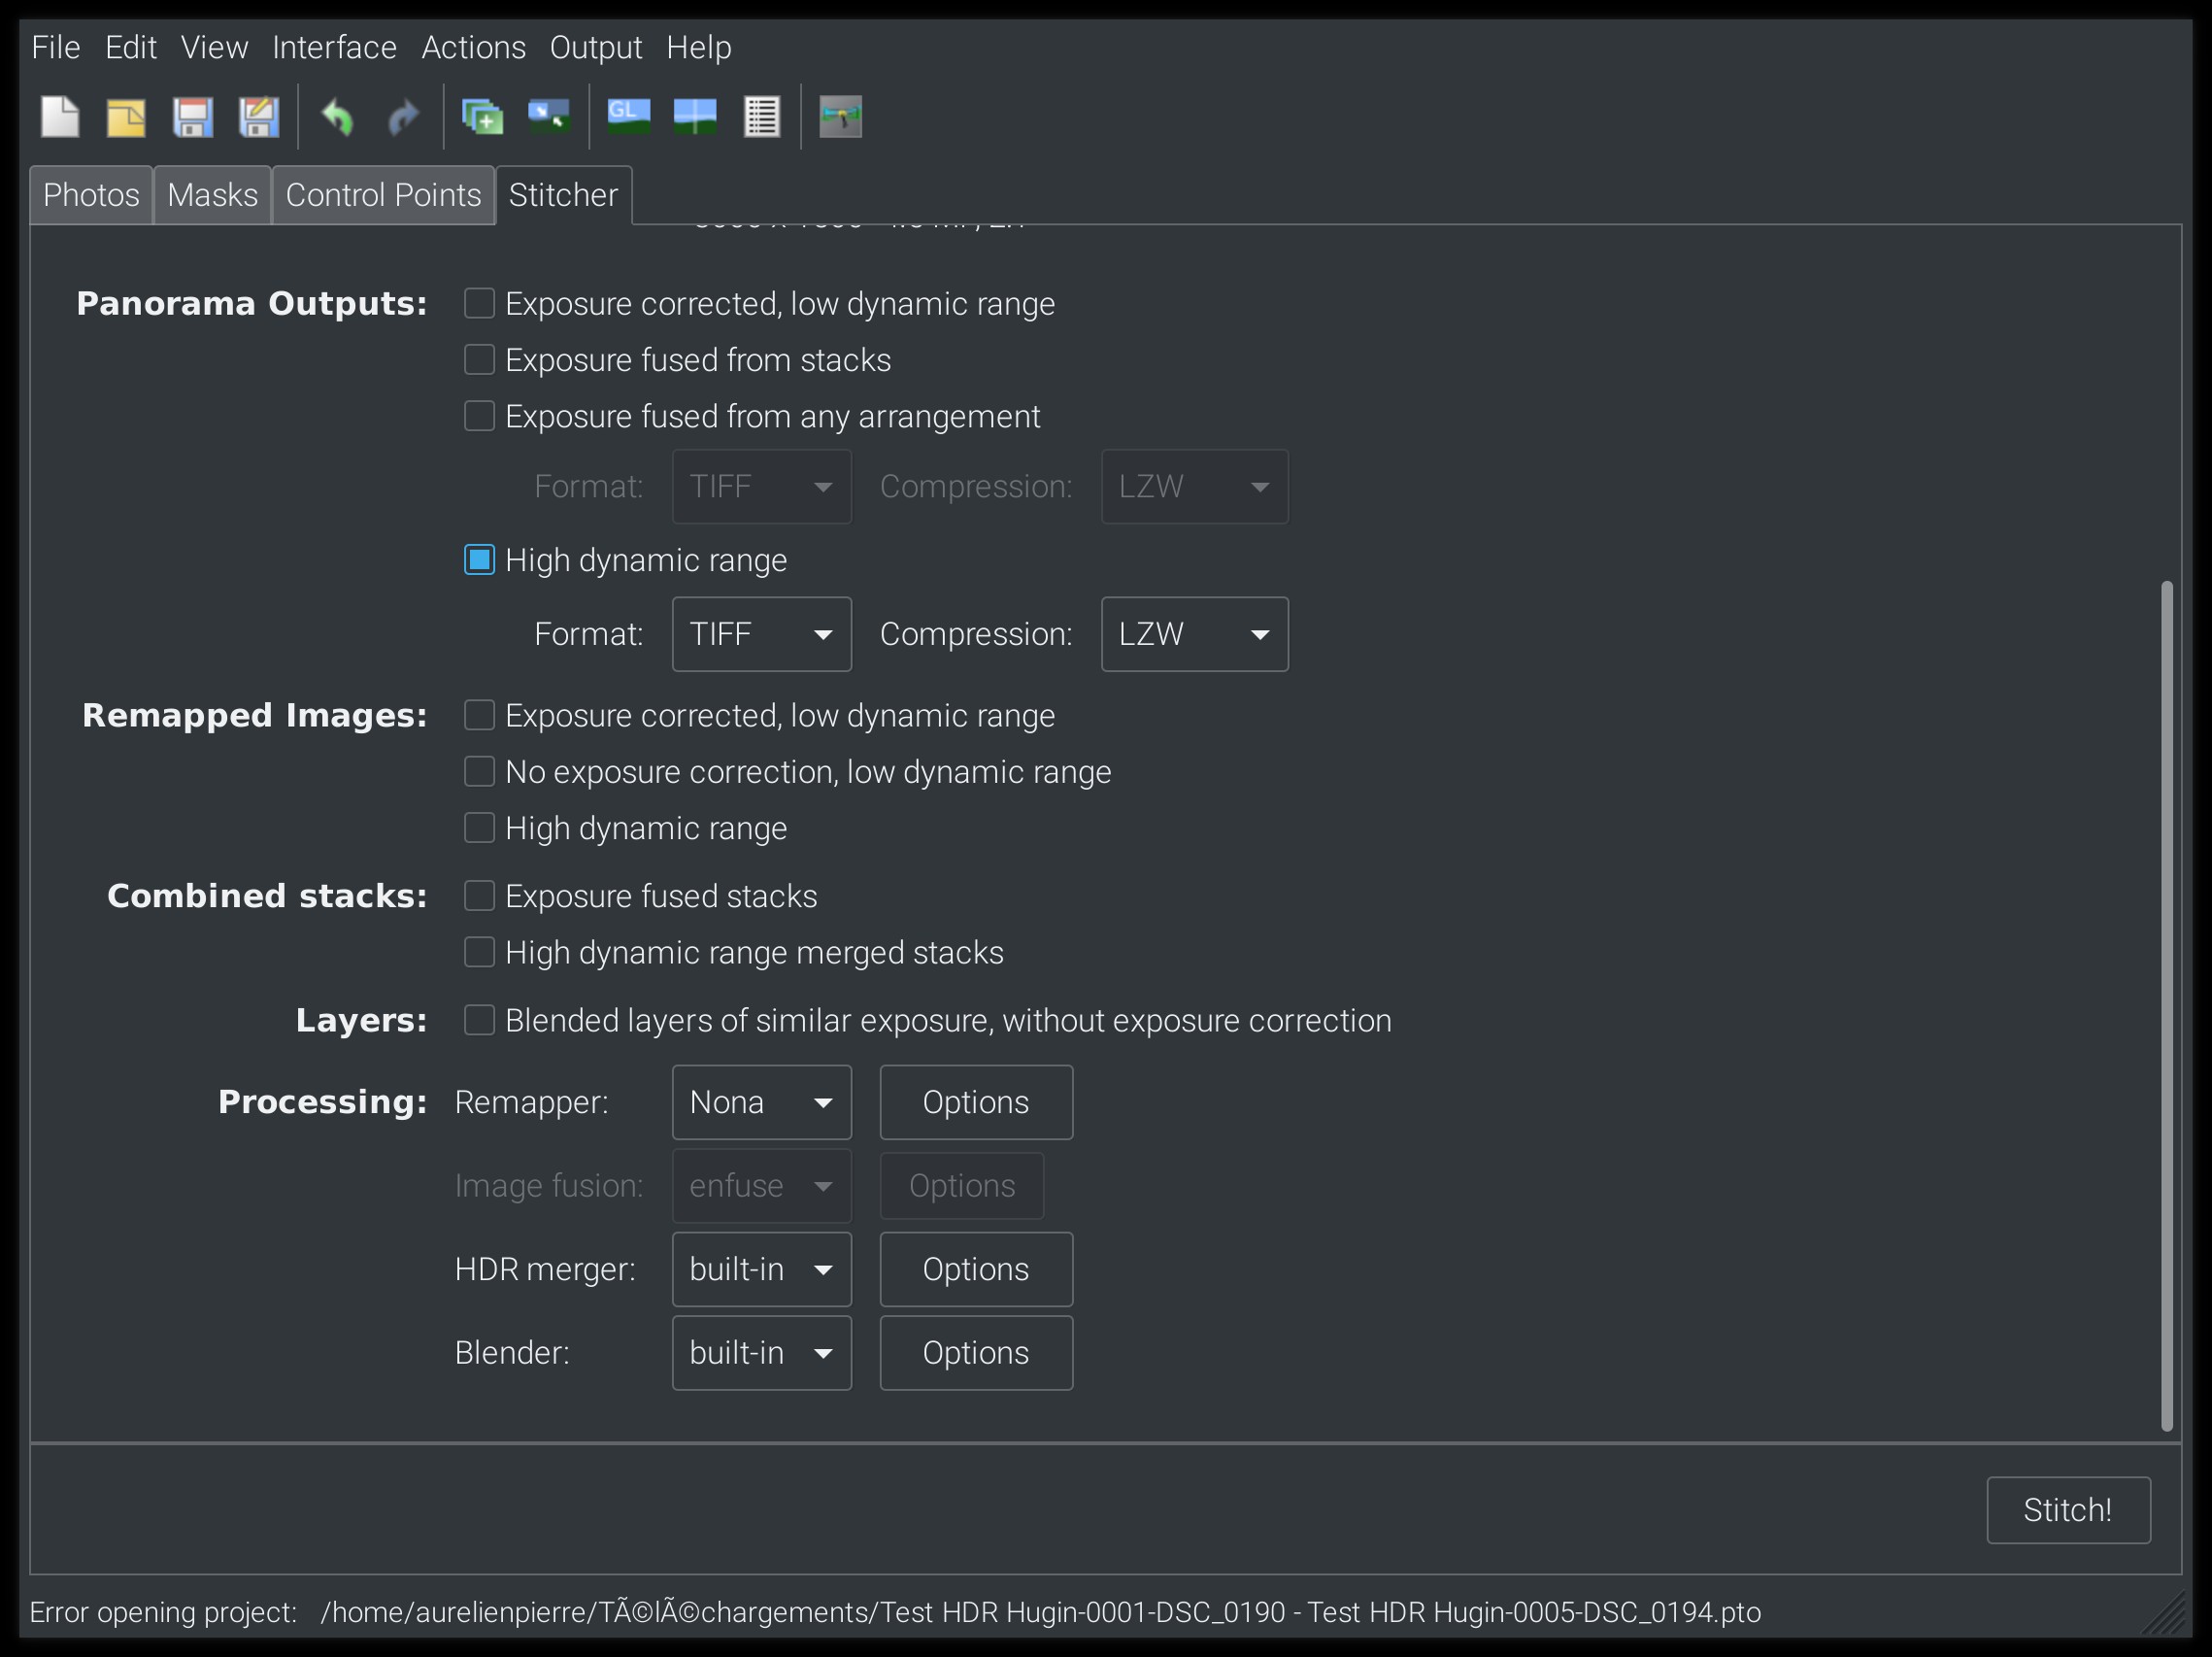
3. Export from Hugin

  1. Go to “stitcher” tab,
  2. Select “High dynamic range” (EXR or TIFF, doesn’t really matter for color, TIFF may be smaller) as output,
  3. Select “built-in” for HDR merger and Blender options. Merging options should use “Average”.
  4. Export (Stitch !)

4. Import in darktable and process

  1. Copy-paste the white-balance values for D65 from one of your source raws to your stitched HDR/pano,
  2. In exposure module, brighten the image by quite a lot to nail average luminance.

  1. Bring back highlights with filmic (here with contrast = 2, latitude = 20%, shadows/highlights balance = + 50 %)

  1. Finish color to taste.

Notes

#1 - Failure to nuke darktable white balance and highlights clipping before going to Hugin resulted, in this image, in magenta posterized halos on the wall behind the desk lamp. Merging non-white-balanced and without any kind of highlights reconstruction helps getting back as much highlights color as possible, from valid exposures. WB and highlights get fixed on the merged/stitched final image.

#2 - I haven’t checked Hugin source code but from what I see and what I read in the UI, its HDR blending is a simple averaging, which should let the signal linear if you input it linear. For this reason, it is important that you have at least one picture where highlights are 100% unclipped. In any case, Hugin doesn’t seem to be doing any nasty HDR tonemapping thing, which is good for us.

#3 - I haven’t tested in details if Hugin can accept unbounded EXR files in input, but it doesn’t matter to us here since we come from camera bounded 14 bits linear… Using 32 bits EXR would only use disk space for nothing.

#4 - Ever wondered what filmic shadows/highlights balance is for ? Let’s set it to -18% (it was + 50% before):

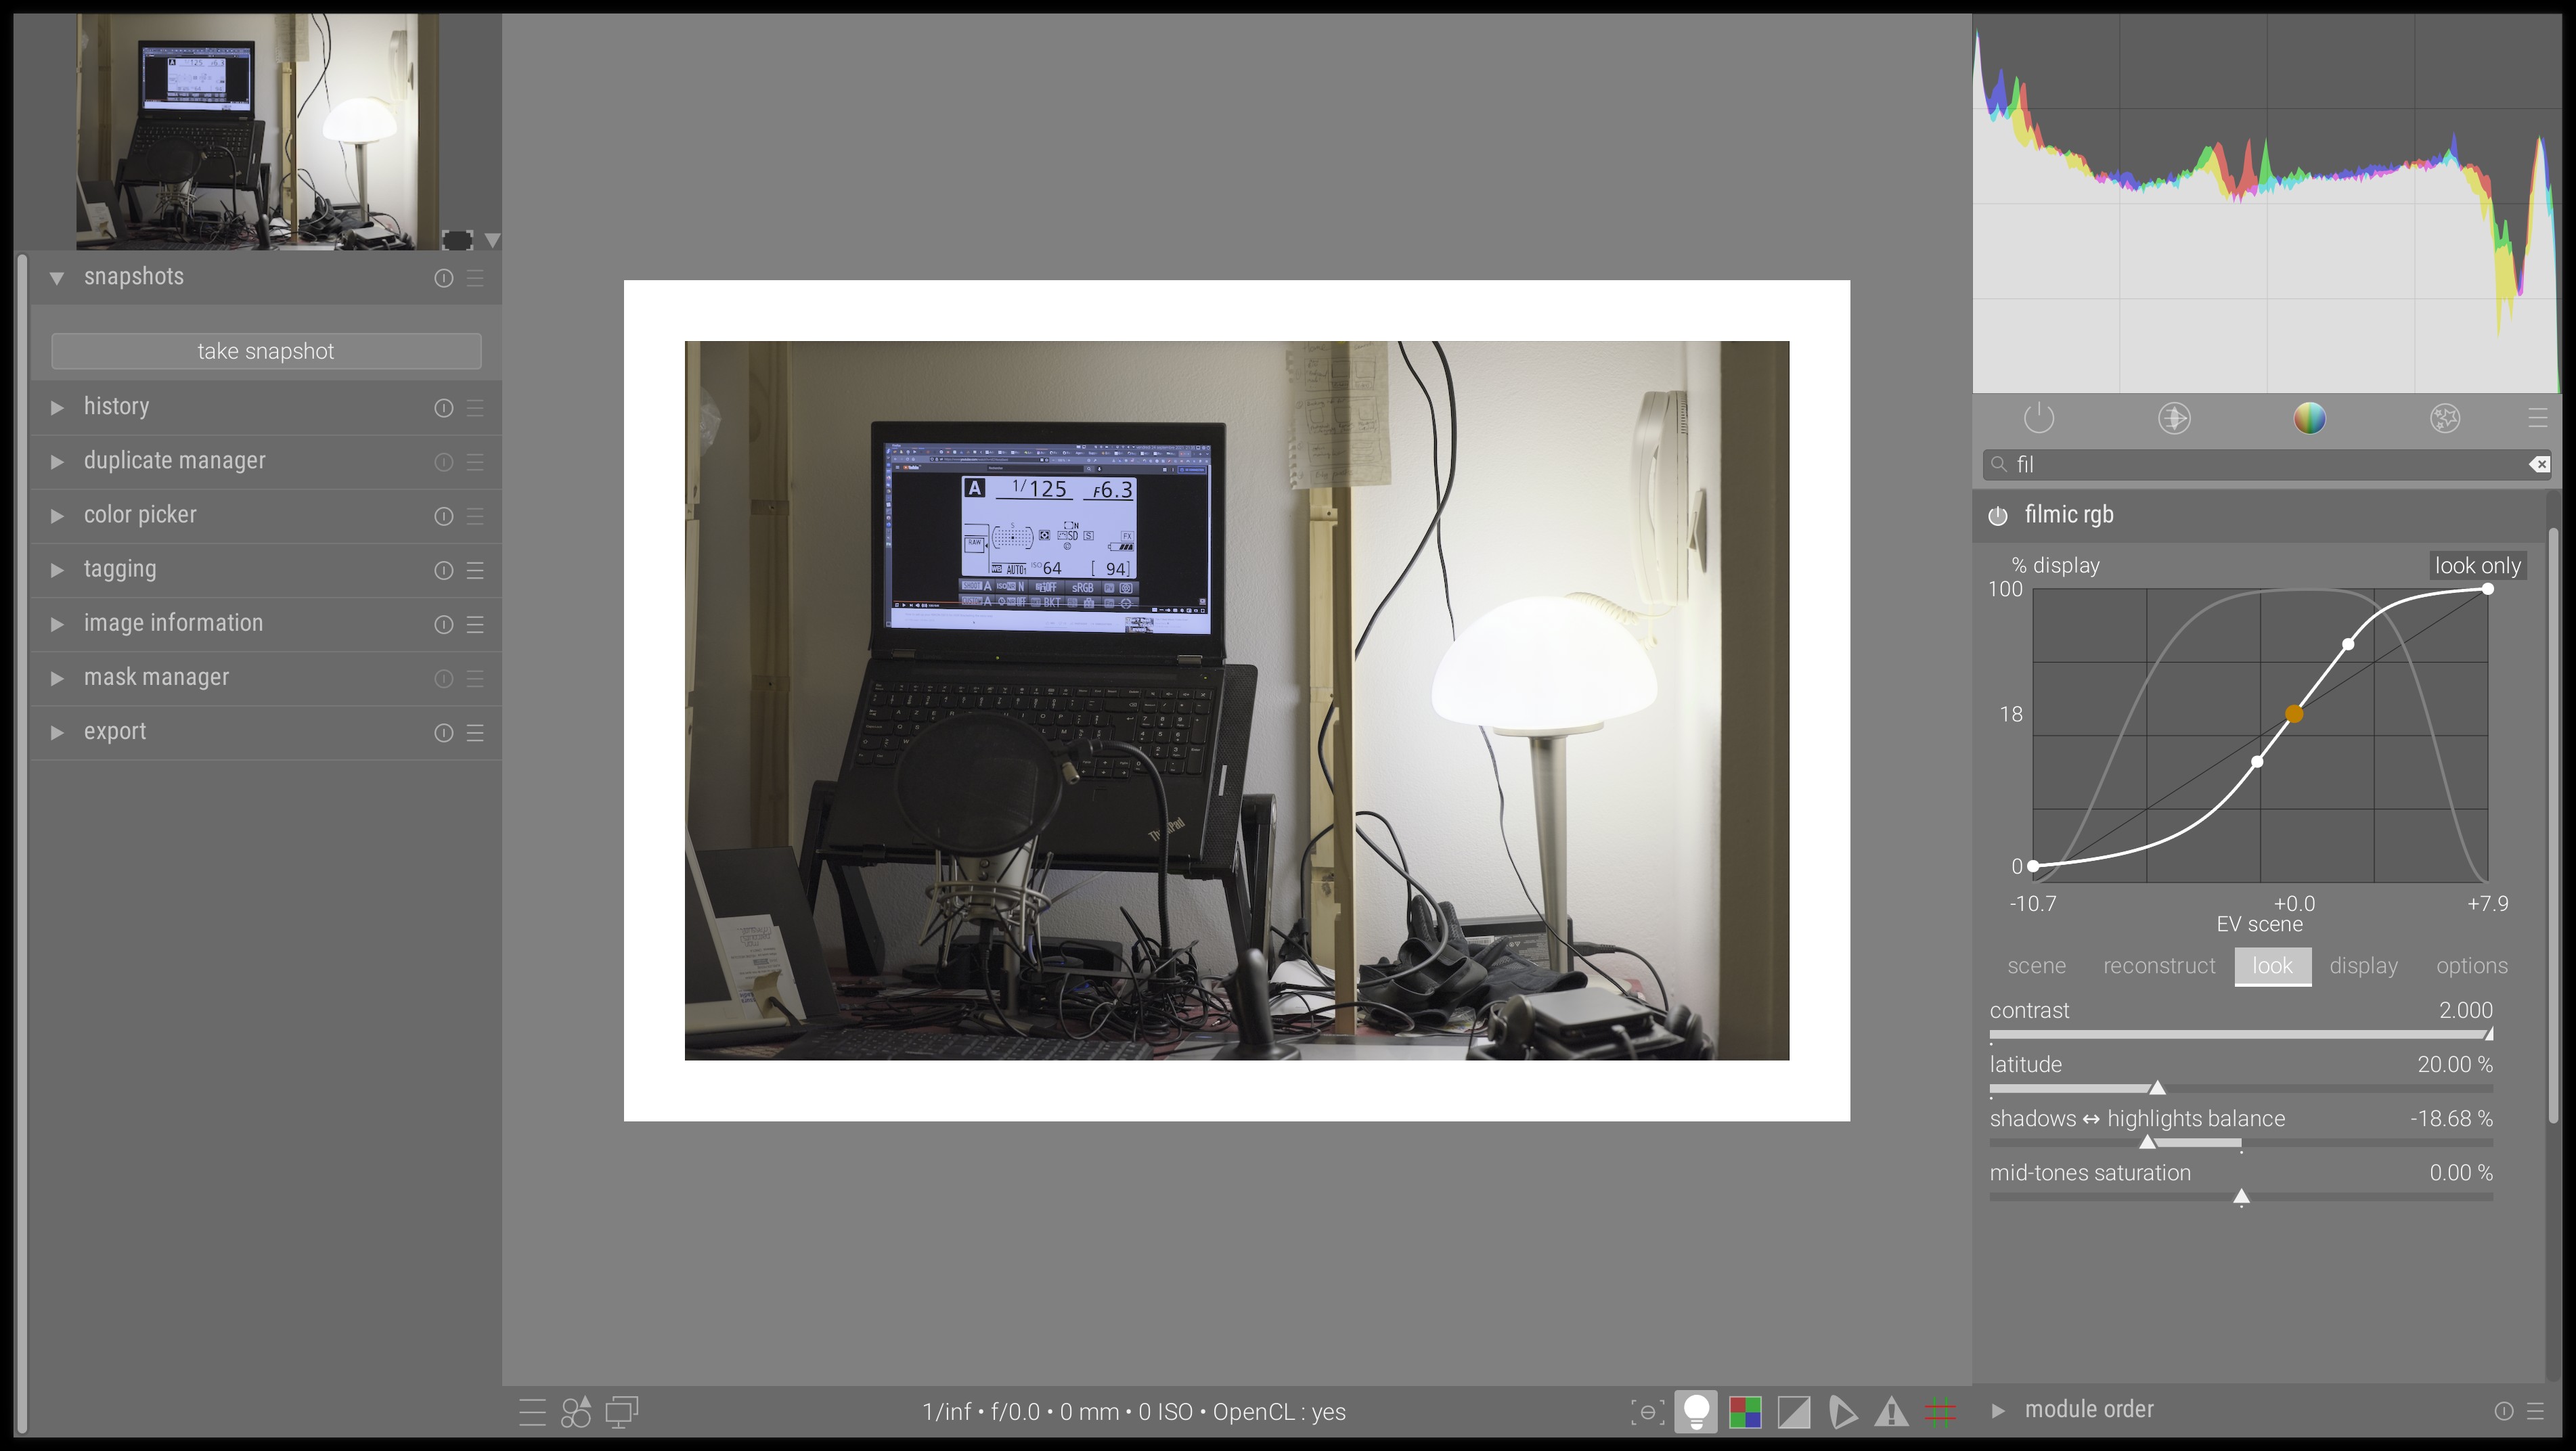
White emissive on top of white reflective makes the difference much clearer than usual.

#5 - In case you can shoot exposure bracketing on a tripod, you can ditch Hugin and directly use darktable’s HDR merging. It’s scene-referred compliant too.

#6 - Always shoot bracketed if your subject is not moving, there is no reason not to. Stacking images helps not only with dynamic range but also with noise. That’s actually how smartphones manage to get very good results with shitty sensors. It’s still possible to deal with moving subjects through stacking by using masks, but the overhead is not worth the extra quality.


Real-life pano obtained with this method (non-HDR):

27 Likes

Wow, thank you for the instructions. Just when I have a picture I need to stack. I followed your guide but I failed at optimize geometry step. Hugin kept creating a too small field of view or doing nothing at all with any geometric I chose. If I post the RAWs here, would you give it a try?

1 Like

I suppose you need to calculate the field of view/optimal size/crop before exporting: (just hit the buttons in the right order)

1 Like

There could be an error in the automatically created control points that prevents the optimizer from working properly. After Create Control Points, in the Control Points tab you can select each pair of images and see if there are any points that are obviously in the wrong place. Or can try to fix them automatically - after Create Control Points, right click in the list of photos in the Photos tab and select Control Points → Clean control points.

1 Like

This is why I like the scene referred way over the basecurve these days.

In the dark days of Lightroom having its panomerge feature you had to bake in your edits before the merge or else you’d lose access to the camera styles (I don’t remember what the exact term was, but it is where Adobe kept their version of basecurve for “Camera Neutral” or “Camera Landscape” settings) and a few other ACR gubbins. Fimic doesn’t care, linear data be linear data. TIFF, RAW, etc. Things may have changed in the time since I last used Adobe but that always annoyed me that you had to bake in your RAW conversion before the final pano product.

Edit: scene referred gives you more flexibility is the crux of what I’m getting at here, at least in how these tools have been designed so far. My guess is Adobe isn’t overly worried about interoperability with other tools as much.

The main issue I have with Hugin is its fussiness on input files. Aurélien briefly addressed that.

@lhutton I don’t know which version of ACR you last used. Same here: I haven’t played with the CC in a long time, and even though I have had it at work recently, I won’t use it if I can help it. Later versions of ACR do allow you to merge raw files before adjustments[1] but as far as I know don’t have panorama and alignment capabilities as Hugin does. Last I checked panomerge and the alignment tool are still separate and have been collecting dust and as a result performing worse than they have previously.


[1] Unfortunately, it still imposes its built-in beautifying adjustments afterward so you can’t do scene-referred editing.

@afre the last version I used was 5.x circa 2012 or thereabouts. The panorama function would send out to PS to do the merge but it would functionally export the RAWs to TIFFs with the adjustments baked in. But from what I remember you didn’t have access to do all the RAW adjustments when it came back into LR after the merge and like you mention the beautifying adjustments were baked in.

I know what you mean. The integration of LR/ACR has improved a lot since. In many ways, LR is now better than PS (at least being developed much more heavily) due to Adobe’s shifting strategy toward mobile and touch and appified software. In this sense, its software is even less relevant to people like you and I and this community.

So, although many of us know how to make panos, do HDR and use dt in a scene-referred manner, tutorials like this one are very helpful to the community. Keep it up @anon41087856!

I followed the process and I end to have issues with my white balance.

Here you can see a snip of the stitched image that was white balanced before Hugin.
image
When I disabled color calibration and white balance, stitched the image, and applied the same white balance and color calibration settings to the stitched image as in the first snip, the result is below.
image
The first image is stitched as low dynamic range TIFF, the latter as high dynamic range TIFF. I would have assumed that applying the same WB coefficients and the same color calibration would give me the same end result.

1 Like

Also, I noticed that in filmic when auto applying the white and black point, the black point is always at -16EV.

I get the same cast as you if I follow the steps from the op.

What works for me is to let white balance enabled before exporting the tiffs.

Also, when editing the stitched image in dt, I change the input profile from embedded matrix to linear Rec2020 RGB, which gives a result I like better. Also, at this stage, no need to do white balance.

Regarding this input profile setting thing, don’t trust me :man_shrugging:, because I’m not sure what I’m doing (my guess is: I exported a tiff with Rec2020 and I assume Hugin worked and preserved it. But it’s only an uninformed guess… )

I exported earlier with white balance enabled, but then I read this post. I think it makes sense, that WB multiplies the RGB values, and if Hugin is clipping at 1.0, we don’t get the full dynamic range. It is better to ensure that we don’t introduce any clipping in dt. But why the RGB values that should remain the same through stitching get changed so that multiplying the output with the same WB coefficients gives a different result than multiplying the input. Maybe @anon41087856 has some idea.

Also, when editing the stitched image in dt, I change the input profile from embedded matrix to linear Rec2020 RGB , which gives a result I like better.
I think your guess is right. I also change the input profile to linear Rec2020.

1 Like

Just a note you might want to consider.

dt’s rawprepare module (required for all raw files) use the black and Whitepoint parameters. For some cameras / files these are slightly wrong resulting in values above 1 at that stage already. WB coeffs and the demosaicer further contribute .

You might want to set exposure to a fixed value to ensure there is no clipping. Also the demosaicers differ somewhat, I would suggest to use RCD for low iso and lmmse for high ISO images as both keep overshoots under control quite well.

Just my experience …

1 Like

Thank you for the tips. I’m exposing in Manual mode, so I can control the clipping. I’m using for low ISO RCD+VNG4 to get smoother skies.

I was wondering, does it have any impact to the tones that white balance is normally applied to an image that has a standard color matrix applied, but now in this case it is applied to an image with Linear Rec2020 RGB?

Thanks for the tutorial! Finally got around to shooting some handheld panoramas and practicing them. In addition to the original post, I found a couple of gotchas:

  1. When adding 16-bit TIFFs to the project, Hugin (as of version 2021.0.0) doesn’t consider them linear files but sets out to fit a “response curve” to the data during the photometric calibration. Given the lack of multiple exposures per view, this is going to fail (as far as I understand). I wondered why the output TIFFs from Hugin looked like the contrast had been boosted and response to edits was really different from the original images. For 32-bit TIFFs, hugin flags them as “linear response” and doesn’t do the curve fitting. You can set the 16-bit TIFFs to linear as well by selecting them all, right click → Edit image variablesCamera responseTypeLinear. Afterwards, perform photometric calibration.

  2. Hugin seems to take white balance coefficients from the EXIF data and tries to utilize them to unify the white balance between the images. However I found that causing strange color casts in some parts of the panorama, and Hugin shouldn’t be applying any white balance adjustments to the scene-referred data anyway. After loading the images, select all images, right click → ResetReset user defined → check only Color and select *to one (no color correction). Click ok.

  3. After considering the above, I began wondering if any of the photometric corrections are meaningful. After setting the image response to Linear and disabling all the color corrections, vignetting correction is all that is left. However if lens correction is applied in darktable, vignetting should be already taken care of. After resetting the values as described above, one can probably actually skip pressing the photometric calibration button altogether and leave vignetting parameters to zero.

  4. Speaking of lens corrections, distortions are also already handled in darktable lens corrections module if data is present. Therefore you can skip optimizing the distortion parameters in Hugin. Select e.g. Positions (y, p, r) in the Geometric optimizations combobox instead of Everything. Note that the case may be different if you can’t undistort the image in darktable. For my handheld panorama this turned out to be sufficient.

Pretty satisfied with the outcome. Could have bracketed several exposures for each view to improve SNR in the dark areas, but I’ll leave it for the next time.

7 Likes

I’m having the same issues with white balance with this workflow: the after importing the HDR TiFF output from Hugin and copying the white balance values for D65 from one of my source RAWs, the result is not properly white balanced (it’s way too green).

I’ve set the camera response type for the source TIFFs in Hugin to linear. Also, the Darktable uses Linear Rec709 RGB automatically for the re-imported TIFF.

What’s going wrong here? And what would be the correct way to fix it?

Any screenshots and files (one of the raws, XMP for the processing before hugin, TIFF from Hugin and XMP for the processing after Hugin) would be pretty helpful. Also, if you exported the raws using linear Rec.2020 as the output profile, you should choose that as the input profile for the Hugin TIFF. I don’t know why darktable chooses Rec.709 automatically instead.

Linear Rec. 709 is the fallback if it doesn’t manage to detect an embedded profile.

1 Like

Sorry for the delay in reply.

This is one of the source RAWs, with just white balance (to D65) and lens correction enabled:

And this is what the result from Hugin looks like after re-importing in Darktable and copying the white balance values from the previous source RAW:

This is one of the source RAWs (the same one as the first screenshot):
IMG_4261.CR2 (32.1 MB)
IMG_4261.CR2.xmp (9.5 KB)

The TIFF result from Hugin is pretty large (too large to upload here)…

But doesn’t that mean you apply the white balance twice? Once before exporting to tiff, and once on returning to dt…

1 Like