Is this the best way to implement color grading in ART?

I have a modest Wacom Intuos S tablet. I use it from time to time with brush masks, but not extensively. TBH, some reasons for me not using the pen:

  • There’s no quick way (that I’m aware of) to quickly pan the image while in draw mode, other than turning draw mode on and off. For example, a common capability elsewhere is to hold down the spacebar and then the pen / mouse will pan the image instead of drawing. Release it and the pen is active again.

  • There’s no way to create soft brush strokes, i.e., a soft-edged / fuzzy brush.

  • There’s no quick way to increase / decrease brush size while drawing without explicitly adjusting the tool. E.g., [ and ] are often used to decrease / increase brush size elsewhere.

  • In the end result, it’s still creating a mask through which I need to apply an effect, not simply brushing an effect. There are advantages to both, but incrementally “brushing on” an effect in real time is very intuitive. To some degree, they’re almost the same thing, just in a different sequence, but it’s nice to see the effect added on in real time vs. building the mask and then applying the effect through the mask.

  • Ctrl+z (e.g.) to undo the last brush stroke would be nice.

And… there’s also another “meta reason” in that I quite often end up doing further edits in a bitmap editor (usually Affinity Photo, and for various reasons). I’m still kind of working on which edits seem to work better in ART and which are better later. For example:

  • ART’s vignette tool is in some ways superior to the one in Photo, but doing it in ART ‘bakes’ it into the image earlier in the workflow. Same is true for the gradient tool, in particular since Photo has “true” no gradient tool of that sort.

  • ART’s masking / selection by color (and related) is better than I can do in Photo. In fact, most of ART’s local adjustments tools are better than I can do in Photo.

  • Photo’s inpainting / cloning tools are better / faster for me. Also, all the tools in Photo can be used locally through masks.

Now, could someone deeply skilled in Photo better my results? Probably. But the same can be said of someone deeply skilled in ART, so… :slight_smile: I’m just playing and asking questions.

And again, these aren’t complaints about ART, just the real things I’ve encountered. If I’m overlooking something, by all means I’d like to know.

Thanks.

Yes and no. I’ve seen it work OK, particularly between multiple layers / masks of the same type tool / mask. But when you start ‘crossing boundaries’ things can get strange: Color/Tone to Local Contrast, etc. Also, when (for example) there’s a brush applied in erase mode to an existing mask, the composite mask can copy quite strangely. Throw in inverted masks, etc., and it’s a challenge to make work predictably (at least in my experience).

One other thought: From what I’ve seen (e.g., ACR) after an adjustment is applied, it remains a dynamic thing. You can go back and further adjust it, post-brushing. So, to compare:

ART / mask

  1. Create / refine the mask(s)
  2. Make the adjustment(s)
  3. Change the mask / adjustments as needed later to refine

ACR-ish / brush

  1. Define the adjustment type / details and assign to a brush
  2. Brush on the adjustment
  3. Refine the adjustment as needed later
  4. And possibly ?? Add more adjustments later using the same brush

So, there’s a lot of similarity but also a few key differences.

Anyway, just random thinking…

Is it perhaps something related to blending the effect and how ACR does that … just guessing about the difference you are seeming??

I thought he actually provided a couple of his raw files to accompany him but I can’t locate them if he did. And I don’t have anything really appropriate – lately I’ve tried the warming / cooling technique shirts on a few play raws.

You’re not going to get anywhere close to him with a single shot. Pretty much all of his images look like he used HDR , Luminosity Masks. or another blending method.

Maybe but I seriously doubt it. I’ve been following Will for quite a while and he has never mentioned doing any of that. Maybe odd luminosity mask in Ps long ago, but he has never mentioned HDR. He’s an avowed hand-held shooter and about the only stacking he does is focus.

None of those photo that I’ve seen of his are single shots. 99% of photographers wont mention hdr or masks or stacking, they lie through their teethuntill you buy their course. lol

Oh look just buy his course to learn how to

Master focus stacking and create epic night sky images with infinite depth of field…

That’s his astrophoto course, obviously. Plus, focus stacking is not HDR.

FTR you can find very similar processing from many others, e.g., Nick Page, Mads Iverson, Nigel Danson, Michael Shainblum, Andy Hutchinson, James Popsys, Adam Gibbs, etc., etc. It’s a standard technique, by and large. But if you doubt, ask Will - He’s responsive.

I think you might be wise to watch for a while before you declare him and “99% of photographers” to be liars. Does that include everyone here as well?

The point is the technique and how it can be implemented in ART. Whether it involves one image, compositing or whatever is ultimately irrelevant – it’s the image that matters. I don’t believe HDR is required for this technique (I’ve come too close myself before without HDR). Modern cameras can certainly handle the dynamic range, even my low-end DSLR.

1 Like

Nick Page makes no secret that he masks and stacks in Photoshop.

and that’s how it should be.

I don’t have access to the specific edits he did. I’m pretty sure he made some of his raws available for download, but I can’t find them now (maybe it was for a limited time only).

For whatever reason – lack of subject matter maybe? – I also can’t find any strong potentially warm / cool images I’ve shot, but here’s an ancient Canon 350D shot that we can use… all 8mp of it! LOL It’s kinda intrinsically cool with warm areas in it, so maybe it’ll work.

The image files in this post are licensed Creative Commons, By-Attribution, Share-Alike.

IMG_1440.CR2 (6.6 MB)

This is a seriously cropped edit. I’ve tried to warm the sunset-facing parts of the flooded flood gate while cooling the water.


IMG_1440.CR2.arp (13.9 KB)

And here’s another similar image but with maybe a bit more intrinsic temperature potential. I’ve not re-edited it yet. Also an old 350D clunker.

IMG_1353.CR2 (7.0 MB)

For this purpose I’m not as interested in perfect artistic work (sorta) but rather in the best way to approach it technically.

Thanks.

I’ve seen Nick demo this type of color pushing / separating, whether to (e.g.) separate greens from yellows in foliage or separate warm and cold to emphasize depth.

No idea if it’s going into the rigth direction, but with just 2 quick area masks, I warmed up the sunlit part of the image, and cooled down the remaining, to introduce more color separation


IMG_1440.jpg.out.arp (13.2 KB)
.

It’s not the best image to test. Maybe I need to pop down to NZ and shoot a few… :smiley:

2 Likes

So, here are some thoughts. I tried to find something with a similar palette to the picture in the video above; however, as I don’t have anything as beautiful, we’ll have to use the attached picture:
PXL_20210816_084702642.dng (11.0 MB)

I’ll try to go step by step to illustrate some processing options.
As a start, we can take the “Standard Film Curve” profile that is bundled with ART, lowering the exposure a little bit to avoid a pure white sky; also, since this is a phone picture, we also want to use the embedded flat-field correction to get a reasonable starting point:

Then, we use the tone equalizer to brighten the shadows a little bit, like this:

Now we can do our grading. In this case, I want to give the picture a warmer feeling, emphasizing the yellow in the light rays and with overall “richer” greens in the foliage. I also want to show a bit more detail in the deep shadows in the foreground.
So, I go to the color/tone correction tool, and select HSL factors mode, to get something vaguely similar to the Lightroom panel shown in the video.

Now, before tweaking the parameters, though, here’s a “trick” I’m going to use. As we can read in the ART wiki, the color/tone correction tool works in linear RGB. This is not necessarily the best choice for creative color grading, especially if you want to have fine control over the darker regions of the image, as small changes to the “shadows” controls will already show a big impact. Since our picture is predominantly dark, this is exactly the case here. So, I’m going to change the “working gamma” of the HSL wheels from 1.0 (i.e. linear) to something bigger, say 2. The trick to do this in ART is quite simple: before our HSL layer, we insert a “Separate RGB channels” layer with a gamma of 2.0, and then add another “Separate RGB channels” layer with a gamma of 0.5 (i.e. 1/2.0) after the HSL layer:
Screenshot from 2023-10-14 14-55-09
Screenshot from 2023-10-14 14-55-31

Now we can tweak our HSL sliders and wheels to our liking, and get something like this:


(If you want to see the effect of working with a different gamma, try disabling the two gamma layers and see what happens)

Now the basic color grading is done, but our shadows are a bit flat.
We can fix this with another grading layer, this time in Perceptual mode (standard would also work), to add a bit more “depth” to the darkest parts:


In order to not affect the brighter tones, I’m using a simple luminosity mask:
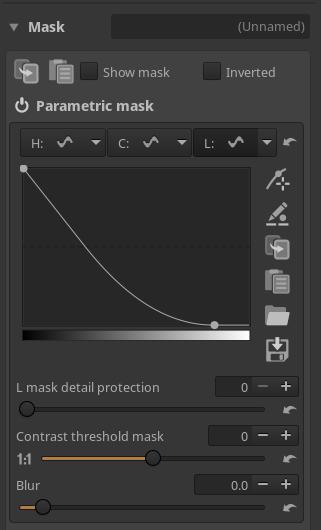
Screenshot from 2023-10-14 14-59-29

The picture is already good (for my taste), but if we want a bit extra “bite” we can add some local contrast (again using a luminosity mask excluding the darkest tones to avoid crushing the blacks, which is an unfortunate side effect of ART’s local contrast):

Our final result:

And here’s the full ARP with snapshots corresponding to the different steps above:
PXL_20210816_084702642.dng.arp (97.5 KB)

4 Likes

Just a quick acknowledgement since I’m on my phone at the moment, so – thanks! I’m tied up for a while today but will definitely dissect this detailed post later when I have more time.

Thanks again.

OK - I’ve made notes for my future reference. This makes sense, although I’d not thought about the gamma implications. Thanks for the explanation.

One sort of related question about this tool (I’m not sure what the color wheel’s “official” name is :slight_smile:) :

image

What’s the difference between saturation applied via the sliders at top vs. on the side? I’m not asking about input vs. output (I understand that) but rather either of them vs. the vertical slider. Does the vertical slider affect only the saturation intensity of pixels changed by color wheel adjustments, while the other two are image-wide (either masked or not)? Somehow that seems basically the same thing in many cases.

Thanks again.

The volume slider only affects the range of the correction wheel; it’s very different from saturation. The latter scales the chromaticity channel in a HCL representation of the colours (so, the operation is a multiplication), whereas the wheel performs an additive operation in the ab components of a Lab-like representation. In summary: quite different things

So sat sliders = HCL chromaticity multiplication, wheel = Lab-ish addition. Thanks. I’ll have to do some testing to get a better feel how that appears visually.

While I always considered the local adjustment mask layers to “sum” (loosely speaking) I never considered their relative position in respect to processing flow. I just assumed they formed an aggregate effect regardless of position. Good to know.